JSF - JDBC एकीकरण
इस लेख में, हम JDBC का उपयोग करके JSF में डेटाबेस को एकीकृत करने का तरीका प्रदर्शित करेंगे।
इस उदाहरण को चलाने के लिए डेटाबेस की आवश्यकताएं निम्नलिखित हैं।
| S.No | सॉफ्टवेयर और विवरण |
|---|---|
| 1 | PostgreSQL 9.1
ओपन सोर्स और लाइटवेट डेटाबेस |
| 2 | PostgreSQL JDBC4 ड्राइवर
PostgreSQL 9.1 और JDK 1.5 या इसके बाद के संस्करण के लिए JDBC ड्राइवर |
PostgreSQL JDBC4 Driver jar को tomcat web server की lib निर्देशिका में डालें।
डेटाबेस एसक्यूएल कमांड्स
create user user1;
create database testdb with owner = user1;

CREATE TABLE IF NOT EXISTS authors (
    id int PRIMARY KEY,
    name VARCHAR(25)
);

INSERT INTO authors(id, name) VALUES(1, 'Rob Bal');
INSERT INTO authors(id, name) VALUES(2, 'John Carter');
INSERT INTO authors(id, name) VALUES(3, 'Chris London');
INSERT INTO authors(id, name) VALUES(4, 'Truman De Bal');
INSERT INTO authors(id, name) VALUES(5, 'Emile Capote');
INSERT INTO authors(id, name) VALUES(7, 'Breech Jabber');
INSERT INTO authors(id, name) VALUES(8, 'Bob Carter');
INSERT INTO authors(id, name) VALUES(9, 'Nelson Mand');
INSERT INTO authors(id, name) VALUES(10, 'Tennant Mark');

alter user user1 with password 'user1';

grant all on authors to user1;
उदाहरण अनुप्रयोग
हमें JDBC एकीकरण का परीक्षण करने के लिए एक परीक्षण JSF एप्लिकेशन बनाएं।
| कदम | विवरण |
|---|---|
| 1 | एक नाम के साथ एक प्रोजेक्ट बना HelloWorld एक पैकेज के तहत com.tutorialspoint.test में बताई गई विधि पहले आवेदन - JSF अध्याय। |
| 2 | Src → मुख्य फ़ोल्डर के तहत संसाधन फ़ोल्डर बनाएँ । |
| 3 | Src → मुख्य → संसाधन फ़ोल्डर के अंतर्गत css फ़ोल्डर बनाएँ । |
| 4 | Src → मुख्य → संसाधन → css फ़ोल्डर के अंतर्गत style.css फ़ाइल बनाएँ । |
| 5 | नीचे बताए अनुसार style.css फ़ाइल को संशोधित करें। |
| 6 | नीचे बताए अनुसार pom.xml को संशोधित करें। |
| 7 | बनाएं Author.java पैकेज के अंतर्गत com.tutorialspoint.test नीचे बताये गए। |
| 8 | पैकेज के तहत UserData.java बनाएं । नीचे दिए गए विवरण के अनुसार। |
| 9 | नीचे बताए अनुसार home.xhtml को संशोधित करें। शेष फाइलों को अपरिवर्तित रखें। |
| 10 | यह सुनिश्चित करने के लिए एप्लिकेशन को संकलित करें और चलाएं कि व्यावसायिक तर्क आवश्यकताओं के अनुसार काम कर रहा है। |
| 1 1 | अंत में, एप्लिकेशन को युद्ध फ़ाइल के रूप में बनाएं और इसे Apache Tomcat Webserver में तैनात करें। |
| 12 | अंतिम चरण में नीचे बताए अनुसार उपयुक्त URL का उपयोग करके अपना वेब एप्लिकेशन लॉन्च करें। |
styles.css
.authorTable {
   border-collapse:collapse;
   border-bottom:1px solid #000000;
}

.authorTableHeader {
   text-align:center;
   background:none repeat scroll 0 0 #B5B5B5;
   border-bottom:1px solid #000000;
   border-top:1px solid #000000;
   padding:2px;
}

.authorTableOddRow {
   text-align:center;
   background:none repeat scroll 0 0 #FFFFFFF;
}

.authorTableEvenRow {
   text-align:center;
   background:none repeat scroll 0 0 #D3D3D3;
}
pom.xml
<project xmlns = "http://maven.apache.org/POM/4.0.0"
   xmlns:xsi = "http://www.w3.org/2001/XMLSchema-instance"
   xsi:schemaLocation = "http://maven.apache.org/POM/4.0.0
   http://maven.apache.org/maven-v4_0_0.xsd">

   <modelVersion>4.0.0</modelVersion>
   <groupId>com.tutorialspoint.test</groupId>
   <artifactId>helloworld</artifactId>
   <packaging>war</packaging>
   <version>1.0-SNAPSHOT</version>
   <name>helloworld Maven Webapp</name>
   <url>http://maven.apache.org</url >

   <dependencies>
      <dependency>
         <groupId>junit</groupId>
         <artifactId>junit</artifactId>
         <version>3.8.1</version>
         <scope>test</scope>
      </dependency>

      <dependency>
         <groupId>com.sun.faces</groupId>
         <artifactId>jsf-api</artifactId>
         <version>2.1.7</version>
      </dependency>

      <dependency>
         <groupId>com.sun.faces</groupId>
         <artifactId>jsf-impl</artifactId>
         <version>2.1.7</version>
      </dependency>

      <dependency>
         <groupId>javax.servlet</groupId>
         <artifactId>jstl</artifactId>
         <version>1.2</version>
      </dependency>

      <dependency>
        <groupId>postgresql</groupId>
        <artifactId>postgresql</artifactId>
        <version>9.1-901.jdbc4</version>
     </dependency>
   </dependencies>

   <build>
      <finalName>helloworld</finalName>
      <plugins>
         <plugin>
            <groupId>org.apache.maven.plugins</groupId>
            <artifactId>maven-compiler-plugin</artifactId>
            <version>2.3.1</version>
            <configuration>
               <source>1.6</source>
               <target>1.6</target>
            </configuration>
         </plugin>

         <plugin>
            <artifactId>maven-resources-plugin</artifactId>
            <version>2.6</version>
            <executions>
               <execution>
                  <id>copy-resources</id>
                  <phase>validate</phase>
                  <goals>
                     <goal>copy-resources</goal>
                  </goals>

                  <configuration>
                     <outputDirectory>${basedir}/target/helloworld/resources
                        </outputDirectory>
                     <resources>
                        <resource>
                           <directory>src/main/resources</directory>
                           <filtering>true</filtering>
                        </resource>
                     </resources>
                  </configuration>
               </execution>
            </executions>
         </plugin>

      </plugins>
   </build>
</project>
Author.java
package com.tutorialspoint.test;

public class Author {
   int id;
   String name;

   public String getName() {
      return name;
   }

   public void setName(String name) {
      this.name = name;
   }

   public int getId() {
      return id;
   }

   public void setId(int id) {
      this.id = id;
   }
}
UserData.java
package com.tutorialspoint.test;

import java.io.Serializable;

import java.sql.Connection;
import java.sql.DriverManager;
import java.sql.PreparedStatement;
import java.sql.ResultSet;
import java.sql.SQLException;

import java.util.ArrayList;
import java.util.List;

import javax.faces.bean.ManagedBean;
import javax.faces.bean.SessionScoped;
import javax.faces.event.ComponentSystemEvent;

@ManagedBean(name = "userData", eager = true)
@SessionScoped
public class UserData implements Serializable {
   private static final long serialVersionUID = 1L;

   public List<Author> getAuthors() {
      ResultSet rs = null;
      PreparedStatement pst = null;
      Connection con = getConnection();
      String stm = "Select * from authors";
      List<Author> records = new ArrayList<Author>();

      try {
         pst = con.prepareStatement(stm);
         pst.execute();
         rs = pst.getResultSet();

         while(rs.next()) {
            Author author = new Author();
            author.setId(rs.getInt(1));
            author.setName(rs.getString(2));
            records.add(author);
         }
      } catch (SQLException e) {
         e.printStackTrace();
      }
      return records;
   }

   public Connection getConnection() {
      Connection con = null;
      String url = "jdbc:postgresql://localhost/testdb";
      String user = "user1";
      String password = "user1";

      try {
         con = DriverManager.getConnection(url, user, password);
         System.out.println("Connection completed.");
      } catch (SQLException ex) {
         System.out.println(ex.getMessage());
      }

      finally {
      }
      return con;
   }
}
home.xhtml
<?xml version = "1.0" encoding = "UTF-8"?>
<!DOCTYPE html PUBLIC "-//W3C//DTD XHTML 1.0 Transitional//EN"
"http://www.w3.org/TR/xhtml1/DTD/xhtml1-transitional.dtd">

<html xmlns = "http://www.w3.org/1999/xhtml"
   xmlns:f = "http://java.sun.com/jsf/core"
   xmlns:h = "http://java.sun.com/jsf/html">

   <h:head>
      <title>JSF Tutorial!</title>
      <h:outputStylesheet library = "css" name = "styles.css"  />
   </h:head>

   <h:body>
      <h2>JDBC Integration Example</h2>

      <h:dataTable value = "#{userData.authors}" var = "c"
         styleClass = "authorTable"
         headerClass = "authorTableHeader"
         rowClasses = "authorTableOddRow,authorTableEvenRow">

         <h:column><f:facet name = "header">Author ID</f:facet>
            #{c.id}
         </h:column>

         <h:column><f:facet name = "header">Name</f:facet>
            #{c.name}
         </h:column>
      </h:dataTable>
   </h:body>
</html>
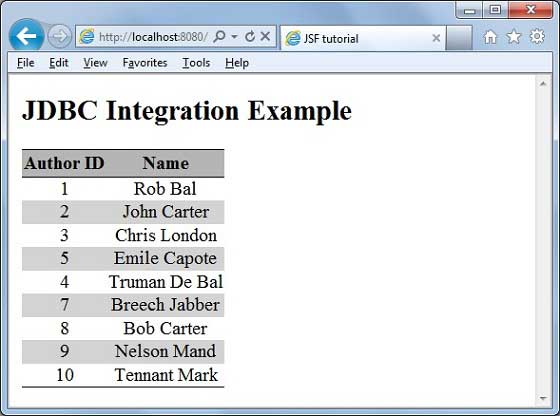
एक बार जब आप सभी बदलावों के साथ तैयार हो जाते हैं, तो हमें एप्लिकेशन को संकलित करने और चलाने के लिए जैसा कि हमने JSF में किया था - पहला एप्लिकेशन अध्याय। यदि आपके आवेदन में सब कुछ ठीक है, तो यह निम्नलिखित परिणाम देगा।
