MVVM - Aplikasi Pertama
Di bab ini, kita akan mempelajari cara menggunakan pola MVVM untuk layar input sederhana dan aplikasi WPF yang mungkin sudah biasa Anda gunakan.
Mari kita lihat contoh sederhana di mana kita akan menggunakan pendekatan MVVM.
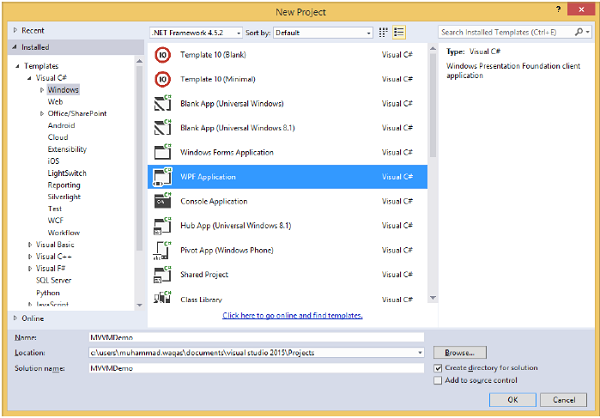
Step 1 - Buat proyek Aplikasi WPF MVVMDemo baru.

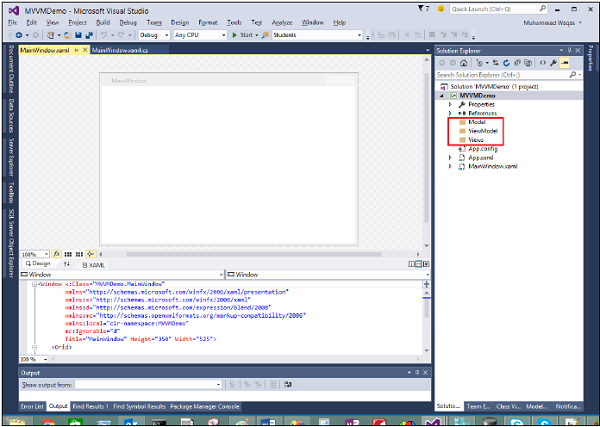
Step 2 - Tambahkan tiga folder (Model, ViewModel, dan Views) ke dalam proyek Anda.

Step 3 - Tambahkan kelas StudentModel di folder Model dan tempel kode di bawah ini di kelas itu
using System.ComponentModel;

namespace MVVMDemo.Model {

   public class StudentModel {}

   public class Student : INotifyPropertyChanged {
      private string firstName;
      private string lastName;

      public string FirstName {
         get {
            return firstName;
         }

         set {
            if (firstName != value) {
               firstName = value;
               RaisePropertyChanged("FirstName");
               RaisePropertyChanged("FullName");
            }
         }
      }

      public string LastName {
         get {return lastName; }

         set {
            if (lastName != value) {
               lastName = value;
               RaisePropertyChanged("LastName");
               RaisePropertyChanged("FullName");
            }
         }
      }

      public string FullName {
         get {
            return firstName + " " + lastName;
         }
      }

      public event PropertyChangedEventHandler PropertyChanged;

      private void RaisePropertyChanged(string property) {
         if (PropertyChanged != null) {
            PropertyChanged(this, new PropertyChangedEventArgs(property));
         }
      }
   }
}
Step 4 - Tambahkan kelas StudentViewModel lain ke dalam folder ViewModel dan tempel kode berikut.
using MVVMDemo.Model;
using System.Collections.ObjectModel;

namespace MVVMDemo.ViewModel {

   public class StudentViewModel {

      public ObservableCollection<Student> Students {
         get;
         set;
      }

      public void LoadStudents() {
         ObservableCollection<Student> students = new ObservableCollection<Student>();

         students.Add(new Student { FirstName = "Mark", LastName = "Allain" });
         students.Add(new Student { FirstName = "Allen", LastName = "Brown" });
         students.Add(new Student { FirstName = "Linda", LastName = "Hamerski" });

         Students = students;
      }
   }
}
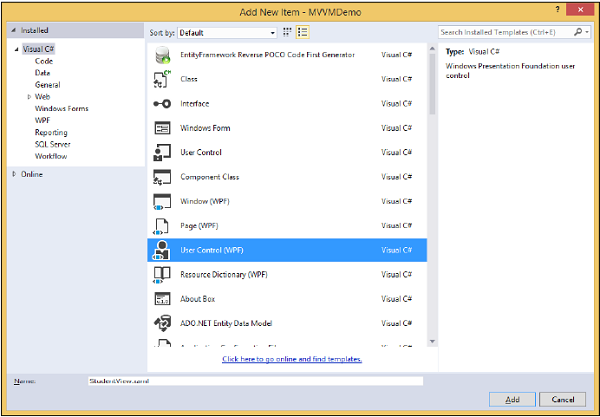
Step 5 - Tambahkan User Control (WPF) baru dengan klik kanan folder Views dan Pilih Add> New Item…

Step 6- Klik tombol Tambah. Sekarang Anda akan melihat file XAML. Tambahkan kode berikut ke file StudentView.xaml yang berisi elemen UI berbeda.
<UserControl x:Class = "MVVMDemo.Views.StudentView"
   xmlns = "http://schemas.microsoft.com/winfx/2006/xaml/presentation"
   xmlns:x = "http://schemas.microsoft.com/winfx/2006/xaml"
   xmlns:mc = "http://schemas.openxmlformats.org/markup-compatibility/2006"
   xmlns:d = "http://schemas.microsoft.com/expression/blend/2008"
   xmlns:local = "clr-namespace:MVVMDemo.Views"
   mc:Ignorable = "d"
   d:DesignHeight = "300" d:DesignWidth = "300">

   <Grid>
      <StackPanel HorizontalAlignment = "Left">

         <ItemsControl ItemsSource = "{Binding Path = Students}">

            <ItemsControl.ItemTemplate>
               <DataTemplate>
                  <StackPanel Orientation = "Horizontal">
                     <TextBox Text = "{Binding Path = FirstName, Mode = TwoWay}"
                        Width = "100" Margin = "3 5 3 5"/>

                     <TextBox Text = "{Binding Path = LastName, Mode = TwoWay}"
                        Width = "100" Margin = "0 5 3 5"/>

                     <TextBlock Text = "{Binding Path = FullName, Mode = OneWay}"
                        Margin = "0 5 3 5"/>

                  </StackPanel>
               </DataTemplate>
            </ItemsControl.ItemTemplate>

         </ItemsControl>

      </StackPanel>
   </Grid>

</UserControl>
Step 7 - Sekarang tambahkan StudentView ke file MainPage.xaml Anda menggunakan kode berikut.
<Window x:Class = "MVVMDemo.MainWindow"
   xmlns = "http://schemas.microsoft.com/winfx/2006/xaml/presentation"
   xmlns:x = "http://schemas.microsoft.com/winfx/2006/xaml"
   xmlns:d = "http://schemas.microsoft.com/expression/blend/2008"
   xmlns:mc = "http://schemas.openxmlformats.org/markup-compatibility/2006"
   xmlns:local = "clr-namespace:MVVMDemo"
   xmlns:views = "clr-namespace:MVVMDemo.Views"
   mc:Ignorable = "d"
   Title = "MainWindow" Height = "350" Width = "525">

   <Grid>
      <views:StudentView x:Name = "StudentViewControl" Loaded = "StudentViewControl_Loaded"/>
   </Grid>

</Window>
Step 8 - Berikut adalah implementasi untuk event Loaded di file MainPage.xaml.cs, yang akan mengupdate View dari ViewModel.
using System.Windows;

namespace MVVMDemo {

   /// <summary>
      /// Interaction logic for MainWindow.xaml
   /// </summary>

   public partial class MainWindow : Window {

      public MainWindow() {
         InitializeComponent();
      }

      private void StudentViewControl_Loaded(object sender, RoutedEventArgs e) {
         MVVMDemo.ViewModel.StudentViewModel studentViewModelObject =
            new MVVMDemo.ViewModel.StudentViewModel();
         studentViewModelObject.LoadStudents();

         StudentViewControl.DataContext = studentViewModelObject;
      }
   }
}
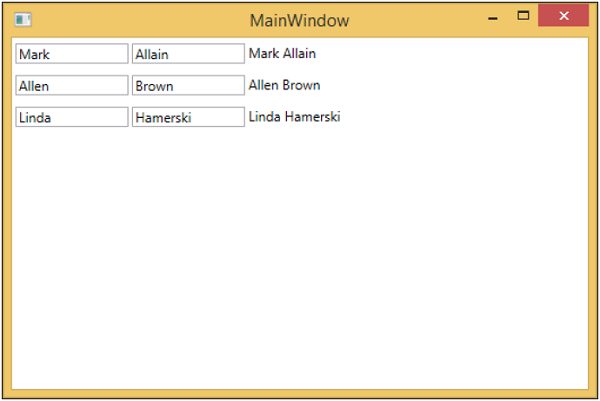
Step 9 - Ketika kode di atas dikompilasi dan dijalankan, Anda akan menerima output berikut di jendela utama Anda.

Kami menyarankan Anda untuk menjalankan contoh di atas dengan cara langkah demi langkah untuk pemahaman yang lebih baik.