MVCフレームワーク-高度な例
最初の章では、コントローラーとビューがMVCでどのように相互作用するかを学びました。このチュートリアルでは、一歩前進して、モデルの使用方法と、作成、編集、削除するための高度なアプリケーションの作成方法を学習します。アプリケーションのユーザーのリストを表示します。
高度なMVCアプリケーションを作成する
Step 1− [ファイル]→[新規]→[プロジェクト]→[ASP.NETMVCWebアプリケーション]を選択します。AdvancedMVCApplicationという名前を付けます。[OK]をクリックします。次のウィンドウで、[テンプレート]を[インターネットアプリケーション]として、[ViewEngine]を[Razor]として選択します。今回は、空のアプリケーションの代わりにテンプレートを使用していることに注意してください。
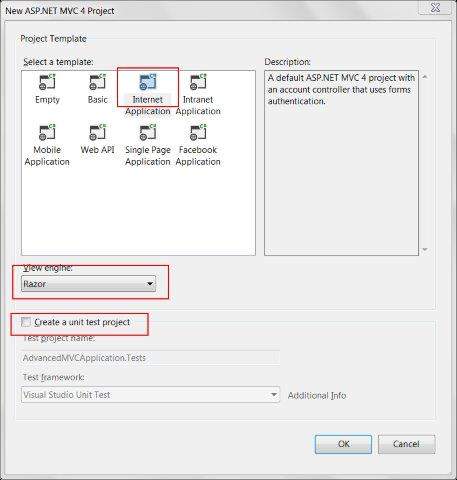
これにより、次のスクリーンショットに示すように、新しいソリューションプロジェクトが作成されます。デフォルトのASP.NETテーマを使用しているため、サンプルのビュー、コントローラー、モデル、およびその他のファイルが付属しています。
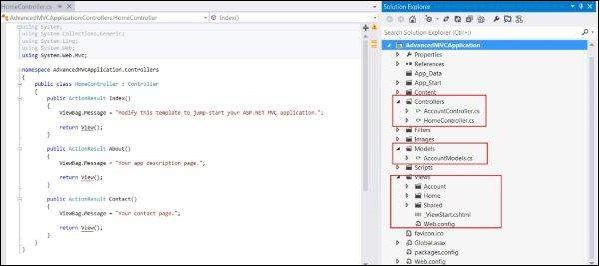
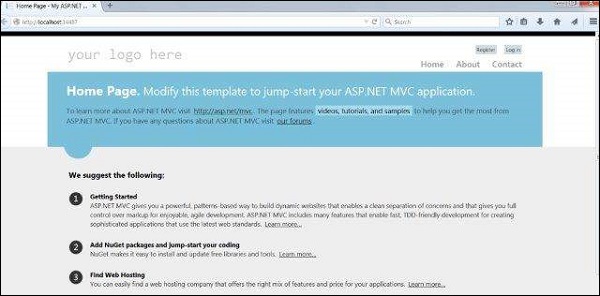
Step 2 −次のスクリーンショットに示すように、ソリューションをビルドしてアプリケーションを実行し、デフォルトの出力を確認します。
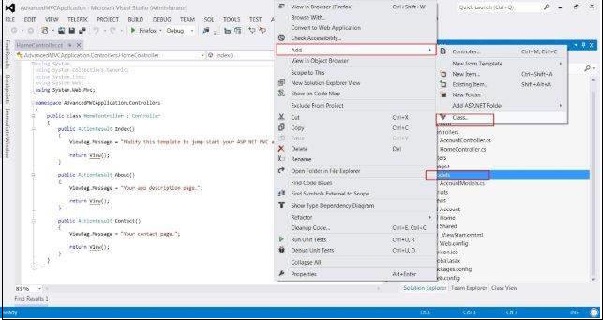
Step 3−ユーザーデータの構造を定義する新しいモデルを追加します。「モデル」フォルダーを右クリックし、「追加」→「クラス」をクリックします。これにUserModelという名前を付けて、[追加]をクリックします。
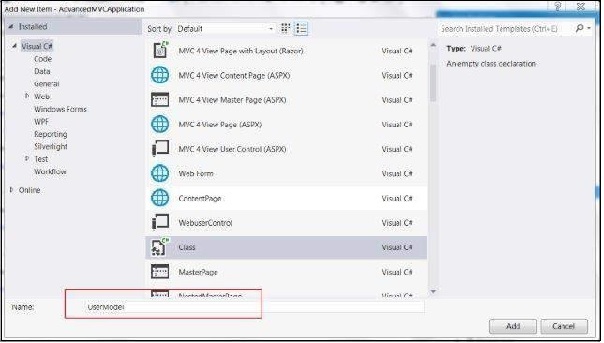
Step 4 −新しく作成したUserModel.csに次のコードをコピーします。
using System;
using System.ComponentModel;
using System.ComponentModel.DataAnnotations;
using System.Web.Mvc.Html;

namespace AdvancedMVCApplication.Models {
   public class UserModels {

      [Required]
      public int Id { get; set; }
      [DisplayName("First Name")]
      [Required(ErrorMessage = "First name is required")]
      public string FirstName { get; set; }
      [Required]
      public string LastName { get; set; }

      public string Address { get; set; }

      [Required]
      [StringLength(50)]
      public string Email { get; set; }

      [DataType(DataType.Date)]
      public DateTime DOB { get; set; }

      [Range(100,1000000)]
      public decimal Salary { get; set; }
   }
}
上記のコードでは、ユーザーモデルが持つすべてのパラメーター、それらのデータ型、および必須フィールドや長さなどの検証を指定しました。
ユーザーモデルでデータを保持する準備ができたので、クラスファイルUsers.csを作成します。このファイルには、ユーザーの表示、ユーザーの追加、編集、および削除のメソッドが含まれています。
Step 5−モデルを右クリックし、「追加」→「クラス」をクリックします。ユーザーという名前を付けます。これにより、Models内にusers.csクラスが作成されます。次のコードをusers.csクラスにコピーします。
using System;
using System.Collections.Generic;
using System.EnterpriseServices;

namespace AdvancedMVCApplication.Models {

   public class Users {
      public List UserList = new List();

      //action to get user details
      public UserModels GetUser(int id) {
         UserModels usrMdl = null;

         foreach (UserModels um in UserList)

            if (um.Id == id)
               usrMdl = um;
               return usrMdl;
      }

      //action to create new user
      public void CreateUser(UserModels userModel) {
         UserList.Add(userModel);
      }

      //action to udpate existing user
      public void UpdateUser(UserModels userModel) {

         foreach (UserModels usrlst in UserList) {

            if (usrlst.Id == userModel.Id) {
               usrlst.Address = userModel.Address;
               usrlst.DOB = userModel.DOB;
               usrlst.Email = userModel.Email;
               usrlst.FirstName = userModel.FirstName;
               usrlst.LastName = userModel.LastName;
               usrlst.Salary = userModel.Salary;
               break;
            }
         }
      }

      //action to delete exising user
      public void DeleteUser(UserModels userModel) {

         foreach (UserModels usrlst in UserList) {

            if (usrlst.Id == userModel.Id) {
               UserList.Remove(usrlst);
               break;
            }
         }
      }
   }
}
UserModel.csとUsers.csを取得したら、ユーザーを表示、ユーザーの追加、編集、削除を行うためのビューをモデルに追加します。まず、ビューを作成してユーザーを作成しましょう。
Step 6 −「ビュー」フォルダを右クリックし、「追加」→「表示」をクリックします。

Step 7 −次のウィンドウで、[ビュー名]を[UserAdd]、[ビューエンジン]を[Razor]として選択し、[強い型のビューを作成する]チェックボックスをオンにします。
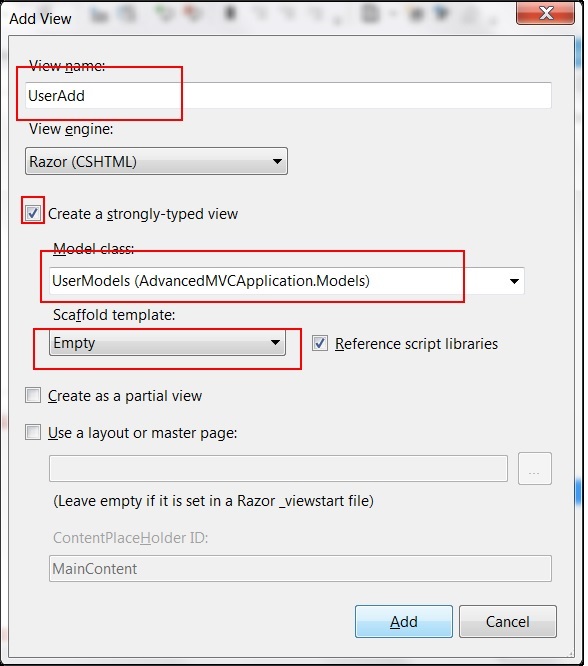
Step 8− [追加]をクリックします。これにより、以下に示すように、デフォルトで次のCSHMLコードが作成されます-
@model AdvancedMVCApplication.Models.UserModels

@{
   ViewBag.Title = "UserAdd";
}

<h2>UserAdd</h2>

@using (Html.BeginForm()) {
   @Html.ValidationSummary(true)

   <fieldset>
      <legend>UserModels</legend>
      <div class = "editor-label">
         @Html.LabelFor(model => model.FirstName)
      </div>

      <div class = "editor-field">
         @Html.EditorFor(model => model.FirstName)
         @Html.ValidationMessageFor(model => model.FirstName)
      </div>

      <div class = "editor-label">
         @Html.LabelFor(model => model.LastName)
      </div>

      <div class = "editor-field">
         @Html.EditorFor(model => model.LastName)
         @Html.ValidationMessageFor(model => model.LastName)
      </div>

      <div class = "editor-label">
         @Html.LabelFor(model => model.Address)
      </div>

      <div class = "editor-field">
         @Html.EditorFor(model => model.Address)
         @Html.ValidationMessageFor(model => model.Address)
      </div>

      <div class = "editor-label">
         @Html.LabelFor(model => model.Email)
      </div>

      <div class = "editor-field">
         @Html.EditorFor(model => model.Email)
         @Html.ValidationMessageFor(model => model.Email)
      </div>

      <div class = "editor-label">
         @Html.LabelFor(model => model.DOB)
      </div>

      <div class = "editor-field">
         @Html.EditorFor(model => model.DOB)
         @Html.ValidationMessageFor(model => model.DOB)
      </div>

      <div class = "editor-label">
         @Html.LabelFor(model => model.Salary)
      </div>

      <div class = "editor-field">
         @Html.EditorFor(model => model.Salary)
         @Html.ValidationMessageFor(model => model.Salary)
      </div>

      <p>
         <input type = "submit" value = "Create" />
      </p>
   </fieldset>
}
<div>
   @Html.ActionLink("Back to List", "Index")
</div>

@section Scripts {

   @Scripts.Render("~/bundles/jqueryval")
}
ご覧のとおり、このビューには、検証メッセージやラベルなど、フィールドのすべての属性の詳細が含まれています。このビューは、最終的なアプリケーションでは次のようになります。
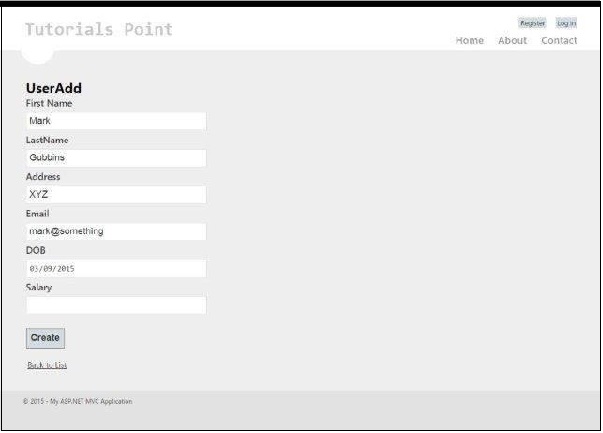
UserAddと同様に、以下に示す4つのビューを指定されたコードで追加します-
Index.cshtml
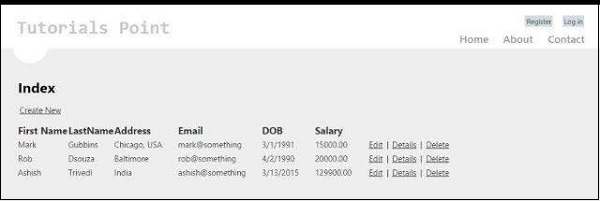
このビューでは、システムに存在するすべてのユーザーがインデックスページに表示されます。
@model IEnumerable<AdvancedMVCApplication.Models.UserModels>

@{
   ViewBag.Title = "Index";
}

<h2>Index</h2>

<p>
   @Html.ActionLink("Create New", "UserAdd")
</p>

<table>
   <tr>
      <th>
         @Html.DisplayNameFor(model => model.FirstName)
      </th>

      <th>
         @Html.DisplayNameFor(model => model.LastName)
      </th>

      <th>
         @Html.DisplayNameFor(model => model.Address)
      </th>

      <th>
         @Html.DisplayNameFor(model => model.Email)
      </th>

      <th>
         @Html.DisplayNameFor(model => model.DOB)
      </th>

      <th>
         @Html.DisplayNameFor(model => model.Salary)
      </th>

      <th></th>
   </tr>

   @foreach (var item in Model) {
      <tr>
         <td>
            @Html.DisplayFor(modelItem => item.FirstName)
         </td>

         <td>
            @Html.DisplayFor(modelItem => item.LastName)
         </td>

         <td>
            @Html.DisplayFor(modelItem => item.Address)
         </td>

         <td>
            @Html.DisplayFor(modelItem => item.Email)
         </td>

         <td>
            @Html.DisplayFor(modelItem => item.DOB)
         </td>

         <td>
            @Html.DisplayFor(modelItem => item.Salary)
         </td>

         <td>
            @Html.ActionLink("Edit", "Edit", new { id = item.Id }) |
            @Html.ActionLink("Details", "Details", new { id = item.Id }) |
            @Html.ActionLink("Delete", "Delete", new { id = item.Id })
         </td>
      </tr>
   }
</table>
このビューは、最終的なアプリケーションでは次のようになります。
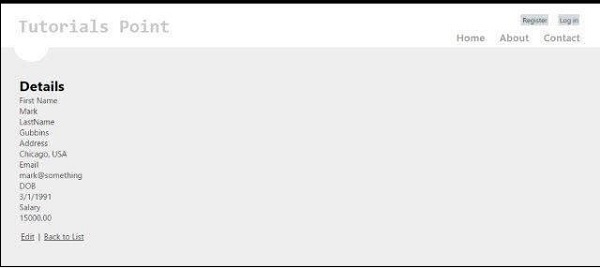
Details.cshtml
このビューには、ユーザーレコードをクリックすると、特定のユーザーの詳細が表示されます。
@model AdvancedMVCApplication.Models.UserModels

@{
   ViewBag.Title = "Details";
}

<h2>Details</h2>
<fieldset>
   <legend>UserModels</legend>
   <div class = "display-label">
      @Html.DisplayNameFor(model => model.FirstName)
   </div>

   <div class = "display-field">
      @Html.DisplayFor(model => model.FirstName)
   </div>

   <div class = "display-label">
      @Html.DisplayNameFor(model => model.LastName)
   </div>

   <div class = "display-field">
      @Html.DisplayFor(model => model.LastName)
   </div>

   <div class = "display-label">
      @Html.DisplayNameFor(model => model.Address)
   </div>

   <div class = "display-field">
      @Html.DisplayFor(model => model.Address)
   </div>

   <div class = "display-label">
      @Html.DisplayNameFor(model => model.Email)
   </div>

   <div class = "display-field">
      @Html.DisplayFor(model => model.Email)
   </div>

   <div class = "display-label">
      @Html.DisplayNameFor(model => model.DOB)
   </div>

   <div class = "display-field">
      @Html.DisplayFor(model => model.DOB)
   </div>

   <div class = "display-label">
      @Html.DisplayNameFor(model => model.Salary)
   </div>

   <div class = "display-field">
      @Html.DisplayFor(model => model.Salary)
   </div>

</fieldset>
<p>
   @Html.ActionLink("Edit", "Edit", new { id = Model.Id }) |
   @Html.ActionLink("Back to List", "Index")
</p>
このビューは、最終的なアプリケーションでは次のようになります。
Edit.cshtml
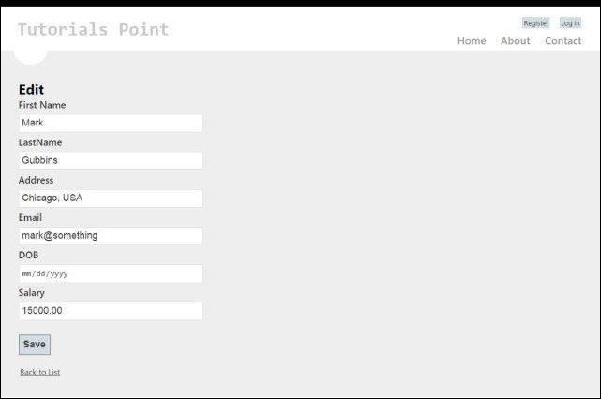
このビューには、既存のユーザーの詳細を編集するための編集フォームが表示されます。
@model AdvancedMVCApplication.Models.UserModels

@{
   ViewBag.Title = "Edit";
}

<h2>Edit</h2>
@using (Html.BeginForm()) {
   @Html.AntiForgeryToken()
   @Html.ValidationSummary(true)

   <fieldset>
      <legend>UserModels</legend>
      @Html.HiddenFor(model => model.Id)
      <div class = "editor-label">
         @Html.LabelFor(model => model.FirstName)
      </div>

      <div class = "editor-field">
         @Html.EditorFor(model => model.FirstName)
         @Html.ValidationMessageFor(model => model.FirstName)
      </div>

      <div class = "editor-label">
         @Html.LabelFor(model => model.LastName)
      </div>

      <div class = "editor-field">
         @Html.EditorFor(model => model.LastName)
         @Html.ValidationMessageFor(model => model.LastName)
      </div>

      <div class = "editor-label">
         @Html.LabelFor(model => model.Address)
      </div>

      <div class = "editor-field">
         @Html.EditorFor(model => model.Address)
         @Html.ValidationMessageFor(model => model.Address)
      </div>

      <div class = "editor-label">
         @Html.LabelFor(model => model.Email)
      </div>

      <div class = "editor-field">
         @Html.EditorFor(model => model.Email)
         @Html.ValidationMessageFor(model => model.Email)
      </div>

      <div class = "editor-label">
         @Html.LabelFor(model => model.DOB)
      </div>

      <div class = "editor-field">
         @Html.EditorFor(model => model.DOB)
         @Html.ValidationMessageFor(model => model.DOB)
      </div>

      <div class = "editor-label">
         @Html.LabelFor(model => model.Salary)
      </div>

      <div class = "editor-field">
         @Html.EditorFor(model => model.Salary)
         @Html.ValidationMessageFor(model => model.Salary)
      </div>

      <p>
         <input type = "submit" value = "Save" />
      </p>
   </fieldset>
}
<div>
   @Html.ActionLink("Back to List", "Index")
</div>

@section Scripts {
   @Scripts.Render("~/bundles/jqueryval")
}
このビューは、アプリケーションでは次のようになります。
Delete.cshtml
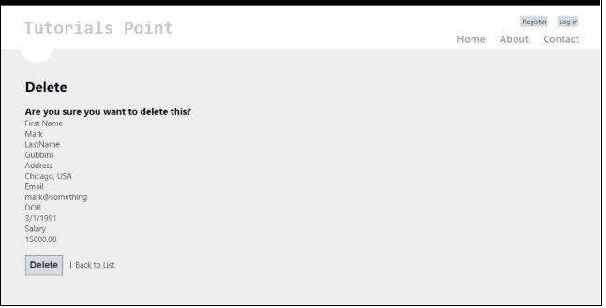
このビューには、既存のユーザーを削除するためのフォームが表示されます。
@model AdvancedMVCApplication.Models.UserModels

@{
   ViewBag.Title = "Delete";
}

<h2>Delete</h2>
<h3>Are you sure you want to delete this?</h3>
<fieldset>
   <legend>UserModels</legend>
   <div class = "display-label">
      @Html.DisplayNameFor(model => model.FirstName)
   </div>

   <div class = "display-field">
      @Html.DisplayFor(model => model.FirstName)
   </div>

   <div class = "display-label">
      @Html.DisplayNameFor(model => model.LastName)
   </div>

   <div class = "display-field">
      @Html.DisplayFor(model => model.LastName)
   </div>

   <div class = "display-label">
      @Html.DisplayNameFor(model => model.Address)
   </div>

   <div class = "display-field">
      @Html.DisplayFor(model => model.Address)
   </div>

   <div class = "display-label">
      @Html.DisplayNameFor(model => model.Email)
   </div>

   <div class = "display-field">
      @Html.DisplayFor(model => model.Email)
   </div>

   <div class = "display-label">
      @Html.DisplayNameFor(model => model.DOB)
   </div>

   <div class = "display-field">
      @Html.DisplayFor(model => model.DOB)
   </div>

   <div class = "display-label">
      @Html.DisplayNameFor(model => model.Salary)
   </div>

   <div class = "display-field">
      @Html.DisplayFor(model => model.Salary)
   </div>
</fieldset>

@using (Html.BeginForm()) {
   @Html.AntiForgeryToken()

   <p>
      <input type = "submit" value = "Delete" /> |
      @Html.ActionLink("Back to List", "Index")
   </p>
}
このビューは、最終的なアプリケーションでは次のようになります。
Step 9−アプリケーションにはすでにモデルとビューが追加されています。最後に、ビューのコントローラーを追加します。「コントローラー」フォルダーを右クリックし、「追加」→「コントローラー」をクリックします。UserControllerという名前を付けます。
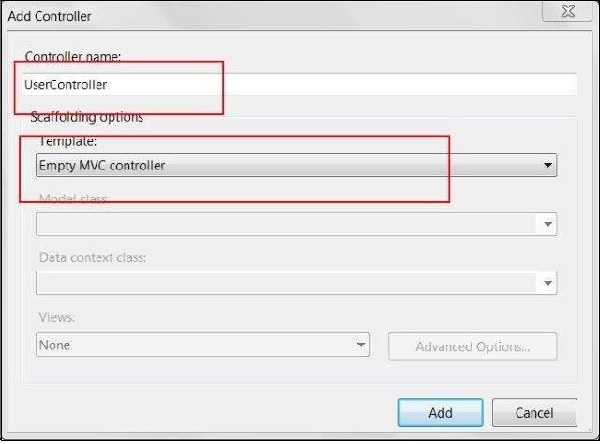
デフォルトでは、Controllerクラスは次のコードで作成されます-
using System;
using System.Collections.Generic;
using System.Linq;
using System.Web;
using System.Web.Mvc;
using AdvancedMVCApplication.Models;

namespace AdvancedMVCApplication.Controllers {

   public class UserController : Controller {
      private static Users _users = new Users();

      public ActionResult Index() {
         return View(_users.UserList);
      }
   }
}
上記のコードでは、インデックスページでユーザーのリストをレンダリングするときにインデックスメソッドが使用されます。
Step 10 − Indexメソッドを右クリックし、[Create View]を選択して、[Index]ページのビューを作成します(すべてのユーザーが一覧表示され、新しいユーザーを作成するためのオプションが表示されます)。
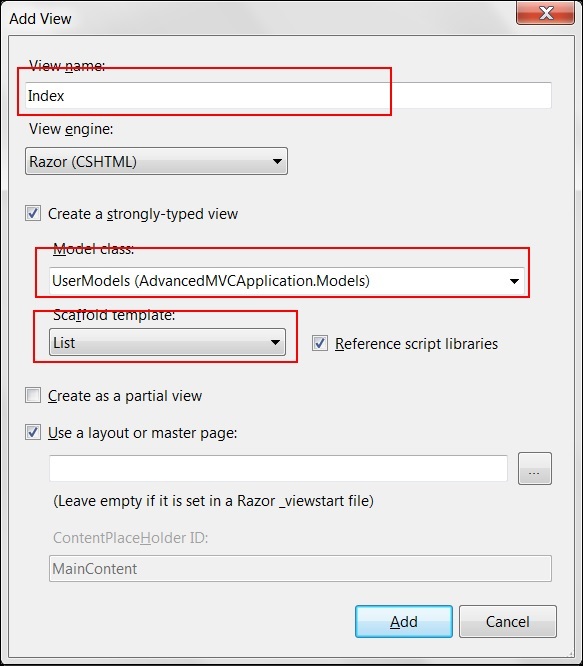
Step 11−次に、UserController.csに次のコードを追加します。このコードでは、さまざまなユーザーアクションのアクションメソッドを作成し、以前に作成した対応するビューを返します。
操作ごとに、GETとPOSTの2つのメソッドを追加します。HttpGetは、データのフェッチとレンダリング中に使用されます。HttpPostは、データの作成/更新に使用されます。たとえば、新しいユーザーを追加する場合、ユーザーを追加するためのフォームが必要になります。これはGET操作です。フォームに入力してこれらの値を送信したら、POSTメソッドが必要になります。
//Action for Index View
public ActionResult Index() {
   return View(_users.UserList);
}

//Action for UserAdd View
[HttpGet]
public ActionResult UserAdd() {
   return View();
}

[HttpPost]
public ActionResult UserAdd(UserModels userModel) {
   _users.CreateUser(userModel);
   return View("Index", _users.UserList);
}

//Action for Details View
[HttpGet]
public ActionResult Details(int id) {
   return View(_users.UserList.FirstOrDefault(x => x.Id == id));
}

[HttpPost]
public ActionResult Details() {
   return View("Index", _users.UserList);
}

//Action for Edit View
[HttpGet]
public ActionResult Edit(int id) {
   return View(_users.UserList.FirstOrDefault(x=>x.Id==id));
}

[HttpPost]
public ActionResult Edit(UserModels userModel) {
   _users.UpdateUser(userModel);
   return View("Index", _users.UserList);
}

//Action for Delete View
[HttpGet]
public ActionResult Delete(int id) {
   return View(_users.UserList.FirstOrDefault(x => x.Id == id));
}

[HttpPost]
public ActionResult Delete(UserModels userModel) {
   _users.DeleteUser(userModel);
   return View("Index", _users.UserList);
} sers.UserList);
Step 12 −最後に行うことは、App_StartフォルダーのRouteConfig.csファイルに移動し、デフォルトのコントローラーをユーザーに変更することです。
defaults: new { controller = "User", action = "Index", id = UrlParameter.Optional }高度なアプリケーションを起動して実行するために必要なのはこれだけです。
Step 13−アプリケーションを実行します。次のスクリーンショットに示すようなアプリケーションを見ることができます。前のスクリーンショットで見たように、ユーザーの追加、表示、編集、および削除のすべての機能を実行できます。
