Arduino-키보드 메시지
이 예에서 버튼을 누르면 텍스트 문자열이 키보드 입력으로 컴퓨터에 전송됩니다. 문자열은 버튼을 누른 횟수를보고합니다. Leonardo를 프로그래밍하고 연결했으면 좋아하는 텍스트 편집기를 열어 결과를 확인하십시오.
Warning − 사용시 Keyboard.print()명령을 내리면 Arduino가 컴퓨터의 키보드를 대신합니다. 이 기능을 사용하여 스케치를 실행하는 동안 컴퓨터의 제어권을 잃지 않도록 전화하기 전에 신뢰할 수있는 제어 시스템을 설정하십시오.Keyboard.print(). 이 스케치에는 버튼을 누른 후에 만 실행되도록 키보드를 토글하는 푸시 버튼이 포함되어 있습니다.
필요한 구성 요소
다음 구성 요소가 필요합니다-
- 1 × 브레드 보드
- 1 × Arduino Leonardo, Micro 또는 Due 보드
- 순간 푸시 버튼 1 개
- 1 × 10k ohm 저항기
순서
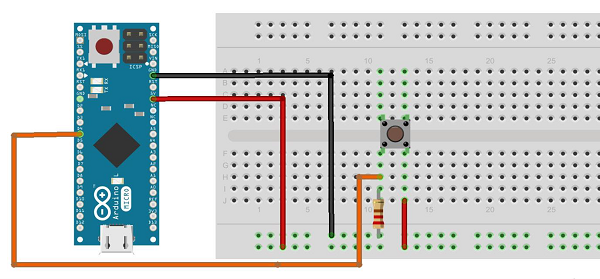
회로도를 따라 아래 그림과 같이 브레드 보드의 구성 요소를 연결합니다.
스케치
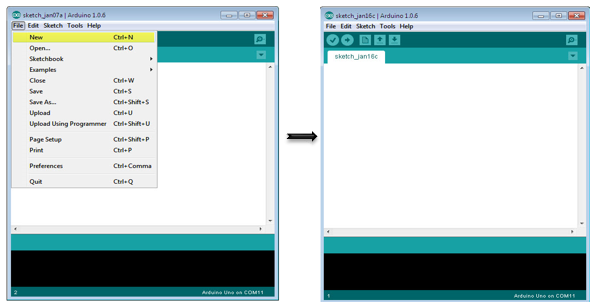
컴퓨터에서 Arduino IDE 소프트웨어를 엽니 다. Arduino 언어로 코딩하면 회로가 제어됩니다. 새로 만들기를 클릭하여 새 스케치 파일을 엽니 다.
Arduino 코드
/*
   Keyboard Message test For the Arduino Leonardo and Micro,
      Sends a text string when a button is pressed.
   The circuit:
   * pushbutton attached from pin 4 to +5V
   * 10-kilohm resistor attached from pin 4 to ground
*/

#include "Keyboard.h"
const int buttonPin = 4; // input pin for pushbutton
int previousButtonState = HIGH; // for checking the state of a pushButton
int counter = 0; // button push counter

void setup() {
   pinMode(buttonPin, INPUT); // make the pushButton pin an input:
   Keyboard.begin(); // initialize control over the keyboard:
}

void loop() {
   int buttonState = digitalRead(buttonPin); // read the pushbutton:
   if ((buttonState != previousButtonState)&& (buttonState == HIGH)) // and it's currently pressed: {
      // increment the button counter
      counter++;
      // type out a message
      Keyboard.print("You pressed the button ");
      Keyboard.print(counter);
      Keyboard.println(" times.");
   }
   // save the current button state for comparison next time:
   previousButtonState = buttonState;
}
참고할 코드
푸시 버튼의 한 단자를 Arduino의 핀 4에 연결합니다. 다른 핀을 5V에 연결합니다. 저항을 풀다운으로 사용하고 핀 4에서 접지에 연결하여 접지에 대한 참조를 제공합니다.
보드를 프로그래밍 한 후 USB 케이블을 분리하고 텍스트 편집기를 열고 텍스트 커서를 입력 영역에 놓습니다. 다시 USB를 통해 보드를 컴퓨터에 연결하고 버튼을 눌러 문서를 작성합니다.
결과
텍스트 편집기를 사용하면 Arduino를 통해 보낸 텍스트가 표시됩니다.