GWT-국제화
GWT는 GWT 애플리케이션을 국제화하는 세 가지 방법을 제공합니다. 프로젝트간에 가장 일반적으로 사용되는 정적 문자열 국제화의 사용을 보여줍니다.
| Sr. 아니. | 기술 및 설명 |
|---|---|
| 1 |
Static String Internationalization 이 기술은 가장 널리 사용되며 런타임시 오버 헤드가 거의 필요하지 않습니다. 상수 및 매개 변수화 된 문자열을 모두 번역하는 매우 효율적인 기술이며 구현이 가장 간단합니다. 정적 문자열 국제화는 표준 Java 특성 파일을 사용하여 변환 된 문자열 및 매개 변수화 된 메시지를 저장하고 해당 값을 검색하기 위해 강력한 유형의 Java 인터페이스가 작성됩니다. |
| 2 |
Dynamic String Internationalization 이 기술은 매우 유연하지만 정적 문자열 국제화보다 느립니다. 호스트 페이지에는 현지화 된 문자열이 포함되어 있으므로 새 로케일을 추가 할 때 애플리케이션을 다시 컴파일 할 필요가 없습니다. GWT 애플리케이션이 기존 서버 측 현지화 시스템과 통합되는 경우이 기술이 사용됩니다. |
| 삼 |
Localizable Interface 이 기술은 세 가지 기술 중 가장 강력합니다. Localizable을 구현하면 사용자 지정 유형의 지역화 된 버전을 만들 수 있습니다. 고급 국제화 기술입니다. |
GWT 응용 프로그램 국제화 워크 플로
1 단계-속성 파일 만들기
응용 프로그램에서 사용할 메시지가 포함 된 속성 파일을 만듭니다. 우리는HelloWorldMessages.properties 예제에서 파일.
enterName = Enter your name
clickMe = Click Me
applicationTitle = Application Internationalization Demonstration
greeting = Hello {0}
로케일 고유의 번역 된 값을 포함하는 특성 파일을 작성하십시오. 우리는HelloWorldMessages_de.properties예제에서 파일. 이 파일에는 독일어 번역이 포함되어 있습니다. _de는 독일어 로케일을 지정하고 응용 프로그램에서 독일어를 지원할 것입니다.
Eclipse를 사용하여 속성 파일을 생성하는 경우 파일의 인코딩을 UTF-8로 변경하고 파일을 선택한 다음 마우스 오른쪽 버튼을 클릭하여 속성 창을 엽니 다. Other UTF-8. 변경 사항을 적용하고 저장합니다.
enterName = Geben Sie Ihren Namen
clickMe = Klick mich
applicationTitle = Anwendung Internationalisierung Demonstration
greeting = Hallo {0}
2 단계-모듈 설명자 XML 파일에 i18n 모듈 추가
모듈 파일 업데이트 HelloWorld.gwt.xml 독일어 로케일 지원 포함
<?xml version = "1.0" encoding = "UTF-8"?>
<module rename-to = 'helloworld'>
   ...
   <extend-property name = "locale" values="de" />
   ...
</module>
3 단계-속성 파일에 해당하는 인터페이스 만들기
GWT의 메시지 인터페이스를 확장하여 내부화 지원을 포함하여 HelloWorldMessages.java 인터페이스를 만듭니다. 속성 파일의 키와 동일한 메서드 이름을 포함해야합니다. 자리 표시자는 문자열 인수로 대체됩니다.
public interface HelloWorldMessages extends Messages {

   @DefaultMessage("Enter your name")
   String enterName();

   @DefaultMessage("Click Me")
   String clickMe();

   @DefaultMessage("Application Internalization Demonstration")
   String applicationTitle();

   @DefaultMessage("Hello {0}")
   String greeting(String name);
}
4 단계-UI 구성 요소에서 메시지 인터페이스를 사용합니다.
개체 사용 HelloWorldMessages 에 HelloWorld 메시지를 얻으려면.
public class HelloWorld implements EntryPoint {

   /* create an object of HelloWorldMessages interface
      using GWT.create() method */
   private HelloWorldMessages messages =
   GWT.create(HelloWorldMessages.class);

   public void onModuleLoad() {
   ...
      Label titleLabel = new Label(messages.applicationTitle());
      //Add title to the application
      RootPanel.get("gwtAppTitle").add(titleLabel);
   ...
   }
}
국제화-완전한 예
이 예제는 GWT 애플리케이션의 국제화 기능을 보여주는 간단한 단계를 안내합니다.
다음 단계에 따라 GWT에서 생성 한 GWT 애플리케이션을 업데이트합니다 -애플리케이션 생성 장-
| 단계 | 기술 |
|---|---|
| 1 | GWT- 애플리케이션 만들기 장에 설명 된대로 com.tutorialspoint 패키지 아래에 HelloWorld 라는 이름으로 프로젝트를 만듭니다 . |
| 2 | 아래 설명과 같이 HelloWorld.gwt.xml , HelloWorld.css , HelloWorld.html 및 HelloWorld.java 를 수정하십시오 . 나머지 파일은 변경하지 마십시오. |
| 삼 | 애플리케이션을 컴파일하고 실행하여 구현 된 논리의 결과를 확인합니다. |
다음은 수정 된 모듈 설명 자의 내용입니다. src/com.tutorialspoint/HelloWorld.gwt.xml.
<?xml version = "1.0" encoding = "UTF-8"?>
<module rename-to = 'helloworld'>
  <!-- Inherit the core Web Toolkit stuff.                        -->
  <inherits name = 'com.google.gwt.user.User'/>

  <!-- Inherit the default GWT style sheet.                       -->
  <inherits name = 'com.google.gwt.user.theme.clean.Clean'/>

  <!-- Specify the app entry point class.                         -->
  <entry-point class = 'com.tutorialspoint.client.HelloWorld'/>
  <extend-property name = "locale" values="de" />
  <!-- Specify the paths for translatable code                    -->
  <source path = 'client'/>
  <source path = 'shared'/>

</module>
다음은 수정 된 스타일 시트 파일의 내용입니다. war/HelloWorld.css.
body {
   text-align: center;
   font-family: verdana, sans-serif;
}

h1 {
   font-size: 2em;
   font-weight: bold;
   color: #777777;
   margin: 40px 0px 70px;
   text-align: center;
}
다음은 수정 된 HTML 호스트 파일의 내용입니다. war/HelloWorld.html.
<html>
   <head>
      <title>Hello World</title>
      <link rel = "stylesheet" href = "HelloWorld.css"/>
      <script language = "javascript" src = "helloworld/helloworld.nocache.js">
      </script>
   </head>
   <body>

      <h1 id = "gwtAppTitle"></h1>
      <div id = "gwtContainer"></div>

   </body>
</html>
이제 HelloWorldMessages.properties 파일을 src/com.tutorialspoint/client 포장하고 다음 내용물을 넣으십시오.
enterName = Enter your name
clickMe = Click Me
applicationTitle = Application Internationalization Demonstration
greeting = Hello {0}
이제 HelloWorldMessages_de.properties 파일을 src/com.tutorialspoint/client 포장하고 다음 내용물을 넣으십시오.
enterName = Geben Sie Ihren Namen
clickMe = Klick mich
applicationTitle = Anwendung Internationalisierung Demonstration
greeting = Hallo {0}
이제 HelloWorldMessages.java 클래스를 src/com.tutorialspoint/client 포장하고 다음 내용물을 넣으십시오.
package com.tutorialspoint.client;
import com.google.gwt.i18n.client.Messages;

public interface HelloWorldMessages extends Messages {
   @DefaultMessage("Enter your name")
   String enterName();

   @DefaultMessage("Click Me")
   String clickMe();

   @DefaultMessage("Application Internationalization Demonstration")
   String applicationTitle();

   @DefaultMessage("Hello {0}")
   String greeting(String name);
}
Java 파일의 다음 내용을 갖도록합시다 src/com.tutorialspoint/HelloWorld.java GWT 코드의 국제화 기능을 보여줄 것입니다.
package com.tutorialspoint.client;

import com.google.gwt.core.client.EntryPoint;
import com.google.gwt.core.client.GWT;

import com.google.gwt.event.dom.client.ClickEvent;
import com.google.gwt.event.dom.client.ClickHandler;
import com.google.gwt.event.dom.client.KeyCodes;
import com.google.gwt.event.dom.client.KeyUpEvent;
import com.google.gwt.event.dom.client.KeyUpHandler;

import com.google.gwt.user.client.Window;
import com.google.gwt.user.client.ui.Button;
import com.google.gwt.user.client.ui.DecoratorPanel;
import com.google.gwt.user.client.ui.HasHorizontalAlignment;
import com.google.gwt.user.client.ui.HorizontalPanel;
import com.google.gwt.user.client.ui.Label;
import com.google.gwt.user.client.ui.RootPanel;
import com.google.gwt.user.client.ui.TextBox;
import com.google.gwt.user.client.ui.VerticalPanel;

public class HelloWorld implements EntryPoint {

   /* create an object of HelloWorldMessages interface
      using GWT.create() method */
   private HelloWorldMessages messages =
   GWT.create(HelloWorldMessages.class);

   public void onModuleLoad() {
      /*create UI */
      final TextBox txtName = new TextBox();
      txtName.setWidth("200");
      txtName.addKeyUpHandler(new KeyUpHandler() {
         @Override
         public void onKeyUp(KeyUpEvent event) {
            if(event.getNativeKeyCode() == KeyCodes.KEY_ENTER){
               Window.alert(getGreeting(txtName.getValue()));
            }
         }
      });
      Label lblName = new Label(messages.enterName() + ": ");

      Button buttonMessage = new Button(messages.clickMe() + "!");

      buttonMessage.addClickHandler(new ClickHandler() {
         @Override
         public void onClick(ClickEvent event) {
            Window.alert(getGreeting(txtName.getValue()));
         }
      });

      HorizontalPanel hPanel = new HorizontalPanel();
      hPanel.add(lblName);
      hPanel.add(txtName);

      VerticalPanel vPanel = new VerticalPanel();
      vPanel.setSpacing(10);
      vPanel.add(hPanel);
      vPanel.add(buttonMessage);
      vPanel.setCellHorizontalAlignment(buttonMessage,
      HasHorizontalAlignment.ALIGN_RIGHT);

      DecoratorPanel panel = new DecoratorPanel();
      panel.add(vPanel);
      Label titleLabel = new Label(messages.applicationTitle());
      //Add title to the application
      RootPanel.get("gwtAppTitle").add(titleLabel);
      // Add widgets to the root panel.
      RootPanel.get("gwtContainer").add(panel);
   }

   public String getGreeting(String name){
      return messages.greeting(name + "!");
   }
}
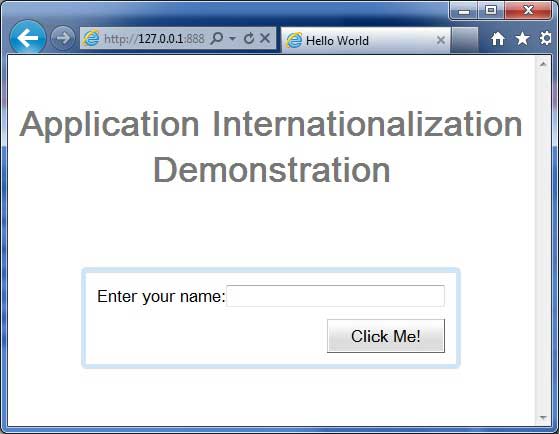
모든 변경이 완료되면 GWT-Create Application 장 에서했던 것처럼 개발 모드에서 애플리케이션을 컴파일하고 실행 해 보겠습니다 . 응용 프로그램에 문제가 없으면 다음과 같은 결과가 생성됩니다.

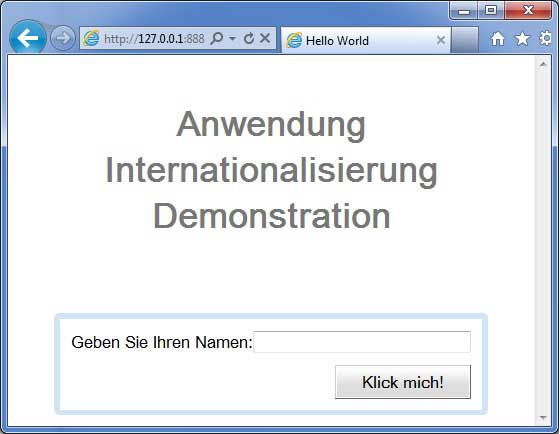
이제 포함하도록 URL을 업데이트 로케일 = de.Set URL - http://127.0.0.1:8888/HelloWorld.html?gwt.codesvr=127.0.0.1:9997&locale=de. 응용 프로그램에 문제가 없으면 다음과 같은 결과가 생성됩니다.
