Joomla-모듈 생성
이 장에서 우리는 Creating ModulesJoomla에서. 모듈은 유연하고 가볍고 페이지 렌더링에 유용한 확장입니다.
모듈 생성
다음은 Joomla에서 모듈을 만드는 간단한 단계입니다.
Step 1 −라는 폴더를 만듭니다. mod_firstmodule 당신의 Joomla → modules 폴더.
Step 2 −에서 mod_firstmodule폴더는 "helper.php"라는 파일을 생성합니다. 이 파일에는 도우미로 클래스 이름이 포함되어 있으며 모듈 출력에 검색된 데이터를 표시하는 데 도움이됩니다.
helper.php
<?php
   /**
      * Helper class for Hello World! module
      *
      * @package    Joomla.Tutorials
      * @subpackage Modules
      * @link http://docs.joomla.org/J3.x:Creating_a_simple_module/Developing_a_Basic_Module
      * @license        GNU/GPL, see LICENSE.php
      * mod_helloworld is free software. This version may have been modified pursuant
      * to the GNU General Public License, and as distributed it includes or
      * is derivative of works licensed under the GNU General Public License or
      * other free or open source software licenses.
   */

   class ModHelloWorldHelper {
      /**
         * Retrieves the hello message
         *
         * @param   array  $params An object containing the module parameters
         *
        * @access public
      */

      public static function getHello($params) {
         return 'Hello, World!';
      }
   }

?>
Step 3 − 다음과 같은 파일을 생성합니다. mod_helloworld.php. 초기화 루틴을 수행하고 필요한 데이터를 수집하고 템플릿을 사용하여 모듈 출력을 표시하는 모듈의 진입 점입니다.
mod_helloworld.php
<?php
   /**
      * Hello World! Module Entry Point
      *
      * @package    Joomla.Tutorials
      * @subpackage Modules
      * @license    GNU/GPL, see LICENSE.php
      * @link       http://docs.joomla.org/J3.x:Creating_a_simple_module/Developing_a_Basic_Module
      * mod_helloworld is free software. This version may have been modified pursuant
      * to the GNU General Public License, and as distributed it includes or
      * is derivative of works licensed under the GNU General Public License or
      * other free or open source software licenses.
   */

   // No direct access
   defined('_JEXEC') or die;

   // Include the syndicate functions only once
   require_once dirname(__FILE__) . '/helper.php';

   $hello = modHelloWorldHelper::getHello($params);
   require JModuleHelper::getLayoutPath('mod_helloworld');
?>
Step 4 − 만들기 mod_helloworld.xml file. 이 파일에는 모듈에 대한 정보가 포함되어 있습니다. 이 xml 파일에는 모듈에 대해 Joomla에 설치할 파일 정보가 포함되어 있습니다.
mod_helloworld.xml 파일
<?xml version = "1.0" encoding = "utf-8"?>

<extension type = "module" version = "3.1.0" client = "site" method="upgrade">

   <name>Hello, World!</name>
   <author>Tutorials Point</author>
   <version>1.0.0</version>
   <description>A simple Hello World! module.</description>

   <files>
      <filename>mod_helloworld.xml</filename>
      <filename module = "mod_helloworld">mod_helloworld.php</filename>
      <filename>index.html</filename>
      <filename>helper.php</filename>
      <filename>tmpl/default.php</filename>
      <filename>tmpl/index.html</filename>
   </files>

   <config>
   </config>

</extension>
Step 5 − 다음과 같은 간단한 html 파일을 만듭니다. index.html. 이 파일을 작성하는 목적은 생성 된 디렉토리를 찾아 보지 않는 것입니다. 사용자가 이러한 디렉토리를 탐색하면 index.html 파일이 표시됩니다. 이 파일을 비워 둘 수도 있습니다.
index.html
<html>
   <body> Welcome to Tutorials Point!!!!! </body>
</html>
Step 6 − 다음과 같은 폴더를 생성합니다. tmpl. 장소default.php 아래 표시된 파일과 index.html ((5) 단계에서 생성됨) tmpl폴더. default.php 파일은 모듈 출력을 표시하는 템플릿입니다.
default.php
<?php
   /**
      * @package Joomla.Site
      * @subpackage mod_firstmodule
      * @copyright Copyright (C) 2005 - 2012 Open Source Matters, Inc. All rights reserved.
      * @license GNU General Public License version 2 or later; see LICENSE.txt
   */
defined('_JEXEC') or die;
>

<p>Hello World!!!!!!</p>
이러한 파일을 모두 만든 후 전체 폴더를 압축하십시오. mod_firstmodule.
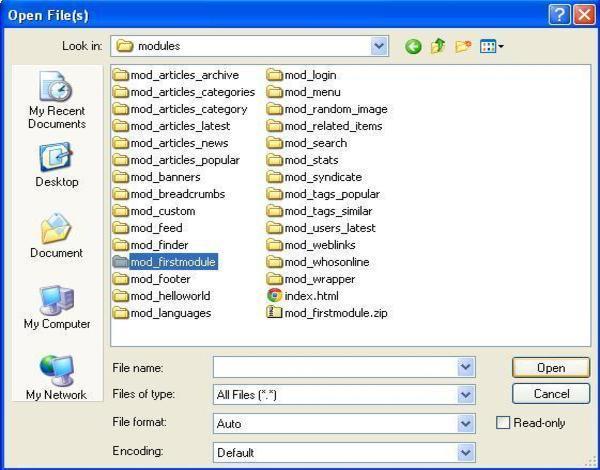
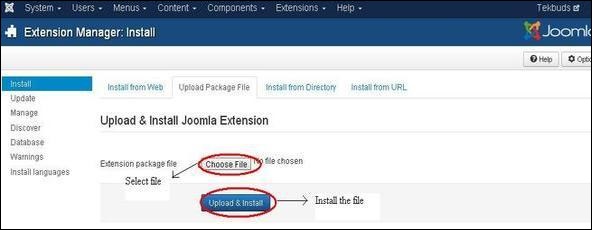
Step 7 − 이동 Extension → Extension ManagerJoomla 관리자에서 다음 화면이 표시됩니다. 여기에서 생성 된 모듈 파일을 업로드하고 설치할 수 있습니다.mod_firstmodule폴더. 클릭Choose File생성 된 모듈 파일 (압축 된 파일)을 선택합니다. 클릭Upload & Install 버튼을 눌러 모듈 파일을 업로드합니다.
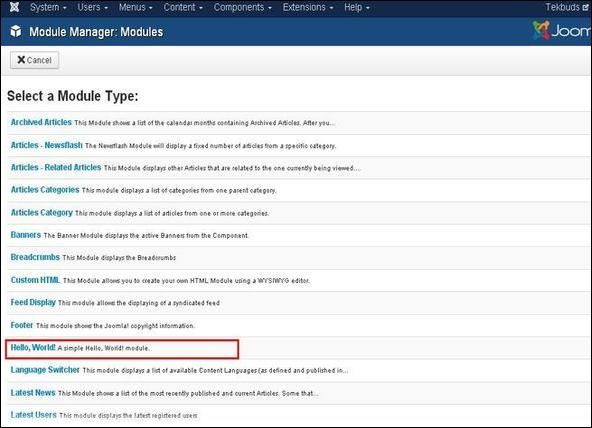
Step 8 − 업로드 및 설치 후 Module Manager 그리고 클릭 New. 여기에서 아래와 같이 생성 된 모듈 파일을 볼 수 있습니다.
Step 9 −이 모듈을 다른 모듈과 유사하게 할당 한 다음 게시 할 수 있습니다.