Joomla-템플릿 생성
이 장에서 우리는 create a template Joomla에서.
템플릿 생성
다음은 Joomla에서 템플릿을 만드는 간단한 단계입니다.
Step 1 −라는 폴더를 만듭니다. MyFirstTemplate 당신의 내부 Joomla → Templates폴더. 내부MyFirstTemplate모든 이미지와 CSS 파일을 저장하려면 images 및 CSS 라는 이름의 폴더를 2 개 더 만듭니다 .
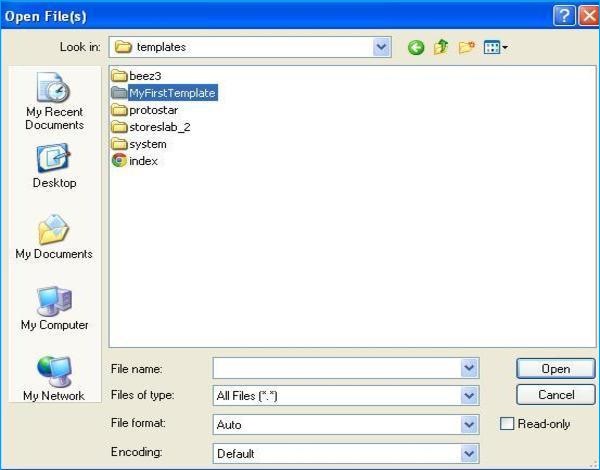
Step 2 − 내부 MyFirstTemplate 폴더에서 다음과 같은 파일을 만듭니다. templateDetails.xml,이 파일이 없으면 Joomla에 템플릿이 표시되지 않습니다.
templateDetails.xml
<?xml version = "1.0" encoding = "utf-8"?>

<extension version = "3.0" type = "template">
   <name>Tutorials Point</name>
   <creationDate>2015-06-13</creationDate>
   <author>Tutorials Point</author>
   <authorEmail>[email protected]</authorEmail>
   <authorUrl>http://www.example.com </authorUrl>
   <copyright>Jack 2015</copyright>
   <license>GNU/GPL</license>
   <version>1.0.2</version>
   <description>My First Template</description>

   <files>
      <filename>index.php</filename>
      <filename>templateDetails.xml</filename>
      <folder>images</folder>
      <folder>css</folder>
   </files>

   <positions>
      <position>breadcrumb</position>
      <position>left</position>
      <position>right</position>
      <position>top</position>
      <position>user1</position>
      <position>user2</position>
      <position>user3</position>
     <position>user4</position>
     <position>footer</position>
   </positions>

</extension>
코드의 세부 사항
<files> − 사용 가능한 파일 및 폴더가 MyFirstTemplate 폴더.
<folder> − 사용 가능한 전체 폴더를 MyFirstTemplate 폴더.
Step 3 − 다음과 같은 파일을 생성합니다. index.php. 이것은 모든 Joomla 페이지를 실행하는 데 도움이됩니다.
index.php
<?php defined( '_JEXEC' ) or die( 'Restricted access' );?>
<!DOCTYPE html>

<html xmlns = "http://www.w3.org/1999/xhtml" xml:lang = "<?php echo $this->language; ?>" lang = "<?php echo $this->language; ?>" >

   <head>                                         //head section
      <jdoc:include type = "head" />
      <link rel = "stylesheet" href = "<?php echo $this->baseurl ?>/templates/system/css/system.css" type = "text/css" />
      <link rel = "stylesheet" href = "<?php echo $this->baseurl ?>/templates/system/css/general.css" type = "text/css" />
      <link rel = "stylesheet" href = "<?php echo $this->baseurl ?>/templates/<?php echo $this->template; ?>/css/template.css" type="text/css" />
   </head>

   <body>                                          //body section
      <jdoc:include type = "modules" name = "top" />
      <jdoc:include type = "component" />
      <jdoc:include type = "modules" name = "bottom" />
   </body>

</html>

?>
코드의 세부 사항
<?php defined( '_JEXEC' ) or die( 'Restricted access' );?>
<!DOCTYPE html>
<html xmlns = "http://www.w3.org/1999/xhtml" xml:lang = "<?php echo $this->language; ?>" lang = "<?php echo $this->language; ?>" >
이 코드는 사용중인 html 페이지 유형을 브라우저에 알리고 웹 사이트에서 사용되는 언어를 설명하여 HTML 문서를 시작하는 데 사용됩니다.
<head>                                         //head section
   <jdoc:include type = "head" />
   <link rel = "stylesheet" href = "<?php echo $this->baseurl ?>/templates/system/css/system.css" type = "text/css" />
   <link rel = "stylesheet" href = "<?php echo $this->baseurl ?>/templates/system/css/general.css" type = "text/css" />
   <link rel = "stylesheet" href = "<?php echo $this->baseurl ?>/templates/<?php echo $this->template; ?>/css/template.css" type = "text/css" />
</head>
이 줄은 Joomla의 템플릿에 대한 다양한 스타일 시트를 연결하는 데 사용됩니다.
<body>                                          //body section
   <jdoc:include type = "modules" name = "top" />
   <jdoc:include type = "component" />
   <jdoc:include type = "modules" name = "bottom" />
</body>
여기 본문 섹션에서 jdocJoomla 시스템의 일부에서 출력을 Joomla에 포함하는 데 사용됩니다. 그만큼name = "top" 상단에 메뉴를 설정하는 데 사용됩니다.
Step 4 −이 두 파일을 생성 한 후 Joomla에 로그인하고 Extension → Extension Manager 다음 페이지가 표시됩니다.
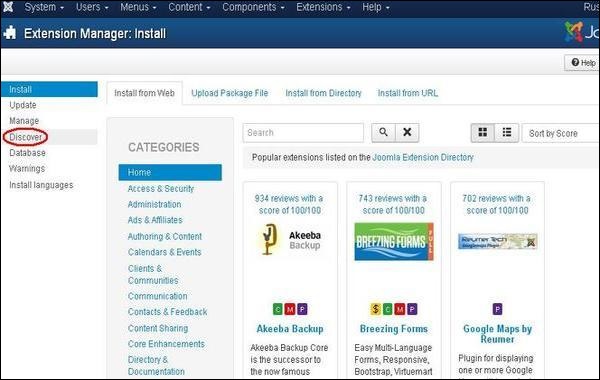
Step 5 − 위 페이지에서 Discover 링크를 클릭하면 다음 페이지가 표시됩니다.
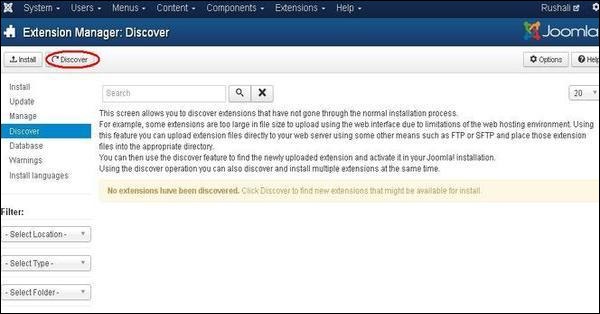
Step 6 − 다음으로 Discover 버튼을 눌러 아래와 같이 새로 생성 된 템플릿을 찾습니다.
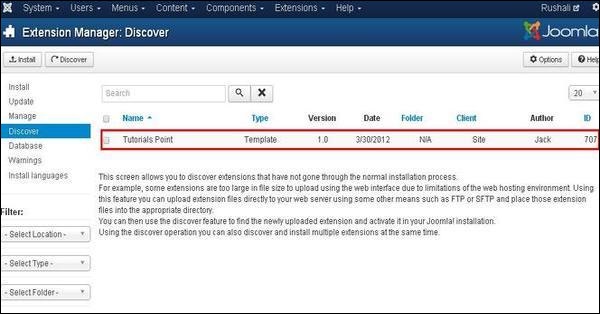
Step 7 − 확인란을 클릭하여 템플릿을 선택하고 Install 버튼을 눌러 Joomla에 템플릿을 설치합니다.
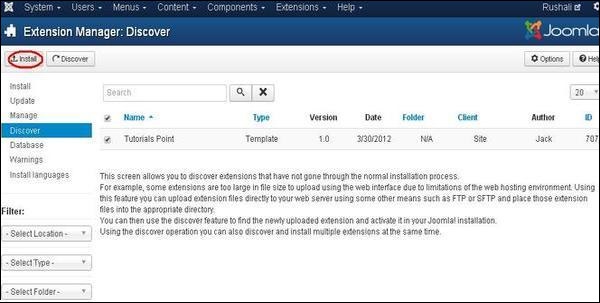
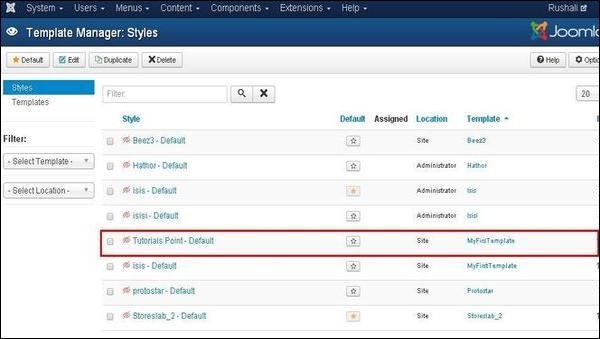
Step 8 − 템플릿을 설치 한 후를 클릭하여 새로 생성 된 템플릿을 볼 수 있습니다. Extension → Template Manager. 새로 생성 된 템플릿이 아래와 같이 나열됩니다.
툴바
다음은 템플릿 관리자의 도구 모음 옵션입니다-
Default − 기본 템플릿을 선택합니다.
Edit − 편집 할 템플릿을 선택합니다.
Duplicate − 선택한 템플릿의 사본을 복제합니다.
Delete − Joomla의 템플릿을 삭제합니다.