Meteor-할일 앱
이 장에서는 간단한 할일 앱을 만드는 방법을 배웁니다.
1 단계-앱 만들기
명령 프롬프트를 열고 다음 명령을 실행하십시오-
C:\Users\username\Desktop>meteor create todo-app앱을 보려면 다음을 사용하여 앱을 실행해야합니다. meteor 명령하고 이동 http://localhost:3000
C:\Users\username\Desktop\todo-app>meteor2 단계-폴더 및 파일 만들기
기본 파일 구조 대신 리팩토링합니다. 만들자client 우리가 만들 폴더 todo-app.html, todo-app.css 과 todo-app.js.
C:\Users\username\Desktop\todo-app>mkdir client
C:\Users\username\Desktop\todo-app\client>touch todo-app.html
C:\Users\username\Desktop\todo-app\client>touch todo-app.js
우리는 또한 server 폴더 server.js 내부.
C:\Users\username\Desktop\todo-app>mkdir server
C:\Users\username\Desktop\todo-app\server>touch server.js
마지막으로 collections 폴더 task-collection.js 내부 파일.
C:\Users\username\Desktop\todo-app>mkdir server
C:\Users\username\Desktop\todo-app\collections>touch task-collection.js
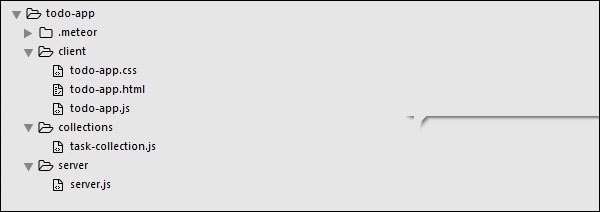
다음 이미지에서 앱 구조를 볼 수 있습니다.

3 단계-client / todo-app.html
첫 번째 개발 단계는 앱용 HTML을 만드는 것입니다. 새 작업을 추가 할 수있는 입력 필드가 필요합니다. 작업은 다음이 포함 된 목록 형식입니다.delete 과 check기능. 완료된 작업을 표시하거나 숨기는 기능도 있습니다.
<head>
   <title>Todo App</title>
</head>

<body>
   <h1>Todo List ({{incompleteCount}})</h1>

   <label class = "hide-completed">
      <input type = "checkbox" checked = "{{hideCompleted}}" />
      Hide Completed Tasks
   </label>

   <form class = "new-task">
      <input type = "text" name = "text" placeholder = "Add new tasks" />
   </form>

   <ul>
      {{#each tasks}}
         {{> task}}
      {{/each}}
   </ul>
</body>

<template name = "task">
   <li class = "{{#if checked}}checked{{/if}}">
      <button class = "delete">x</button>
      <input type = "checkbox" checked = "{{checked}}" class = "toggle-checked" />
      <span>{{username}} - {{text}}</span>
   </li>
</template>
4 단계-collections / task-collection.js
이것은 우리가 새로운 MongoDB 컬렉션을 생성하는 곳이므로 서버와 클라이언트 모두에서 사용할 수 있습니다.
Tasks = new Mongo.Collection("tasks");5 단계-server / server.js
서버 측에서 앱에 대한 메서드를 정의합니다. 이러한 메서드는 클라이언트에서 호출됩니다. 이 파일에서는 데이터베이스 쿼리도 게시합니다.
// Publishing tasks from the server...

Meteor.publish("tasks", function () {
   return Tasks.find({});
});

// Methods for handling MongoDb Tasks collection data...

Meteor.methods({

   addTask: function (text) {

      Tasks.insert({
         text: text,
         createdAt: new Date(),
      });
   },

   deleteTask: function (taskId) {
      var task = Tasks.findOne(taskId);
      Tasks.remove(taskId);
   },

   setChecked: function (taskId, setChecked) {
      var task = Tasks.findOne(taskId);
      Tasks.update(taskId, { $set: { checked: setChecked} });
   }
});
6 단계-client / todo-app.js
기본 클라이언트 JavaScript 파일입니다. 이 파일도 리팩토링 할 수 있지만 여기에 모든 클라이언트 측 코드를 작성합니다. 먼저, 우리는task서버에 게시 된 컬렉션입니다. 그런 다음helpers 앱 로직을 처리 할 수 있도록하고 마지막으로 events 서버에서 메서드를 호출합니다.
// Subscribing to the published tasks
Meteor.subscribe("tasks");

// Show/Hide functionality
Template.body.helpers({

   tasks: function () {

      if (Session.get("hideCompleted")) {

         // If hide completed is checked, filter tasks
         return Tasks.find({checked: {$ne: true}}, {sort: {createdAt: -1}});
      } else {

         // Otherwise, return all of the tasks
         return Tasks.find({}, {sort: {createdAt: -1}});
      }
   },

   hideCompleted: function () {
      return Session.get("hideCompleted");
   },

   incompleteCount: function () {
      return Tasks.find({checked: {$ne: true}}).count();
   }
});

// Events for creating new tasks and Show/Hide functionality.
// Calling methods from the server

Template.body.events({

   "submit .new-task": function (event) {
      event.preventDefault();
      var text = event.target.text.value;

      Meteor.call("addTask", text);
      event.target.text.value = "";
   },

   "change .hide-completed input": function (event) {
      Session.set("hideCompleted", event.target.checked);
   }
});

// Events for Deleting and Check/Uncheck functionality
Template.task.events({

   "click .toggle-checked": function () {

      // Set the checked property to the opposite of its current value
      Meteor.call("setChecked", this._id, ! this.checked);
   },

   "click .delete": function () {
      Meteor.call("deleteTask", this._id);
   }
});
7 단계-배포
개발이 끝나면 명령 프롬프트 창에서 앱을 배포 할 수 있습니다. 우리 앱의 배포 이름은my-first-todo-app.
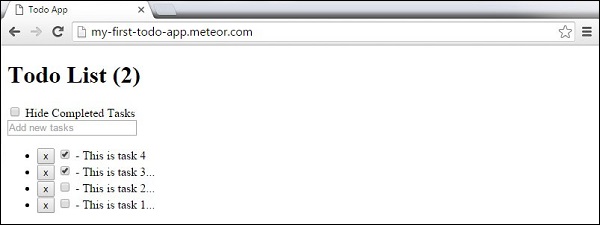
C:\Users\username\Desktop\todo-app>meteor deploy my-first-todo-app우리는 열 수 있습니다 http://my-first-todo-app.meteor.com/ 앱 사용을 시작합니다.
