TurboGears-Genshi 템플릿 언어
Genshi는 XML 기반 템플릿 언어입니다. 유사하다Kid이전 버전의 TurboGears에 대한 템플릿 엔진이었습니다. Genshi와 Kid는 다음과 같은 다른 잘 알려진 템플릿 언어에서 영감을 받았습니다.HSLT, TAL 과 PHP.
Genshi 템플릿은 처리 지시문으로 구성됩니다. 이러한 지시문은 템플릿의 요소 및 속성입니다. Genshi 지시문은 네임 스페이스에 정의됩니다.http://genshi.edgewall.org/. 따라서이 네임 스페이스는 템플릿의 루트 요소에 선언되어야합니다.
<html xmlns = "http://www.w3.org/1999/xhtml"
   xmlns:py = "http://genshi.edgewall.org/"
   lang = "en">
...
</html>
위의 선언은 기본 네임 스페이스가 XHTML로 설정되고 Genshi 지시문에 'py'접두사가 있음을 의미합니다.
Genshi 지시어
Genshi에는 많은 지시문이 정의되어 있습니다. 다음 목록은 Genshi 지시문을 열거합니다-
- py:if
- py:choose
- py:for
- py:def
- py:match
- py:with
- py:replace
- py:content
- py:attrs
- py:strip
조건부 섹션
Genshi는 콘텐츠의 조건부 렌더링을위한 두 가지 지시문 (py : if 및 py : choose)을 제공합니다.
py : if
이 지시문 요소의 내용은 if clause참으로 평가됩니다. 템플릿 컨텍스트의 데이터가{‘foo’:True, ‘bar’:’Hello’}, 다음 지시문-
<div>
   <b py:if = "foo">${bar}</b>
</div>
결과적으로
Hello그러나이 출력은 다음과 같은 경우 렌더링되지 않습니다. ‘foo’ is set to False.
이 지시문은 요소로도 사용할 수 있습니다. 이 경우<py:if> 해당에 의해 폐쇄되어야합니다 </py:if>
<div>
   <py:if test = "foo">
      <b>${bar}</b>
   </py:if>
</div>
py : choose
고급 조건부 처리는 다음을 사용하여 가능합니다. py:choose 함께 py:when 과 py:otherwise지시. 이 기능은 다음과 유사합니다.switch – case 건설하다 C/C++.
표현 py:choose 지시문은 다음으로 식별되는 다른 값으로 확인됩니다. py:when대안 및 해당 콘텐츠가 렌더링됩니다. 기본 대안은 다음과 같은 형식으로 제공 될 수 있습니다.py:otherwise 지령.
<div py:choose = "foo”>
   <span py:when = "0">0</span>
   <span py:when = "1">1</span>
   <span py:otherwise = "">2</span>
</div>
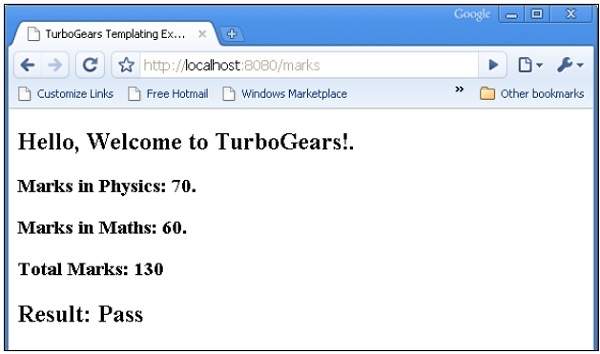
다음 예는 py:choose 과 py:when지시. HTML 양식은 데이터를 / marks URL에 게시합니다. 그만큼marks() 함수는 사전 객체의 형태로 마크와 결과를 다음으로 리디렉션합니다. total.html주형. 조건부 표시result Pass/Fail 사용하여 달성됩니다 py:choose 과 py:when 지시.
마크 입력의 HTML 스크립트 (marks.html)는 다음과 같습니다-
<html>
   <body>
      <form action = "http://localhost:8080/marks" method = "post">
         <p>Marks in Physics:</p>
         <p><input type = "text" name = "phy" /></p>
         <p>Marks in Maths:</p>
         <p><input type = "text" name = "maths" /></p>
         <p><input type = "submit" value = "submit" /></p>
      </form>
   </body>
</html>
완전한 코드 root.py다음과 같다. 그만큼marks() 컨트롤러가 마크와 결과를 total.html 템플릿 −
from hello.lib.base import BaseController
from tg import expose, request

class RootController(BaseController):
   @expose("hello.templates.marks")
      def marksform(self):
      return {}

   @expose("hello.templates.total")
      def marks(self, **kw):
      phy = kw['phy']
      maths = kw['maths']
      ttl = int(phy)+int(maths)
      avg = ttl/2

      if avg ≥ 50:
         mydata = {'phy':phy, 'maths':maths, 'total':ttl, 'result':2}
      else:
         mydata = {'phy':phy, 'maths':maths, 'total':ttl,'result':1}

      return mydata
그만큼 total.html 템플릿 폴더에서 사전 데이터를 수신하고 다음과 같이 조건부로 html 출력으로 구문 분석합니다.
<html xmlns = "http://www.w3.org/1999/xhtml"
   xmlns:py = "http://genshi.edgewall.org/"
   lang = "en">

   <head>
      <title>TurboGears Templating Example</title>
   </head>

   <body>
      <h2>Hello, Welcome to TurboGears!.</h2>
      <h3>Marks in Physics: ${phy}.</h3>
      <h3>Marks in Maths: ${maths}.</h3>
      <h3>Total Marks: ${total}</h3>

      <div py:choose = "result">
         <span py:when = "1"><h2>Result: Fail</h2></span>
         <span py:when = "2"><h2>Result: Pass</h2></span>
      </div>

   </body>
</html>
서버 시작 (아직 실행 중이 아닌 경우)
Gearbox server –reload –debug시작하다 http://localhost::8080/marksform 브라우저에서-

그만큼 total.html 다음 출력을 렌더링합니다-
py : for
py : for 지시문의 요소는 반복 가능한 각 항목 (일반적으로 Python List 객체)에 대해 반복됩니다. 만약items = [1,2,3] 템플릿 컨텍스트에 존재하는 경우 다음 py : for 지시문에 따라 반복 할 수 있습니다.
<ul>
   <li py:for = "item in items">${item}</li>
</ul>
다음 출력이 렌더링됩니다-
1
2
3
다음 예제는 py : for 지시문을 사용하여 total.html 템플릿에서 렌더링 된 HTML 양식 데이터를 보여줍니다.
<py:for each = "item in items">
   <li>${item}</li>
</py:for>
HTML 양식 스크립트
<html>
   <body>

      <form action = "http://localhost:8080/loop" method="post">
         <p>Marks in Physics:</p>
         <p><input type = "text" name = "phy" /></p>
         <p>Marks in Chemistry:</p>
         <p><input type = "text" name = "che" /></p>
         <p>Marks in Maths:</p>
         <p><input type = "text" name = "maths" /></p>
         <p><input type = "submit" value = "submit" /></p>
      </form>

   </body>
</html>
그만큼 loop() 컨트롤러는 양식 데이터를 읽고 목록 객체의 형태로 total.template에 보냅니다.
from hello.lib.base import BaseController
from tg import expose, request

class RootController(BaseController):
   @expose("hello.templates.marks")
   def marksform(self):
   return {}

   @expose("hello.templates.temp")
   def loop(self, **kw):
      phy = kw['phy']
      maths = kw['maths']
      che = kw['che']
      l1 = []
      l1.append(phy)
      l1.append(che)
      l1.append(maths)

   return ({'subjects':['physics', 'Chemistry', 'Mathematics'], 'marks':l1})
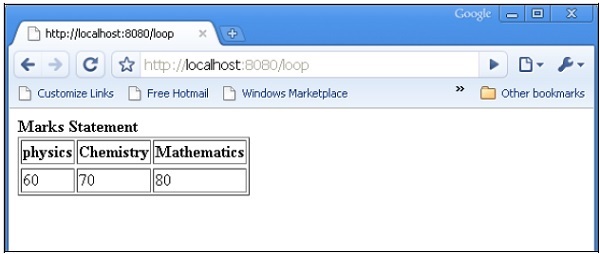
temp.html 템플릿은 py : for 루프를 사용하여 dict 객체의 내용을 테이블 형식으로 렌더링합니다.
<html xmlns = "http://www.w3.org/1999/xhtml"
   xmlns:py = "http://genshi.edgewall.org/" lang = "en">

   <body>
      <b>Marks Statement</b>
      <table border = '1'>
         <thead>
            <py:for each = "key in subjects"><th>${key}</th></py:for>
         </thead>
         <tr>
            <py:for each = "key in marks"><td>${key}</td></py:for>
         </tr>
      </table>
   </body>
</html>
서버 시작 (아직 실행 중이 아닌 경우)
gearbox server –reload –debug시작하다 http://localhost::8080/marksform 브라우저에서.
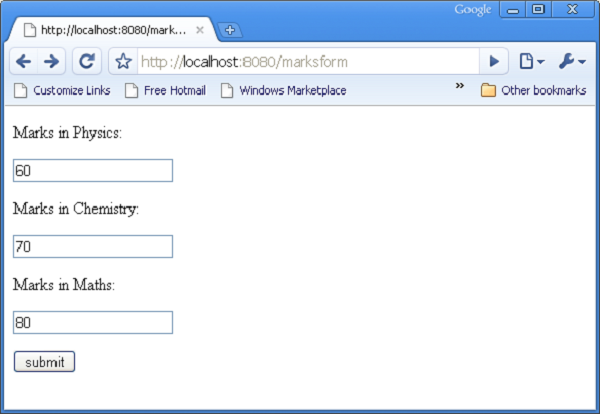
위의 양식이 제출되면 다음 출력이 브라우저에 표시됩니다.
py : def
이 지시문은 매크로를 만드는 데 사용됩니다. 매크로는 재사용 가능한 템플릿 코드 스 니펫입니다. Python 함수와 마찬가지로 이름이 있고 선택적으로 매개 변수를 가질 수 있습니다. 이 매크로의 출력은 템플릿의 어느 위치 에나 삽입 할 수 있습니다.
py : def 지시문은 다음 구문을 따릅니다.
<p py:def = "greeting(name)">
   Hello, ${name}!
</p>
이 매크로는 'name'매개 변수에 대한 변수 값으로 렌더링 할 수 있습니다.
${greeting('world')}
${greeting('everybody)}
이 지시문은 다음과 같이 다른 버전의 구문과 함께 사용할 수도 있습니다.
<py:def function = "greeting(name)">
   <p>Hello, ${name}! </p>
</py:def>
다음 예에서 macro() 컨트롤러 root.py 보낸다 dict 두 개의 키 name1 및 name2가있는 개체를 macro.html 템플릿에 추가합니다.
from hello.lib.base import BaseController
from tg import expose, request

class RootController(BaseController):
   @expose('hello.templates.macro')
   def macro(self):
      return {'name1':'TutorialPoint', 'name2':'TurboGears'}
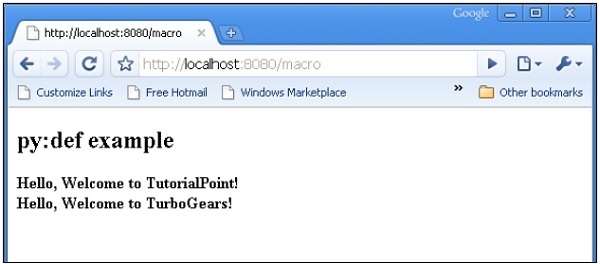
이 macro.html 템플릿에는 인사라는 매크로 정의가 포함되어 있습니다. 컨트롤러에서 수신 한 데이터에 대한 인사말 메시지를 생성하는 데 사용됩니다.
<html xmlns = "http://www.w3.org/1999/xhtml"
   xmlns:py = "http://genshi.edgewall.org/"
   lang = "en">

   <body>
      <h2>py:def example</h2>

      <div>
         <div py:def = "greeting(name)">
            Hello, Welcome to ${name}!
         </div>

         <b>
            ${greeting(name1)}
            ${greeting(name2)}
         </b>

      </div>
   </body>
</html>
기어 박스를 사용하여 서버 시작
gearbox serve –reload –debug브라우저에 다음 URL을 입력하여 macro () 컨트롤러를 호출합니다.
http://localhost:8080/macro
다음 출력은 브라우저에서 렌더링됩니다-
py : with
이 지시문을 사용하면 지역 변수에 표현식을 할당 할 수 있습니다. 이러한 지역 변수는 내부 표현을 덜 장황하고 효율적으로 만듭니다.
x = 50이 템플릿에 대한 컨텍스트 데이터에 주어 졌다고 가정하면 다음은 py : with 지시문입니다.
<div>
   <span py:with = "y = 50; z = x+y">$x $y $z</span>
</div>
결과는 다음과 같습니다.
50 50 100py : with 지시문의 대체 버전도 사용할 수 있습니다.
<div>
   <py:with = "y = 50; z = x+y">$x $y $z</py:with>
</div>
다음 예제에서 macro () 컨트롤러는 이름, phy 및 수학 키가있는 dict 객체를 반환합니다.
from hello.lib.base import BaseController
from tg import expose, request

class RootController(BaseController):
   @expose('hello.templates.macro')
   def macro(self):
      return {'name':'XYZ', 'phy':60, 'maths':70}
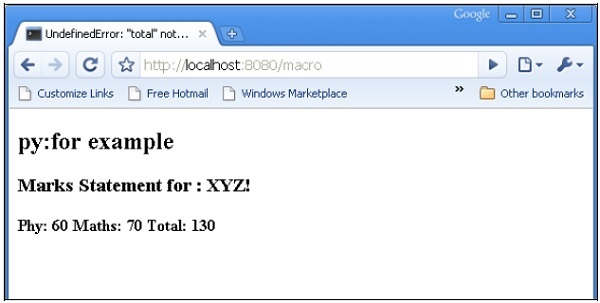
macro.html 템플릿은 py : with 지시문을 사용하여 phy 및 maths 키의 값을 추가합니다.
<html xmlns = "http://www.w3.org/1999/xhtml"
   xmlns:py = "http://genshi.edgewall.org/"
   lang = "en">

   <body>
      <h2>py:with example</h2>
      <h3>Marks Statement for : ${name}!</h3>

      <b>Phy: $phy Maths: $maths
         <span py:with = "ttl = phy+maths">Total: $ttl</span>
      </b>

   </body>

</html>
브라우저는 URL에 대한 응답으로 다음 출력을 렌더링합니다. http://localhost:8080/macro
구조 조작 지시문
그만큼 py:attrs 지시문은 요소에서 속성을 추가, 수정 또는 제거합니다.
<ul>
   <li py:attrs = "foo">Bar</li>
</ul>
만약 foo = {‘class’:’collapse’} 위의 스 니펫이 렌더링 할 템플릿 컨텍스트에 있습니다.
<ul>
   <li class = "collapse">Bar</li>
</ul>
그만큼 py:content 지시문은 표현식을 평가 한 결과로 중첩 된 내용을 대체합니다.
<ul>
   <li py:content = "bar">Hello</li>
</ul>
컨텍스트 데이터에 bar = 'Bye'가 주어지면
<ul>
   <li>Bye</li>
</ul>
그만큼 py:replace 지시문은 표현식을 평가 한 결과로 요소 자체를 대체합니다.
<div>
   <span py:replace = "bar">Hello</span>
</div>
컨텍스트 데이터에 bar = 'Bye'가 주어지면
<div>
   Bye
</div>