Spring Boot - OAuth2 z JWT
W tym rozdziale poznasz szczegółowo mechanizmy Spring Boot Security i OAuth2 z JWT.
Serwer autoryzacji
Serwer autoryzacji jest najwyższym komponentem architektonicznym dla bezpieczeństwa Web API. Serwer autoryzacji działa jako centralny punkt autoryzacji, który umożliwia aplikacjom i punktom końcowym HTTP identyfikację funkcji aplikacji.
Serwer zasobów
Serwer zasobów to aplikacja, która zapewnia token dostępu klientom w celu uzyskania dostępu do punktów końcowych HTTP serwera zasobów. Jest to zbiór bibliotek, który zawiera punkty końcowe HTTP, zasoby statyczne i dynamiczne strony internetowe.
OAuth2
OAuth2 to struktura autoryzacji, która umożliwia zabezpieczeniom sieci Web aplikacji dostęp do zasobów klienta. Aby zbudować aplikację OAuth2, musimy skupić się na typie przyznania (kod autoryzacji), identyfikatorze klienta i tajnym kluczu klienta.
JWT Token
JWT Token to JSON Web Token, używany do reprezentowania roszczeń zabezpieczonych między dwiema stronami. Możesz dowiedzieć się więcej o tokenie JWT na www.jwt.io/ .
Teraz zamierzamy zbudować aplikację OAuth2, która umożliwia korzystanie z serwera autoryzacji, serwera zasobów za pomocą tokena JWT.
Możesz wykonać następujące kroki, aby zaimplementować Spring Boot Security z tokenem JWT, uzyskując dostęp do bazy danych.
Najpierw musimy dodać następujące zależności w naszym pliku konfiguracyjnym kompilacji.
Użytkownicy Maven mogą dodawać następujące zależności w pliku pom.xml.
<dependency>
   <groupId>org.springframework.boot</groupId>
   <artifactId>spring-boot-starter-jdbc</artifactId>
</dependency>

<dependency>
   <groupId>org.springframework.boot</groupId>
   <artifactId>spring-boot-starter-security</artifactId>
</dependency>

<dependency>
   <groupId>org.springframework.boot</groupId>
   <artifactId>spring-boot-starter-web</artifactId>
</dependency>

<dependency>
   <groupId>org.springframework.security.oauth</groupId>
   <artifactId>spring-security-oauth2</artifactId>
</dependency>

<dependency>
   <groupId>org.springframework.security</groupId>
   <artifactId>spring-security-jwt</artifactId>
</dependency>

<dependency>
   <groupId>com.h2database</groupId>
   <artifactId>h2</artifactId>
</dependency>

<dependency>
   <groupId>org.springframework.boot</groupId>
   <artifactId>spring-boot-starter-test</artifactId>
   <scope>test</scope>
</dependency>

<dependency>
   <groupId>org.springframework.security</groupId>
   <artifactId>spring-security-test</artifactId>
   <scope>test</scope>
</dependency>
Użytkownicy Gradle mogą dodawać następujące zależności w pliku build.gradle.
compile('org.springframework.boot:spring-boot-starter-security')
compile('org.springframework.boot:spring-boot-starter-web')
testCompile('org.springframework.boot:spring-boot-starter-test')
testCompile('org.springframework.security:spring-security-test')

compile("org.springframework.security.oauth:spring-security-oauth2")
compile('org.springframework.security:spring-security-jwt')
compile("org.springframework.boot:spring-boot-starter-jdbc")
compile("com.h2database:h2:1.4.191")
gdzie,
Spring Boot Starter Security - Implementuje Spring Security
Spring Security OAuth2 - Implementuje strukturę OAUTH2, aby włączyć serwer autoryzacji i serwer zasobów.
Spring Security JWT - Generuje token JWT dla bezpieczeństwa WWW
Spring Boot Starter JDBC - Uzyskuje dostęp do bazy danych, aby upewnić się, że użytkownik jest dostępny, czy nie.
Spring Boot Starter Web - Zapisuje punkty końcowe HTTP.
H2 Database - Przechowuje informacje o użytkowniku do uwierzytelnienia i autoryzacji.
Pełny plik konfiguracyjny kompilacji znajduje się poniżej.
<?xml version = "1.0" encoding = "UTF-8"?>
<project xmlns = "http://maven.apache.org/POM/4.0.0"
   xmlns:xsi = "http://www.w3.org/2001/XMLSchema-instance"
   xsi:schemaLocation = "http://maven.apache.org/POM/4.0.0
   http://maven.apache.org/xsd/maven-4.0.0.xsd">

   <modelVersion>4.0.0</modelVersion>
   <groupId>com.tutorialspoint</groupId>
   <artifactId>websecurityapp</artifactId>
   <version>0.0.1-SNAPSHOT</version>
   <packaging>jar</packaging>
   <name>websecurityapp</name>
   <description>Demo project for Spring Boot</description>

   <parent>
      <groupId>org.springframework.boot</groupId>
      <artifactId>spring-boot-starter-parent</artifactId>
      <version>1.5.9.RELEASE</version>
      <relativePath /> <!-- lookup parent from repository -->
   </parent>

   <properties>
      <project.build.sourceEncoding>UTF-8</project.build.sourceEncoding>
      <project.reporting.outputEncoding>UTF-8</project.reporting.outputEncoding>
      <java.version>1.8</java.version>
   </properties>

   <dependencies>
      <dependency>
         <groupId>org.springframework.boot</groupId>
         <artifactId>spring-boot-starter-jdbc</artifactId>
      </dependency>

      <dependency>
         <groupId>org.springframework.boot</groupId>
         <artifactId>spring-boot-starter-security</artifactId>
      </dependency>

      <dependency>
         <groupId>org.springframework.boot</groupId>
         <artifactId>spring-boot-starter-web</artifactId>
      </dependency>

      <dependency>
         <groupId>org.springframework.security.oauth</groupId>
         <artifactId>spring-security-oauth2</artifactId>
      </dependency>

      <dependency>
         <groupId>org.springframework.security</groupId>
         <artifactId>spring-security-jwt</artifactId>
      </dependency>

      <dependency>
         <groupId>com.h2database</groupId>
         <artifactId>h2</artifactId>
      </dependency>

      <dependency>
         <groupId>org.springframework.boot</groupId>
         <artifactId>spring-boot-starter-test</artifactId>
         <scope>test</scope>
      </dependency>

      <dependency>
         <groupId>org.springframework.security</groupId>
         <artifactId>spring-security-test</artifactId>
         <scope>test</scope>
      </dependency>
   </dependencies>

   <build>
      <plugins>
         <plugin>
            <groupId>org.springframework.boot</groupId>
            <artifactId>spring-boot-maven-plugin</artifactId>
         </plugin>
      </plugins>
   </build>

</project>
Gradle – build.gradle
buildscript {
   ext {
      springBootVersion = '1.5.9.RELEASE'
   }
   repositories {
      mavenCentral()
   }
   dependencies {
      classpath("org.springframework.boot:spring-boot-gradle-plugin:${springBootVersion}")
   }
}
apply plugin: 'java'
apply plugin: 'eclipse'
apply plugin: 'org.springframework.boot'

group = 'com.tutorialspoint'
version = '0.0.1-SNAPSHOT'
sourceCompatibility = 1.8

repositories {
   mavenCentral()
}

dependencies {
   compile('org.springframework.boot:spring-boot-starter-security')
   compile('org.springframework.boot:spring-boot-starter-web')
   testCompile('org.springframework.boot:spring-boot-starter-test')
   testCompile('org.springframework.security:spring-security-test')
   compile("org.springframework.security.oauth:spring-security-oauth2")
   compile('org.springframework.security:spring-security-jwt')
   compile("org.springframework.boot:spring-boot-starter-jdbc")
   compile("com.h2database:h2:1.4.191")
}
Teraz w głównej aplikacji Spring Boot dodaj adnotację @EnableAuthorizationServer i @EnableResourceServer, aby działały jako serwer uwierzytelniania i serwer zasobów w tej samej aplikacji.
Możesz również użyć poniższego kodu, aby napisać prosty punkt końcowy HTTP, aby uzyskać dostęp do interfejsu API z Spring Security za pomocą tokenu JWT.
package com.tutorialspoint.websecurityapp;

import org.springframework.boot.SpringApplication;
import org.springframework.boot.autoconfigure.SpringBootApplication;
import org.springframework.security.oauth2.config.annotation.web.configuration.EnableAuthorizationServer;
import org.springframework.security.oauth2.config.annotation.web.configuration.EnableResourceServer;
import org.springframework.web.bind.annotation.RequestMapping;
import org.springframework.web.bind.annotation.RestController;

@SpringBootApplication
@EnableAuthorizationServer
@EnableResourceServer
@RestController
public class WebsecurityappApplication {
   public static void main(String[] args) {
      SpringApplication.run(WebsecurityappApplication.class, args);
   }
   @RequestMapping(value = "/products")
   public String getProductName() {
      return "Honey";
   }
}
Użyj poniższego kodu, aby zdefiniować klasę POJO do przechowywania informacji o użytkowniku na potrzeby uwierzytelniania.
package com.tutorialspoint.websecurityapp;

import java.util.ArrayList;
import java.util.Collection;
import org.springframework.security.core.GrantedAuthority;

public class UserEntity {
   private String username;
   private String password;
   private Collection<GrantedAuthority> grantedAuthoritiesList = new ArrayList<>();

   public String getPassword() {
      return password;
   }
   public void setPassword(String password) {
      this.password = password;
   }
   public Collection<GrantedAuthority> getGrantedAuthoritiesList() {
      return grantedAuthoritiesList;
   }
   public void setGrantedAuthoritiesList(Collection<GrantedAuthority> grantedAuthoritiesList) {
      this.grantedAuthoritiesList = grantedAuthoritiesList;
   }
   public String getUsername() {
      return username;
   }
   public void setUsername(String username) {
      this.username = username;
   }
}
Teraz użyj poniższego kodu i zdefiniuj klasę CustomUser, która rozszerza klasę org.springframework.security.core.userdetails.User na potrzeby uwierzytelniania Spring Boot.
package com.tutorialspoint.websecurityapp;

import org.springframework.security.core.userdetails.User;

public class CustomUser extends User {
   private static final long serialVersionUID = 1L;
   public CustomUser(UserEntity user) {
      super(user.getUsername(), user.getPassword(), user.getGrantedAuthoritiesList());
   }
}
Można utworzyć klasę @Repository, aby odczytać informacje o użytkowniku z bazy danych i wysłać je do usługi użytkownika niestandardowego, a także dodać przyznane uprawnienie „ROLE_SYSTEMADMIN”.
package com.tutorialspoint.websecurityapp;

import java.sql.ResultSet;
import java.util.ArrayList;
import java.util.Collection;
import java.util.List;

import org.springframework.beans.factory.annotation.Autowired;
import org.springframework.jdbc.core.JdbcTemplate;
import org.springframework.security.core.GrantedAuthority;
import org.springframework.security.core.authority.SimpleGrantedAuthority;
import org.springframework.stereotype.Repository;

@Repository
public class OAuthDao {
   @Autowired
   private JdbcTemplate jdbcTemplate;

   public UserEntity getUserDetails(String username) {
      Collection<GrantedAuthority> grantedAuthoritiesList = new ArrayList<>();
      String userSQLQuery = "SELECT * FROM USERS WHERE USERNAME=?";
      List<UserEntity> list = jdbcTemplate.query(userSQLQuery, new String[] { username },
         (ResultSet rs, int rowNum) -> {

         UserEntity user = new UserEntity();
         user.setUsername(username);
         user.setPassword(rs.getString("PASSWORD"));
         return user;
      });
      if (list.size() > 0) {
         GrantedAuthority grantedAuthority = new SimpleGrantedAuthority("ROLE_SYSTEMADMIN");
         grantedAuthoritiesList.add(grantedAuthority);
         list.get(0).setGrantedAuthoritiesList(grantedAuthoritiesList);
         return list.get(0);
      }
      return null;
   }
}
Możesz utworzyć klasę usługi szczegółów użytkownika niestandardowego, która rozszerza klasę org.springframework.security.core.userdetails.UserDetailsService, aby wywołać klasę repozytorium DAO, jak pokazano.
package com.tutorialspoint.websecurityapp;

import org.springframework.beans.factory.annotation.Autowired;
import org.springframework.security.core.userdetails.UserDetailsService;
import org.springframework.security.core.userdetails.UsernameNotFoundException;
import org.springframework.stereotype.Service;

@Service
public class CustomDetailsService implements UserDetailsService {
   @Autowired
   OAuthDao oauthDao;

   @Override
   public CustomUser loadUserByUsername(final String username) throws UsernameNotFoundException {
      UserEntity userEntity = null;
      try {
         userEntity = oauthDao.getUserDetails(username);
         CustomUser customUser = new CustomUser(userEntity);
         return customUser;
      } catch (Exception e) {
         e.printStackTrace();
         throw new UsernameNotFoundException("User " + username + " was not found in the database");
      }
   }
}
Następnie utwórz klasę @configuration, aby włączyć zabezpieczenia sieci Web, zdefiniuj koder hasła (BCryptPasswordEncoder) i zdefiniuj komponent bean AuthenticationManager. Klasa konfiguracji zabezpieczeń powinna rozszerzać klasę WebSecurityConfigurerAdapter.
package com.tutorialspoint.websecurityapp;

import org.springframework.beans.factory.annotation.Autowired;
import org.springframework.context.annotation.Bean;
import org.springframework.context.annotation.Configuration;

import org.springframework.security.authentication.AuthenticationManager;
import org.springframework.security.config.annotation.authentication.builders.AuthenticationManagerBuilder;
import org.springframework.security.config.annotation.method.configuration.EnableGlobalMethodSecurity;
import org.springframework.security.config.annotation.web.builders.HttpSecurity;
import org.springframework.security.config.annotation.web.builders.WebSecurity;
import org.springframework.security.config.annotation.web.configuration.EnableWebSecurity;
import org.springframework.security.config.annotation.web.configuration.WebSecurityConfigurerAdapter;
import org.springframework.security.config.http.SessionCreationPolicy;
import org.springframework.security.crypto.bcrypt.BCryptPasswordEncoder;
import org.springframework.security.crypto.password.PasswordEncoder;

@Configuration
@EnableWebSecurity
@EnableGlobalMethodSecurity(prePostEnabled = true)
public class SecurityConfiguration extends WebSecurityConfigurerAdapter {
   @Autowired
   private CustomDetailsService customDetailsService;

   @Bean
   public PasswordEncoder encoder() {
      return new BCryptPasswordEncoder();
   }
   @Override
   @Autowired
   protected void configure(AuthenticationManagerBuilder auth) throws Exception {
      auth.userDetailsService(customDetailsService).passwordEncoder(encoder());
   }
   @Override
   protected void configure(HttpSecurity http) throws Exception {
      http.authorizeRequests().anyRequest().authenticated().and().sessionManagement()
         .sessionCreationPolicy(SessionCreationPolicy.NEVER);
   }
   @Override
   public void configure(WebSecurity web) throws Exception {
      web.ignoring();
   }
   @Override
   @Bean
   public AuthenticationManager authenticationManagerBean() throws Exception {
      return super.authenticationManagerBean();
   }
}
Teraz zdefiniuj klasę konfiguracji OAuth2, aby dodać identyfikator klienta, klucz tajny klienta, zdefiniuj JwtAccessTokenConverter, klucz prywatny i klucz publiczny dla klucza osoby podpisującej token i klucza weryfikatora, a następnie skonfiguruj ClientDetailsServiceConfigurer pod kątem ważności tokenu z zakresami.
package com.tutorialspoint.websecurityapp;

import org.springframework.beans.factory.annotation.Autowired;
import org.springframework.beans.factory.annotation.Qualifier;
import org.springframework.context.annotation.Bean;
import org.springframework.context.annotation.Configuration;

import org.springframework.security.authentication.AuthenticationManager;
import org.springframework.security.oauth2.config.annotation.configurers.ClientDetailsServiceConfigurer;
import org.springframework.security.oauth2.config.annotation.web.configuration.AuthorizationServerConfigurerAdapter;
import org.springframework.security.oauth2.config.annotation.web.configurers.AuthorizationServerEndpointsConfigurer;
import org.springframework.security.oauth2.config.annotation.web.configurers.AuthorizationServerSecurityConfigurer;
import org.springframework.security.oauth2.provider.token.store.JwtAccessTokenConverter;
import org.springframework.security.oauth2.provider.token.store.JwtTokenStore;

@Configuration
public class OAuth2Config extends AuthorizationServerConfigurerAdapter {
   private String clientid = "tutorialspoint";
   private String clientSecret = "my-secret-key";
   private String privateKey = "private key";
   private String publicKey = "public key";

   @Autowired
   @Qualifier("authenticationManagerBean")
   private AuthenticationManager authenticationManager;

   @Bean
   public JwtAccessTokenConverter tokenEnhancer() {
      JwtAccessTokenConverter converter = new JwtAccessTokenConverter();
      converter.setSigningKey(privateKey);
      converter.setVerifierKey(publicKey);
      return converter;
   }
   @Bean
   public JwtTokenStore tokenStore() {
      return new JwtTokenStore(tokenEnhancer());
   }
   @Override
   public void configure(AuthorizationServerEndpointsConfigurer endpoints) throws Exception {
      endpoints.authenticationManager(authenticationManager).tokenStore(tokenStore())
      .accessTokenConverter(tokenEnhancer());
   }
   @Override
   public void configure(AuthorizationServerSecurityConfigurer security) throws Exception {
      security.tokenKeyAccess("permitAll()").checkTokenAccess("isAuthenticated()");
   }
   @Override
   public void configure(ClientDetailsServiceConfigurer clients) throws Exception {
      clients.inMemory().withClient(clientid).secret(clientSecret).scopes("read", "write")
         .authorizedGrantTypes("password", "refresh_token").accessTokenValiditySeconds(20000)
         .refreshTokenValiditySeconds(20000);

   }
}
Teraz utwórz klucz prywatny i klucz publiczny za pomocą openssl.
Możesz użyć następujących poleceń do wygenerowania klucza prywatnego.
openssl genrsa -out jwt.pem 2048
openssl rsa -in jwt.pem
Możesz użyć Do generowania klucza publicznego użyj poniższych poleceń.
openssl rsa -in jwt.pem -puboutW przypadku wersji Spring Boot późniejszej niż 1.5 dodaj poniższą właściwość w pliku application.properties, aby zdefiniować kolejność filtrów zasobów OAuth2.
security.oauth2.resource.filter-order=3Użytkownicy plików YAML mogą dodać poniższą właściwość w pliku YAML.
security:
   oauth2:
      resource:
         filter-order: 3
Teraz utwórz plik schema.sql i data.sql w zasobach classpath src/main/resources/directory aby połączyć aplikację z bazą danych H2.
Plik schema.sql jest taki, jak pokazano -
CREATE TABLE USERS (ID INT PRIMARY KEY, USERNAME VARCHAR(45), PASSWORD VARCHAR(60));Plik data.sql jest taki, jak pokazano -
INSERT INTO USERS (ID, USERNAME,PASSWORD) VALUES (
   1, '[email protected]','$2a$08$fL7u5xcvsZl78su29x1ti.dxI.9rYO8t0q5wk2ROJ.1cdR53bmaVG');

INSERT INTO USERS (ID, USERNAME,PASSWORD) VALUES (
   2, '[email protected]','$2a$08$fL7u5xcvsZl78su29x1ti.dxI.9rYO8t0q5wk2ROJ.1cdR53bmaVG');
Note - Hasło powinno być przechowywane w tabeli bazy danych w formacie Bcrypt Encoder.
Możesz utworzyć wykonywalny plik JAR i uruchomić aplikację Spring Boot za pomocą następujących poleceń Maven lub Gradle.
W przypadku Mavena możesz użyć polecenia podanego poniżej -
mvn clean installPo „BUILD SUCCESS” można znaleźć plik JAR w katalogu docelowym.
W przypadku Gradle możesz użyć polecenia, jak pokazano -
gradle clean buildPo komunikacie „BUILD SUCCESSFUL” można znaleźć plik JAR w katalogu build / libs.
Teraz uruchom plik JAR za pomocą polecenia pokazanego tutaj -
java –jar <JARFILE>Aplikacja jest uruchamiana na porcie Tomcat 8080.

Teraz naciśnij adres URL metody POST za pośrednictwem POSTMAN, aby uzyskać token OAUTH2.
http://localhost:8080/oauth/token
Teraz dodaj nagłówki żądań w następujący sposób -
Authorization - Uwierzytelnianie podstawowe za pomocą identyfikatora klienta i tajnego klucza klienta.
Content Type - application / x-www-form-urlencoded

Teraz dodaj parametry żądania w następujący sposób -
- grant_type = hasło
- nazwa użytkownika = twoja nazwa użytkownika
- hasło = twoje hasło
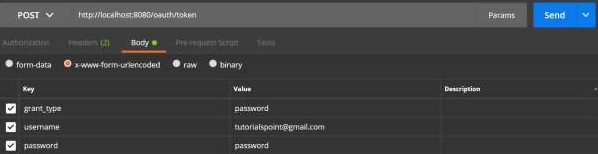
Teraz naciśnij API i uzyskaj access_token, jak pokazano -

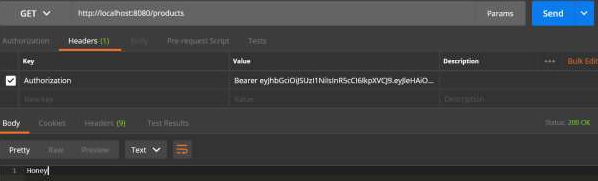
Teraz naciśnij interfejs API serwera zasobów z tokenem dostępu okaziciela w nagłówku żądania, jak pokazano.
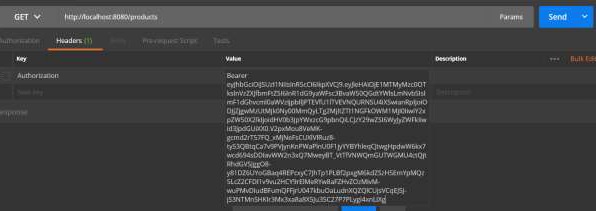
Następnie możesz zobaczyć dane wyjściowe, jak pokazano poniżej -