Мобильный интерфейс Angular - мое первое приложение
В этой главе мы создадим наше первое приложение, которое будет работать как на мобильных устройствах, так и на компьютерах.
Настройка проекта, которую мы создали в предыдущей главе, имеет следующую структуру:
uiformobile/
   node_modules/
   src/
   package.json
   index.html
Следуйте инструкциям по созданию простого пользовательского интерфейса с помощью Mobile Angular UI.
Шаг 1
Добавьте следующие файлы css в раздел заголовка html, как показано ниже -
<!-- Required for desktop -->
<link rel="stylesheet" href="/node_modules/mobile-angular-ui/dist/css/mobile-angular-ui-hover.min.css" />

<!-- Mandatory CSS -->
<link rel="stylesheet" href="/node_modules/mobile-angular-ui/dist/css/mobile-angular-ui-base.min.css" />

<!-- Required for desktop -->
<link rel="stylesheet" href="/node_modules/mobile-angular-ui/dist/css/mobile-angular-ui-desktop.min.css" />
Затем добавьте файлы js -
<script src="/node_modules/angular/angular.min.js"></script>
<script src="/node_modules/angular-route/angular-route.min.js"></script>
<script src="/node_modules/mobile-angular-ui/dist/js/mobile-angular-ui.min.js"></script>
Файл index.html будет выглядеть следующим образом -
<!DOCTYPE html>
<html>
   <head>
      <meta charset="utf-8">
      <title>My App</title>
      <!-- Required for desktop -->
      <link rel="stylesheet" href="/node_modules/mobile-angular-ui/dist/css/mobile-angular-ui-hover.min.css" />

      <!-- Mandatory CSS -->
      <link rel="stylesheet" href="/node_modules/mobile-angular-ui/dist/css/mobile-angular-ui-base.min.css" />

      <!-- Required for desktop -->
      <link rel="stylesheet" href="/node_modules/mobile-angular-ui/dist/css/mobile-angular-ui-desktop.min.css" />
      <script src="/node_modules/angular/angular.min.js"></script>
      <script src="/node_modules/angular-route/angular-route.min.js"></script>
      <script src="/node_modules/mobile-angular-ui/dist/js/mobile-angular-ui.min.js"></script>
   </head>
   <body>
   </body>
</html>
Шаг 2
Мы увидим базовый макет мобильного пользовательского интерфейса angular, как показано ниже -
<body ng-app="myFirstApp">

   <!-- Sidebars -->
   <div class="sidebar sidebar-left"><!-- ... --></div>
   <div class="sidebar sidebar-right"><!-- ... --></div>

   <div class="app">
   <div class="navbar navbar-app navbar-absolute-top"><!-- Top Navbar --></div>
   <div class="navbar navbar-app navbar-absolute-bottom"><!-- Bottom Navbar --></div>

      <!-- App body -->
         <div class='app-body'>
            <div class='app-content'>
               <ng-view></ng-view>
            </div>
         </div>
      </div><!-- ~ .app -->

   <!-- Modals and Overlays -->
   <div ui-yield-to="modals"></div>

</body>
Шаг 3
Создать js/ folder in src/ и добавить app.js к нему.
Определите модуль и добавьте Mobile angular UI и Angular Route в качестве зависимости, как показано ниже -
<script type="text/javascript">
   'ngRoute',
      angular.module('myFirstApp', [
      'mobile-angular-ui'
   ]);
</script>
Добавьте ng-app = ”myFirstApp” в тег <body> -
<body ng-app="myFirstApp">Модуль mobile-angular-ui имеет следующий список модулей:
angular.module('mobile-angular-ui', [
   'mobile-angular-ui.core.activeLinks',      /* adds .active class to current links */
   'mobile-angular-ui.core.fastclick',        /* polyfills overflow: auto */
   'mobile-angular-ui.core.sharedState',      /* SharedState service and directives */
   'mobile-angular-ui.core.outerClick',       /* outerClick directives */
   'mobile-angular-ui.components.modals',     /* modals and overlays */
   'mobile-angular-ui.components.switch',     /* switch form input */
   'mobile-angular-ui.components.sidebars',   /* sidebars */
   'mobile-angular-ui.components.scrollable', /* uiScrollable directives */
   'mobile-angular-ui.components.capture',    /* uiYieldTo and uiContentFor directives */
   'mobile-angular-ui.components.navbars'     /* navbars */
]);
Mobile-angular-ui.min.js содержит все вышеперечисленные модули ядра и компонентов. Вы также можете загрузить необходимые компоненты в соответствии с вашими требованиями вместо загрузки всего mobile-angular-ui.min.js.
Шаг 4
Добавьте контроллер к тегу вашего тела, как показано ниже -
<body ng-app="myFirstApp" ng-controller="MainController">Шаг 5
В базовый макет мы добавили <ng-view></ng-view>, который загрузит для нас просмотры.
Давайте определим маршруты в app.js с помощью ngRoute. Файлы, необходимые для маршрутизации, уже добавлены в раздел head.
Создайте папку home / в src /. Добавьте к нему home.html со следующими деталями -
<div class="list-group text-center">
   <div class="list-group-item list-group-item-home">
      <h1>{{msg}}</h1>
   </div>
</div>
Теперь, когда мы запускаем приложение, по умолчанию мы хотим, чтобы home.html отображался внутри <ng-view> </ng-view>.
Маршрутизация настраивается внутри app.config (), как показано ниже -
app.config(function($routeProvider, $locationProvider) {
   $routeProvider
   .when("/", {
      templateUrl : "src/home/home.html"
   });
   $locationProvider.html5Mode({enabled:true, requireBase:false});
});
Шаг 6
Мы добавили {{msg}} в home.html, как показано ниже -
<div class="list-group text-center">
   <div class="list-group-item list-group-item-home">
      <h1>{{msg}}</h1>
   </div>
</div>
Давайте определим то же самое в контроллере, как показано ниже -
app.controller('MainController', function($rootScope, $scope, $routeParams) {
   $scope.msg="Welcome to Tutorialspoint!"
});
Шаг 7
Теперь запустите команду, чтобы запустить приложение, используя следующую команду -
node server.js
Шаг 8
Загрузите свое приложение на http://localhost:3000 в браузере -
В мобильном режиме вы увидите следующий экран -

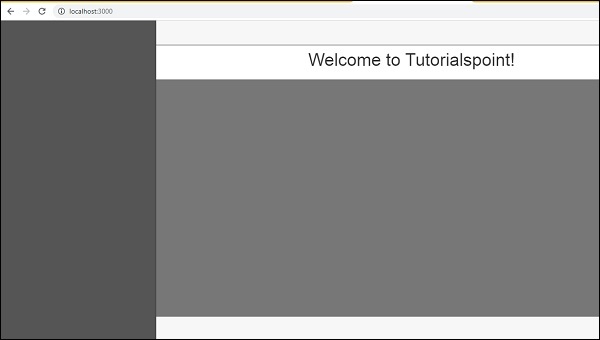
В режиме рабочего стола вы увидите следующий экран -

Давайте разберемся с деталями каждого компонента Mobile Angular UI в следующих главах.
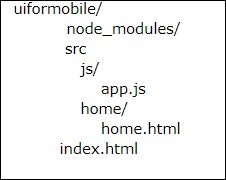
Вот окончательный код для показанного выше дисплея. Структура папок пока выглядит следующим образом -

index.html
<!DOCTYPE html>
<html>
   <head>
      <meta charset="utf-8" />
      <title>Mobile Angular UI Demo</title>
      <meta http-equiv="X-UA-Compatible" content="IE=edge,chrome=1" />
      <meta name="apple-mobile-web-app-capable" content="yes" />
      <meta name="viewport" content="user-scalable=no, initial-scale=1.0, maximum-scale=1.0, minimal-ui" />

      <meta name="apple-mobile-web-app-status-bar-style" content="yes" />
      <link rel="shortcut icon" href="/assets/img/favicon.png" type="image/x-icon" />
      <link rel="stylesheet" href="node_modules/mobile-angular-ui/dist/css/mobile-angular-ui-hover.min.css" />
      <link rel="stylesheet" href="node_modules/mobile-angular-ui/dist/css/mobile-angular-ui-base.min.css" />
      <link rel="stylesheet" href="node_modules/mobile-angular-ui/dist/css/mobile-angular-ui-desktop.min.css" />
      <script src="node_modules/angular/angular.min.js"></script>
      <script src="node_modules/angular-route/angular-route.min.js"></script>
      <script src="node_modules/mobile-angular-ui/dist/js/mobile-angular-ui.min.js"></script>
      <script src="src/js/app.js"></script>
   </head>

   <body ng-app="myFirstApp" ng-controller="MainController">

      <!-- Sidebars -->
      <div class="sidebar sidebar-left"><!-- ... --></div>
      <div class="sidebar sidebar-right"><!-- ... --></div>

      <div class="app">
         <div class="navbar navbar-app navbar-absolute-top"><!-- Top Navbar --></div>
         <div class="navbar navbar-app navbar-absolute-bottom"><!-- Bottom Navbar --></div>

         <!-- App body -->

         <div class='app-body'>
            <div class='app-content'>
               <ng-view></ng-view>
            </div>
         </div>
      </div><!-- ~ .app -->

      <!-- Modals and Overlays -->
      <div ui-yield-to="modals"></div>
   </body>

</html>
js/app.js
/* eslint no-alert: 0 */

'use strict';
//
// Here is how to define your module
// has dependent on mobile-angular-ui
//
var app=angular.module('myFirstApp', [
   'ngRoute',
   'mobile-angular-ui'
]);
app.config(function($routeProvider, $locationProvider) {
   $routeProvider
   .when("/", {
      templateUrl : "src/home/home.html"
   });
   $locationProvider.html5Mode({enabled:true, requireBase:false});
});
app.controller('MainController', function($rootScope, $scope, $routeParams) {
   $scope.msg="Welcome to Tutorialspoint!"
});
home/home.html
<div class="list-group text-center">
   <div class="list-group-item list-group-item-home">
      <h1>{{msg}}</h1>
   </div>
</div>