Flex - สไตล์ด้วย CSS
Flex สนับสนุนการใช้ไวยากรณ์ CSS และสไตล์เพื่อนำไปใช้กับการควบคุม UI ในลักษณะเดียวกับ CSS กับส่วนประกอบ HTML
วิธี # 1: การใช้ไฟล์สไตล์ชีตภายนอก
คุณสามารถอ้างถึงสไตล์ชีตที่มีอยู่ในเส้นทางคลาสของแอปพลิเคชัน ตัวอย่างเช่นพิจารณาไฟล์ Style.css ในcom/tutorialspoint/client folder โดยที่ไฟล์ HelloWorld.mxml อยู่ด้วย
/* CSS file */
@namespace s "library://ns.adobe.com/flex/spark";
@namespace mx "library://ns.adobe.com/flex/mx";
...
.container {
   cornerRadius :10;
   horizontalCenter :0;
   borderColor: #777777;
   verticalCenter:0;
   backgroundColor: #efefef;
}
จากนั้นสามารถอ้างอิงไฟล์ css ได้โดยทำตามข้อมูลโค้ด
<fx:Style source = "/com/tutorialspoint/client/Style.css" />กำหนดสไตล์ให้กับคอมโพเนนต์ UI โดยใช้คุณสมบัติ styleName
<s:BorderContainer width = "500" height = "500" id = "mainContainer"
   styleName = "container">
   ...
</s:BorderContainer>
วิธีที่ 2: การใช้สไตล์ภายในส่วนประกอบคอนเทนเนอร์ Ui
คุณสามารถกำหนดสไตล์ภายในคอมโพเนนต์คอนเทนเนอร์ UI โดยใช้แท็ก <fx: Style>
ตัวเลือกระดับชั้น
<fx:Style>
   @namespace s "library://ns.adobe.com/flex/spark";
   @namespace mx "library://ns.adobe.com/flex/mx";

   /* class level selector  */
   .errorLabel {
      color: red;
   }
</fx:Style>
กำหนดสไตล์ให้กับคอมโพเนนต์ UI โดยใช้คุณสมบัติ styleName
<s:Label id = "errorMsg" text = "This is an error message" styleName = "errorLabel" />ตัวเลือกระดับรหัส
องค์ประกอบ UI สไตล์โดยใช้ตัวเลือกรหัส
<fx:Style>
   /* id level selector  */
   #msgLabel {
      color: gray;
   }
</fx:Style>

<s:Label id = "msgLabel" text = "This is a normal message" />
พิมพ์ตัวเลือกระดับ
จัดรูปแบบขององค์ประกอบ UI ประเภทหนึ่งใน GO เดียว
<fx:Style>
   /* style applied on all buttons  */
   s|Button {
      fontSize: 15;
      color: #9933FF;
   }
</fx:Style>

<s:Button label = "Click Me!" id = "btnClickMe"
   click = "btnClickMe_clickHandler(event)" />
Flex Style กับ CSS ตัวอย่าง
ให้เราทำตามขั้นตอนเพื่อตรวจสอบรูปแบบ CSS ของแอปพลิเคชัน Flex โดยสร้างแอปพลิเคชันทดสอบ -
| ขั้นตอน | คำอธิบาย |
|---|---|
| 1 | สร้างโครงการที่มี HelloWorld ชื่อภายใต้แพคเกจcom.tutorialspoint.clientตามที่อธิบายไว้ในFlex - สร้างแอพลิเคชันบท |
| 2 | ปรับเปลี่ยนStyle.css, HelloWorld.mxmlตามที่อธิบายด้านล่าง เก็บไฟล์ที่เหลือไว้ไม่เปลี่ยนแปลง |
| 3 | คอมไพล์และเรียกใช้แอปพลิเคชันเพื่อให้แน่ใจว่าตรรกะทางธุรกิจทำงานได้ตามข้อกำหนด |
ต่อไปนี้เป็นเนื้อหาของไฟล์ CSS ที่แก้ไข src/com.tutorialspoint/Style.css.
/* CSS file */
@namespace s "library://ns.adobe.com/flex/spark";
@namespace mx "library://ns.adobe.com/flex/mx";

.heading
{
   fontFamily: Arial, Helvetica, sans-serif;
   fontSize: 17px;
   color: #9b1204;
   textDecoration:none;
   fontWeight:normal;
}

.button {
   fontWeight: bold;
}

.container {
   cornerRadius :10;
   horizontalCenter :0;
   borderColor: #777777;
   verticalCenter:0;
   backgroundColor: #efefef;
}
ต่อไปนี้เป็นเนื้อหาของไฟล์ mxml ที่แก้ไข src/com.tutorialspoint/HelloWorld.mxml.
<?xml version = "1.0" encoding = "utf-8"?>
<s:Application xmlns:fx = "http://ns.adobe.com/mxml/2009"
   xmlns:s = "library://ns.adobe.com/flex/spark"
   xmlns:mx = "library://ns.adobe.com/flex/mx"
   width = "100%" height = "100%" minWidth = "500" minHeight = "500"
   initialize = "application_initializeHandler(event)">

   <!--Add reference to style sheet -->
   <fx:Style source = "/com/tutorialspoint/client/Style.css" />

   <!--Using styles within mxml file -->
   <fx:Style>
      @namespace s "library://ns.adobe.com/flex/spark";
      @namespace mx "library://ns.adobe.com/flex/mx";

      /* class level selector  */
      .errorLabel {
         color: red;
      }

      /* id level selector  */
      #msgLabel {
         color: gray;
      }

      /* style applied on all buttons  */
      s|Button {
         fontSize: 15;
         color: #9933FF;
      }
   </fx:Style>

   <fx:Script>
      <![CDATA[
         import mx.controls.Alert;
         import mx.events.FlexEvent;
         protected function btnClickMe_clickHandler(event:MouseEvent):void {
            Alert.show("Hello World!");
         }

         protected function application_initializeHandler(event:FlexEvent):void {
            lblHeader.text = "CSS Demonstrating Application";
         }
      ]]>
   </fx:Script>

   <s:BorderContainer width = "560" height = "500" id = "mainContainer"
      styleName = "container">
      <s:VGroup width = "100%" height = "100%" gap = "50"
         horizontalAlign = "center" verticalAlign = "middle">
         <s:Label width = "100%" id = "lblHeader" fontSize = "40"
            color = "0x777777" styleName = "heading" />
         <s:Button label = "Click Me!" id = "btnClickMe"
            click = "btnClickMe_clickHandler(event)"  />
         <s:Label id = "errorMsg"
            text = "This is an error message" styleName = "errorLabel" />
         <s:Label id = "msgLabel" text = "This is a normal message" />
      </s:VGroup>
   </s:BorderContainer>
</s:Application>
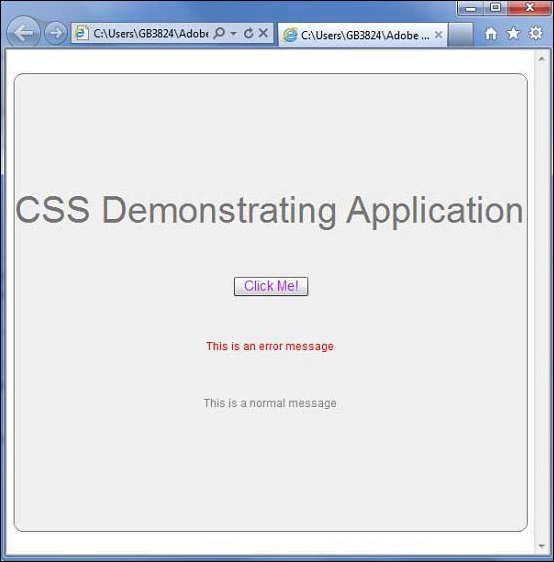
เมื่อคุณพร้อมกับการเปลี่ยนแปลงทั้งหมดแล้วให้เรารวบรวมและเรียกใช้แอปพลิเคชันในโหมดปกติเหมือนที่เราทำในบทFlex - Create Application หากทุกอย่างเรียบร้อยกับแอปพลิเคชันของคุณสิ่งนี้จะให้ผลลัพธ์ดังต่อไปนี้: [ ลองออนไลน์ ]
