RichFaces - ส่วนประกอบของเมนู
RichFaces มีแท็กหลายเวอร์ชันเพื่อใช้ในการสร้างมาร์กอัปประเภทเมนู ในบทนี้เราจะเรียนรู้คุณสมบัติใหม่ ๆ พร้อมกับคุณสมบัติเก่าที่ใช้ซึ่งเราสามารถแสดงเมนูในเบราว์เซอร์ได้อย่างง่ายดาย
<rich: dropDownMenu>
นักพัฒนาสามารถใช้แท็กนี้เพื่อสร้างเมนูแบบเลื่อนลง แท็กนี้มีประโยชน์สำหรับการสร้างส่วนหัวของเว็บไซต์ ในตัวอย่างต่อไปนี้เราจะเรียนรู้วิธีใช้แท็กนี้ในชีวิตจริง สร้างไฟล์หนึ่งไฟล์และตั้งชื่อว่า "DropDownList.xhtml" วางรหัสต่อไปนี้ไว้ด้านใน
<?xml version = "1.0" encoding = "UTF-8"?>
<!DOCTYPE html>
<html xmlns = "http://www.w3.org/1999/xhtml"
   xmlns:h = "http://java.sun.com/jsf/html"
   xmlns:f = "http://java.sun.com/jsf/core"
   xmlns:ui = "http://java.sun.com/jsf/facelets"
   xmlns:a4j = "http://richfaces.org/a4j"
   xmlns:rich = "http://richfaces.org/rich">

   <h:head></h:head>

   <h:body>
      <h:form>
         <rich:toolbar>
            <rich:dropDownMenu>
               <f:facet name = "label">
                  <h:outputText value = "File" />
               </f:facet>

               <rich:menuItem label = "New" />
               <rich:menuItem label = "Open File..." />
               <rich:menuItem label = "Close" />
               <rich:menuItem label = "Close All" />
            </rich:dropDownMenu>
         </rich:toolbar>
      </h:form>
   </h:body>

</html>
ในตัวอย่างข้างต้นเรากำลังสร้างแถบเครื่องมือหนึ่งแถบและภายในแถบเครื่องมือนั้นเรากำลังสร้างเมนูแบบเลื่อนลงหนึ่งเมนู สามารถสร้างเมนูแบบเลื่อนลงจำนวนเท่าใดก็ได้ หากคุณต้องการแทรกฟังก์ชัน JS ที่อิงตามการดำเนินการคุณสามารถใช้สิ่งนั้นภายในแท็ก <menuItem> โดยมีแอตทริบิวต์เป็น "action" โค้ดด้านบนจะสร้างผลลัพธ์ต่อไปนี้ในเบราว์เซอร์

<rich: contextMenu>
แท็กนี้มีประโยชน์ในการสร้างรายการแบบเลื่อนลงตามเหตุการณ์ในฝั่งไคลเอ็นต์ มันจะไม่ทำงานโดยอัตโนมัติ ผู้ใช้ต้องสร้างเหตุการณ์ JS จากนั้นจึงทำงานตามนั้น ในตัวอย่างต่อไปนี้เราจะสร้างอิมเมจการเรนเดอร์จากนั้นสร้างเหตุการณ์ JS ตามการตอบสนองของผู้ใช้ ต่อไปนี้คือไฟล์ xhtml
<?xml version = "1.0" encoding = "UTF-8"?>
<!DOCTYPE html>
<html xmlns = "http://www.w3.org/1999/xhtml"
   xmlns:h = "http://java.sun.com/jsf/html"
   xmlns:f = "http://java.sun.com/jsf/core"
   xmlns:ui = "http://java.sun.com/jsf/facelets"
   xmlns:a4j = "http://richfaces.org/a4j"
   xmlns:rich = "http://richfaces.org/rich">

   <h:head>
      <title>ContextMenu Example</title>
   </h:head>

   <h:body>
      <h:form id = "form">
         <h:outputScript>
            //<![CDATA[
               function resize(pic, coeff) {
                  var w  =  Math.round(pic.width * coeff);
                  var h  =  Math.round(pic.height * coeff);

                  if (w > 1 && h > 1 && h<1000 && w<1000) {
                     pic.width  =  w;
                     pic.heigth  =  h;
                  }
               }
               function enlarge(element){
                  resize(element, 1.1);
               }
               function decrease(element){
                  resize(element, 0.9);
               }
            //]]>
         </h:outputScript>
         <h:graphicImage value = "http://www.tutorialspoint.com/images/jsf-minilogo.png"
            id = "pic" style = "border : 5px solid #E4EAEF"/>

         <rich:contextMenu target = "pic" mode = "client" showEvent = "click">
            <rich:menuItem label = "Zoom In" onclick =
               "enlarge(#{rich:element('pic')});" id = "zin"/>
            <rich:menuItem label = "Zoom Out"
               onclick = "decrease(#{rich:element('pic')});" id = "zout"/>

        </rich:contextMenu>
      </h:form>
   </h:body>

</html>
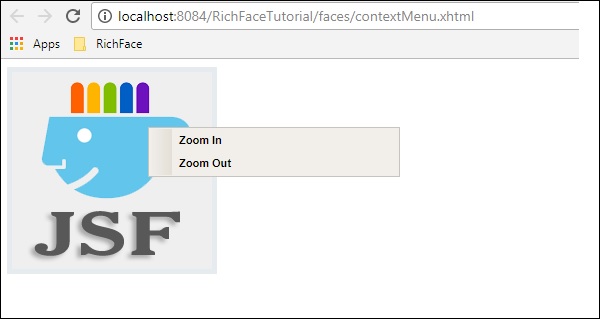
เรียกใช้ตัวอย่างด้านบนและเลือกภาพที่แสดงผล ตัวเลือกต่อไปนี้ "ซูมเข้า" และ "ย่อ" จะถูกนำเสนอ คลิกตัวเลือกที่เหมาะสมจากนั้นฟังก์ชันที่จำเป็นจะถูกนำไปใช้กับรูปภาพ โค้ดด้านบนจะสร้างผลลัพธ์ต่อไปนี้ในเบราว์เซอร์

<rich: Component Control>
ส่วนประกอบนี้ใช้งานง่ายเมื่อใดก็ตามที่เราต้องการเรียกใช้ฟังก์ชันอื่น ๆ จากสภาพแวดล้อม RichFaces แท็กนี้ใช้เพื่อเรียกคลาสการดำเนินการที่ใช้ JavaScript ตัวอย่างต่อไปนี้สาธิตวิธีใช้แท็กนี้ สร้างไฟล์และตั้งชื่อเป็นไฟล์“ componentContent.xhtml” วางโค้ดต่อไปนี้ไว้
<?xml version = "1.0" encoding = "UTF-8"?>
<!--
   To change this license header, choose License Headers in Project Properties.
   To change this template file, choose Tools | Templates
   and open the template in the editor.
-->
<!DOCTYPE html>
<html xmlns = "http://www.w3.org/1999/xhtml"
   xmlns:h = "http://java.sun.com/jsf/html"
   xmlns:f = "http://java.sun.com/jsf/core"
   xmlns:ui = "http://java.sun.com/jsf/facelets"
   xmlns:a4j = "http://richfaces.org/a4j"
   xmlns:rich = "http://richfaces.org/rich">

   <h:head>
      <title>Component Control Example</title>
      <meta name = "viewport" content = "width = device-width, initial-scale = 1.0"/>
   </h:head>

   <h:body>
      <h:commandButton value = "Call the popup">
         <rich:componentControl target = "popup" operation = "show" />
      </h:commandButton>
      <rich:popupPanel id = "popup" modal = "false" autosized = "true" resizeable = "false">
         <f:facet name = "header">
            <h:outputText value = "Welcome mesage" />
         </f:facet>

         <f:facet name = "controls">
            <h:outputLink value = "#"
               onclick = "#{rich:component('popup')}.hide(); return false;"
               style = "color: inherit">

               X
            </h:outputLink>
         </f:facet>
         <p>Welcome to RICH FACE tutorial at tutorialspoint.com</p>
      </rich:popupPanel>
   </h:body>

</html>
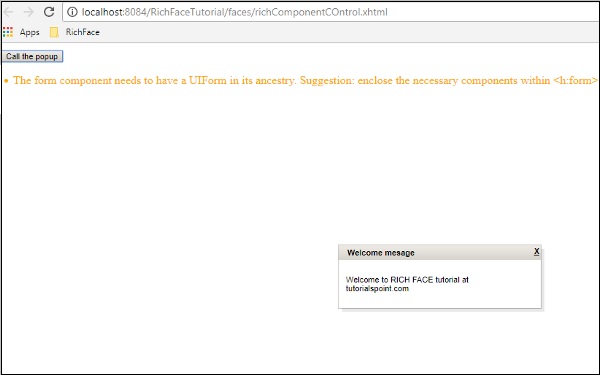
ในโค้ดด้านบนเราเรียกใช้ฟังก์ชัน“ onclick ()” โดยใช้ id“ popup” เมื่อเราเรียกใช้มันจะแสดงปุ่มที่มี "เรียกป๊อปอัป" เมื่อเราคลิกปุ่ม RichFaces จะเรียกใช้ฟังก์ชัน JS เป็นการภายในและแสดงผลลัพธ์ต่อไปนี้ในเบราว์เซอร์
