การใช้บริการเว็บ RESTful
บทนี้จะกล่าวถึงรายละเอียดเกี่ยวกับการใช้งาน RESTful Web Services โดยใช้ jQuery AJAX
สร้างเว็บแอ็พพลิเคชัน Spring Boot อย่างง่ายและเขียนไฟล์คลาสคอนโทรลเลอร์ซึ่งใช้ในการเปลี่ยนเส้นทางไปยังไฟล์ HTML เพื่อใช้บริการเว็บ RESTful
เราจำเป็นต้องเพิ่ม Thymeleaf เริ่มต้น Spring Boot และการพึ่งพาเว็บในไฟล์คอนฟิกูเรชันบิลด์ของเรา
สำหรับผู้ใช้ Maven ให้เพิ่มการอ้างอิงด้านล่างในไฟล์ pom.xml ของคุณ
<dependency>
   <groupId>org.springframework.boot</groupId>
   <artifactId>spring-boot-starter-thymeleaf</artifactId>
</dependency>

<dependency>
   <groupId>org.springframework.boot</groupId>
   <artifactId>spring-boot-starter-web</artifactId>
</dependency>
สำหรับผู้ใช้ Gradle ให้เพิ่มการอ้างอิงด้านล่างลงในไฟล์ build.gradle ของคุณ -
compile group: ‘org.springframework.boot’, name: ‘spring-boot-starter-thymeleaf’
compile(‘org.springframework.boot:spring-boot-starter-web’)
รหัสสำหรับไฟล์คลาส @Controller ได้รับด้านล่าง -
@Controller
public class ViewController {
}
คุณสามารถกำหนดเมธอด Request URI เพื่อเปลี่ยนเส้นทางไปยังไฟล์ HTML ดังที่แสดงด้านล่าง -
@RequestMapping(“/view-products”)
public String viewProducts() {
   return “view-products”;
}
@RequestMapping(“/add-products”)
public String addProducts() {
   return “add-products”;
}
API นี้ http://localhost:9090/products ควรส่งคืน JSON ด้านล่างตามที่แสดงด้านล่าง -
[
   {
      "id": "1",
      "name": "Honey"
   },
   {
      "id": "2",
      "name": "Almond"
   }
]
ตอนนี้สร้างไฟล์ view-products.html ภายใต้ไดเร็กทอรี template ใน classpath
ในไฟล์ HTML เราได้เพิ่มไลบรารี jQuery และเขียนโค้ดเพื่อใช้บริการเว็บ RESTful ในการโหลดหน้าเว็บ
<script src = "https://ajax.googleapis.com/ajax/libs/jquery/3.2.1/jquery.min.js"></script>

<script>
$(document).ready(function(){
   $.getJSON("http://localhost:9090/products", function(result){
      $.each(result, function(key,value) {
         $("#productsJson").append(value.id+" "+value.name+" ");
      });
   });
});
</script>
วิธีการ POST และ URL นี้ http://localhost:9090/products ควรมีเนื้อหาการร้องขอและเนื้อหาการตอบสนองด้านล่าง
รหัสสำหรับเนื้อหาการร้องขอมีให้ด้านล่าง -
{
   "id":"3",
   "name":"Ginger"
}
โค้ดสำหรับ Response body แสดงไว้ด้านล่าง -
Product is created successfullyตอนนี้สร้างไฟล์ add-products.html ภายใต้ไดเร็กทอรี template ใน classpath
ในไฟล์ HTML เราได้เพิ่มไลบรารี jQuery และเขียนโค้ดที่ส่งแบบฟอร์มไปยังบริการเว็บ RESTful เมื่อคลิกที่ปุ่ม
<script src = "https://ajax.googleapis.com/ajax/libs/jquery/3.2.1/jquery.min.js"></script>
<script>
   $(document).ready(function() {
      $("button").click(function() {
         var productmodel = {
            id : "3",
            name : "Ginger"
         };
         var requestJSON = JSON.stringify(productmodel);
         $.ajax({
            type : "POST",
            url : "http://localhost:9090/products",
            headers : {
               "Content-Type" : "application/json"
            },
            data : requestJSON,
            success : function(data) {
               alert(data);
            },
            error : function(data) {
            }
         });
      });
   });
</script>
รหัสที่สมบูรณ์จะได้รับด้านล่าง
Maven - ไฟล์ pom.xml
<?xml version = "1.0" encoding = "UTF-8"?>
<project xmlns = "http://maven.apache.org/POM/4.0.0"
   xmlns:xsi = "http://www.w3.org/2001/XMLSchema-instance"
   xsi:schemaLocation = "http://maven.apache.org/POM/4.0.0
   http://maven.apache.org/xsd/maven-4.0.0.xsd">

   <modelVersion>4.0.0</modelVersion>
   <groupId>com.tutorialspoint</groupId>
   <artifactId>demo</artifactId>
   <version>0.0.1-SNAPSHOT</version>
   <packaging>jar</packaging>
   <name>demo</name>
   <description>Demo project for Spring Boot</description>

   <parent>
      <groupId>org.springframework.boot</groupId>
      <artifactId>spring-boot-starter-parent</artifactId>
      <version>1.5.8.RELEASE</version>
      <relativePath />
   </parent>

   <properties>
      <project.build.sourceEncoding>UTF-8</project.build.sourceEncoding>
      <project.reporting.outputEncoding>UTF-8</project.reporting.outputEncoding>
      <java.version>1.8</java.version>
   </properties>

   <dependencies>
      <dependency>
         <groupId>org.springframework.boot</groupId>
         <artifactId>spring-boot-starter-web</artifactId>
      </dependency>

      <dependency>
         <groupId>org.springframework.boot</groupId>
         <artifactId>spring-boot-starter-test</artifactId>
         <scope>test</scope>
      </dependency>

      <dependency>
         <groupId>org.springframework.boot</groupId>
         <artifactId>spring-boot-starter-thymeleaf</artifactId>
      </dependency>
   </dependencies>

   <build>
      <plugins>
         <plugin>
            <groupId>org.springframework.boot</groupId>
            <artifactId>spring-boot-maven-plugin</artifactId>
         </plugin>
      </plugins>
   </build>

</project>
รหัสสำหรับ Gradle - build.gradle ได้รับด้านล่าง -
buildscript {
   ext {
      springBootVersion = ‘1.5.8.RELEASE’
   }
   repositories {
      mavenCentral()
   }
   dependencies {
      classpath("org.springframework.boot:spring-boot-gradle-plugin:${springBootVersion}")
   }
}

apply plugin: ‘java’
apply plugin: ‘eclipse’
apply plugin: ‘org.springframework.boot’

group = ‘com.tutorialspoint’
version = ‘0.0.1-SNAPSHOT’
sourceCompatibility = 1.8

repositories {
   mavenCentral()
}

dependencies {
   compile(‘org.springframework.boot:spring-boot-starter-web’)
   compile group: ‘org.springframework.boot’, name: ‘spring-boot-starter-thymeleaf’
   testCompile(‘org.springframework.boot:spring-boot-starter-test’)
}
ไฟล์คลาสคอนโทรลเลอร์ที่ระบุด้านล่าง - ViewController.java ได้รับด้านล่าง -
package com.tutorialspoint.demo.controller;

import org.springframework.stereotype.Controller;
import org.springframework.web.bind.annotation.RequestMapping;

@Controller
public class ViewController {
   @RequestMapping(“/view-products”)
   public String viewProducts() {
      return “view-products”;
   }
   @RequestMapping(“/add-products”)
   public String addProducts() {
      return “add-products”;
   }
}
ไฟล์ view-products.html มีให้ด้านล่าง -
<!DOCTYPE html>
<html>
   <head>
      <meta charset = "ISO-8859-1"/>
      <title>View Products</title>
      <script src = "https://ajax.googleapis.com/ajax/libs/jquery/3.2.1/jquery.min.js"></script>

      <script>
         $(document).ready(function(){
            $.getJSON("http://localhost:9090/products", function(result){
               $.each(result, function(key,value) {
                  $("#productsJson").append(value.id+" "+value.name+" ");
               });
            });
         });
      </script>
   </head>

   <body>
      <div id = "productsJson"> </div>
   </body>
</html>
ไฟล์ add-products.html ได้รับด้านล่าง -
<!DOCTYPE html>
<html>
   <head>
      <meta charset = "ISO-8859-1" />
      <title>Add Products</title>
      <script src = "https://ajax.googleapis.com/ajax/libs/jquery/3.2.1/jquery.min.js"></script>

      <script>
         $(document).ready(function() {
            $("button").click(function() {
               var productmodel = {
                  id : "3",
                  name : "Ginger"
               };
               var requestJSON = JSON.stringify(productmodel);
               $.ajax({
                  type : "POST",
                  url : "http://localhost:9090/products",
                  headers : {
                     "Content-Type" : "application/json"
                  },
                  data : requestJSON,
                  success : function(data) {
                     alert(data);
                  },
                  error : function(data) {
                  }
               });
            });
         });
      </script>
   </head>

   <body>
      <button>Click here to submit the form</button>
   </body>
</html>
ไฟล์คลาส Spring Boot Application หลักอยู่ด้านล่าง -
package com.tutorialspoint.demo;

import org.springframework.boot.SpringApplication;
import org.springframework.boot.autoconfigure.SpringBootApplication;

@SpringBootApplication
public class DemoApplication {
   public static void main(String[] args) {
      SpringApplication.run(DemoApplication.class, args);
   }
}
ตอนนี้คุณสามารถสร้างไฟล์ JAR ที่ปฏิบัติการได้และเรียกใช้แอปพลิเคชัน Spring Boot โดยใช้คำสั่ง Maven หรือ Gradle ต่อไปนี้
สำหรับ Maven ใช้คำสั่งตามที่ระบุด้านล่าง -
mvn clean installหลังจาก“ BUILD SUCCESS” คุณจะพบไฟล์ JAR ภายใต้ไดเร็กทอรีเป้าหมาย
สำหรับ Gradle ให้ใช้คำสั่งตามที่ระบุด้านล่าง -
gradle clean buildหลังจาก“ BUILD SUCCESSFUL” คุณจะพบไฟล์ JAR ภายใต้ไดเร็กทอรี build / libs
รันไฟล์ JAR โดยใช้คำสั่งต่อไปนี้ -
java –jar <JARFILE>ตอนนี้แอปพลิเคชันเริ่มต้นบนพอร์ต Tomcat 8080 แล้ว

ตอนนี้กด URL ในเว็บเบราว์เซอร์ของคุณและคุณจะเห็นผลลัพธ์ดังที่แสดง -
http: // localhost: 8080 / view-products

http: // localhost: 8080 / ผลิตภัณฑ์เสริม

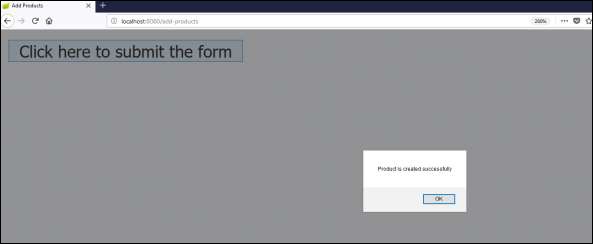
ตอนนี้คลิกที่ปุ่ม Click here to submit the form และคุณจะเห็นผลลัพธ์ดังภาพ -

ตอนนี้กดดู URL ผลิตภัณฑ์และดูผลิตภัณฑ์ที่สร้างขึ้น
http://localhost:8080/view-products

JS เชิงมุม
ในการใช้ API โดยใช้ Angular JS คุณสามารถใช้ตัวอย่างที่ระบุด้านล่าง -
ใช้รหัสต่อไปนี้เพื่อสร้าง Angular JS Controller เพื่อใช้ GET API - http://localhost:9090/products -
angular.module('demo', [])
.controller('Hello', function($scope, $http) {
   $http.get('http://localhost:9090/products').
   then(function(response) {
      $scope.products = response.data;
   });
});
ใช้รหัสต่อไปนี้เพื่อสร้าง Angular JS Controller เพื่อใช้ POST API - http://localhost:9090/products -
angular.module('demo', [])
.controller('Hello', function($scope, $http) {
   $http.post('http://localhost:9090/products',data).
   then(function(response) {
      console.log("Product created successfully");
   });
});
Note - ข้อมูลวิธีการโพสต์แสดงถึงเนื้อหาคำขอในรูปแบบ JSON เพื่อสร้างผลิตภัณฑ์