Spring Boot - OAuth2 พร้อม JWT
ในบทนี้คุณจะได้เรียนรู้โดยละเอียดเกี่ยวกับกลไก Spring Boot Security และ OAuth2 พร้อม JWT
เซิร์ฟเวอร์การอนุญาต
Authorization Server เป็นส่วนประกอบสถาปัตยกรรมชั้นยอดสำหรับ Web API Security เซิร์ฟเวอร์การอนุญาตทำหน้าที่เป็นจุดรวมการอนุญาตที่ช่วยให้แอปและจุดสิ้นสุด HTTP ของคุณสามารถระบุคุณสมบัติของแอปพลิเคชันของคุณได้
เซิร์ฟเวอร์ทรัพยากร
Resource Server เป็นแอปพลิเคชันที่จัดเตรียมโทเค็นการเข้าถึงให้กับไคลเอ็นต์เพื่อเข้าถึง Resource Server HTTP Endpoints เป็นชุดของไลบรารีที่มี HTTP Endpoints ทรัพยากรแบบคงที่และหน้าเว็บแบบไดนามิก
OAuth2
OAuth2 เป็นกรอบการอนุญาตที่ช่วยให้ Web Security ของแอปพลิเคชันสามารถเข้าถึงทรัพยากรจากไคลเอนต์ ในการสร้างแอปพลิเคชัน OAuth2 เราต้องให้ความสำคัญกับประเภทการให้สิทธิ์ (รหัสการให้สิทธิ์) รหัสลูกค้าและข้อมูลลับของไคลเอ็นต์
โทเค็น JWT
JWT Token เป็นโทเค็นเว็บ JSON ซึ่งใช้เพื่อแสดงการอ้างสิทธิ์ที่ปลอดภัยระหว่างสองฝ่าย คุณสามารถเรียนรู้เพิ่มเติมเกี่ยวกับ JWT โทเค็นที่www.jwt.io/
ตอนนี้เรากำลังจะสร้างแอปพลิเคชัน OAuth2 ที่ช่วยให้สามารถใช้ Authorization Server, Resource Server ด้วยความช่วยเหลือของ JWT Token
คุณสามารถใช้ขั้นตอนต่อไปนี้เพื่อใช้ Spring Boot Security กับโทเค็น JWT โดยการเข้าถึงฐานข้อมูล
ขั้นแรกเราต้องเพิ่มการอ้างอิงต่อไปนี้ในไฟล์คอนฟิกูเรชันบิลด์ของเรา
ผู้ใช้ Maven สามารถเพิ่มการอ้างอิงต่อไปนี้ในไฟล์ pom.xml ของคุณ
<dependency>
   <groupId>org.springframework.boot</groupId>
   <artifactId>spring-boot-starter-jdbc</artifactId>
</dependency>

<dependency>
   <groupId>org.springframework.boot</groupId>
   <artifactId>spring-boot-starter-security</artifactId>
</dependency>

<dependency>
   <groupId>org.springframework.boot</groupId>
   <artifactId>spring-boot-starter-web</artifactId>
</dependency>

<dependency>
   <groupId>org.springframework.security.oauth</groupId>
   <artifactId>spring-security-oauth2</artifactId>
</dependency>

<dependency>
   <groupId>org.springframework.security</groupId>
   <artifactId>spring-security-jwt</artifactId>
</dependency>

<dependency>
   <groupId>com.h2database</groupId>
   <artifactId>h2</artifactId>
</dependency>

<dependency>
   <groupId>org.springframework.boot</groupId>
   <artifactId>spring-boot-starter-test</artifactId>
   <scope>test</scope>
</dependency>

<dependency>
   <groupId>org.springframework.security</groupId>
   <artifactId>spring-security-test</artifactId>
   <scope>test</scope>
</dependency>
ผู้ใช้ Gradle สามารถเพิ่มการอ้างอิงต่อไปนี้ในไฟล์ build.gradle
compile('org.springframework.boot:spring-boot-starter-security')
compile('org.springframework.boot:spring-boot-starter-web')
testCompile('org.springframework.boot:spring-boot-starter-test')
testCompile('org.springframework.security:spring-security-test')

compile("org.springframework.security.oauth:spring-security-oauth2")
compile('org.springframework.security:spring-security-jwt')
compile("org.springframework.boot:spring-boot-starter-jdbc")
compile("com.h2database:h2:1.4.191")
ที่ไหน
Spring Boot Starter Security - ใช้ Spring Security
Spring Security OAuth2 - ใช้โครงสร้าง OAUTH2 เพื่อเปิดใช้งานเซิร์ฟเวอร์การอนุญาตและเซิร์ฟเวอร์ทรัพยากร
Spring Security JWT - สร้างโทเค็น JWT เพื่อความปลอดภัยของเว็บ
Spring Boot Starter JDBC - เข้าถึงฐานข้อมูลเพื่อให้แน่ใจว่าผู้ใช้พร้อมใช้งานหรือไม่
Spring Boot Starter Web - เขียนจุดสิ้นสุด HTTP
H2 Database - จัดเก็บข้อมูลผู้ใช้สำหรับการพิสูจน์ตัวตนและการอนุญาต
ไฟล์คอนฟิกูเรชันบิลด์ที่สมบูรณ์มีให้ด้านล่าง
<?xml version = "1.0" encoding = "UTF-8"?>
<project xmlns = "http://maven.apache.org/POM/4.0.0"
   xmlns:xsi = "http://www.w3.org/2001/XMLSchema-instance"
   xsi:schemaLocation = "http://maven.apache.org/POM/4.0.0
   http://maven.apache.org/xsd/maven-4.0.0.xsd">

   <modelVersion>4.0.0</modelVersion>
   <groupId>com.tutorialspoint</groupId>
   <artifactId>websecurityapp</artifactId>
   <version>0.0.1-SNAPSHOT</version>
   <packaging>jar</packaging>
   <name>websecurityapp</name>
   <description>Demo project for Spring Boot</description>

   <parent>
      <groupId>org.springframework.boot</groupId>
      <artifactId>spring-boot-starter-parent</artifactId>
      <version>1.5.9.RELEASE</version>
      <relativePath /> <!-- lookup parent from repository -->
   </parent>

   <properties>
      <project.build.sourceEncoding>UTF-8</project.build.sourceEncoding>
      <project.reporting.outputEncoding>UTF-8</project.reporting.outputEncoding>
      <java.version>1.8</java.version>
   </properties>

   <dependencies>
      <dependency>
         <groupId>org.springframework.boot</groupId>
         <artifactId>spring-boot-starter-jdbc</artifactId>
      </dependency>

      <dependency>
         <groupId>org.springframework.boot</groupId>
         <artifactId>spring-boot-starter-security</artifactId>
      </dependency>

      <dependency>
         <groupId>org.springframework.boot</groupId>
         <artifactId>spring-boot-starter-web</artifactId>
      </dependency>

      <dependency>
         <groupId>org.springframework.security.oauth</groupId>
         <artifactId>spring-security-oauth2</artifactId>
      </dependency>

      <dependency>
         <groupId>org.springframework.security</groupId>
         <artifactId>spring-security-jwt</artifactId>
      </dependency>

      <dependency>
         <groupId>com.h2database</groupId>
         <artifactId>h2</artifactId>
      </dependency>

      <dependency>
         <groupId>org.springframework.boot</groupId>
         <artifactId>spring-boot-starter-test</artifactId>
         <scope>test</scope>
      </dependency>

      <dependency>
         <groupId>org.springframework.security</groupId>
         <artifactId>spring-security-test</artifactId>
         <scope>test</scope>
      </dependency>
   </dependencies>

   <build>
      <plugins>
         <plugin>
            <groupId>org.springframework.boot</groupId>
            <artifactId>spring-boot-maven-plugin</artifactId>
         </plugin>
      </plugins>
   </build>

</project>
Gradle – build.gradle
buildscript {
   ext {
      springBootVersion = '1.5.9.RELEASE'
   }
   repositories {
      mavenCentral()
   }
   dependencies {
      classpath("org.springframework.boot:spring-boot-gradle-plugin:${springBootVersion}")
   }
}
apply plugin: 'java'
apply plugin: 'eclipse'
apply plugin: 'org.springframework.boot'

group = 'com.tutorialspoint'
version = '0.0.1-SNAPSHOT'
sourceCompatibility = 1.8

repositories {
   mavenCentral()
}

dependencies {
   compile('org.springframework.boot:spring-boot-starter-security')
   compile('org.springframework.boot:spring-boot-starter-web')
   testCompile('org.springframework.boot:spring-boot-starter-test')
   testCompile('org.springframework.security:spring-security-test')
   compile("org.springframework.security.oauth:spring-security-oauth2")
   compile('org.springframework.security:spring-security-jwt')
   compile("org.springframework.boot:spring-boot-starter-jdbc")
   compile("com.h2database:h2:1.4.191")
}
ตอนนี้ในแอปพลิเคชัน Spring Boot หลักให้เพิ่มคำอธิบายประกอบ @EnableAuthorizationServer และ @EnableResourceServer เพื่อทำหน้าที่เป็นเซิร์ฟเวอร์ Auth และเซิร์ฟเวอร์ทรัพยากรในแอปพลิเคชันเดียวกัน
นอกจากนี้คุณสามารถใช้รหัสต่อไปนี้เพื่อเขียนจุดสิ้นสุด HTTP อย่างง่ายเพื่อเข้าถึง API ด้วย Spring Security โดยใช้ JWT Token
package com.tutorialspoint.websecurityapp;

import org.springframework.boot.SpringApplication;
import org.springframework.boot.autoconfigure.SpringBootApplication;
import org.springframework.security.oauth2.config.annotation.web.configuration.EnableAuthorizationServer;
import org.springframework.security.oauth2.config.annotation.web.configuration.EnableResourceServer;
import org.springframework.web.bind.annotation.RequestMapping;
import org.springframework.web.bind.annotation.RestController;

@SpringBootApplication
@EnableAuthorizationServer
@EnableResourceServer
@RestController
public class WebsecurityappApplication {
   public static void main(String[] args) {
      SpringApplication.run(WebsecurityappApplication.class, args);
   }
   @RequestMapping(value = "/products")
   public String getProductName() {
      return "Honey";
   }
}
ใช้รหัสต่อไปนี้เพื่อกำหนดคลาส POJO เพื่อจัดเก็บข้อมูลผู้ใช้สำหรับการพิสูจน์ตัวตน
package com.tutorialspoint.websecurityapp;

import java.util.ArrayList;
import java.util.Collection;
import org.springframework.security.core.GrantedAuthority;

public class UserEntity {
   private String username;
   private String password;
   private Collection<GrantedAuthority> grantedAuthoritiesList = new ArrayList<>();

   public String getPassword() {
      return password;
   }
   public void setPassword(String password) {
      this.password = password;
   }
   public Collection<GrantedAuthority> getGrantedAuthoritiesList() {
      return grantedAuthoritiesList;
   }
   public void setGrantedAuthoritiesList(Collection<GrantedAuthority> grantedAuthoritiesList) {
      this.grantedAuthoritiesList = grantedAuthoritiesList;
   }
   public String getUsername() {
      return username;
   }
   public void setUsername(String username) {
      this.username = username;
   }
}
ตอนนี้ใช้โค้ดต่อไปนี้และกำหนดคลาส CustomUser ที่ขยาย org.springframework.security.core.userdetails.User class สำหรับ Spring Boot authentication
package com.tutorialspoint.websecurityapp;

import org.springframework.security.core.userdetails.User;

public class CustomUser extends User {
   private static final long serialVersionUID = 1L;
   public CustomUser(UserEntity user) {
      super(user.getUsername(), user.getPassword(), user.getGrantedAuthoritiesList());
   }
}
คุณสามารถสร้างคลาส @Repository เพื่ออ่านข้อมูลผู้ใช้จากฐานข้อมูลและส่งไปยังบริการผู้ใช้แบบกำหนดเองและยังเพิ่มสิทธิ์ที่ได้รับ“ ROLE_SYSTEMADMIN”
package com.tutorialspoint.websecurityapp;

import java.sql.ResultSet;
import java.util.ArrayList;
import java.util.Collection;
import java.util.List;

import org.springframework.beans.factory.annotation.Autowired;
import org.springframework.jdbc.core.JdbcTemplate;
import org.springframework.security.core.GrantedAuthority;
import org.springframework.security.core.authority.SimpleGrantedAuthority;
import org.springframework.stereotype.Repository;

@Repository
public class OAuthDao {
   @Autowired
   private JdbcTemplate jdbcTemplate;

   public UserEntity getUserDetails(String username) {
      Collection<GrantedAuthority> grantedAuthoritiesList = new ArrayList<>();
      String userSQLQuery = "SELECT * FROM USERS WHERE USERNAME=?";
      List<UserEntity> list = jdbcTemplate.query(userSQLQuery, new String[] { username },
         (ResultSet rs, int rowNum) -> {

         UserEntity user = new UserEntity();
         user.setUsername(username);
         user.setPassword(rs.getString("PASSWORD"));
         return user;
      });
      if (list.size() > 0) {
         GrantedAuthority grantedAuthority = new SimpleGrantedAuthority("ROLE_SYSTEMADMIN");
         grantedAuthoritiesList.add(grantedAuthority);
         list.get(0).setGrantedAuthoritiesList(grantedAuthoritiesList);
         return list.get(0);
      }
      return null;
   }
}
คุณสามารถสร้างคลาสเซอร์วิสรายละเอียดผู้ใช้แบบกำหนดเองที่ขยาย org.springframework.security.core.userdetails.UserDetailsService เพื่อเรียกคลาสที่เก็บ DAO ดังที่แสดง
package com.tutorialspoint.websecurityapp;

import org.springframework.beans.factory.annotation.Autowired;
import org.springframework.security.core.userdetails.UserDetailsService;
import org.springframework.security.core.userdetails.UsernameNotFoundException;
import org.springframework.stereotype.Service;

@Service
public class CustomDetailsService implements UserDetailsService {
   @Autowired
   OAuthDao oauthDao;

   @Override
   public CustomUser loadUserByUsername(final String username) throws UsernameNotFoundException {
      UserEntity userEntity = null;
      try {
         userEntity = oauthDao.getUserDetails(username);
         CustomUser customUser = new CustomUser(userEntity);
         return customUser;
      } catch (Exception e) {
         e.printStackTrace();
         throw new UsernameNotFoundException("User " + username + " was not found in the database");
      }
   }
}
จากนั้นสร้างคลาส @configuration เพื่อเปิดใช้งาน Web Security การกำหนดตัวเข้ารหัสรหัสผ่าน (BCryptPasswordEncoder) และกำหนด AuthenticationManager bean คลาสคอนฟิกูเรชันความปลอดภัยควรขยายคลาส WebSecurityConfigurerAdapter
package com.tutorialspoint.websecurityapp;

import org.springframework.beans.factory.annotation.Autowired;
import org.springframework.context.annotation.Bean;
import org.springframework.context.annotation.Configuration;

import org.springframework.security.authentication.AuthenticationManager;
import org.springframework.security.config.annotation.authentication.builders.AuthenticationManagerBuilder;
import org.springframework.security.config.annotation.method.configuration.EnableGlobalMethodSecurity;
import org.springframework.security.config.annotation.web.builders.HttpSecurity;
import org.springframework.security.config.annotation.web.builders.WebSecurity;
import org.springframework.security.config.annotation.web.configuration.EnableWebSecurity;
import org.springframework.security.config.annotation.web.configuration.WebSecurityConfigurerAdapter;
import org.springframework.security.config.http.SessionCreationPolicy;
import org.springframework.security.crypto.bcrypt.BCryptPasswordEncoder;
import org.springframework.security.crypto.password.PasswordEncoder;

@Configuration
@EnableWebSecurity
@EnableGlobalMethodSecurity(prePostEnabled = true)
public class SecurityConfiguration extends WebSecurityConfigurerAdapter {
   @Autowired
   private CustomDetailsService customDetailsService;

   @Bean
   public PasswordEncoder encoder() {
      return new BCryptPasswordEncoder();
   }
   @Override
   @Autowired
   protected void configure(AuthenticationManagerBuilder auth) throws Exception {
      auth.userDetailsService(customDetailsService).passwordEncoder(encoder());
   }
   @Override
   protected void configure(HttpSecurity http) throws Exception {
      http.authorizeRequests().anyRequest().authenticated().and().sessionManagement()
         .sessionCreationPolicy(SessionCreationPolicy.NEVER);
   }
   @Override
   public void configure(WebSecurity web) throws Exception {
      web.ignoring();
   }
   @Override
   @Bean
   public AuthenticationManager authenticationManagerBean() throws Exception {
      return super.authenticationManagerBean();
   }
}
ตอนนี้กำหนดคลาส OAuth2 Configuration เพื่อเพิ่ม Client ID, Client Secret, กำหนด JwtAccessTokenConverter, Private key และ Public key สำหรับ token signer key และ verifier key และกำหนดค่า ClientDetailsServiceConfigurer สำหรับความถูกต้องของโทเค็นด้วยขอบเขต
package com.tutorialspoint.websecurityapp;

import org.springframework.beans.factory.annotation.Autowired;
import org.springframework.beans.factory.annotation.Qualifier;
import org.springframework.context.annotation.Bean;
import org.springframework.context.annotation.Configuration;

import org.springframework.security.authentication.AuthenticationManager;
import org.springframework.security.oauth2.config.annotation.configurers.ClientDetailsServiceConfigurer;
import org.springframework.security.oauth2.config.annotation.web.configuration.AuthorizationServerConfigurerAdapter;
import org.springframework.security.oauth2.config.annotation.web.configurers.AuthorizationServerEndpointsConfigurer;
import org.springframework.security.oauth2.config.annotation.web.configurers.AuthorizationServerSecurityConfigurer;
import org.springframework.security.oauth2.provider.token.store.JwtAccessTokenConverter;
import org.springframework.security.oauth2.provider.token.store.JwtTokenStore;

@Configuration
public class OAuth2Config extends AuthorizationServerConfigurerAdapter {
   private String clientid = "tutorialspoint";
   private String clientSecret = "my-secret-key";
   private String privateKey = "private key";
   private String publicKey = "public key";

   @Autowired
   @Qualifier("authenticationManagerBean")
   private AuthenticationManager authenticationManager;

   @Bean
   public JwtAccessTokenConverter tokenEnhancer() {
      JwtAccessTokenConverter converter = new JwtAccessTokenConverter();
      converter.setSigningKey(privateKey);
      converter.setVerifierKey(publicKey);
      return converter;
   }
   @Bean
   public JwtTokenStore tokenStore() {
      return new JwtTokenStore(tokenEnhancer());
   }
   @Override
   public void configure(AuthorizationServerEndpointsConfigurer endpoints) throws Exception {
      endpoints.authenticationManager(authenticationManager).tokenStore(tokenStore())
      .accessTokenConverter(tokenEnhancer());
   }
   @Override
   public void configure(AuthorizationServerSecurityConfigurer security) throws Exception {
      security.tokenKeyAccess("permitAll()").checkTokenAccess("isAuthenticated()");
   }
   @Override
   public void configure(ClientDetailsServiceConfigurer clients) throws Exception {
      clients.inMemory().withClient(clientid).secret(clientSecret).scopes("read", "write")
         .authorizedGrantTypes("password", "refresh_token").accessTokenValiditySeconds(20000)
         .refreshTokenValiditySeconds(20000);

   }
}
ตอนนี้สร้างคีย์ส่วนตัวและคีย์สาธารณะโดยใช้ openssl
คุณสามารถใช้คำสั่งต่อไปนี้เพื่อสร้างคีย์ส่วนตัว
openssl genrsa -out jwt.pem 2048
openssl rsa -in jwt.pem
คุณสามารถใช้สำหรับการสร้างคีย์สาธารณะโดยใช้คำสั่งด้านล่าง
openssl rsa -in jwt.pem -puboutสำหรับ Spring Boot เวอร์ชันหลังกว่า 1.5 รีลีสให้เพิ่มคุณสมบัติด้านล่างในไฟล์ application.properties ของคุณเพื่อกำหนดลำดับตัวกรอง OAuth2 Resource
security.oauth2.resource.filter-order=3ผู้ใช้ไฟล์ YAML สามารถเพิ่มคุณสมบัติด้านล่างในไฟล์ YAML
security:
   oauth2:
      resource:
         filter-order: 3
ตอนนี้สร้างไฟล์ schema.sql และ data.sql ภายใต้ทรัพยากร classpath src/main/resources/directory เพื่อเชื่อมต่อแอปพลิเคชันกับฐานข้อมูล H2
ไฟล์ schema.sql ดังที่แสดง -
CREATE TABLE USERS (ID INT PRIMARY KEY, USERNAME VARCHAR(45), PASSWORD VARCHAR(60));ไฟล์ data.sql ดังรูป -
INSERT INTO USERS (ID, USERNAME,PASSWORD) VALUES (
   1, '[email protected]','$2a$08$fL7u5xcvsZl78su29x1ti.dxI.9rYO8t0q5wk2ROJ.1cdR53bmaVG');

INSERT INTO USERS (ID, USERNAME,PASSWORD) VALUES (
   2, '[email protected]','$2a$08$fL7u5xcvsZl78su29x1ti.dxI.9rYO8t0q5wk2ROJ.1cdR53bmaVG');
Note - ควรจัดเก็บรหัสผ่านในรูปแบบของ Bcrypt Encoder ในตารางฐานข้อมูล
คุณสามารถสร้างไฟล์ JAR ที่ปฏิบัติการได้และรันแอ็พพลิเคชัน Spring Boot โดยใช้คำสั่ง Maven หรือ Gradle ต่อไปนี้
สำหรับ Maven คุณสามารถใช้คำสั่งด้านล่าง -
mvn clean installหลังจาก“ BUILD SUCCESS” คุณจะพบไฟล์ JAR ภายใต้ไดเร็กทอรีเป้าหมาย
สำหรับ Gradle คุณสามารถใช้คำสั่งดังภาพ -
gradle clean buildหลังจาก“ BUILD SUCCESSFUL” คุณจะพบไฟล์ JAR ภายใต้ไดเร็กทอรี build / libs
ตอนนี้เรียกใช้ไฟล์ JAR โดยใช้คำสั่งที่แสดงที่นี่ -
java –jar <JARFILE>แอปพลิเคชันเริ่มต้นบนพอร์ต Tomcat 8080

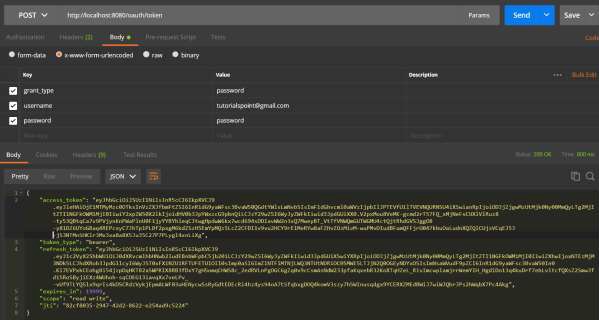
ตอนนี้กด URL วิธีการ POST ผ่าน POSTMAN เพื่อรับโทเค็น OAUTH2
http://localhost:8080/oauth/token
ตอนนี้เพิ่มส่วนหัวของคำขอดังต่อไปนี้ -
Authorization - การรับรองความถูกต้องขั้นพื้นฐานด้วยรหัสลูกค้าและความลับของลูกค้า
Content Type - แอปพลิเคชัน / x-www-form-urlencoded

ตอนนี้เพิ่มพารามิเตอร์การร้องขอดังต่อไปนี้ -
- Grant_type = รหัสผ่าน
- username = ชื่อผู้ใช้ของคุณ
- รหัสผ่าน = รหัสผ่านของคุณ

ตอนนี้กด API และรับ access_token ดังที่แสดง -

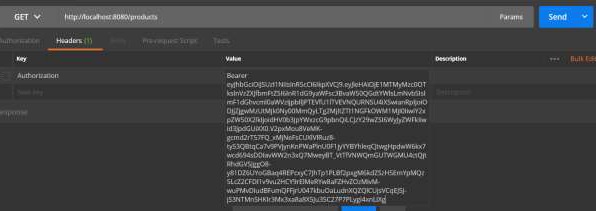
ตอนนี้ตี Resource Server API ด้วย Bearer access token ใน Request Header ดังที่แสดง

จากนั้นคุณจะเห็นผลลัพธ์ดังที่แสดงด้านล่าง -
