Spring Boot - ฐานข้อมูล Flyway
Flyway เป็นแอปพลิเคชันควบคุมเวอร์ชันเพื่อพัฒนาสคีมาฐานข้อมูลของคุณได้อย่างง่ายดายและเชื่อถือได้ในทุกอินสแตนซ์ของคุณ หากต้องการเรียนรู้เพิ่มเติมเกี่ยวกับ Flyway คุณสามารถใช้ลิงค์ - www.flywaydb.org
โครงการซอฟต์แวร์จำนวนมากใช้ฐานข้อมูลเชิงสัมพันธ์ สิ่งนี้ต้องการการจัดการการย้ายฐานข้อมูลหรือที่มักเรียกว่าการย้ายสคีมา
ในบทนี้คุณจะได้เรียนรู้รายละเอียดเกี่ยวกับวิธีกำหนดค่าฐานข้อมูล Flyway ในแอปพลิเคชัน Spring Boot ของคุณ
การกำหนดค่าฐานข้อมูล Flyway
ขั้นแรกให้ดาวน์โหลดโครงการ Spring Boot จากหน้า Spring Initializer www.start.spring.ioและเลือกการอ้างอิงต่อไปนี้ -
- เว็บ Spring Boot Starter
- Flyway
- MySQL
- JDBC
ผู้ใช้ Maven สามารถเพิ่มการอ้างอิงต่อไปนี้ในไฟล์ pom.xml
<dependency>
   <groupId>org.flywaydb</groupId>
   <artifactId>flyway-core</artifactId>
</dependency>

<dependency>
   <groupId>org.springframework.boot</groupId>
   <artifactId>spring-boot-starter-jdbc</artifactId>
</dependency>

<dependency>
   <groupId>org.springframework.boot</groupId>
   <artifactId>spring-boot-starter-web</artifactId>
</dependency>

<dependency>
   <groupId>mysql</groupId>
   <artifactId>mysql-connector-java</artifactId>
</dependency>

<dependency>
   <groupId>org.springframework.boot</groupId>
   <artifactId>spring-boot-starter-test</artifactId>
   <scope>test</scope>
</dependency>
ผู้ใช้ Gradle สามารถเพิ่มการอ้างอิงต่อไปนี้ในไฟล์ build.gradle
compile('org.flywaydb:flyway-core')
compile('org.springframework.boot:spring-boot-starter-jdbc')
compile('org.springframework.boot:spring-boot-starter-web')
compile('mysql:mysql-connector-java')
ในคุณสมบัติของแอปพลิเคชันเราจำเป็นต้องกำหนดค่าคุณสมบัติฐานข้อมูลสำหรับการสร้างแหล่งข้อมูลและคุณสมบัติของฟลายเวย์ที่เราต้องกำหนดค่าในคุณสมบัติของแอปพลิเคชัน
สำหรับผู้ใช้ไฟล์คุณสมบัติให้เพิ่มคุณสมบัติด้านล่างในไฟล์ application.properties
spring.application.name = flywayapp

spring.datasource.driverClassName = com.mysql.jdbc.Driver
spring.datasource.url = jdbc:mysql://localhost:3306/USERSERVICE?autoreconnect=true
spring.datasource.username = root
spring.datasource.password = root
spring.datasource.testOnBorrow = true
spring.datasource.testWhileIdle = true
spring.datasource.timeBetweenEvictionRunsMillis = 60000
spring.datasource.minEvictableIdleTimeMillis = 30000
spring.datasource.validationQuery = SELECT 1
spring.datasource.max-active = 15
spring.datasource.max-idle = 10
spring.datasource.max-wait = 8000

flyway.url = jdbc:mysql://localhost:3306/mysql
flyway.schemas = USERSERVICE
flyway.user = root
flyway.password = root
ผู้ใช้ YAML สามารถเพิ่มคุณสมบัติต่อไปนี้ในไฟล์ application.yml
spring:
   application:
      name: flywayapp
   datasource:
      driverClassName: com.mysql.jdbc.Driver
      url: "jdbc:mysql://localhost:3306/USERSERVICE?autoreconnect=true"
      password: "root"
      username: "root"
      testOnBorrow: true
      testWhileIdle: true
      timeBetweenEvictionRunsMillis: 60000
      minEvictableIdleTimeMillis: 30000
      validationQuery: SELECT 1
      max-active: 15
      max-idle: 10
      max-wait: 8000
flyway:
   url: jdbc:mysql://localhost:3306/mysql
   schemas: USERSERVICE
   user: "root"
   password: "root"
ตอนนี้สร้างไฟล์ SQL ภายใต้ไฟล์ src/main/resources/db/migrationไดเรกทอรี ตั้งชื่อไฟล์ SQL เป็น“ V1__Initial.sql”
CREATE TABLE USERS (ID INT AUTO_INCREMENT PRIMARY KEY, USERID VARCHAR(45));
INSERT INTO USERS (ID, USERID) VALUES (1, 'tutorialspoint.com');
รหัสไฟล์คลาสแอ็พพลิเคชัน Spring Boot หลักมีให้ด้านล่าง -
package com.tutorialspoint.flywayapp;

import org.springframework.boot.SpringApplication;
import org.springframework.boot.autoconfigure.SpringBootApplication;

@SpringBootApplication
public class FlywayappApplication {
   public static void main(String[] args) {
      SpringApplication.run(FlywayappApplication.class, args);
   }
}
ไฟล์คอนฟิกูเรชันบิลด์ที่สมบูรณ์มีให้ด้านล่าง
Maven – pom.xml
<?xml version = "1.0" encoding = "UTF-8"?>
<project xmlns = "http://maven.apache.org/POM/4.0.0"
   xmlns:xsi = "http://www.w3.org/2001/XMLSchema-instance"
   xsi:schemaLocation = "http://maven.apache.org/POM/4.0.0
   http://maven.apache.org/xsd/maven-4.0.0.xsd">

   <modelVersion>4.0.0</modelVersion>
   <groupId>com.tutorialspoint</groupId>
   <artifactId>flywayapp</artifactId>
   <version>0.0.1-SNAPSHOT</version>
   <packaging>jar</packaging>
   <name>flywayapp</name>
   <description>Demo project for Spring Boot</description>

   <parent>
      <groupId>org.springframework.boot</groupId>
      <artifactId>spring-boot-starter-parent</artifactId>
      <version>1.5.9.RELEASE</version>
      <relativePath/> <!-- lookup parent from repository -->
   </parent>

   <properties>
      <project.build.sourceEncoding>UTF-8</project.build.sourceEncoding>
      <project.reporting.outputEncoding>UTF-8</project.reporting.outputEncoding>
      <java.version>1.8</java.version>
   </properties>

   <dependencies>
      <dependency>
         <groupId>org.flywaydb</groupId>
         <artifactId>flyway-core</artifactId>
      </dependency>

      <dependency>
         <groupId>org.springframework.boot</groupId>
         <artifactId>spring-boot-starter-jdbc</artifactId>
      </dependency>

      <dependency>
         <groupId>org.springframework.boot</groupId>
         <artifactId>spring-boot-starter-web</artifactId>
      </dependency>

      <dependency>
         <groupId>mysql</groupId>
         <artifactId>mysql-connector-java</artifactId>
      </dependency>
   </dependencies>

   <build>
      <plugins>
         <plugin>
            <groupId>org.springframework.boot</groupId>
            <artifactId>spring-boot-maven-plugin</artifactId>
         </plugin>
      </plugins>
   </build>

</project>
Gradle – build.gradle
buildscript {
   ext {
      springBootVersion = '1.5.9.RELEASE'
   }
   repositories {
      mavenCentral()
   }
   dependencies {
      classpath("org.springframework.boot:spring-boot-gradle-plugin:${springBootVersion}")
   }
}

apply plugin: 'java'
apply plugin: 'eclipse'
apply plugin: 'org.springframework.boot'

group = 'com.tutorialspoint'
version = '0.0.1-SNAPSHOT'
sourceCompatibility = 1.8

repositories {
   mavenCentral()
}
dependencies {
   compile('org.flywaydb:flyway-core')
   compile('org.springframework.boot:spring-boot-starter-jdbc')
   compile('org.springframework.boot:spring-boot-starter-web')
   compile('mysql:mysql-connector-java')
   testCompile('org.springframework.boot:spring-boot-starter-test')
}
คุณสามารถสร้างไฟล์ JAR ที่ปฏิบัติการได้และเรียกใช้แอปพลิเคชัน Spring Boot โดยใช้คำสั่ง Maven หรือ Gradle ที่ระบุด้านล่าง -
สำหรับ Maven คุณสามารถใช้คำสั่งที่แสดงไว้ที่นี่ -
mvn clean installหลังจาก“ BUILD SUCCESS” คุณจะพบไฟล์ JAR ภายใต้ไดเร็กทอรีเป้าหมาย
สำหรับ Gradle คุณสามารถใช้คำสั่งที่แสดงไว้ที่นี่ -
gradle clean buildหลังจาก“ BUILD SUCCESSFUL” คุณจะพบไฟล์ JAR ภายใต้ไดเร็กทอรี build / libs
ตอนนี้เรียกใช้ไฟล์ JAR โดยใช้คำสั่งต่อไปนี้ -
java –jar <JARFILE>ตอนนี้ Tomcat เริ่มต้นที่พอร์ต 8080 และในหน้าต่างคอนโซลคุณสามารถดูบันทึกฐานข้อมูลของ flyway ดังที่แสดงไว้ที่นี่

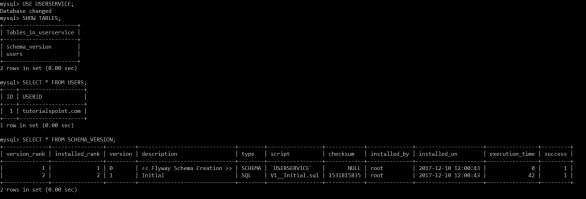
ตอนนี้คุณสามารถไปที่ฐานข้อมูลและทำแบบสอบถามแบบเลือกได้
