VueJS - ฟังก์ชัน Render
เราได้เห็นส่วนประกอบและการใช้งานของมัน ตัวอย่างเช่นเรามีเนื้อหาที่ต้องนำมาใช้ซ้ำในโครงการ เราสามารถแปลงเช่นเดียวกับส่วนประกอบและใช้งานได้
ลองมาดูตัวอย่างขององค์ประกอบง่ายๆและดูว่าฟังก์ชันการแสดงผลมีไว้ทำอะไรภายใน
ตัวอย่าง
<html>
<head>
<title>VueJs Instance</title>
<script type = "text/javascript" src = "js/vue.js"></script>
</head>
<body>
<div id = "component_test">
<testcomponent></testcomponent>
</div>
<script type = "text/javascript">
Vue.component('testcomponent',{
template : '<h1>Hello World</h1>',
data: function() {
},
methods:{
}
});
var vm = new Vue({
el: '#component_test'
});
</script>
</body>
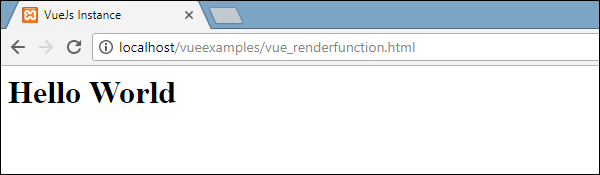
</html>ลองพิจารณาตัวอย่างข้างต้นของส่วนประกอบง่ายๆที่พิมพ์ Hello World ดังที่แสดงในภาพหน้าจอต่อไปนี้
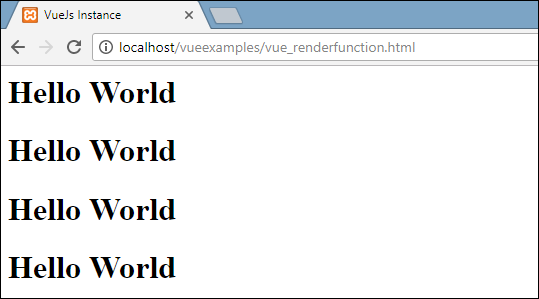
ตอนนี้ถ้าเราต้องการใช้ส่วนประกอบซ้ำเราสามารถทำได้โดยพิมพ์อีกครั้ง ตัวอย่างเช่น,
<div id = "component_test">
   <testcomponent></testcomponent>
   <testcomponent></testcomponent>
   <testcomponent></testcomponent>
   <testcomponent></testcomponent>
</div>
และผลลัพธ์จะเป็นดังต่อไปนี้
อย่างไรก็ตามตอนนี้เราต้องการการเปลี่ยนแปลงบางอย่างในส่วนประกอบ เราไม่ต้องการให้พิมพ์ข้อความเดียวกัน เราจะเปลี่ยนมันได้อย่างไร? ในกรณีที่เราพิมพ์อะไรบางอย่างในส่วนประกอบนั้นจะถูกนำมาพิจารณาหรือไม่?
ให้เราพิจารณาตัวอย่างต่อไปนี้และดูว่าเกิดอะไรขึ้น
<div id = "component_test">
   <testcomponent>Hello Jai</testcomponent>
   <testcomponent>Hello Roy</testcomponent>
   <testcomponent>Hello Ria</testcomponent>
   <testcomponent>Hello Ben</testcomponent>
</div>
ผลลัพธ์ยังคงเหมือนกับที่เราเห็นก่อนหน้านี้ มันไม่เปลี่ยนข้อความตามที่เราต้องการ
ส่วนประกอบให้สิ่งที่เรียกว่าเป็น slots. มาใช้ประโยชน์กันดูว่าเราได้ผลลัพธ์ที่ต้องการหรือไม่
ตัวอย่าง
<html>
<head>
<title>VueJs Instance</title>
<script type = "text/javascript" src = "js/vue.js"></script>
</head>
<body>
<div id = "component_test">
<testcomponent>Hello Jai</testcomponent>
<testcomponent>Hello Roy</testcomponent>
<testcomponent>Hello Ria</testcomponent>
<testcomponent>Hello Ben</testcomponent>
</div>
<script type = "text/javascript">
Vue.component('testcomponent',{
template : '<h1><slot></slot></h1>',
data: function() {
},
methods:{
}
});
var vm = new Vue({
el: '#component_test'
});
</script>
</body>
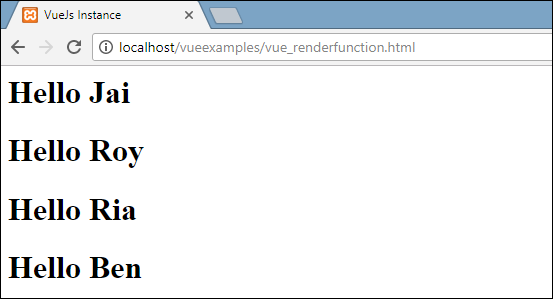
</html>ดังที่เห็นในโค้ดด้านบนในเทมเพลตเราได้เพิ่มช่องดังนั้นตอนนี้จึงใช้ค่าเพื่อส่งเข้าไปในส่วนประกอบดังที่แสดงในภาพหน้าจอต่อไปนี้
ตอนนี้ให้เราพิจารณาว่าเราต้องการเปลี่ยนสีและขนาด ตัวอย่างเช่นขณะนี้เราใช้แท็ก h1 และเราต้องการเปลี่ยนแท็ก HTML เป็นแท็ก p หรือแท็ก div สำหรับคอมโพเนนต์เดียวกัน เราจะมีความยืดหยุ่นในการเปลี่ยนแปลงมากมายได้อย่างไร
เราสามารถทำได้โดยใช้ฟังก์ชันเรนเดอร์ ฟังก์ชัน Render ช่วยทำให้คอมโพเนนต์เป็นแบบไดนามิกและใช้วิธีที่จำเป็นโดยทำให้เป็นเรื่องปกติและช่วยส่งผ่านอาร์กิวเมนต์โดยใช้ส่วนประกอบเดียวกัน
ตัวอย่าง
<html>
   <head>
      <title>VueJs Instance</title>
      <script type = "text/javascript" src = "js/vue.js"></script>
   </head>
   <body>
      <div id = "component_test">
         <testcomponent :elementtype = "'div,red,25,div1'">Hello Jai</testcomponent>
         <testcomponent :elementtype = "'h3,green,25,h3tag'">Hello Roy</testcomponent>
         <testcomponent :elementtype = "'p,blue,25,ptag'">Hello Ria</testcomponent>
         <testcomponent :elementtype = "'div,green,25,divtag'">Hello Ben</testcomponent>
      </div>
      <script type = "text/javascript">
         Vue.component('testcomponent',{
            render :function(createElement){
               var a = this.elementtype.split(",");
               return createElement(a[0],{
                  attrs:{
                     id:a[3],
                     style:"color:"+a[1]+";font-size:"+a[2]+";"
                  }
               },
               this.$slots.default
               )
            },
            props:{
               elementtype:{
                  attributes:String,
                  required:true
               }
            }
         });
         var vm = new Vue({
            el: '#component_test'
         });
      </script>
   </body>
</html>
ในโค้ดด้านบนเราได้เปลี่ยนองค์ประกอบและเพิ่มฟังก์ชันการแสดงผลด้วยคุณสมบัติของอุปกรณ์ประกอบฉากโดยใช้โค้ดต่อไปนี้
Vue.component('testcomponent',{
   render :function(createElement){
      var a = this.elementtype.split(",");
      return createElement(a[0],{
         attrs:{
            id:a[3],
            style:"color:"+a[1]+";font-size:"+a[2]+";"
         }
      },
      this.$slots.default
      )
   },
   props:{
      elementtype:{
         attributes:String,
         required:true
      }
   }
});
อุปกรณ์ประกอบฉากมีลักษณะดังต่อไปนี้
props:{
   elementtype:{
      attributes:String,
      required:true
   }
}
เราได้กำหนดคุณสมบัติที่เรียกว่า elementtype ซึ่งรับฟิลด์แอตทริบิวต์ของสตริงประเภท ฟิลด์บังคับอีกช่องหนึ่งซึ่งระบุว่าฟิลด์บังคับ
ในฟังก์ชัน render เราได้ใช้คุณสมบัติ elementtype ดังที่เห็นในโค้ดต่อไปนี้
render :function(createElement){
   var a = this.elementtype.split(",");
   return createElement(a[0],{
      attrs:{
         id:a[3],
         style:"color:"+a[1]+";font-size:"+a[2]+";"
      }
   },
   this.$slots.default
   )
}
ฟังก์ชัน Render ใช้ createElement เป็นอาร์กิวเมนต์และส่งคืนค่าเดียวกัน CreateElement สร้างองค์ประกอบ DOM แบบเดียวกับใน JavaScript เรายังได้แยกประเภทองค์ประกอบในเครื่องหมายจุลภาคโดยใช้ค่าในช่อง attrs
CreateElement ใช้พารามิเตอร์แรกเป็นแท็กองค์ประกอบที่จะสร้าง ส่งผ่านไปยังส่วนประกอบโดยใช้รหัสต่อไปนี้
<testcomponent :elementtype = "'div,red,25,div1'">Hello Jai</testcomponent>คอมโพเนนต์ต้องใช้ฟิลด์อุปกรณ์ประกอบฉากดังที่แสดงด้านบน เริ่มต้นด้วย: และชื่อของอุปกรณ์ประกอบฉาก ที่นี่เรากำลังส่งแท็กองค์ประกอบสีขนาดแบบอักษรและรหัสขององค์ประกอบ
ในฟังก์ชั่นการแสดงผลใน createElement เรากำลังแยกคอมมาดังนั้นองค์ประกอบแรกคือ elementtag ซึ่งมอบให้กับ createElemet ดังที่แสดงในโค้ดต่อไปนี้
return createElement(
   a[0],{
      attrs:{
         id:a[3],
         style:"color:"+a[1]+";font-size:"+a[2]+";"
      }
   },
   this.$slots.default
)a[0]คือแท็กองค์ประกอบ html พารามิเตอร์ถัดไปคือแอตทริบิวต์สำหรับแท็กองค์ประกอบ มีการกำหนดไว้ในฟิลด์ attr ในโค้ดต่อไปนี้
attrs:{
   id:a[3],
   style:"color:"+a[1]+";font-size:"+a[2]+";"
}
เราได้กำหนดแอตทริบิวต์สองรายการสำหรับแท็กองค์ประกอบ - id และ style. ในการทำ id เรากำลังส่ง [3] ซึ่งเป็นค่าที่เรามีหลังจากแยกคอมมา การใช้สไตล์เราได้กำหนดสีและขนาดแบบอักษร
สุดท้ายคือช่องนั่นคือข้อความที่เราให้ไว้ในส่วนประกอบในส่วนของรหัสต่อไปนี้
<testcomponent :elementtype = "'div,red,25,div1'">Hello Jai</testcomponent>เราได้กำหนดข้อความที่จะพิมพ์ใน createElement โดยใช้โค้ดต่อไปนี้
this.$slots.defaultใช้ค่าเริ่มต้นที่กำหนดในฟิลด์ส่วนประกอบ
ต่อไปนี้เป็นผลลัพธ์ที่เราได้รับในเบราว์เซอร์
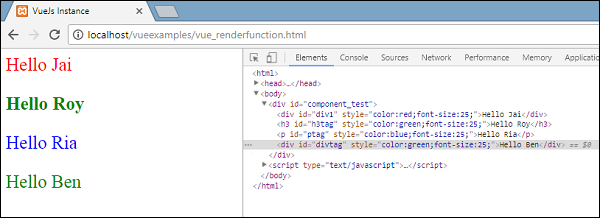
องค์ประกอบยังแสดงโครงสร้าง นี่คือส่วนประกอบที่เรากำหนดไว้ -
<div id = "component_test">
   <testcomponent :elementtype = "'div,red,25,div1'">Hello Jai</testcomponent>
   <testcomponent :elementtype = "'h3,green,25,h3tag'">Hello Roy</testcomponent>
   <testcomponent :elementtype = "'p,blue,25,ptag'">Hello Ria</testcomponent>
   <testcomponent :elementtype = "'div,green,25,divtag'">Hello Ben</testcomponent>
</div>