Spring Boot - Dinlenme Şablonu
Rest Şablonu, RESTful Web Servislerini kullanan uygulamalar oluşturmak için kullanılır. Kullanabilirsinizexchange()tüm HTTP yöntemleri için web hizmetlerini tüketme yöntemi. Aşağıda verilen kod, Rest Şablonu nesnesini otomatik olarak kablolamak için Bean for Rest Şablonunun nasıl oluşturulacağını gösterir.
package com.tutorialspoint.demo;

import org.springframework.boot.SpringApplication;
import org.springframework.boot.autoconfigure.SpringBootApplication;
import org.springframework.context.annotation.Bean;
import org.springframework.web.client.RestTemplate;

@SpringBootApplication
public class DemoApplication {
   public static void main(String[] args) {
      SpringApplication.run(DemoApplication.class, args);
   }
   @Bean
   public RestTemplate getRestTemplate() {
      return new RestTemplate();
   }
}
ALMAK
Consuming the GET API by using RestTemplate - exchange() method
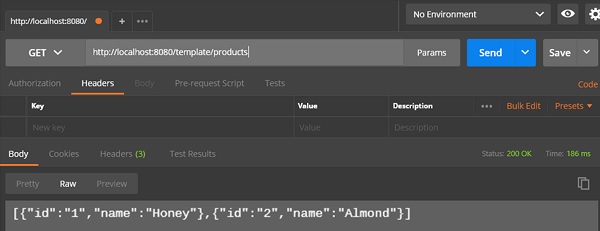
Bu URL'yi varsayalım http://localhost:8080/products Aşağıdaki JSON'u döndürür ve aşağıdaki kodu kullanarak Rest Şablonunu kullanarak bu API yanıtını kullanacağız -
[
   {
      "id": "1",
      "name": "Honey"
   },
   {
      "id": "2",
      "name": "Almond"
   }
]
API'yi kullanmak için verilen noktaları takip etmeniz gerekecek -
- Kalan Şablon Nesnesini otomatik olarak bağladı.
- İstek Başlıklarını ayarlamak için HttpHeaders'ı kullanın.
- İstek nesnesini sarmak için HttpEntity kullanın.
- Exchange () yöntemi için URL, HttpMethod ve Return türünü sağlayın.
@RestController
public class ConsumeWebService {
   @Autowired
   RestTemplate restTemplate;

   @RequestMapping(value = "/template/products")
   public String getProductList() {
      HttpHeaders headers = new HttpHeaders();
      headers.setAccept(Arrays.asList(MediaType.APPLICATION_JSON));
      HttpEntity <String> entity = new HttpEntity<String>(headers);

      return restTemplate.exchange("
         http://localhost:8080/products", HttpMethod.GET, entity, String.class).getBody();
   }
}
İLETİ
Consuming POST API by using RestTemplate - exchange() method
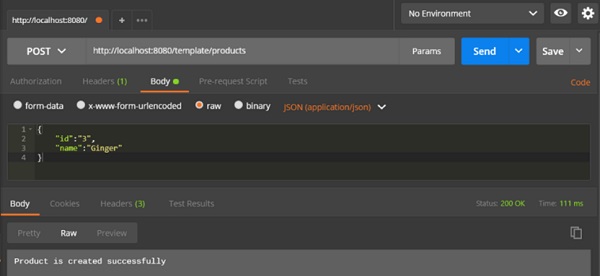
Bu URL'yi varsayalım http://localhost:8080/products aşağıda gösterilen yanıtı döndürürse, Rest Şablonunu kullanarak bu API yanıtını kullanacağız.
Aşağıda verilen kod, İstek gövdesidir -
{
   "id":"3",
   "name":"Ginger"
}
Aşağıda verilen kod, Yanıt gövdesidir -
Product is created successfullyAPI'yi kullanmak için aşağıda verilen noktaları takip etmeniz gerekecek -
Kalan Şablon Nesnesini otomatik olarak bağladı.
İstek Başlıklarını ayarlamak için HttpHeaders'ı kullanın.
İstek nesnesini sarmak için HttpEntity'yi kullanın. Burada, Ürün nesnesini istek gövdesine göndermek için sarıyoruz.
Exchange () yöntemi için URL, HttpMethod ve Return türünü sağlayın.
@RestController
public class ConsumeWebService {
   @Autowired
   RestTemplate restTemplate;

   @RequestMapping(value = "/template/products", method = RequestMethod.POST)
   public String createProducts(@RequestBody Product product) {
      HttpHeaders headers = new HttpHeaders();
      headers.setAccept(Arrays.asList(MediaType.APPLICATION_JSON));
      HttpEntity<Product> entity = new HttpEntity<Product>(product,headers);

      return restTemplate.exchange(
         "http://localhost:8080/products", HttpMethod.POST, entity, String.class).getBody();
   }
}
KOYMAK
Consuming PUT API by using RestTemplate - exchange() method
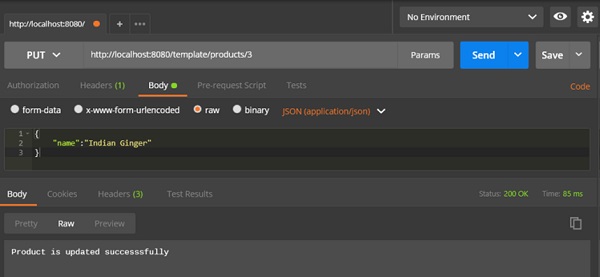
Bu URL'yi varsayalım http://localhost:8080/products/3 aşağıdaki yanıtı döndürür ve bu API yanıtını Rest Şablonu kullanarak tüketeceğiz.
Aşağıda verilen kod İstek gövdesi -
{
   "name":"Indian Ginger"
}
Aşağıda verilen kod, Yanıt gövdesidir -
Product is updated successfullyAPI'yi kullanmak için aşağıda verilen noktaları takip etmeniz gerekecek -
Kalan Şablon Nesnesini otomatik olarak bağladı.
İstek Başlıklarını ayarlamak için HttpHeaders'ı kullanın.
İstek nesnesini sarmak için HttpEntity kullanın. Burada, Ürün nesnesini istek gövdesine göndermek için sarıyoruz.
Exchange () yöntemi için URL, HttpMethod ve Return türünü sağlayın.
@RestController
public class ConsumeWebService {
   @Autowired
   RestTemplate restTemplate;

   @RequestMapping(value = "/template/products/{id}", method = RequestMethod.PUT)
   public String updateProduct(@PathVariable("id") String id, @RequestBody Product product) {
      HttpHeaders headers = new HttpHeaders();
      headers.setAccept(Arrays.asList(MediaType.APPLICATION_JSON));
      HttpEntity<Product> entity = new HttpEntity<Product>(product,headers);

      return restTemplate.exchange(
         "http://localhost:8080/products/"+id, HttpMethod.PUT, entity, String.class).getBody();
   }
}
SİL
Consuming DELETE API by using RestTemplate - exchange() method
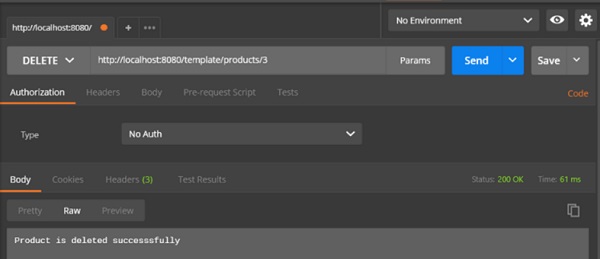
Bu URL'yi varsayalım http://localhost:8080/products/3 aşağıda verilen yanıtı döndürür ve bu API yanıtını Rest Şablonu kullanarak tüketeceğiz.
Aşağıda gösterilen bu kod satırı Yanıt gövdesidir -
Product is deleted successfullyAPI'yi kullanmak için aşağıda gösterilen noktaları takip etmeniz gerekecek -
Kalan Şablon Nesnesini otomatik olarak bağladı.
İstek Başlıklarını ayarlamak için HttpHeaders'ı kullanın.
İstek nesnesini sarmak için HttpEntity kullanın.
Exchange () yöntemi için URL, HttpMethod ve Return türünü sağlayın.
@RestController
public class ConsumeWebService {
   @Autowired
   RestTemplate restTemplate;

   @RequestMapping(value = "/template/products/{id}", method = RequestMethod.DELETE)
   public String deleteProduct(@PathVariable("id") String id) {
      HttpHeaders headers = new HttpHeaders();
      headers.setAccept(Arrays.asList(MediaType.APPLICATION_JSON));
      HttpEntity<Product> entity = new HttpEntity<Product>(headers);

      return restTemplate.exchange(
         "http://localhost:8080/products/"+id, HttpMethod.DELETE, entity, String.class).getBody();
   }
}
Rest Template Controller sınıf dosyasının tamamı aşağıda verilmiştir -
package com.tutorialspoint.demo.controller;

import java.util.Arrays;

import org.springframework.beans.factory.annotation.Autowired;
import org.springframework.http.HttpEntity;
import org.springframework.http.HttpHeaders;
import org.springframework.http.HttpMethod;
import org.springframework.http.MediaType;

import org.springframework.web.bind.annotation.PathVariable;
import org.springframework.web.bind.annotation.RequestBody;
import org.springframework.web.bind.annotation.RequestMapping;
import org.springframework.web.bind.annotation.RequestMethod;
import org.springframework.web.bind.annotation.RestController;
import org.springframework.web.client.RestTemplate;

import com.tutorialspoint.demo.model.Product;

@RestController
public class ConsumeWebService {
   @Autowired
   RestTemplate restTemplate;

   @RequestMapping(value = "/template/products")
   public String getProductList() {
      HttpHeaders headers = new HttpHeaders();
      headers.setAccept(Arrays.asList(MediaType.APPLICATION_JSON));
      HttpEntity<String> entity = new HttpEntity<String>(headers);

      return restTemplate.exchange(
         "http://localhost:8080/products", HttpMethod.GET, entity, String.class).getBody();
   }
   @RequestMapping(value = "/template/products", method = RequestMethod.POST)
   public String createProducts(@RequestBody Product product) {
      HttpHeaders headers = new HttpHeaders();
      headers.setAccept(Arrays.asList(MediaType.APPLICATION_JSON));
      HttpEntity<Product> entity = new HttpEntity<Product>(product,headers);

      return restTemplate.exchange(
         "http://localhost:8080/products", HttpMethod.POST, entity, String.class).getBody();
   }
   @RequestMapping(value = "/template/products/{id}", method = RequestMethod.PUT)
   public String updateProduct(@PathVariable("id") String id, @RequestBody Product product) {
      HttpHeaders headers = new HttpHeaders();
      headers.setAccept(Arrays.asList(MediaType.APPLICATION_JSON));
      HttpEntity<Product> entity = new HttpEntity<Product>(product,headers);

      return restTemplate.exchange(
         "http://localhost:8080/products/"+id, HttpMethod.PUT, entity, String.class).getBody();
   }
   @RequestMapping(value = "/template/products/{id}", method = RequestMethod.DELETE)
   public String deleteProduct(@PathVariable("id") String id) {
      HttpHeaders headers = new HttpHeaders();
      headers.setAccept(Arrays.asList(MediaType.APPLICATION_JSON));
      HttpEntity<Product> entity = new HttpEntity<Product>(headers);

      return restTemplate.exchange(
         "http://localhost:8080/products/"+id, HttpMethod.DELETE, entity, String.class).getBody();
   }
}
Spring Boot Uygulama Sınıfı - DemoApplication.java kodu aşağıda verilmiştir -
package com.tutorialspoint.demo;

import org.springframework.boot.SpringApplication;
import org.springframework.boot.autoconfigure.SpringBootApplication;

@SpringBootApplication
public class DemoApplication {
   public static void main(String[] args) {
      SpringApplication.run(DemoApplication.class, args);
   }
}
Maven build - pom.xml kodu aşağıda verilmiştir -
<?xml version = "1.0" encoding = "UTF-8"?>
<project xmlns = "http://maven.apache.org/POM/4.0.0"
   xmlns:xsi = "http://www.w3.org/2001/XMLSchema-instance"
   xsi:schemaLocation = "http://maven.apache.org/POM/4.0.0
   http://maven.apache.org/xsd/maven-4.0.0.xsd">

   <modelVersion>4.0.0</modelVersion>
   <groupId>com.tutorialspoint</groupId>
   <artifactId>demo</artifactId>
   <version>0.0.1-SNAPSHOT</version>
   <packaging>jar</packaging>
   <name>demo</name>
   <description>Demo project for Spring Boot</description>

   <parent>
      <groupId>org.springframework.boot</groupId>
      <artifactId>spring-boot-starter-parent</artifactId>
      <version>1.5.8.RELEASE</version>
      <relativePath/>
   </parent>

   <properties>
      <project.build.sourceEncoding>UTF-8</project.build.sourceEncoding>
      <project.reporting.outputEncoding>UTF-8</project.reporting.outputEncoding>
      <java.version>1.8</java.version>
   </properties>

   <dependencies>
      <dependency>
         <groupId>org.springframework.boot</groupId>
         <artifactId>spring-boot-starter-web</artifactId>
      </dependency>

      <dependency>
         <groupId>org.springframework.boot</groupId>
         <artifactId>spring-boot-starter-test</artifactId>
         <scope>test</scope>
      </dependency>
   </dependencies>

   <build>
      <plugins>
         <plugin>
            <groupId>org.springframework.boot</groupId>
            <artifactId>spring-boot-maven-plugin</artifactId>
         </plugin>
      </plugins>
   </build>

</project>
Gradle Build - build.gradle kodu aşağıda verilmiştir -
buildscript {
   ext {
      springBootVersion = '1.5.8.RELEASE'
   }
   repositories {
      mavenCentral()
   }
   dependencies {
      classpath("org.springframework.boot:spring-boot-gradle-plugin:${springBootVersion}")
   }
}

apply plugin: 'java'
apply plugin: 'eclipse'
apply plugin: 'org.springframework.boot'

group = 'com.tutorialspoint'
version = '0.0.1-SNAPSHOT'
sourceCompatibility = 1.8

repositories {
   mavenCentral()
}
dependencies {
   compile('org.springframework.boot:spring-boot-starter-web')
   testCompile('org.springframework.boot:spring-boot-starter-test')
}
Aşağıdaki Maven veya Gradle komutlarını kullanarak yürütülebilir bir JAR dosyası oluşturabilir ve Spring Boot uygulamasını çalıştırabilirsiniz:
Maven için aşağıda verilen komutu kullanabilirsiniz -
mvn clean install"BUILD SUCCESS" sonrasında, JAR dosyasını hedef dizinin altında bulabilirsiniz.
Gradle için aşağıda gösterilen komutu kullanabilirsiniz -
gradle clean build"BUILD SUCCESSFUL" den sonra, JAR dosyasını build / libs dizini altında bulabilirsiniz.
Şimdi, aşağıdaki komutu kullanarak JAR dosyasını çalıştırın -
java –jar <JARFILE>Uygulama Tomcat 8080 portunda başlamıştır.

Şimdi POSTMAN uygulamasında aşağıdaki URL'lere tıklayın ve çıktıyı görebilirsiniz.
Ürünleri Rest Şablonuna Göre GET - http://localhost:8080/template/products

Ürünleri Oluştur POST - http://localhost:8080/template/products

Ürün PUT'u Güncelle - http://localhost:8080/template/products/3

Ürünü Sil - http://localhost:8080/template/products/3
