Zend Framework - Çalışma Örneği
Bu bölümde, Zend Framework'te eksiksiz bir MVC tabanlı Çalışan Uygulamasının nasıl oluşturulacağını öğreneceğiz. Aşağıda verilen adımları izleyin.
1. Adım: Module.php
Öncelikle - myapp / module / Employee / src / dizini içinde bir Employee modülü oluşturmalı ve ardından ConfigProviderInterface arayüzünü uygulamalıyız.
Module sınıfı için tam kod aşağıdaki gibidir -
<?php
namespace Employee;
use Zend\ModuleManager\Feature\ConfigProviderInterface;
class Module implements ConfigProviderInterface {
   public function getConfig() {
      return include __DIR__ . '/../config/module.config.php';
   }
}
2. Adım: composer.json
Yapılandırın Tutorial modül içinde composer.json aşağıdaki kodu kullanarak otomatik yükleme bölümü altında.
"autoload": {
   "psr-4": {
      "Application\\": "module/Application/src/",
      "Tutorial\\": "module/Tutorial/src/",
      "Employee\\": "module/Employee/src/"
   }
}
Şimdi, bir composer update komutu kullanarak uygulamayı güncelleyin.
composer updateComposer komutu, uygulamada gerekli değişiklikleri yapacak ve aşağıdaki komut isteminde gösterildiği gibi günlükleri gösterecektir.
Loading composer repositories with package information
Updating dependencies (including require-dev)
   - Removing zendframework/zend-component-installer (0.3.0)
   - Installing zendframework/zend-component-installer (0.3.1)
   Downloading: 100%

   - Removing zendframework/zend-stdlib (3.0.1)
   - Installing zendframework/zend-stdlib (3.1.0)
   Loading from cache

   - Removing zendframework/zend-eventmanager (3.0.1)
   - Installing zendframework/zend-eventmanager (3.1.0)
   Downloading: 100%

   - Removing zendframework/zend-view (2.8.0)
   - Installing zendframework/zend-view (2.8.1)
   Loading from cache

   - Removing zendframework/zend-servicemanager (3.1.0)
   - Installing zendframework/zend-servicemanager (3.2.0)
   Downloading: 100%

   - Removing zendframework/zend-escaper (2.5.1)
   - Installing zendframework/zend-escaper (2.5.2)
   Loading from cache

   - Removing zendframework/zend-http (2.5.4)
   - Installing zendframework/zend-http (2.5.5)
   Loading from cache

   - Removing zendframework/zend-mvc (3.0.1)
   - Installing zendframework/zend-mvc (3.0.4)
   Downloading: 100%

   - Removing phpunit/phpunit (5.7.4)
   - Installing phpunit/phpunit (5.7.5)
   Downloading: 100%

Writing lock file
Generating autoload files
Adım 3: Çalışan Modülü için module.config.php
Myapp / module / Employee / config altında aşağıdaki kodla modül yapılandırma dosyasını oluşturun, "module.config.php".
<?php
namespace Employee;
use Zend\ServiceManager\Factory\InvokableFactory;
use Zend\Router\Http\Segment;
return [
   'controllers' => [
      'factories' => [
         Controller\EmployeeController::class => InvokableFactory::class,
      ],
   ],
   'view_manager' => [
      'template_path_stack' => ['employee' => __DIR__ . '/../view',],
   ],
];
Şimdi, Employee modülünü uygulama seviyesi yapılandırma dosyasında - myapp / config / modules.config.php - yapılandırın.
return ['Zend\Router', 'Zend\Validator', 'Application', 'Tutorial', 'Employee'];4. Adım: EmployeeController
AbstractActionController'ı genişleterek yeni bir PHP sınıfı EmployeeController oluşturun ve bunu myapp / module / Employee / src / Controller dizinine yerleştirin.
Tam kod listesi aşağıdaki gibidir -
<?php
namespace Employee\Controller;
use Zend\Mvc\Controller\AbstractActionController;
use Zend\View\Model\ViewModel;
class EmployeeController extends AbstractActionController {
   public function indexAction() {
      return new ViewModel();
   }
}
Adım 5: Yönlendirici Yapılandırması
Çalışan modülümüze bir segment rotası ekleyelim. Myapp / module / Employee / config'de bulunan çalışan modülü yapılandırma dosyası module.config.php'yi güncelleyin.
<?php
namespace Employee;
use Zend\ServiceManager\Factory\InvokableFactory;
use Zend\Router\Http\Segment;
return [
   'controllers' => [
      'factories' => [
         Controller\EmployeeController::class => InvokableFactory::class,
      ],
   ],
   'router' => [
      'routes' => [
         'employee' => [
            'type' => Segment::class,
            'options' => [
               'route' => '/employee[/:action[/:id]]',
               'constraints' => [
                  'action' => '[a-zA-Z][a-zA-Z0-9_-]*',
                  'id' => '[0-9]+',
               ],
               'defaults' => [
                  'controller' => Controller\EmployeeController::class,
                  'action' => 'index',
               ],
            ],
         ],
      ],
   ],
   'view_manager' => [
      'template_path_stack' => [
         'employee' => __DIR__ . '/../view',
      ],
   ],
];
Çalışan modülümüz için yönlendirmeyi başarıyla ekledik. Sonraki adım, Employee uygulaması için bir görünüm komut dosyası oluşturmaktır.
6. Adım: ViewModel'i oluşturun
Myapp / module / Employee / view / calisan / calisan dizini altinda "index.phtml" adinda bir dosya olusturun.
Dosyaya aşağıdaki değişiklikleri ekleyin -
<div class = "row content">
<h3>This is my first Zend application</h3>
</div>
Move to “EmployeeController.php” file and edit the following changes,
<?php
namespace Employee\Controller;
use Zend\Mvc\Controller\AbstractActionController;
use Zend\View\Model\ViewModel;
class EmployeeController extends AbstractActionController {
public function indexAction() {
return new ViewModel();
}
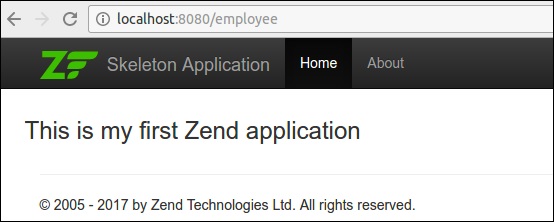
}Son olarak Çalışan modülünü başarıyla tamamladık. aşağıdaki url'yi kullanarak ona erişebiliriz -http://localhost:8080/employee.
Sonuç
Bir sonraki adımda gerçekleştireceğiz add, edit ve deleteçalışan uygulamasındaki veri işlemleri. Bu işlemleri gerçekleştirmek için öncelikle bir veritabanı modeli oluşturmalıyız. Bir sonraki adımda açıklanmaktadır.
7. Adım: Bir Model Oluşturun
Model oluşturalım, Modülümüzde Çalışan src directory. Modeller genellikle Model klasörü altında gruplanır (myapp / module / Employee / src / Model / Employee.php)
<?php
namespace Employee\Model;
class Employee {
   public $id; public $emp_name;
   public $emp_job;
}
Adım 8: MySQL Tablosu
Adlı bir veritabanı oluşturun tutorials aşağıdaki komutu kullanarak yerel MYSQL sunucusunda -
create database tutorials;Adlı bir tablo oluşturalım employee veritabanında aşağıdaki SQL komutunu kullanarak -
use tutorials;
CREATE TABLE employee (
   id int(11) NOT NULL auto_increment,
   emp_name varchar(100) NOT NULL,
   emp_job varchar(100) NOT NULL,
   PRIMARY KEY (id)
);
Verileri şuraya ekle: employee aşağıdaki sorguyu kullanan tablo -
INSERT INTO employee (emp_name, emp_job) VALUES ('Adam',  'Tutor');
INSERT INTO employee (emp_name, emp_job) VALUES ('Bruce',  'Programmer');
INSERT INTO employee (emp_name, emp_job) VALUES ('David',  'Designer');
Adım 9: Veritabanı Yapılandırmasını Güncelleyin
Global Configuration dosyasını, myapp / config / autoload / global.php'yi gerekli veritabanı sürücü bilgileriyle güncelleyin.
return [
   'db' => [
      'driver' => 'Pdo',
      'dsn' => 'mysql:dbname = tutorials;host=localhost',
      'driver_options' => [PDO::MYSQL_ATTR_INIT_COMMAND => 'SET NAMES \'UTF8\''],
   ],
];
Şimdi, yerel yapılandırma dosyasındaki veritabanı kimlik bilgilerini güncelleyin - myapp / config / autoload / local.php. Bu şekilde, yerel ve canlı veritabanı bağlantı kimlik bilgilerini ayırabiliriz.
<?php
return array(
   'db' => array('username' => '<user_name>', 'password' => '<password>',),
);
Adım 10: exchangeArray'i uygulayın
Employee modelinde exchangeArray işlevini uygulayın.
<?php
namespace Employee\Model;
class Employee {
   public $id;
   public $emp_name; public $emp_job;
   public function exchangeArray($data) { $this->id = (!empty($data['id'])) ? $data['id'] : null;
      $this->emp_name = (!empty($data['emp_name'])) ? $data['emp_name'] : null; $this->emp_job = (!empty($data['emp_job'])) ? $data['emp_job'] : null;
   }
}
Adım 11: Çalışan Verilerini almak için TableGateway'i kullanın
Model klasörünün kendisinde EmployeeTable sınıfı oluşturun. Aşağıdaki kod bloğunda tanımlanmıştır.
<?php
namespace Employee\Model;
use Zend\Db\TableGateway\TableGatewayInterface;
class EmployeeTable {
   protected $tableGateway; public function __construct(TableGatewayInterface $tableGateway) {
      $this->tableGateway = $tableGateway;
   }
   public function fetchAll() {
      $resultSet = $this->tableGateway->select();
      return $resultSet;
   }
}
Adım 12: EmployeeTable Sınıfını Yapılandırın
Module.php'deki çalışan hizmetini getServiceConfig () yöntemini kullanarak güncelleyin
<?php
namespace Employee;
use Zend\Db\Adapter\AdapterInterface;
use Zend\Db\ResultSet\ResultSet;
use Zend\Db\TableGateway\TableGateway;
use Zend\ModuleManager\Feature\ConfigProviderInterface;

class Module implements ConfigProviderInterface {
   public function getConfig() {
      return include __DIR__ . '/../config/module.config.php';
   }
   public function getServiceConfig() {
      return [
         'factories' => [
            Model\EmployeeTable::class => function (    $container) {
               $tableGateway = $container>get( Model\EmployeeTableGateway::class);
               $table = new Model\EmployeeTable($tableGateway);
               return $table; }, Model\EmployeeTableGateway::class => function ($container) {
               $dbAdapter = $container->get(AdapterInterface::class);
               $resultSetPrototype = new ResultSet(); $resultSetPrototype->setArrayObjectPrototype(new Model\Employee());
               return new TableGateway('employee', $dbAdapter, null, $resultSetPrototype);
            },
         ],
      ];
   }
}
Adım 13: Denetleyiciye Çalışan Hizmetini Ekleyin
Employee Module Configuration'ın denetleyici bölümünü - myapp / module / config / module.config.php aşağıda gösterildiği gibi güncelleyin.
'controllers' => [
   'factories' => [
      Controller\EmployeeController::class => function($container) { return new Controller\EmployeeController( $container->get(Model\EmployeeTable::class)
         );
      },
   ],
]
Adım 14: EmployeeController için Oluşturucu Ekleyin
Yapıcıyı şu şekilde ekleyin: EmployeeTable bağımsız değişken olarak ve aşağıdaki değişiklikleri düzenleyin.
<?php
namespace Employee\Controller;
use Zend\Mvc\Controller\AbstractActionController;
use Zend\View\Model\ViewModel;
use Employee\Model\Employee;
use Employee\Model\EmployeeTable;

class EmployeeController extends AbstractActionController {
   private $table; public function __construct(EmployeeTable $table) {
      $this->table = $table;
   }
   public function indexAction() {
      $view = new ViewModel([ 'data' => $this->table->fetchAll(),
      ]);
      return $view;
   }
}
15. Adım: Çalışan Bilgilerini "index.phtml" görünüm komut dosyasında görüntüleyin
Dosyaya taşı - index.phtml ve aşağıdaki değişiklikleri yapın -
<?php
$title = 'Employee application';
$this->headTitle($title);
?>
<table class="table">
<tr>
<th>Employee Name</th>
<th>Employee Job</th>
<th>Edit/Delete operations</th>
</tr>
<?php foreach ($data as $empdata) : ?>
<tr>
<td><?php echo $this->escapeHtml($empdata->emp_name);?></td>
<td><?php echo $this->escapeHtml($empdata->emp_job);?></td>
<td>
<a href="<?php echo $this->url('employee', array('action'=>'edit', 'id' =>$empdata->id));?>">Edit</a>
<a href="<?php echo $this->url('employee', array('action'=>'delete', 'id' => $empdata->id));?>">Delete</a>
</td>
</tr>
<?php endforeach; ?>
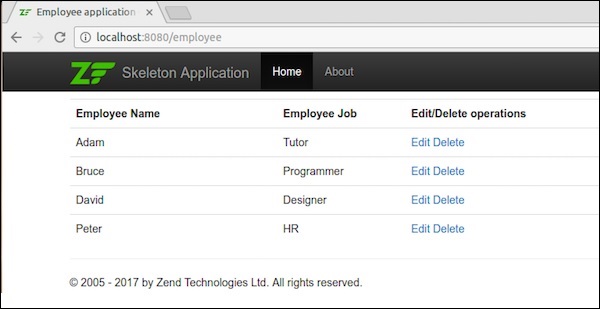
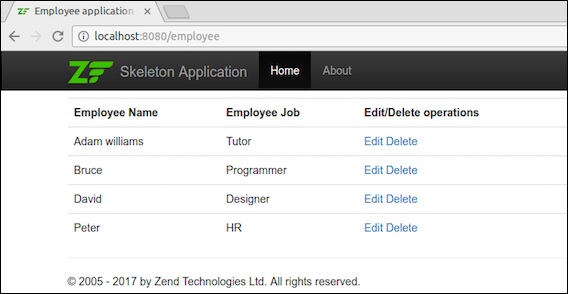
</table>Şimdi başarıyla bir veritabanı modeli oluşturduk ve uygulama içindeki kayıtları getirebiliriz.
URL'yi kullanarak uygulamayı isteyin - http://localhost:8080/employee.
Sonuç

Bir sonraki adım, insert, edit ve delete çalışan modülündeki veri işlemleri.
Adım 16: Bir Çalışan Formu Oluşturun
Adlı bir dosya oluşturun EmployeeForm.phpmyapp / module / Employee / src / Form dizininde. Aşağıdaki kod bloğunda açıklanmıştır.
<?php
namespace Employee\Form;
use Zend\Form\Form;

class EmployeeForm extends Form {
   public function __construct($name = null) { / / we want to ignore the name passed parent::__construct('employee'); $this->add(array(
         'name' => 'id',
         'type' => 'Hidden',
      ));
      $this->add(array( 'name' => 'emp_name', 'type' => 'Text', 'options' => array( 'label' => 'Name', ), )); $this->add(array(
         'name' => 'emp_job',
         'type' => 'Text',
         'options' => array(
            'label' => 'Job',
         ),
      ));
      $this->add(array(
         'name' => 'submit',
         'type' => 'Submit',
         'attributes' => array(
            'value' => 'Go',
            'id' => 'submitbutton',
         ),
      ));
   }
}
Adım 17: Çalışan Modelini Güncelleyin
Çalışan modelini güncelleyin ve InputFilterAwareInterface'i uygulayın. Myapp / module / Employee / src / Employee / Model dizinine gidin ve aşağıdaki değişiklikleriEmployee.phpfile.
<?php
namespace Employee\Model;

// Add these import statements
use Zend\InputFilter\InputFilter;
use Zend\InputFilter\InputFilterAwareInterface;
use Zend\InputFilter\InputFilterInterface;

class Employee implements InputFilterAwareInterface {
   public $id;
   public $emp_name; public $emp_job;
   protected $inputFilter; public function exchangeArray($data) {
      $this->id = (isset($data['id'])) ? $data['id'] : null; $this->emp_name = (isset($data['emp_name'])) ? $data['emp_name'] : null;
      $this->emp_job = (isset($data['emp_job']))  ? $data['emp_job'] : null; } // Add content to these methods: public function setInputFilter(InputFilterInterface $inputFilter) {
      throw new \Exception("Not used");
   }
   public function getInputFilter() {
      if (!$this->inputFilter) { $inputFilter = new InputFilter();
         $inputFilter->add(array( 'name' => 'id', 'required' => true, 'filters' => array( array('name' => 'Int'), ), )); $inputFilter->add(array(
            'name' => 'emp_name',
            'required' => true,
            'filters' => array(
               array('name' => 'StripTags'),
               array('name' => 'StringTrim'),
            ),
            'validators' => array(
               array('name' => 'StringLength',
                        'options' => array(
                           'encoding' => 'UTF-8',
                           'min' => 1,
                           'max' => 50,
                        ),
                    ),
                ),
            ));
         $inputFilter->add(array( 'name' => 'emp_job', 'required' => true, 'filters' => array( array('name' => 'StripTags'), array('name' => 'StringTrim'), ), 'validators' => array( array('name' => 'StringLength', 'options' => array( 'encoding' => 'UTF-8', 'min' => 1, 'max' => 50, ), ), ), )); $this->inputFilter = $inputFilter; } return $this->inputFilter;
   }
}
Adım 18: Employee Controller'da addAction ekleyin
Aşağıdaki değişiklikleri ekleyin EmployeeController sınıf.
<?php
use Zend\Mvc\Controller\AbstractActionController;
use Zend\View\Model\ViewModel;
use Employee\Model\Employee;
use Employee\Model\EmployeeTable;
use Employee\Form\EmployeeForm;

public function addAction() {
   $form = new EmployeeForm(); $form->get('submit')->setValue('Add');
   $request = $this->getRequest();

   if ($request->isPost()) { $employee = new Employee();
      $form->setInputFilter($employee->getInputFilter());
      $form->setData($request->getPost());

      if ($form->isValid()) { $employee->exchangeArray($form->getData()); $this->table->saveEmployee($employee); // Redirect to list of employees return $this->redirect()->toRoute('employee');
      }
   }
   return array('form' => $form);
}
Adım 19: EmployeeTable sınıfına kaydetme işlevselliği ekleyin
EmployeeTable sınıfına şu iki işlevi ekleyin - myapp / module / Employee / src / Model / EmployeeTable.php
public function getEmployee($id) {
   $id = (int) $id;
   $rowset = $this->tableGateway->select(array('id' => $id)); $row = $rowset->current(); if (!$row) {
      throw new \Exception("Could not find row $id"); } return $row;
}
public function saveEmployee(Employee $employee) { $data = array (
      'emp_name' => $employee->emp_name, 'emp_job' => $employee->emp_job,
   );
   $id = (int) $employee->id;
   if ($id == 0) { $this->tableGateway->insert($data); } else { if ($this->getEmployee($id)) { $this->tableGateway->update($data, array('id' => $id));
      } else {
         throw new \Exception('Employee id does not exist');
      }
   }
}
Adım 20: AddAction yöntemi, Add.phtml için Görünüm komut dosyası oluşturun
Uygulamam / modül / görünüm / çalışan / çalışan içindeki "Add.phtml" dosyasına aşağıdaki değişiklikleri ekleyin.
<?php
$title = 'Add new employee'; $this->headTitle($title); ?> <h1><?php echo $this->escapeHtml($title); ?></h1> <?php $form->setAttribute('action', $this->url('employee', array('action' => 'add'))); $form->prepare();
echo $this->form()->openTag($form);
echo $this->formHidden($form->get('id'));
echo $this->formRow($form->get('emp_name'))."<br>";
echo $this->formRow($form->get('emp_job'))."<br>";
echo $this->formSubmit($form->get('submit'));
echo $this->form()->closeTag();
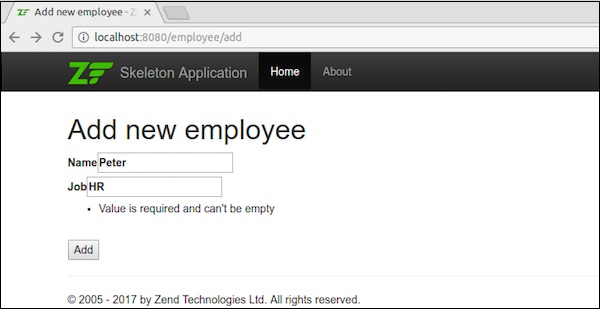
Request the application using the url, http://localhost:8080/employee/addSonuç
Veriler eklendikten sonra, ana sayfaya yönlendirilecektir.
Adım 21: Çalışan Kayıtlarını Düzenleyin
Employee modülünde veri düzenleme işlemlerini gerçekleştirelim. Aşağıdaki değişiklikleri güncelleyinEmployeecontroller.php.
public function editAction() {
   $id = (int) $this->params()->fromRoute('id', 0); if (!$id) {
      return $this->redirect()->toRoute('employee', array( 'action' => 'add' )); } try { $employee = $this->table->getEmployee($id);
   } catch (\Exception $ex) { return $this->redirect()->toRoute('employee', array(
         'action' => 'index'
      ));
   }
   $form = new EmployeeForm(); $form->bind($employee); $form->get('submit')->setAttribute('value', 'Edit');
   $request = $this->getRequest();

   if ($request->isPost()) { $form->setInputFilter($employee->getInputFilter()); $form->setData($request->getPost()); if ($form->isValid()) {
         $this->table->saveEmployee($employee);

         // Redirect to list of employees
         return $this->redirect()->toRoute('employee'); } } return array('id' => $id, 'form' => $form,);
}
Burada arıyoruz id, eşleşen rotada olan ve ardından düzenleme işlemi için çalışan ayrıntılarını yükleyin.
Adım 22: Employee.php
Şimdi - myapp / module / Employee / src / Employee / Model / dizininde bulunan “Employee.php” dosyasına aşağıdaki değişiklikleri ekleyin.
public function getArrayCopy() {
   return get_object_vars($this);
}
Burada, Zend \ Stdlib \ Hydrator \ ArraySerializable, modelde iki yöntem bulmayı bekler: getArrayCopy() ve exchangeArray().
Burada exchangeArray () yineleme için kullanılır. Bu işlev, çalışan tablosundaki verileri bağlamak için kullanılır.
Şimdi, için bir görünüm betiği oluşturmamız gerekiyor editAction().
Adım 23: Edit.phtml oluşturun
/ Çalışan / görünüm / çalışan / çalışan / edit.phtml modülünde bir görünüm komut dosyası oluşturun
<?php
$title = 'Edit employee records'; $this->headTitle($title); ?> <h1><?php echo $this->escapeHtml($title); ?></h1> <?php $form = $this->form; $form->setAttribute('action', $this->url( 'employee', array('action' => 'edit', 'id' => $this->id,)
));
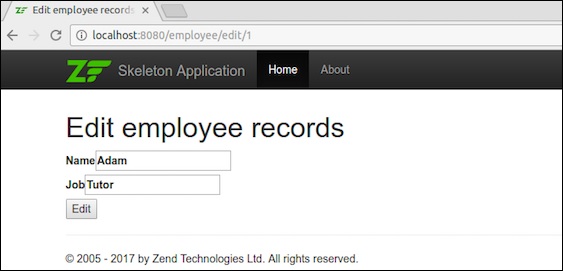
$form->prepare(); echo $this->form()->openTag($form); echo $this->formHidden($form->get('id')); echo $this->formRow($form->get('emp_name'))."<br>"; echo $this->formRow($form->get('emp_job'))."<br>"; echo $this->formSubmit($form->get('submit')); echo $this->form()->closeTag();Çalışan ayrıntılarının düzenlenmesi aşağıdaki ekran görüntüsünde gösterilmektedir.
Veriler düzenlendiğinde, ana sayfaya yönlendirilecektir.
Adım 24: deleteEmployee yöntemini ekleyin
EmployeeTable sınıfına deleteEmployee yöntemini ekleyin - myapp / module / Employee / src / Model / EmployeeTable.php
public function deleteEmployee($id) { $this->tableGateway->delete(['id' => (int) $id]);
}
Adım 25: Çalışan Kayıtlarını Silin
Şimdi Employee modülünde veri silme işlemlerini gerçekleştirelim. Aşağıdaki yöntemi ekleyin,deleteAction EmployeeController sınıfında.
public function deleteAction() {
   $id = (int) $this->params()->fromRoute('id', 0); if (!$id) {
      return $this->redirect()->toRoute('employee'); } $request = $this->getRequest(); if ($request->isPost()) {
      $del = $request->getPost('del', 'No');
      if ($del == 'Yes') { $id = (int) $request->getPost('id'); $this->table->deleteEmployee($id); } return $this->redirect()->toRoute('employee');
   }
   return array(
      'id' => $id, 'employee' => $this->table->getEmployee($id)
   );
}
Burada deleteEmployee () yöntemi, çalışanı kendi id ve çalışanlar listesi sayfasına (ana sayfa) yönlendirir.
Şimdi deleteAction () yöntemi için karşılık gelen bir görünüm komut dosyaları oluşturalım.
Adım 26: Bir Görünüm Komut Dosyası Oluşturun
Uygulamam / modül / Çalışan / görünüm / çalışan / çalışan / delete.phtml içinde delete.phtml adlı bir dosya oluşturun ve içine aşağıdaki kodu ekleyin.
<?php
$title = 'Delete an employee record';
$this->headTitle($title);
?>
<h1><?php echo $this->escapeHtml($title); ?></h1>
'<?php echo $this->escapeHtml($employee->emp_name); ?>' by
'<?php echo $this->escapeHtml($employee->emp_job); ?&'?
<?php
$url = $this->url('employee', array('action' => 'delete', 'id' => $this->id,)); ?> <form action ="<?php echo $url; ?>" method = "post">
<div>
<input type = "hidden" name = "id" value = "<?php echo (int) $employee->id; ?>" />
<input type = "submit" name = "del" value = "Yes" />
<input type = "submit" name = "del" value = "No" />
</div>
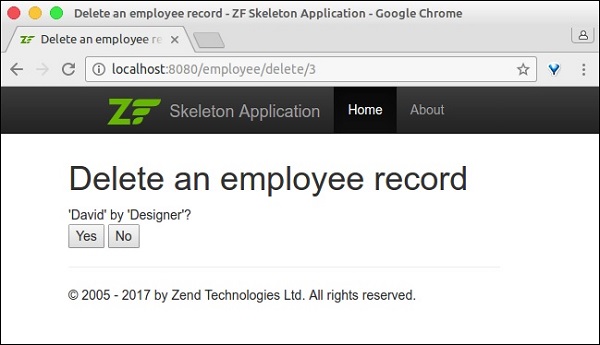
</form>Şimdi, herhangi bir çalışanı silin edit Ana sayfadaki bağlantı ve sonuç aşağıdaki ekran görüntüsünde gösterildiği gibi olacaktır.
Sonuç
Gerekli tüm özellikleri uygulayarak Çalışan modülünü başarıyla tamamladık.
Sonuç
Mevcut rekabet ortamında, Zend çerçevesi geliştirici tarafından en üst noktaya yerleştirilmiştir. PHP dilinde herhangi bir programa veya herhangi bir uygulama türüne soyutlamalar sağlar. Olgunlaştırılmış bir çerçevedir ve modern PHP dili özelliklerini destekler. Eğlenceli, profesyonel, gelişen ve mevcut teknolojiye ayak uyduruyor.