Flex - Datenbindung
Was ist Datenbindung?
Datenbindung ist ein Prozess, bei dem Daten eines Objekts an ein anderes Objekt gebunden werden. Es erfordert eine Quelleneigenschaft, eine Zieleigenschaft und ein auslösendes Ereignis, das angibt, wann die Daten von der Quelle zum Ziel kopiert werden sollen.
Flex bietet drei Möglichkeiten, um die Datenbindung wie folgt durchzuführen
- Syntax für geschweifte Klammern in MXML-Skript ({})
- <fx: binding> -Tag in MXML
- BindingUtils in ActionScript
Datenbindung - Verwenden von geschweiften Klammern in MXML
Das folgende Beispiel zeigt, wie geschweifte Klammern verwendet werden, um die Datenbindung einer Quelle an das Ziel anzugeben.
<s:TextInput id = "txtInput1" />
<s:TextInput id = "txtInput2" text = "{txtInput1.text}" />
Datenbindung - Verwenden des Tags <fx: Binding> in MXML
Das folgende Beispiel zeigt die Verwendung
<fx:Binding source = "txtInput1.text" destination = "txtInput2.text" />
<s:TextInput id = "txtInput1" />
<s:TextInput id = "txtInput2" />
Datenbindung - Verwenden von BindingUtils in ActionScript
Das folgende Beispiel zeigt, wie Sie mit BindingUtils die Datenbindung einer Quelle an das Ziel angeben.
<fx:Script>
   <![CDATA[
      import mx.binding.utils.BindingUtils;
      import mx.events.FlexEvent;

      protected function txtInput2_preinitializeHandler(event:FlexEvent):void {
         BindingUtils.bindProperty(txtInput2,"text",txtInput1, "text");
      }
   ]]>
</fx:Script>

<s:TextInput id = "txtInput1" />
<s:TextInput id = "txtInput2"
   preinitialize = "txtInput2_preinitializeHandler(event)" />
Beispiel für die Flex-Datenbindung
Führen Sie die folgenden Schritte aus, um das Skinnen in einer Flex-Anwendung in Aktion zu sehen, indem Sie eine Testanwendung erstellen.
| Schritt | Beschreibung |
|---|---|
| 1 | Erstellen Sie ein Projekt mit dem Namen HelloWorld unter einem Paket com.tutorialspoint.client, wie im Kapitel Flex - Anwendung erstellen erläutert . |
| 2 | Ändern Sie HelloWorld.mxml wie unten erläutert. Halten Sie den Rest der Dateien unverändert. |
| 3 | Kompilieren Sie die Anwendung und führen Sie sie aus, um sicherzustellen, dass die Geschäftslogik den Anforderungen entspricht. |
Im Folgenden finden Sie den Inhalt der geänderten Datei HelloWorld.mxmlsrc/com/tutorialspoint/client/HelloWorld.mxml.
<?xml version = "1.0" encoding = "utf-8"?>
<s:Application xmlns:fx = "http://ns.adobe.com/mxml/2009"
xmlns:s = "library://ns.adobe.com/flex/spark"
xmlns:mx = "library://ns.adobe.com/flex/mx
width = "100%" height = "100%" minWidth = "500" minHeight = "500">
<fx:Style source = "/com/tutorialspoint/client/Style.css" />
<fx:Script>
<![CDATA[
import mx.binding.utils.BindingUtils;
import mx.events.FlexEvent;
protected function txtInput6_preinitializeHandler(event:FlexEvent):void {
BindingUtils.bindProperty(txtInput6,"text",txtInput5, "text");
}
]]>
</fx:Script>
<fx:Binding source = "txtInput3.text" destination = "txtInput4.text" />
<s:BorderContainer width = "500" height = "550" id = "mainContainer"
styleName = "container">
<s:VGroup width = "100%" height = "100%" gap = "50" horizontalAlign = "center"
verticalAlign = "middle">
<s:Label id = "lblHeader" text = "Data Binding Demonstration"
fontSize = "40" color = "0x777777" styleName = "heading" />
<s:Panel title = "Example #1 (Using Curly Braces,\{\})" width = "400"
height = "100" >
<s:layout>
<s:VerticalLayout paddingTop = "10" paddingLeft = "10" />
</s:layout>
<s:HGroup >
<s:Label text = "Type here: " width = "100" paddingTop = "6" />
<s:TextInput id = "txtInput1" />
</s:HGroup>
<s:HGroup >
<s:Label text = "Copied text: " width = "100" paddingTop = "6" />
<s:TextInput id = "txtInput2" text = "{txtInput1.text}" />
</s:HGroup>
</s:Panel>
<s:Panel title = "Example #2 (Using <fx:Binding>)" width = "400"
height = "100" >
<s:layout>
<s:VerticalLayout paddingTop = "10" paddingLeft = "10" />
</s:layout>
<s:HGroup >
<s:Label text = "Type here: " width = "100" paddingTop = "6" />
<s:TextInput id = "txtInput3" />
</s:HGroup>
<s:HGroup >
<s:Label text = "Copied text: " width = "100" paddingTop = "6" />
<s:Label id = "txtInput4" />
</s:HGroup>
</s:Panel>
<s:Panel title = "Example #3 (Using BindingUtils)" width = "400"
height = "100" >
<s:layout>
<s:VerticalLayout paddingTop = "10" paddingLeft = "10" />
</s:layout>
<s:HGroup >
<s:Label text = "Type here: " width = "100" paddingTop = "6" />
<s:TextInput id = "txtInput5" />
</s:HGroup>
<s:HGroup >
<s:Label text = "Copied text: " width = "100" paddingTop = "6" />
<s:TextInput enabled = "false" id = "txtInput6"
preinitialize = "txtInput6_preinitializeHandler(event)" />
</s:HGroup>
</s:Panel>
</s:VGroup>
</s:BorderContainer>
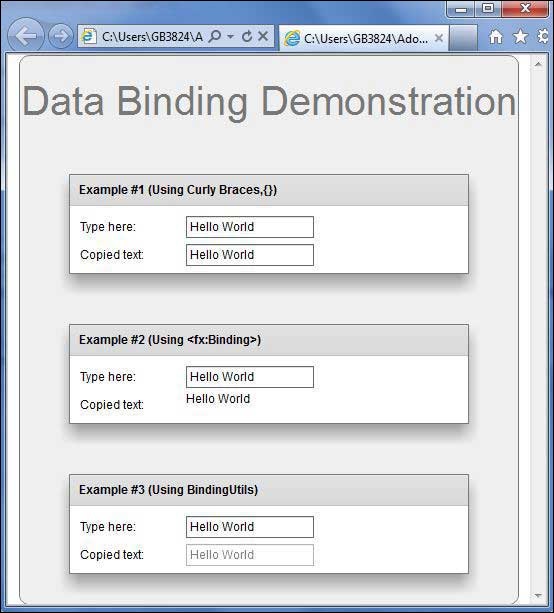
</s:Application>Wenn Sie mit allen vorgenommenen Änderungen fertig sind, lassen Sie uns die Anwendung im normalen Modus kompilieren und ausführen, wie wir es im Kapitel Flex - Anwendung erstellen getan haben . Wenn mit Ihrer Anwendung alles in Ordnung ist, führt dies zu folgendem Ergebnis: [ Online testen ]
