Flex - Liaison de données
Qu'est-ce que la liaison de données?
La liaison de données est un processus dans lequel les données d'un objet sont liées à un autre objet. Il nécessite une propriété source, une propriété de destination et un événement déclencheur qui indique quand copier les données de la source vers la destination.
Flex propose trois méthodes de liaison de données comme ci-dessous
- Syntaxe des accolades dans le script MXML ({})
- Balise <fx: binding> en MXML
- BindingUtils dans ActionScript
Liaison de données - Utilisation d'accolades dans MXML
L'exemple suivant montre comment utiliser des accolades pour spécifier la liaison de données d'une source à la destination.
<s:TextInput id = "txtInput1" />
<s:TextInput id = "txtInput2" text = "{txtInput1.text}" />
Liaison de données - Utilisation de la balise <fx: Binding> dans MXML
L'exemple suivant montre comment utiliser
<fx:Binding source = "txtInput1.text" destination = "txtInput2.text" />
<s:TextInput id = "txtInput1" />
<s:TextInput id = "txtInput2" />
Liaison de données - Utilisation de BindingUtils dans ActionScript
L'exemple suivant montre comment utiliser BindingUtils pour spécifier la liaison de données d'une source à la destination.
<fx:Script>
   <![CDATA[
      import mx.binding.utils.BindingUtils;
      import mx.events.FlexEvent;

      protected function txtInput2_preinitializeHandler(event:FlexEvent):void {
         BindingUtils.bindProperty(txtInput2,"text",txtInput1, "text");
      }
   ]]>
</fx:Script>

<s:TextInput id = "txtInput1" />
<s:TextInput id = "txtInput2"
   preinitialize = "txtInput2_preinitializeHandler(event)" />
Exemple de liaison de données Flex
Suivez les étapes ci-dessous pour voir le skinning en action dans une application Flex en créant une application de test -
| Étape | La description |
|---|---|
| 1 | Créez un projet avec un nom HelloWorld sous un package com.tutorialspoint.client comme expliqué dans le chapitre Flex - Créer une application . |
| 2 | Modifiez HelloWorld.mxml comme expliqué ci-dessous. Gardez le reste des fichiers inchangé. |
| 3 | Compilez et exécutez l'application pour vous assurer que la logique métier fonctionne conformément aux exigences. |
Voici le contenu du fichier HelloWorld.mxml modifiésrc/com/tutorialspoint/client/HelloWorld.mxml.
<?xml version = "1.0" encoding = "utf-8"?>
<s:Application xmlns:fx = "http://ns.adobe.com/mxml/2009"
xmlns:s = "library://ns.adobe.com/flex/spark"
xmlns:mx = "library://ns.adobe.com/flex/mx
width = "100%" height = "100%" minWidth = "500" minHeight = "500">
<fx:Style source = "/com/tutorialspoint/client/Style.css" />
<fx:Script>
<![CDATA[
import mx.binding.utils.BindingUtils;
import mx.events.FlexEvent;
protected function txtInput6_preinitializeHandler(event:FlexEvent):void {
BindingUtils.bindProperty(txtInput6,"text",txtInput5, "text");
}
]]>
</fx:Script>
<fx:Binding source = "txtInput3.text" destination = "txtInput4.text" />
<s:BorderContainer width = "500" height = "550" id = "mainContainer"
styleName = "container">
<s:VGroup width = "100%" height = "100%" gap = "50" horizontalAlign = "center"
verticalAlign = "middle">
<s:Label id = "lblHeader" text = "Data Binding Demonstration"
fontSize = "40" color = "0x777777" styleName = "heading" />
<s:Panel title = "Example #1 (Using Curly Braces,\{\})" width = "400"
height = "100" >
<s:layout>
<s:VerticalLayout paddingTop = "10" paddingLeft = "10" />
</s:layout>
<s:HGroup >
<s:Label text = "Type here: " width = "100" paddingTop = "6" />
<s:TextInput id = "txtInput1" />
</s:HGroup>
<s:HGroup >
<s:Label text = "Copied text: " width = "100" paddingTop = "6" />
<s:TextInput id = "txtInput2" text = "{txtInput1.text}" />
</s:HGroup>
</s:Panel>
<s:Panel title = "Example #2 (Using <fx:Binding>)" width = "400"
height = "100" >
<s:layout>
<s:VerticalLayout paddingTop = "10" paddingLeft = "10" />
</s:layout>
<s:HGroup >
<s:Label text = "Type here: " width = "100" paddingTop = "6" />
<s:TextInput id = "txtInput3" />
</s:HGroup>
<s:HGroup >
<s:Label text = "Copied text: " width = "100" paddingTop = "6" />
<s:Label id = "txtInput4" />
</s:HGroup>
</s:Panel>
<s:Panel title = "Example #3 (Using BindingUtils)" width = "400"
height = "100" >
<s:layout>
<s:VerticalLayout paddingTop = "10" paddingLeft = "10" />
</s:layout>
<s:HGroup >
<s:Label text = "Type here: " width = "100" paddingTop = "6" />
<s:TextInput id = "txtInput5" />
</s:HGroup>
<s:HGroup >
<s:Label text = "Copied text: " width = "100" paddingTop = "6" />
<s:TextInput enabled = "false" id = "txtInput6"
preinitialize = "txtInput6_preinitializeHandler(event)" />
</s:HGroup>
</s:Panel>
</s:VGroup>
</s:BorderContainer>
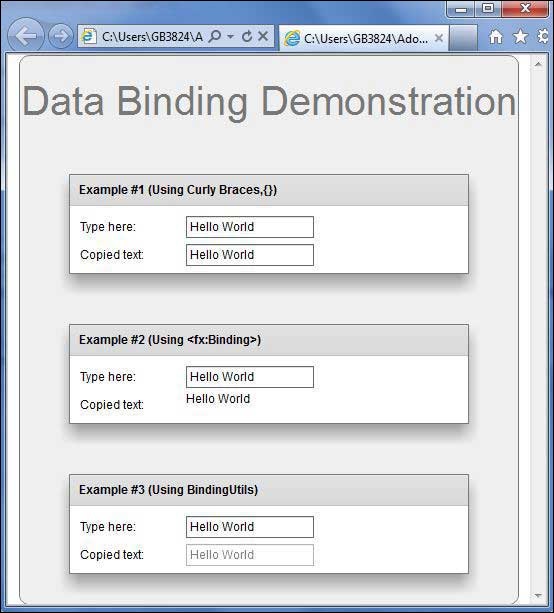
</s:Application>Une fois que vous êtes prêt avec tous les changements effectués, laissez-nous compiler et exécuter l'application en mode normal comme nous l'avons fait dans le chapitre Flex - Créer une application . Si tout va bien avec votre application, elle produira le résultat suivant: [ Essayez-le en ligne ]
