Spring MVC - Exemple d'intégration de LOG4J
L'exemple suivant montre comment intégrer LOG4J à l'aide de Spring Web MVC Framework. Pour commencer, ayons en place un IDE Eclipse fonctionnel et respectons les étapes suivantes pour développer une application Web basée sur un formulaire dynamique à l'aide de Spring Web Framework.
| Étape | La description |
|---|---|
| 1 | Créez un projet avec le nom TestWeb sous un package com.tutorialspoint comme expliqué dans le chapitre Spring MVC - Hello World. |
| 2 | Créez une classe Java HelloController sous le package com.tutorialspointpackage. |
| 3 | Téléchargez la bibliothèque log4j LOG4J à partir de la page du référentiel maven . Mettez-le dans votre CLASSPATH. |
| 4 | Créez un log4j.properties sous le dossier SRC. |
| 5 | La dernière étape consiste à créer le contenu des fichiers source et de configuration et d'exporter l'application comme expliqué ci-dessous. |
HelloController.java
package com.tutorialspoint;

import org.apache.log4j.Logger;
import org.springframework.stereotype.Controller;
import org.springframework.web.bind.annotation.RequestMapping;
import org.springframework.web.bind.annotation.RequestMethod;
import org.springframework.ui.ModelMap;

@Controller
@RequestMapping("/hello")
public class HelloController{
   private static final Logger LOGGER = Logger.getLogger(HelloController.class);
   @RequestMapping(method = RequestMethod.GET)
   public String printHello(ModelMap model) {
      LOGGER.info("printHello started.");

      //logs debug message
      if(LOGGER.isDebugEnabled()){
         LOGGER.debug("Inside:  printHello");
      }
      //logs exception
      LOGGER.error("Logging a sample exception", new Exception("Testing"));

      model.addAttribute("message", "Hello Spring MVC Framework!");
      LOGGER.info("printHello ended.");
      return "hello";
   }
}
log4j.properties
# Root logger option
log4j.rootLogger = DEBUG, stdout, file

# Redirect log messages to console
log4j.appender.stdout = org.apache.log4j.ConsoleAppender
log4j.appender.stdout.Target = System.out
log4j.appender.stdout.layout = org.apache.log4j.PatternLayout
log4j.appender.stdout.layout.ConversionPattern = %d{yyyy-MM-dd HH:mm:ss} %-5p %c{1}:%L - %m%n

# Redirect log messages to a log file
log4j.appender.file = org.apache.log4j.RollingFileAppender
#outputs to Tomcat home
log4j.appender.file.File = ${catalina.home}/logs/myapp.log
log4j.appender.file.MaxFileSize = 5MB
log4j.appender.file.MaxBackupIndex = 10
log4j.appender.file.layout = org.apache.log4j.PatternLayout
log4j.appender.file.layout.ConversionPattern = %d{yyyy-MM-dd HH:mm:ss} %-5p %c{1}:%L - %m%n
TestWeb-servlet.xml
<beans xmlns = "http://www.springframework.org/schema/beans"
   xmlns:context = "http://www.springframework.org/schema/context"
   xmlns:xsi = "http://www.w3.org/2001/XMLSchema-instance"
   xmlns:mvc = "http://www.springframework.org/schema/mvc"
   xsi:schemaLocation = "
   http://www.springframework.org/schema/beans
   http://www.springframework.org/schema/beans/spring-beans-3.0.xsd
   http://www.springframework.org/schema/context
   http://www.springframework.org/schema/context/spring-context-3.0.xsd
   http://www.springframework.org/schema/mvc
   http://www.springframework.org/schema/mvc/spring-mvc-3.0.xsd">
   <context:component-scan base-package = "com.tutorialspoint" />

   <bean class = "org.springframework.web.servlet.view.InternalResourceViewResolver">
      <property name = "prefix" value = "/WEB-INF/jsp/" />
      <property name = "suffix" value = ".jsp" />
   </bean>
</beans>
bonjour.jsp
<%@ page contentType = "text/html; charset = UTF-8" %>
<html>
   <head>
      <title>Hello World</title>
   </head>
   <body>
      <h2>${message}</h2>
   </body>
</html>
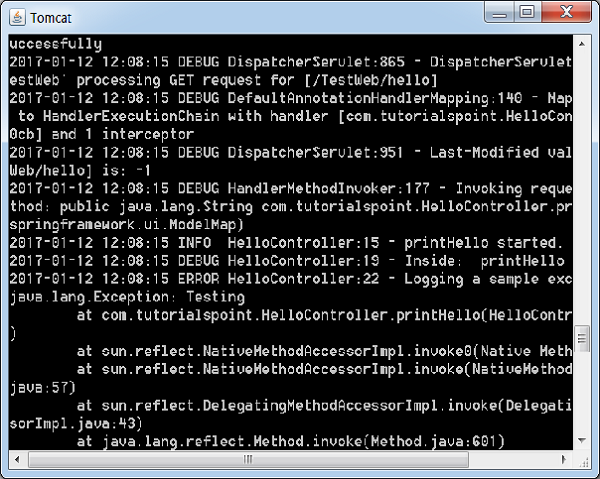
Ici, nous avons configuré le LOG4J pour enregistrer les détails sur la console Tomcat et dans le fichier présent dans & t; tomcat home → se connecte sous myapp.log.
Une fois que vous avez terminé la création des fichiers source et de configuration, exportez votre application. Faites un clic droit sur votre application, utilisezExport → WAR File option et enregistrez votre TestWeb.war fichier dans le dossier webapps de Tomcat.
Maintenant, démarrez le serveur Tomcat et assurez-vous que vous pouvez accéder à d'autres pages Web à partir du dossier Webapps à l'aide d'un navigateur standard. Essayez une URL -http://localhost:8080/TestWeb/hello et nous verrons l'écran suivant sur le journal de Tomcat.
