Electron-通知
Electronは、MacOS専用のネイティブ通知APIを提供します。したがって、これは使用せず、代わりにnode-notifierというnpmモジュールを使用します。これにより、Windows、MacOS、およびLinux上のユーザーに通知できます。
そのフォルダーで次のコマンドを使用して、アプリフォルダーにnode-notifierモジュールをインストールします-
$ npm install --save node-notifierこのボタンをクリックするたびに通知を生成するボタンを持つアプリを作成しましょう。
新しいを作成します main.js ファイルに次のコードを入力します-
const {app, BrowserWindow} = require('electron')
const url = require('url')
const path = require('path')

let win

function createWindow() {
   win = new BrowserWindow({width: 800, height: 600})
   win.loadURL(url.format ({
      pathname: path.join(__dirname, 'index.html'),
      protocol: 'file:',
      slashes: true
   }))
}

app.on('ready', createWindow)次に、通知をトリガーするWebページとスクリプトを作成しましょう。新しいを作成しますindex.html 次のコードのファイル-
<!DOCTYPE html>
<html>
   <head>
      <meta charset = "UTF-8">
      <title>Menus</title>
   </head>

   <body>
      <button type = "button" id = "notify" name = "button">
         Click here to trigger a notification!</button>
      <script type = "text/javascript">
         const notifier = require('node-notifier')
         const path = require('path');

         document.getElementById('notify').onclick = (event) => {
            notifier.notify ({
               title: 'My awesome title',
               message: 'Hello from electron, Mr. User!',
               icon: path.join('','/home/ayushgp/Desktop/images.png'),  // Absolute path
                  (doesn't work on balloons)
               sound: true,  // Only Notification Center or Windows Toasters
               wait: true    // Wait with callback, until user action is taken
               against notification

            }, function (err, response) {
               // Response is response from notification
            });

            notifier.on('click', function (notifierObject, options) {
               console.log("You clicked on the notification")
            });

            notifier.on('timeout', function (notifierObject, options) {
               console.log("Notification timed out!")
            });
         }
      </script>
   </body>
</html>
ザ・ notify メソッドはそれを渡すことができます objectwith通知のカスタマイズに役立つタイトル、メッセージ、サムネイルなどの情報。通知にいくつかのイベントリスナーを設定することもできます。
次に、次のコマンドを使用してアプリを実行します-
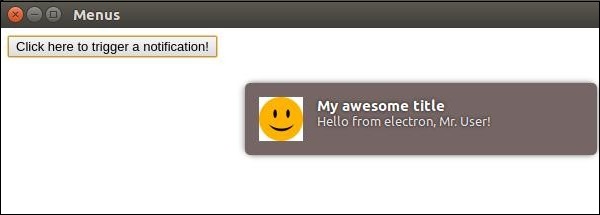
$ electron ./main.js作成したボタンをクリックすると、次のスクリーンショットに示すように、オペレーティングシステムからのネイティブ通知が表示されます-

また、ユーザーが通知をクリックしたり、通知がタイムアウトしたりするイベントも処理しました。これらのメソッドは、アプリがバックグラウンドで実行されている場合に、アプリをよりインタラクティブにするのに役立ちます。