symfony-ルーティング
ルーティングマップは、リクエストURIを特定のコントローラーのメソッドにマップします。一般に、URIには次の3つの部分があります-
- ホスト名セグメント
- パスセグメント
- クエリセグメント
たとえば、URI / URLでは、 http://www.tutorialspoint.com/index?q=data, www.tutorialspoint.comはホスト名セグメント、indexはパスセグメント、q = dataはクエリセグメントです。一般に、ルーティングは一連の制約に対してページセグメントをチェックします。いずれかの制約が一致する場合、値のセットを返します。主な値の1つはコントローラーです。
注釈
アノテーションはSymfonyアプリケーションの設定において重要な役割を果たします。アノテーションは、コーディング自体で構成を宣言することにより、構成を簡素化します。アノテーションは、クラス、メソッド、およびプロパティに関するメタ情報を提供することに他なりません。ルーティングはアノテーションを広範囲に使用します。ルーティングはアノテーションなしで実行できますが、アノテーションはルーティングを大幅に簡素化します。
以下は、サンプルの注釈です。
/**
   * @Route(“/student/home”)
*/
public function homeAction() {
   // ...
}
ルーティングの概念
「student」プロジェクトで作成されたStudentControllerクラスについて考えてみます。
StudentController.php
// src/AppBundle/Controller/StudentController.php
namespace AppBundle\Controller;

use Symfony\Bundle\FrameworkBundle\Controller\Controller;
use Sensio\Bundle\FrameworkExtraBundle\Configuration\Route;

class StudentController extends Controller {
   /**
      * @Route(“/student/home”)
   */
   public function homeAction() {
      // ...
   }

   /**
      * @Route(“/student/about”)
   */
   public function aboutAction() {
   }
}ここで、ルーティングは2つのステップを実行します。あなたが行くなら/student/home、最初のルートが一致し、 homeAction()実行されます。それ以外の場合は、/student/about、2番目のルートが一致し、次に aboutAction() 実行されます。
ワイルドカード形式の追加
2ページ目と3ページ目に対応して/ student / 2や/ student / 3のようなURLを持つ学生レコードのページ付けされたリストがあるとします。次に、ルートのパスを変更する場合は、ワイルドカード形式を使用できます。
例
// src/AppBundle/Controller/BlogController.php
namespace AppBundle\Controller;

use Symfony\Bundle\FrameworkBundle\Controller\Controller;
use Sensio\Bundle\FrameworkExtraBundle\Configuration\Route;

class StudentController extends Controller {
   /**
      * @Route(“/student/{page}", name = “student_about”, requirements = {"page": "\d+"})
   */
   public function aboutAction($page) {
      // ...
   }
}
ここでは、 \d+ 任意の長さの数字に一致する正規表現です。
プレースホルダーの割り当て
作業手順でプレースホルダー値を割り当てることができます。それは次のように定義されます。
// src/AppBundle/Controller/BlogController.php
namespace AppBundle\Controller;

use Symfony\Bundle\FrameworkBundle\Controller\Controller;
use Sensio\Bundle\FrameworkExtraBundle\Configuration\Route;

class StudentController extends Controller {
   /**
      * @Route(“/student/{page}", name = “student_about”, requirements = {"page": "\d+"})
   */

   public function aboutAction($page = 1) {
      // ...
   }
}
ここで、/ studentに移動すると、 student_about route 一致し、 $page デフォルトの値は1です。
ページへのリダイレクト
ユーザーを別のページにリダイレクトする場合は、 redirectToRoute() そして redirect() メソッド。
public function homeAction() {
   // redirect to the "homepage" route
   return $this->redirectToRoute('homepage');

   // redirect externally
   \return $this->redirect('http://example.com/doc');
}
URLの生成
URLを生成するには、ルート名を検討します。 student_name とワイルドカード名、 student-namesそのルートのパスで使用されます。URLを生成するための完全なリストは、次のように定義されています。
class StudentController extends Controller {
   public function aboutAction($name) {
      // ...
      // /student/student-names
      $url = $this->generateUrl(
         ‘student_name’,
         array(‘name’ =>
         ’student-names’)
      );
   }
}
StudentController
次のように、StudentControllerクラスでルーティングする簡単な例を考えてみましょう。
StudentController.php
<?php
namespace AppBundle\Controller;

use Sensio\Bundle\FrameworkExtraBundle\Configuration\Route;
use Symfony\Component\HttpFoundation\Response;
use Symfony\Bundle\FrameworkBundle\Controller\Controller;

class StudentController  {
   /**
      * @Route("/student/home")
   */

   public function homeAction() {
      $name = 'Student details application';
      return new Response(
         '<html><body>Project: '.$name.'</body></html>'
      );
   }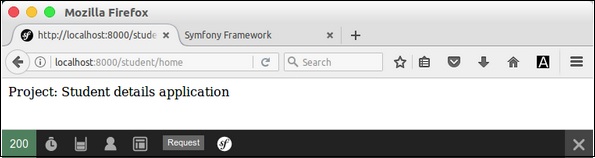
}次に、URLをリクエストします。”http://localhost:8000/student/home” そしてそれは次の結果を生成します。
同様に、別のルートを作成できます aboutAction() 同様に。