GraphQL-클라이언트 인증
인증은 사용자 또는 프로세스의 ID를 확인하는 프로세스 또는 작업입니다. 익명 사용자가 데이터를 사용할 수 없도록 애플리케이션이 사용자를 인증하는 것이 중요합니다. 이 섹션에서는 GraphQL 클라이언트를 인증하는 방법을 배웁니다.
익스프레스 JWT
이 예에서는 jQuery를 사용하여 클라이언트 응용 프로그램을 만듭니다. 요청을 인증하기 위해 우리는 express-jwt 서버 측의 모듈.
express-jwt 모듈은 JWT 토큰을 사용하여 HTTP 요청을 인증 할 수있는 미들웨어입니다. JWT (JSON Web Token)는 로그인 한 사용자를 식별하는 긴 문자열입니다.
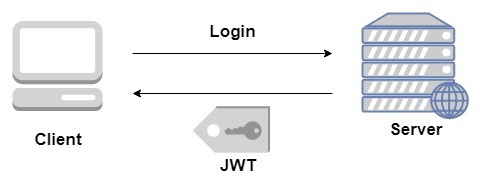
사용자가 성공적으로 로그인하면 서버는 JWT 토큰을 생성합니다. 이 토큰은 로그를 명확하게 식별합니다. 즉, 토큰은 사용자의 신원을 나타냅니다. 따라서 다음에 클라이언트가 서버에 올 때 필요한 리소스를 얻기 위해이 토큰을 제시해야합니다. 클라이언트는 모바일 애플리케이션 또는 웹 애플리케이션 일 수 있습니다.

삽화
이 그림을 이해하기 위해 단계별 절차를 따릅니다.
서버 설정
다음은 서버를 설정하는 단계입니다.
1 단계-프로젝트에 필요한 종속성 다운로드 및 설치
폴더 생성 auth-server-app. 디렉토리를 다음으로 변경하십시오. auth-server-app 터미널에서. 환경 설정 장에 설명 된 3 ~ 5 단계를 따릅니다.
2 단계-스키마 생성
더하다 schema.graphql 프로젝트 폴더의 파일 auth-server-app 다음 코드를 추가하십시오-type Query
{
greetingWithAuth:String
}3 단계-해석기 추가
파일 생성 resolvers.js 프로젝트 폴더에 다음 코드를 추가하십시오-
확인자는 GraphQL의 컨텍스트 개체에서 인증 된 사용자 개체를 사용할 수 있는지 확인합니다. 인증 된 사용자를 사용할 수없는 경우 예외가 발생합니다.
const db = require('./db')

const Query = {
   greetingWithAuth:(root,args,context,info) => {

      //check if the context.user is null
      if (!context.user) {
         throw new Error('Unauthorized');
      }
      return "Hello from TutorialsPoint, welcome back : "+context.user.firstName;
   }
}

module.exports = {Query}
4 단계-Server.js 파일 생성
인증 미들웨어는 JSON 웹 토큰을 사용하여 호출자를 인증합니다. 인증 용 URL은 다음과 같습니다. http://localhost:9000/login.
이것은 사후 작업입니다. 사용자는 백엔드에서 확인 될 이메일과 비밀번호를 제출해야합니다. jwt.sign 메소드를 사용하여 유효한 토큰이 생성되면 클라이언트는 후속 요청을 위해이를 헤더로 보내야합니다.
토큰이 유효한 경우 req.user는 권한 부여 및 액세스 제어를 위해 나중에 미들웨어에서 사용하도록 디코딩 된 JSON 개체로 설정됩니다.
다음 코드는 요청을 인증하기 위해 jsonwebtoken과 express-jwt의 두 모듈을 사용합니다.
사용자가 greet버튼을 누르면 / graphql 경로에 대한 요청이 발행됩니다. 사용자가 인증되지 않은 경우 자신을 인증하라는 메시지가 표시됩니다.
사용자에게 이메일 ID와 비밀번호를 허용하는 양식이 제공됩니다. 이 예에서 / login 경로는 사용자 인증을 담당합니다.
/ login 경로는 데이터베이스에서 사용자가 제공 한 자격 증명과 일치하는 항목이 있는지 확인합니다.
자격 증명이 유효하지 않은 경우 HTTP 401 예외가 사용자에게 반환됩니다.
자격 증명이 유효하면 서버에서 토큰을 생성합니다. 이 토큰은 사용자에 대한 응답의 일부로 전송됩니다. 이것은 jwt.sign 함수에 의해 수행됩니다.
const expressJwt = require('express-jwt');
const jwt = require('jsonwebtoken');

//private key
const jwtSecret = Buffer.from('Zn8Q5tyZ/G1MHltc4F/gTkVJMlrbKiZt', 'base64');

app.post('/login', (req, res) => {
   const {email, password} = req.body;

   //check database
   const user = db.students.list().find((user) =>  user.email === email);
   if (!(user && user.password === password)) {
      res.sendStatus(401);
      return;
   }

   //generate a token based on private key, token doesn't have an expiry
   const token = jwt.sign({sub: user.id}, jwtSecret);
   res.send({token});
});
모든 요청에 대해 app.use () 함수가 호출됩니다. 이것은 차례로 expressJWT 미들웨어를 호출합니다. 이 미들웨어는 JSON 웹 토큰을 디코딩합니다. 토큰에 저장된 사용자 ID는 요청 객체에 속성 사용자로 검색 및 저장됩니다.
//decodes the JWT and stores in request object
app.use(expressJwt({
   secret: jwtSecret,
   credentialsRequired: false
}));
GraphQL 컨텍스트 내에서 사용자 속성을 사용할 수 있도록하기 위해이 속성은 context 아래와 같이 객체-
//Make req.user available to GraphQL context
app.use('/graphql', graphqlExpress((req) => ({
   schema,
   context: {user: req.user &&apm; db.students.get(req.user.sub)}
})));
창조하다 server.js 현재 폴더 경로에서. 완전한 server.js 파일은 다음과 같습니다.
const bodyParser = require('body-parser');
const cors = require('cors');
const express = require('express');
const expressJwt = require('express-jwt'); //auth
const jwt = require('jsonwebtoken'); //auth
const db = require('./db');

var port = process.env.PORT || 9000
const jwtSecret = Buffer.from('Zn8Q5tyZ/G1MHltc4F/gTkVJMlrbKiZt', 'base64');
const app = express();

const fs = require('fs')
const typeDefs = fs.readFileSync('./schema.graphql',{encoding:'utf-8'})
const resolvers = require('./resolvers')
const {makeExecutableSchema} = require('graphql-tools')

const schema = makeExecutableSchema({typeDefs, resolvers})

app.use(cors(), bodyParser.json(), expressJwt({
   secret: jwtSecret,
   credentialsRequired: false
}));

const  {graphiqlExpress,graphqlExpress} = require('apollo-server-express')

app.use('/graphql', graphqlExpress((req) => ({
   schema,
   context: {user: req.user && db.students.get(req.user.sub)}
})));
app.use('/graphiql',graphiqlExpress({endpointURL:'/graphql'}))

//authenticate students
app.post('/login', (req, res) => {
   const email = req.body.email;
   const password = req.body.password;

   const user = db.students.list().find((user) =>  user.email === email);
   if (!(user && user.password === password)) {
      res.sendStatus(401);
      return;
   }
   const token = jwt.sign({sub: user.id}, jwtSecret);
   res.send({token});
});

app.listen(port, () => console.info(`Server started on port ${port}`));
5 단계-애플리케이션 실행
터미널에서 npm start 명령을 실행합니다 . 서버는 9000 포트에서 실행됩니다. 여기서는 GraphiQL을 클라이언트로 사용하여 애플리케이션을 테스트합니다.
브라우저를 열고 URL을 입력하십시오. http://localhost:9000/graphiql. 편집기에 다음 쿼리를 입력하십시오-
{
   greetingWithAuth
}
아래 응답에서 인증 된 사용자가 아니므로 오류가 발생했습니다.
{
   "data": {
      "greetingWithAuth": null
   },
   "errors": [
      {
         "message": "Unauthorized",
         "locations": [
            {
               "line": 2,
               "column": 3
            }
         ],
         "path": [
            "greetingWithAuth"
         ]
      }
   ]
}
다음 섹션에서는 인증 할 클라이언트 애플리케이션을 만들어 보겠습니다.
JQuery 클라이언트 설정
클라이언트 응용 프로그램에서 스키마를 호출하는 인사 버튼이 제공됩니다. greetingWithAuth. 로그인없이 버튼을 클릭하면 아래와 같은 오류 메시지가 나타납니다.

데이터베이스에서 사용 가능한 사용자로 로그인하면 다음 화면이 나타납니다.

액세스 greeting, 먼저 URL에 액세스해야합니다. http://localhost:9000/login 아래와 같이 경로.
응답에는 서버에서 생성 된 토큰이 포함됩니다.
$.ajax({
   url:"http://localhost:9000/login",
   contentType:"application/json",
   type:"POST",
   data:JSON.stringify({email,password}),
   success:function(response) {
      loginToken = response.token;
      $('#authStatus')
      .html("authenticated successfully")
      .css({"color":"green",'font-weight':'bold'});
      $("#greetingDiv").html('').css({'color':''});
   },
   error:(xhr,err) =>  alert('error')
})
로그인에 성공하면 아래와 같이 greetingWithAuth 스키마에 액세스 할 수 있습니다 . Bearer 토큰을 사용하는 모든 후속 요청에는 Authorizationheader가 있어야합니다.
{
   url: "http://localhost:9000/graphql",
   contentType: "application/json",
   headers: {"Authorization": 'bearer '+loginToken},  type:'POST',
   data: JSON.stringify({
   query:`{greetingWithAuth}`
}
다음은 index.html의 코드입니다-
<!DOCTYPE html>
<html>
   <head>
      <script src = "https://ajax.googleapis.com/ajax/libs/jquery/3.3.1/jquery.min.js"></script>
      <script>
         $(document).ready(function() {
            let loginToken = "";
            $("#btnGreet").click(function() {
                  $.ajax({url: "http://localhost:9000/graphql",
                  contentType: "application/json",
                  headers: {"Authorization": 'bearer '+loginToken},
                  type:'POST',
                  data: JSON.stringify({
                  query:`{greetingWithAuth}` }),
                  success: function(result) {
                  $("#greetingDiv").html("<h1>"+result.data.greetingWithAuth+"</h1>")
                  },
                  error:function(jQxhr,error) {
                     if(jQxhr.status == 401) {
                        $("#greetingDiv").html('please authenticate first!!')
                        .css({"color":"red",'font-weight':'bold'})
                        return;
                     }
                     $("#greetingDiv").html('error').css("color","red");
                  }
               });
            });
            $('#btnAuthenticate').click(function() {
               var email =  $("#txtEmail").val();
               var password =  $("#txtPwd").val();
               if(email && password) {
                  $.ajax({
                     url:"http://localhost:9000/login",
                     contentType:"application/json",
                     type:"POST",
                     data:JSON.stringify({email,password}),
                     success:function(response) {
                        loginToken =  response.token;
                        $('#authStatus')
                        .html("authenticated successfully")
                        .css({"color":"green",'font-weight':'bold'});
                        $("#greetingDiv").html('').css({'color':''});
                     },
                     error:(xhr,err) =>  alert('error')
                  })
               }else alert("email and pwd empty")
            })
         });
      </script>
   </head>

   <body>
      <h1> GraphQL Authentication </h1>
      <hr/>
      <section>
         <button id = "btnGreet">Greet</button>
         <br/> <br/>
         <div id = "greetingDiv"></div>
      </section>
      <br/> <br/> <br/>
      <hr/>

      <section id = "LoginSection">
         <header>
            <h2>*Login first to  access greeting </h2>
         </header>
         <input type = "text" value = "[email protected]" placeholder = "enter email" id = "txtEmail"/>
         <br/>

         <input type = "password" value = "pass123" placeholder = "enter password" id = "txtPwd"/>
         <br/>

         <input type = "button" id = "btnAuthenticate"  value = "Login"/>
         <p id = "authStatus"></p>
      </section>
   </body>
</html>