WPF-디버깅
이것은 여러분이 기대하는 것과 똑같이 동작하지 않는 코드 조각의 버그 나 결함을 식별하고 수정하는 체계적인 메커니즘입니다. 한 하위 시스템의 버그를 수정하면 다른 하위 시스템에 버그가 발생할 수 있으므로 하위 시스템이 긴밀하게 결합 된 복잡한 응용 프로그램을 디버깅하는 것은 쉽지 않습니다.
C #에서 디버깅
WPF 애플리케이션에서 프로그래머는 C # 및 XAML과 같은 두 가지 언어를 다룹니다. C # 또는 C / C ++와 같은 절차 적 언어의 디버깅에 익숙하고 중단 점의 사용법도 알고 있다면 애플리케이션의 C # 부분을 쉽게 디버깅 할 수 있습니다.
C # 코드를 디버깅하는 방법을 보여주는 간단한 예제를 살펴 보겠습니다. 이름으로 새 WPF 프로젝트 만들기WPFDebuggingDemo. 도구 상자에서 레이블 4 개, 텍스트 상자 3 개, 버튼 1 개를 드래그합니다. 다음 XAML 코드를 살펴보십시오.
<Window x:Class = "WPFDebuggingDemo.Window1"
   xmlns = "http://schemas.microsoft.com/winfx/2006/xaml/presentation"
   xmlns:x = "http://schemas.microsoft.com/winfx/2006/xaml"
   Title = "Window1" Height = "400" Width = "604">

   <Grid>
      <TextBox Height = "23" Margin = "0,44,169,0" Name = "textBox1"
         VerticalAlignment = "Top" HorizontalAlignment = "Right" Width = "120" />

      <TextBox Height = "23" Margin = "0,99,169,0" Name = "textBox2"
         VerticalAlignment = "Top" HorizontalAlignment = "Right" Width = "120" />

      <TextBox HorizontalAlignment = "Right" Margin = "0,153,169,0"
         Name = "textBox3" Width = "120" Height = "23" VerticalAlignment = "Top" />

      <Label Height = "28" Margin = "117,42,0,0" Name = "label1"
         VerticalAlignment = "Top" HorizontalAlignment = "Left" Width = "120">
         Item 1</Label>

      <Label Height = "28" HorizontalAlignment = "Left"
         Margin = "117,99,0,0" Name = "label2" VerticalAlignment = "Top" Width = "120">
         Item 2</Label>

      <Label HorizontalAlignment = "Left" Margin = "117,153,0,181"
         Name = "label3" Width = "120">Item 3</Label>

      <Button Height = "23" HorizontalAlignment = "Right" Margin = "0,0,214,127"
         Name = "button1" VerticalAlignment = "Bottom" Width = "75"
         Click = "button1_Click">Total</Button>

      <Label Height = "28" HorizontalAlignment = "Right"
         Margin = "0,0,169,66" Name = "label4" VerticalAlignment = "Bottom" Width = "120"/>

   </Grid>

</Window>
다음은 버튼 클릭 이벤트가 구현 된 C # 코드입니다.
using System;
using System.Collections.Generic;
using System.Linq;
using System.Text;

using System.Windows;
using System.Windows.Controls;
using System.Windows.Data;
using System.Windows.Documents;
using System.Windows.Input;
using System.Windows.Media;
using System.Windows.Media.Imaging;
using System.Windows.Navigation;
using System.Windows.Shapes;

namespace WPFDebuggingDemo {
   /// <summary>
      /// Interaction logic for Window1.xaml
   /// </summary>

   public partial class Window1 : Window {

      public Window1() {
         InitializeComponent();
      }

      private void button1_Click(object sender, RoutedEventArgs e) {

         if (textBox1.Text.Length > 0 && textBox2.Text.Length > 0 && textBox2.Text.Length > 0) {
            double total = Convert.ToDouble(textBox1.Text) +
            Convert.ToDouble(textBox2.Text) + Convert.ToDouble(textBox3.Text);
            label4.Content = total.ToString();
         }
         else {
            MessageBox.Show("Enter the value in all field.");
         }
      }
   }
}
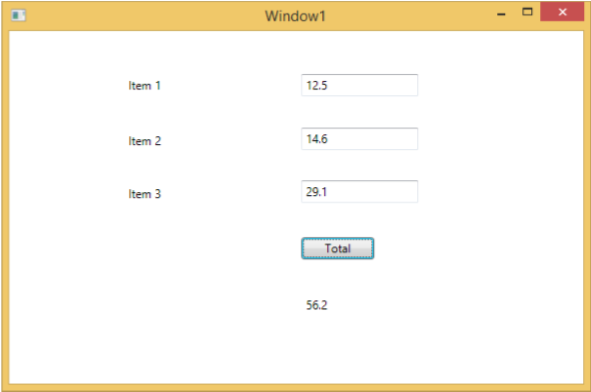
위 코드를 컴파일하고 실행하면 다음과 같은 창이 생성됩니다. 이제 텍스트 상자에 값을 입력하고 합계 버튼을 누릅니다. 텍스트 상자에 입력 된 모든 값을 합산 한 후 총 값을 얻을 수 있습니다.
실제 값이 아닌 값을 입력하려고하면 위의 응용 프로그램이 충돌합니다. 문제를 찾아 해결하기 위해 (충돌 원인) 버튼 클릭 이벤트에 중단 점을 삽입 할 수 있습니다.
아래와 같이 항목 1에 "abc"를 작성합니다.
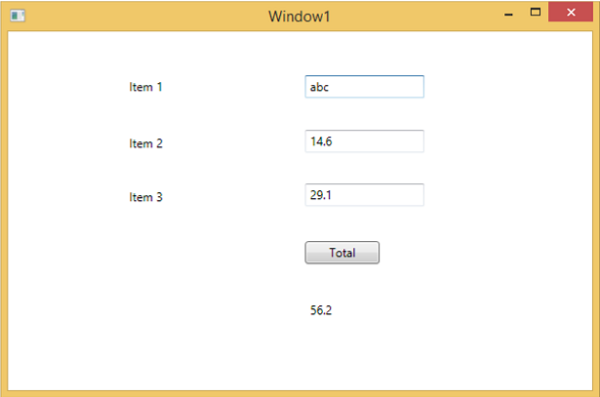
합계 버튼을 클릭하면 프로그램이 중단 점에서 중지되는 것을 볼 수 있습니다.
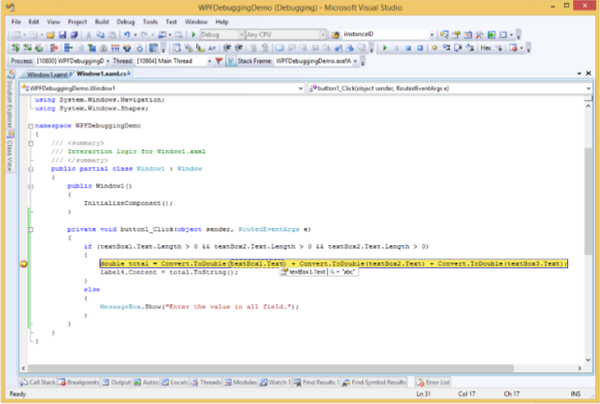
이제 커서를 textbox1.Text쪽으로 이동하면 프로그램이 추가하려고하는 것을 볼 수 있습니다. abc 값을 다른 값과 함께 사용하면 프로그램이 충돌합니다.
XAML에서 디버깅
XAML에서 동일한 종류의 디버깅이 예상되는 경우 다른 절차 언어 코드를 디버깅하는 것처럼 XAML 코드를 아직 디버깅 할 수 없다는 사실에 놀랄 것입니다. XAML 코드에서 디버깅이라는 용어를 들으면 오류를 찾아보십시오.
데이터 바인딩에서 데이터가 화면에 표시되지 않고 이유를 모릅니다.
또는 복잡한 레이아웃과 관련된 문제입니다.
또는 ListBox 및 콤보 상자와 같은 광범위한 템플릿을 사용하여 정렬 문제 또는 여백 색상, 오버레이 등의 문제.
XAML 프로그램 디버깅은 일반적으로 바인딩이 작동하는지 확인하기 위해 수행하는 작업입니다. 작동하지 않으면 무엇이 잘못되었는지 확인합니다. Silverlight를 제외하고 XAML 바인딩에서 중단 점을 설정하는 것은 불가능하지만 출력 창을 사용하여 데이터 바인딩 오류를 확인할 수 있습니다. 데이터 바인딩에서 오류를 찾기 위해 다음 XAML 코드를 살펴 보겠습니다.
<Window x:Class = "DataBindingOneWay.MainWindow"
   xmlns = "http://schemas.microsoft.com/winfx/2006/xaml/presentation"
   xmlns:x = "http://schemas.microsoft.com/winfx/2006/xaml"
   Title = "MainWindow" Height = "350" Width = "604">

   <Grid>
      <StackPanel Name = "Display">
         <StackPanel Orientation = "Horizontal" Margin = "50, 50, 0, 0">
            <TextBlock Text = "Name: " Margin = "10" Width = "100"/>
            <TextBlock Margin = "10" Width = "100" Text = "{Binding FirstName}"/>
         </StackPanel>

         <StackPanel Orientation = "Horizontal" Margin = "50,0,50,0">
            <TextBlock Text = "Title: " Margin = "10" Width = "100"/>
            <TextBlock Margin = "10" Width = "100" Text = "{Binding Title}" />
         </StackPanel>

      </StackPanel>
   </Grid>

</Window>
두 텍스트 블록의 텍스트 속성은 정적으로 "Name"및 "Title"로 설정되고 다른 두 텍스트 블록 텍스트 속성은 "FirstName"및 "Title"에 바인딩되지만 클래스 변수는 아래 표시된 Employee 클래스의 Name 및 Title입니다.
원하는 출력이 표시되지 않을 때 이러한 유형의 오류를 찾을 수있는 위치를 이해하기 위해 의도적으로 잘못된 변수 이름을 작성했습니다.
using System;
using System.Collections.Generic;
using System.Linq;
using System.Text;
using System.Threading.Tasks;

namespace DataBindingOneWay {

   public class Employee {
      public string Name { get; set; }
      public string Title { get; set; }

      public static Employee GetEmployee() {

         var emp = new Employee() {
            Name = "Ali Ahmed", Title = "Developer"
         };

         return emp;
      }
   }
}
다음은 C # 코드의 MainWindow 클래스 구현입니다.
using System;
using System.Windows;
using System.Windows.Controls;

namespace DataBindingOneWay {
   /// <summary>
      /// Interaction logic for MainWindow.xaml
   /// </summary>

   public partial class MainWindow : Window {

      public MainWindow() {
         InitializeComponent();
         DataContext = Employee.GetEmployee();
      }
   }
}
이 응용 프로그램을 실행하면 MainWindow에서 해당 Employee 개체의 Title에 성공적으로 바인딩되었지만 이름이 바인딩되지 않았 음을 즉시 확인할 수 있습니다.
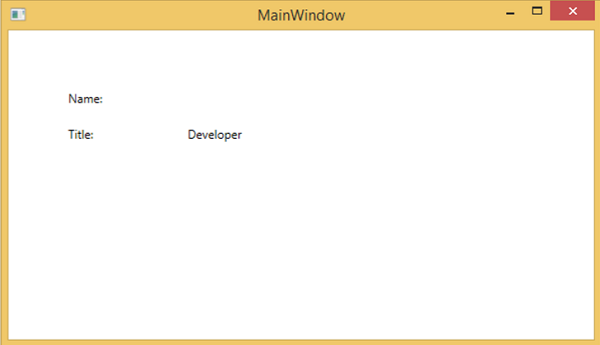
이름에 무슨 일이 있었는지 확인하기 위해 많은 로그가 생성되는 출력 창을 살펴 보겠습니다.
오류를 쉽게 찾을 수있는 방법은 오류를 검색하는 것뿐입니다. "BindingExpression 경로 오류 : 'Object' ''Employe에서 'FirstName'속성을 찾을 수 없습니다."라는 다음 오류가 표시됩니다.
System.Windows.Data Error: 40 : BindingExpression path error: 'FirstName'
   property not found on 'object' ''Employee' (HashCode=11611730)'.
   BindingExpression:Path = FirstName; DataItem = 'Employee' (HashCode = 11611730);
   target element is 'TextBlock' (Name=''); target property is 'Text' (type 'String')
이는 FirstName이 Employee 클래스의 구성원이 아님을 분명하게 나타내므로 응용 프로그램에서 이러한 유형의 문제를 해결하는 데 도움이됩니다.
FirstName을 Name으로 다시 변경하면 원하는 출력이 표시됩니다.
XAML 용 UI 디버깅 도구
런타임에 XAML 코드를 검사하기 위해 Visual Studio 2015와 함께 XAML 용 UI 디버깅 도구가 도입되었습니다. 이러한 도구의 도움으로 XAML 코드는 실행중인 WPF 응용 프로그램의 시각적 트리 형태와 트리의 다양한 UI 요소 속성으로 표시됩니다. 이러한 도구를 활성화하려면 아래 단계를 따르십시오.
- 도구 메뉴로 이동하여 도구 메뉴에서 옵션을 선택합니다.
- 다음 대화 상자가 열립니다.
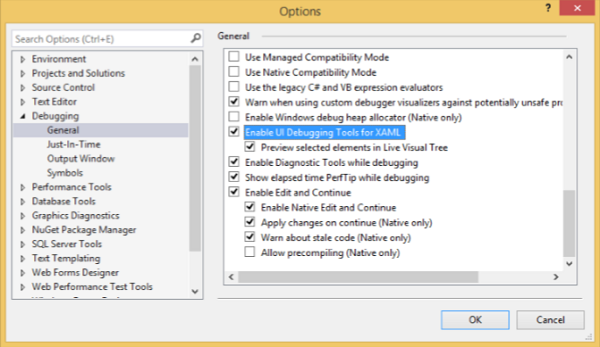
- 왼쪽의 디버깅 항목에서 일반 옵션으로 이동하십시오.
- 강조 표시된 옵션 (예 : "XAML 용 UI 디버깅 도구 사용")을 선택하고 확인 버튼을 클릭합니다.
이제 XAML 애플리케이션을 실행하거나 다음 XAML 코드를 사용합니다.
<Window x:Class = "XAMLTestBinding.MainWindow"
   xmlns = "http://schemas.microsoft.com/winfx/2006/xaml/presentation"
   xmlns:x = "http://schemas.microsoft.com/winfx/2006/xaml"
   Title = "MainWindow" Height = "350" Width = "604">

   <StackPanel>
      <ComboBox Name = "comboBox"  Margin = "50" Width = "100">
         <ComboBoxItem Content = "Green" />
         <ComboBoxItem  Content = "Yellow" IsSelected = "True" />
         <ComboBoxItem Content = "Orange" />
      </ComboBox>

      <TextBox  Name = "textBox" Margin = "50" Width = "100" Height = "23"
         VerticalAlignment = "Top" Text  =
         "{Binding ElementName = comboBox, Path = SelectedItem.Content, Mode = TwoWay, UpdateSourceTrigger = PropertyChanged}"
         Background = "{Binding ElementName = comboBox, Path = SelectedItem.Content}">
      </TextBox>

   </StackPanel>

</Window>
응용 프로그램을 실행하면 모든 요소가 트리에 표시되는 라이브 비주얼 트리가 표시됩니다.

이 라이브 비주얼 트리는 UI 요소의 위치를 이해하기위한 전체 레이아웃 구조를 보여줍니다. 그러나이 옵션은 Visual Studio 2015에서만 사용할 수 있습니다. Visual Studio의 이전 옵션을 사용하는 경우이 도구를 사용할 수 없지만 Visual Studio 용 XAML Spy와 같이 Visual Studio와 통합 할 수있는 다른 도구가 있습니다. . xamlspy 에서 다운로드 할 수 있습니다.