Xamarin - การสร้าง GUI ของแอป
TextView
TextView เป็นส่วนประกอบที่สำคัญมากของวิดเจ็ต Android ส่วนใหญ่ใช้สำหรับแสดงข้อความบนหน้าจอ Android
ในการสร้างมุมมองข้อความเพียงแค่เปิด main.axml และเพิ่มรหัสต่อไปนี้ระหว่างแท็กโครงร่างเชิงเส้น
<TextView
   android:text = "Hello I am a text View"
   android:layout_width = "match_parent"
   android:layout_height = "wrap_content"
   android:id = "@+id/textview1" />
ปุ่ม
ปุ่มคือตัวควบคุมที่ใช้เพื่อทริกเกอร์เหตุการณ์เมื่อมีการคลิก ภายใต้Main.axml พิมพ์รหัสต่อไปนี้เพื่อสร้างปุ่ม
<Button
   android:id = "@+id/MyButton"
   android:layout_width = "fill_parent"
   android:layout_height = "wrap_content"
   android:text = "@string/Hello" />
เปิด Resources\Values\Strings.xml และพิมพ์โค้ดบรรทัดต่อไปนี้ระหว่างแท็ก <resources>
<string name="Hello">Click Me!</string>โค้ดด้านบนแสดงมูลค่าของปุ่มที่เราสร้างขึ้น ต่อไปเราจะเปิดMainActivity.csและสร้างการดำเนินการที่จะดำเนินการเมื่อคลิกปุ่ม พิมพ์รหัสต่อไปนี้ภายใต้base.OnCreate (มัด) วิธีการ
Button button = FindViewById<Button>(Resource.Id.MyButton);
button.Click += delegate { button.Text = "You clicked me"; };
โค้ดด้านบนจะแสดง“ คุณคลิกฉัน” เมื่อผู้ใช้คลิกที่ปุ่ม
FindViewById<< -->วิธีนี้จะค้นหา ID ของข้อมูลพร็อพเพอร์ตี้ที่ระบุ มันค้นหา id ในไฟล์เลย์เอาต์. maxml

ช่องทำเครื่องหมาย
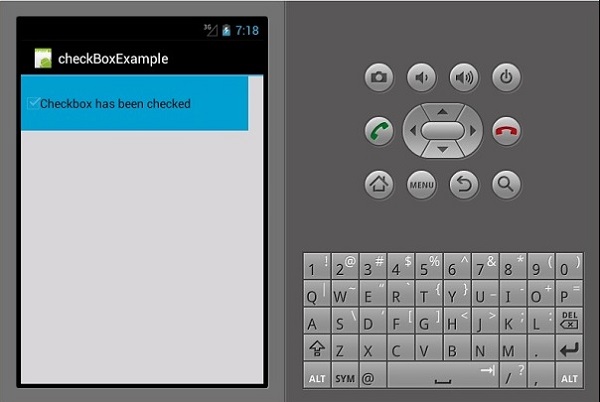
ช่องทำเครื่องหมายถูกใช้เมื่อต้องการเลือกมากกว่าหนึ่งตัวเลือกจากกลุ่มตัวเลือก ในตัวอย่างนี้เราจะสร้างช่องทำเครื่องหมายซึ่งเมื่อเลือกแล้วจะแสดงข้อความว่าได้รับการตรวจสอบแล้วมิฉะนั้นจะแสดงโดยไม่เลือก
เริ่มต้นด้วยการเปิด Main.axml ไฟล์ในโครงการของเราและพิมพ์บรรทัดของโค้ดต่อไปนี้เพื่อสร้างช่องทำเครื่องหมาย
<?xml version = "1.0" encoding = "utf-8"?>
<LinearLayout xmlns:android = "http://schemas.android.com/apk/res/android"
   android:orientation = "vertical"
   android:background = "#d3d3d3"
   android:layout_width = "fill_parent"
   android:layout_height = "fill_parent">
   <CheckBox
      android:text = "CheckBox"
      android:padding = "25dp"
      android:layout_width = "300dp"
      android:layout_height = "wrap_content"
      android:id = "@+id/checkBox1"
      android:textColor = "@android:color/black"
      android:background = "@android:color/holo_blue_dark" />
</LinearLayout>
จากนั้นไปที่ MainActivity.cs เพื่อเพิ่มรหัสการทำงาน
CheckBox checkMe = FindViewById<CheckBox>(Resource.Id.checkBox1);
checkMe.CheckedChange += (object sender, CompoundButton.CheckedChangeEventArgs e) => {
   CheckBox check = (CheckBox)sender;
   if(check.Checked) {
      check.Text = "Checkbox has been checked";
   } else {
      check.Text = "Checkbox has not been checked";
   }
};
จากรหัสด้านบนเราจะพบช่องทำเครื่องหมายโดยใช้ findViewById. ต่อไปเราจะสร้างวิธีการจัดการสำหรับช่องทำเครื่องหมายของเราและในตัวจัดการของเราเราสร้างคำสั่ง if else ซึ่งจะแสดงข้อความขึ้นอยู่กับผลลัพธ์ที่เลือก
CompoundButton.CheckedChangeEventArgs →วิธีนี้จะเริ่มเหตุการณ์เมื่อสถานะช่องทำเครื่องหมายเปลี่ยนไป
แถบความคืบหน้า
แถบความคืบหน้าคือตัวควบคุมที่ใช้เพื่อแสดงความคืบหน้าของการดำเนินการ หากต้องการเพิ่มแถบความคืบหน้าให้เพิ่มบรรทัดรหัสต่อไปนี้ในMain.axml ไฟล์.
<ProgressBar
   style="?android:attr/progressBarStyleHorizontal"
   android:layout_width = "match_parent"
   android:layout_height = "wrap_content"
   android:id = "@+id/progressBar1" />
จากนั้นไปที่ MainActivity.cs และตั้งค่าของแถบความคืบหน้า
ProgressBar pb = FindViewById<ProgressBar>(Resource.Id.progressBar1);
pb.Progress = 35;
ในโค้ดด้านบนเราได้สร้างแถบความคืบหน้าด้วยค่า 35
ปุ่มวิทยุ
นี่คือวิดเจ็ต Android ที่อนุญาตให้บุคคลเลือกหนึ่งจากชุดตัวเลือก ในส่วนนี้เราจะสร้างกลุ่มวิทยุที่มีรายชื่อรถซึ่งจะดึงปุ่มตัวเลือกที่เลือกไว้
ขั้นแรกเราเพิ่มกลุ่มวิทยุและไฟล์ textview ดังแสดงในรหัสต่อไปนี้ -
<?xml version = "1.0" encoding = "utf-8"?>
<LinearLayout xmlns:android = "http://schemas.android.com/apk/res/android"
   android:orientation = "vertical"
   android:background = "@android:color/darker_gray"
   android:layout_width = "fill_parent"
   android:layout_height = "fill_parent">
   <TextView
      android:text = "What is your favourite Car"
      android:layout_width = "match_parent"
      android:layout_height = "wrap_content"
      android:id = "@+id/textView1"
      android:textColor = "@android:color/black" />
   <RadioGroup
      android:layout_width = "match_parent"
      android:layout_height = "wrap_content"
      android:id = "@+id/radioGroup1"
      android:backgroundTint = "#a52a2aff"
      android:background = "@android:color/holo_green_dark">
   <RadioButton
      android:layout_width = "wrap_content"
      android:layout_height = "wrap_content"
      android:text = "Ferrari"
      android:id = "@+id/radioFerrari" />
   <RadioButton
      android:layout_width = "wrap_content"
      android:layout_height = "wrap_content"
      android:text = "Mercedes"
      android:id = "@+id/radioMercedes" />
   <RadioButton
      android:layout_width = "wrap_content"
      android:layout_height = "wrap_content"
      android:text = "Lamborghini"
      android:id = "@+id/radioLamborghini" />
   <RadioButton
      android:text = "Audi"
      android:layout_width = "match_parent"
      android:layout_height = "wrap_content"
      android:id = "@+id/radioAudi" />
   </RadioGroup>
</LinearLayout>
ในการดำเนินการเมื่อคลิกปุ่มตัวเลือกเราจะเพิ่มกิจกรรม ไปที่MainActivity.cs และสร้างตัวจัดการเหตุการณ์ใหม่ดังที่แสดงด้านล่าง
private void onClickRadioButton(object sender, EventArgs e) {
   RadioButton cars = (RadioButton)sender;
   Toast.MakeText(this, cars.Text, ToastLength.Short).Show
   ();
}
Toast.MakeText() →นี่เป็นวิธีการดูที่ใช้เพื่อแสดงข้อความ / เอาต์พุตในป๊อปอัปขนาดเล็ก ที่ด้านล่างของไฟล์OnCreate() วิธีการหลังจากนั้น SetContentView()เพิ่มรหัสต่อไปนี้ สิ่งนี้จะจับปุ่มตัวเลือกแต่ละปุ่มและเพิ่มลงในตัวจัดการเหตุการณ์ที่เราสร้างขึ้น
RadioButton radio_Ferrari = FindViewById<RadioButton>
   (Resource.Id.radioFerrari);
   RadioButton radio_Mercedes = FindViewById<RadioButton>
   (Resource.Id.radioMercedes);
   RadioButton radio_Lambo = FindViewById<RadioButton>
   (Resource.Id.radioLamborghini);
   RadioButton radio_Audi = FindViewById<RadioButton>
   (Resource.Id.radioAudi);
   radio_Ferrari.Click += onClickRadioButton;
   radio_Mercedes.Click += onClickRadioButton;
   radio_Lambo.Click += onClickRadioButton;
   radio_Audi.Click += onClickRadioButton;
ตอนนี้เรียกใช้แอปพลิเคชันของคุณ ควรแสดงหน้าจอต่อไปนี้เป็นผลลัพธ์ -

สลับปุ่ม
ปุ่มสลับใช้เพื่อสลับระหว่างสองสถานะเช่นสามารถสลับระหว่างเปิดและปิดได้ เปิดResources\layout\Main.axml และเพิ่มบรรทัดของโค้ดต่อไปนี้เพื่อสร้างปุ่มสลับ
<?xml version = "1.0" encoding = "utf-8"?>
<LinearLayout xmlns:android = "http://schemas.android.com/apk/res/android"
   android:orientation = "vertical"
   android:background = "#d3d3d3"
   android:layout_width = "fill_parent"
   android:layout_height = "fill_parent">
   <ToggleButton
      android:id = "@+id/togglebutton"
      android:layout_width = "wrap_content"
      android:layout_height = "wrap_content"
      android:textOn = "Torch ON"
      android:textOff = "Torch OFF"
      android:textColor = "@android:color/black" />
</LinearLayout>
เราสามารถเพิ่มการดำเนินการในแถบสลับเมื่อมีการคลิก เปิดMainActivity.cs และเพิ่มบรรทัดต่อไปนี้ของรหัสหลัง OnCreate() คลาสวิธีการ
ToggleButton togglebutton = FindViewById<ToggleButton> (Resource.Id.togglebutton);
togglebutton.Click += (o, e) => {
   if (togglebutton.Checked)
      Toast.MakeText(this, "Torch is ON", ToastLength.Short).Show ();
   else
      Toast.MakeText(this, "Torch is OFF",
      ToastLength.Short).Show();
};
ตอนนี้เมื่อคุณเรียกใช้แอพควรแสดงผลลัพธ์ต่อไปนี้ -

แถบการให้คะแนน
แถบการให้คะแนนคือองค์ประกอบรูปแบบที่ประกอบด้วยดาวซึ่งผู้ใช้แอปสามารถใช้เพื่อให้คะแนนสิ่งต่างๆที่คุณให้ไว้ ในไฟล์Main.axml สร้างแถบการให้คะแนนใหม่ด้วย 5 ดาว
<?xml version = "1.0" encoding = "utf-8"?>
<LinearLayout xmlns:android = "http://schemas.android.com/apk/res/android"
   android:orientation = "vertical"
   android:background = "#d3d3d3"
   android:layout_width = "fill_parent"
   android:layout_height = "fill_parent">
   <RatingBar
      android:layout_width = "wrap_content"
      android:layout_height = "wrap_content"
      android:id = "@+id/ratingBar1"
      android:numStars = "5"
      android:stepSize = "1.0" />
</LinearLayout>
ในการเรียกใช้แอพควรแสดงผลลัพธ์ต่อไปนี้ -

การเติมข้อความอัตโนมัติ
นี่คือมุมมองข้อความที่แสดงคำแนะนำทั้งหมดในขณะที่ผู้ใช้พิมพ์ เรากำลังจะสร้างมุมมองข้อความเติมข้อความอัตโนมัติที่มีรายชื่อผู้คนและปุ่มซึ่งเมื่อคลิกจะแสดงชื่อที่เลือก
เปิด Main.axml และเขียนรหัสต่อไปนี้
<?xml version = "1.0" encoding = "utf-8"?>
<LinearLayout xmlns:android = "http://schemas.android.com/apk/res/android"
   android:orientation = "vertical"
   android:layout_width = "fill_parent"
   android:background = "#d3d3d3"
   android:layout_height = "fill_parent">
   <TextView
      android:text = "Enter Name"
      android:textAppearance = "?android:attr/textAppearanceMedium"
      android:layout_width = "fill_parent"
      android:layout_height = "wrap_content"
      android:id = "@+id/textView1"
      android:padding = "5dp"
      android:textColor = "@android:color/black" />
   <AutoCompleteTextView
      android:layout_width = "fill_parent"
      android:layout_height = "wrap_content"
      android:id = "@+id/autoComplete1"
      android:textColor = "@android:color/black" />
   <Button
      android:text = "Submit"
      android:layout_width = "fill_parent"
      android:layout_height = "wrap_content"
      android:id = "@+id/btn_Submit"
      android:background="@android:color/holo_green_dark" />
</LinearLayout>
โค้ดด้านบนสร้าง TextView สำหรับพิมพ์ AutoCompleteTextViewสำหรับแสดงคำแนะนำและปุ่มสำหรับแสดงชื่อที่ป้อนจาก TextView ไปที่MainActivity.cs เพื่อเพิ่มฟังก์ชัน
สร้างวิธีการจัดการเหตุการณ์ใหม่ดังที่แสดงด้านล่าง
protected void ClickedBtnSubmit(object sender, System.EventArgs e){
   if (autoComplete1.Text != ""){
      Toast.MakeText(this, "The Name Entered ="
         + autoComplete1.Text, ToastLength.Short).Show();
   } else {
      Toast.MakeText(this, "Enter a Name!", ToastLength.Short).Show();
   }
}
ตัวจัดการที่สร้างขึ้นจะตรวจสอบว่าการเติมข้อความอัตโนมัติว่างเปล่า หากไม่ว่างเปล่าจะแสดงข้อความเติมข้อความอัตโนมัติที่เลือก พิมพ์รหัสต่อไปนี้ภายในไฟล์OnCreate() ชั้นเรียน
autoComplete1 = FindViewById<AutoCompleteTextView>(Resource.Id.autoComplete1);
btn_Submit = FindViewById<Button>(Resource.Id.btn_Submit);
var names = new string[] { "John", "Peter", "Jane", "Britney" };
ArrayAdapter adapter = new ArrayAdapter<string>(this,
   Android.Resource.Layout.SimpleSpinnerItem, names);
autoComplete1.Adapter = adapter;
btn_Submit.Click += ClickedBtnSubmit;
ArrayAdapter - นี่คือตัวจัดการคอลเลกชันที่อ่านรายการข้อมูลจากคอลเล็กชันรายการและส่งคืนข้อมูลเหล่านั้นเป็นมุมมองหรือแสดงบนหน้าจอ
ตอนนี้เมื่อคุณเรียกใช้แอปพลิเคชันควรแสดงผลลัพธ์ต่อไปนี้
