Xamarin - การสมัครครั้งแรก
ในบทนี้เราจะดูวิธีสร้างแอปพลิเคชัน Android ขนาดเล็กโดยใช้ Xamarin
สวัสดี Xamarin! ใบสมัคร
ก่อนอื่นให้เริ่มอินสแตนซ์ใหม่ของ Visual Studio แล้วไปที่ File → New → Project.

ในกล่องโต้ตอบเมนูที่ปรากฏขึ้นให้ไปที่ Templates → Visual C# → Android → Blank App (Android).
ตั้งชื่อที่เหมาะสมสำหรับใบสมัครของคุณ ในกรณีของเราเราตั้งชื่อมัน“helloWorld”และบันทึกไว้ในตำแหน่งเริ่มต้นที่ให้ไว้ จากนั้นคลิกปุ่ม OK สำหรับใหม่“helloXamarin” โครงการที่จะโหลด
บน solution, เปิด Resources → layout → Main.axmlไฟล์. เปลี่ยนจากมุมมองการออกแบบและไปที่ไฟล์Source ไฟล์และพิมพ์โค้ดบรรทัดต่อไปนี้เพื่อสร้างแอปของคุณ
<?xml version = "1.0" encoding = "utf-8"?>
<LinearLayout xmlns:android = "http://schemas.android.com/apk/res/android"
   android:orientation = "vertical"
   android:background = "#d3d3d3"
   android:layout_width = "fill_parent"
   android:layout_height = "fill_parent">
   <TextView
      android:text = "@string/HelloXamarin"
      android:textAppearance = "?android:attr/textAppearanceLarge"
      android:layout_width = "match_parent"
      android:layout_height = "wrap_content"
      android:id = "@+id/textView2"
      android:textColor = "@android:color/black" />
</LinearLayout>
ในโค้ดด้านบนเราได้สร้าง Android ใหม่ textview. จากนั้นเปิดค่าโฟลเดอร์และดับเบิลคลิกStrings.xmlเพื่อเปิด ที่นี่เราจะจัดเก็บข้อมูลและค่าเกี่ยวกับไฟล์button สร้างขึ้นด้านบน
<?xml version = "1.0" encoding = "utf-8"?>
<resources>
   <string name = "HelloXamarin">Hello World, I am Xamarin!</string>
   <string name = "ApplicationName">helloWorld</string>
</resources>
เปิด MainActivity.cs ไฟล์และแทนที่โค้ดที่มีอยู่ด้วยโค้ดบรรทัดต่อไปนี้
using System;
using Android.App;
using Android.Content;
using Android.Runtime;
using Android.Views;
using Android.Widget;
using Android.OS;

namespace HelloXamarin {
   public class MainActivity : Activity {
      protected override void OnCreate(Bundle bundle) {
         base.OnCreate(bundle);
         SetContentView(Resource.Layout.Main);
      }
   }
}
บันทึกแอปพลิเคชัน สร้างแล้วเรียกใช้เพื่อแสดงแอพที่สร้างขึ้นใน Android Emulator

หากคุณไม่มี Android Emulator ให้ทำตามขั้นตอนที่ระบุในหัวข้อถัดไปเพื่อสร้าง
การตั้งค่า Android Emulator
บนเมนู Visual Studio ของคุณไปที่ Tools → Android → Android Emulator Manager. ในหน้าต่างป๊อปอัปที่ปรากฏขึ้นให้คลิกไฟล์Createปุ่ม. จะแสดงหน้าจอต่อไปนี้
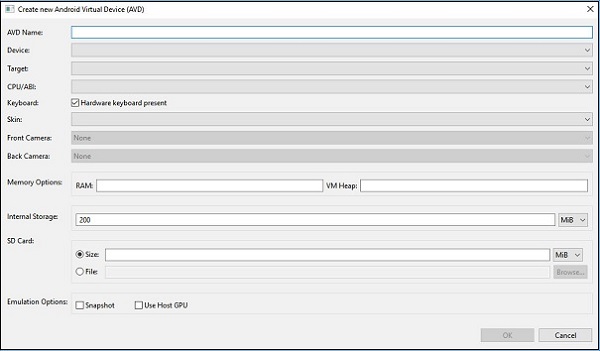
ในหน้าจอด้านบนให้ใส่ไฟล์ AVD nameคุณต้องการ. เลือกdeviceที่เหมาะสมกับจอแสดงผลของคุณเช่นจอแสดงผล Nexus 4” เลือกไฟล์target platform. ขอแนะนำให้ทดสอบบนแพลตฟอร์มเป้าหมายขั้นต่ำเสมอเช่น API 10 Android 2.3 (Gingerbread) เพื่อให้แน่ใจว่าแอปของคุณใช้งานได้กับทุกแพลตฟอร์ม Android
กรอกข้อมูลในช่องที่เหลือแล้วคลิกปุ่มตกลง โปรแกรมจำลองของคุณพร้อมแล้ว คุณสามารถเลือกได้จากรายการอุปกรณ์เสมือน Android ที่มีอยู่แล้วคลิกStart เพื่อเปิดใช้งาน

การปรับเปลี่ยนแอป HelloXamarin
ในส่วนนี้เราจะแก้ไขโครงการของเราและสร้างปุ่มที่จะแสดงข้อความเมื่อคลิก เปิดmain.axml และเปลี่ยนเป็น source view. หลังจากของเราtextview ที่เราสร้างขึ้นเราจะเพิ่มปุ่มดังที่แสดงด้านล่าง
<Button
   android:id = "@+id/MyButton"
   android:layout_width = "fill_parent"
   android:layout_height = "wrap_content"
   android:text = "@string/ButtonClick" />
หลังจากเพิ่มปุ่มแล้วรหัสเต็มของเราจะมีลักษณะดังนี้ -
<?xml version = "1.0" encoding = "utf-8"?>
<LinearLayout xmlns:android = "http://schemas.android.com/apk/res/android"
   android:orientation = "vertical"
   android:layout_width = "fill_parent"
   android:layout_height = "fill_parent">
   <TextView
      android:text = "@string/HelloXamarin"
      android:textAppearance = "?android:attr/textAppearanceLarge"
      android:layout_width = "match_parent"
      android:layout_height = "wrap_content"
      android:id = "@+id/textView2" />

   <Button
      android:id = "@+id/MyButton"
      android:layout_width = "fill_parent"
      android:layout_height = "wrap_content"
      android:text = "@string/ButtonClick" />
</LinearLayout>
ต่อไปเราจะลงทะเบียนค่าปุ่มของเราในไฟล์ strings.xml ไฟล์.
<string name = "ButtonClick">Click Me!</string>หลังจากเพิ่มปุ่มของเราในไฟล์ strings.xml เราจะเปิดไฟล์ MainActivity.cs เพื่อเพิ่มการดำเนินการสำหรับปุ่มของเราเมื่อมีการคลิกดังที่แสดงในรหัสต่อไปนี้
using System;
using Android.App;
using Android.Content;
using Android.Runtime;
using Android.Views;
using Android.Widget;
using Android.OS;

namespace HelloXamarin {
   [Activity(Label = "HelloXamarin", MainLauncher = true, Icon = "@drawable/icon")]
   public class MainActivity : Activity {
      protected override void OnCreate(Bundle bundle) {
         base.OnCreate(bundle);
         SetContentView(Resource.Layout.Main);
         Button button = FindViewById<Button>(Resource.Id.MyButton);
         button.Click += delegate { button.Text = "Hello world I am your first App"; };
      }
   }
}
จากนั้นสร้างและเรียกใช้แอปพลิเคชันของคุณ

หลังจากคลิกที่ปุ่มคุณจะได้ผลลัพธ์ดังต่อไปนี้ -
