Xamarin - เลย์เอาต์
เค้าโครงเชิงเส้น
ในรูปแบบเชิงเส้นเนื้อหาจะถูกจัดเรียงในแนวนอนหรือแนวตั้ง
เลย์เอาต์เชิงเส้น─แนวนอน
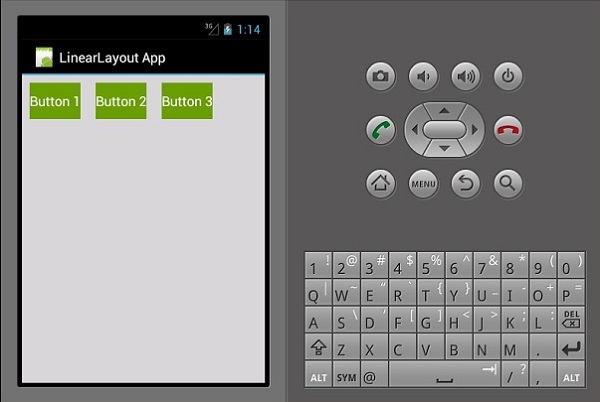
เนื้อหาของเค้าโครงนี้จัดเรียงในแนวนอน สำหรับการสาธิตนี้เราจะสร้างปุ่ม 3 ปุ่มและจัดเรียงในแนวนอนในรูปแบบเชิงเส้น
<?xml version = "1.0" encoding = "utf-8"?>
<LinearLayout xmlns:android = "http://schemas.android.com/apk/res/android"
   android:orientation = "horizontal"
   android:layout_width = "fill_parent"
   android:layout_height = "fill_parent"
   android:background = "#d3d3d3"
   android:minWidth="25px"
   android:minHeight="25px">
   <Button
      android:id="@+id/MyButton1"
      android:layout_width="wrap_content"
      android:layout_margin="10dp"
      android:layout_height="wrap_content"
      android:text="Button 1"
      android:background="@android:color/holo_green_dark" />
   <Button
      android:id="@+id/MyButton2"
      android:layout_width="wrap_content"
      android:layout_margin="10dp"
      android:layout_height="wrap_content"
      android:text="Button 2"
      android:background="@android:color/holo_green_dark" />
   <Button
      android:id="@+id/MyButton3"
      android:layout_width="wrap_content"
      android:layout_margin="10dp"
      android:layout_height="wrap_content"
      android:text="Button 3"
      android:background="@android:color/holo_green_dark" />
</LinearLayout>
ผลลัพธ์ที่ได้จะเป็นดังที่แสดงด้านล่าง -

เลย์เอาต์เชิงเส้น─แนวตั้ง
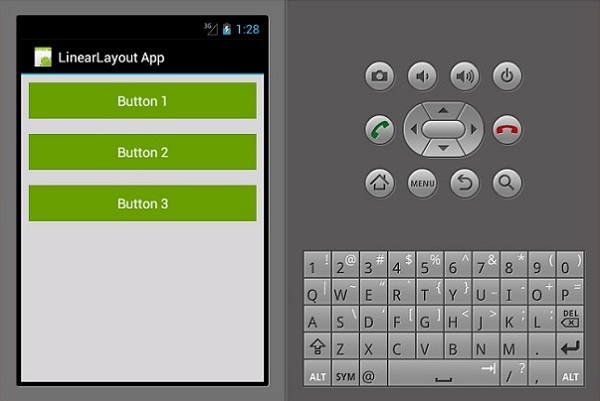
เค้าโครงประเภทนี้จะวางมุมมองเด็กในลักษณะแนวตั้ง
<?xml version = "1.0" encoding = "utf-8"?>
<LinearLayout xmlns:android = "http://schemas.android.com/apk/res/android"
   android:orientation = "vertical"
   android:layout_width = "fill_parent"
   android:layout_height = "fill_parent"
   android:background = "#d3d3d3"
   android:minWidth = "25px"
   android:minHeight = "25px">
   <Button
      android:id = "@+id/MyButton1"
      android:layout_width = "fill_parent"
      android:layout_margin = "10dp"
      android:layout_height = "wrap_content"
      android:text = "Button 1"
      android:background = "@android:color/holo_green_dark" />
   <Button
      android:id = "@+id/MyButton2"
      android:layout_width = "fill_parent"
      android:layout_margin = "10dp"
      android:layout_height = "wrap_content"
      android:text = "Button 2"
      android:background = "@android:color/holo_green_dark" />
   <Button
      android:id = "@+id/MyButton3"
      android:layout_width = "fill_parent"
      android:layout_margin = "10dp"
      android:layout_height = "wrap_content"
      android:text="Button 3"
      android:background = "@android:color/holo_green_dark" />
</LinearLayout>
ผลลัพธ์ที่ได้มีดังนี้ -

เค้าโครงญาติ
ในมุมมองนี้ตำแหน่งของมุมมองลูกจะสัมพันธ์กับมุมมองระดับบนสุดหรือกับมุมมองพี่น้อง ในตัวอย่างต่อไปนี้เราจะสร้าง 3 มุมมอง EditText และปุ่มจากนั้นจัดแนวให้ตรงกัน
สร้างโครงการใหม่และเรียกมัน relative layout app. เปิดmain.axml และเพิ่มรหัสต่อไปนี้
<?xml version = "1.0" encoding = "utf-8"?>
<RelativeLayout xmlns:android = "http://schemas.android.com/apk/res/android"
   android:layout_width = "match_parent"
   android:layout_height = "match_parent"
   android:paddingLeft = "16dp"
   android:background = "#d3d3d3"
   android:paddingRight = "16dp">
   <EditText
      android:id = "@+id/name"
      android:layout_width = "match_parent"
      android:layout_height = "wrap_content"
      android:hint = "First Name"
      android:textColorHint = "@android:color/background_dark"
      android:textColor = "@android:color/background_dark" />
   <EditText
      android:id = "@+id/lastName"
      android:layout_width = "0dp"
      android:layout_height = "wrap_content"
      android:hint = "Last Name"
      android:layout_below = "@id/name"
      android:textColorHint = "@android:color/background_dark"
      android:textColor = "@android:color/background_dark"
      android:layout_alignParentLeft = "true"
      android:layout_toLeftOf = "@+id/age" />
   <EditText
      android:id = "@id/age"
      android:layout_width = "80dp"
      android:layout_height = "wrap_content"
      android:layout_below = "@id/name"
      android:hint = "Age"
      android:textColorHint = "@android:color/background_dark"
      android:textColor = "@android:color/background_dark"
      android:layout_alignParentRight = "true" />
   <Button
      android:layout_width = "85dp"
      android:layout_height = "wrap_content"
      android:layout_below = "@id/age"
      android:layout_alignParentRight = "true"
      android:text = "Submit"
      android:background = "@android:color/holo_green_dark" />
</RelativeLayout>
พารามิเตอร์ที่สำคัญที่เราใช้ในโค้ดนี้คือ -
android:layout_below - จัดแนวองค์ประกอบมุมมองเด็กด้านล่างระดับบนสุด
android:layout_alignParentLeft - จัดเรียงองค์ประกอบหลักไปทางซ้าย
android:layout_toLeftOf - คุณสมบัตินี้จะจัดแนวองค์ประกอบทางด้านซ้ายขององค์ประกอบอื่น
android:layout_alignParentRight - จัดตำแหน่งพาเรนต์ไปทางขวา
เมื่อคุณสร้างและเรียกใช้แอพตอนนี้มันจะสร้างหน้าจอผลลัพธ์ต่อไปนี้ -

เค้าโครงกรอบ
เค้าโครงเฟรมใช้เพื่อแสดงรายการเดียวเท่านั้น เป็นการยากที่จะจัดเรียงรายการหลายรายการในเลย์เอาต์นี้โดยไม่ให้ซ้อนทับกัน
เริ่มโครงการใหม่และเรียกมันว่า frameLayoutApp. สร้างเค้าโครงเฟรมใหม่ดังที่แสดงด้านล่าง
<?xml version = "1.0" encoding = "utf-8"?>
<FrameLayout xmlns:android = "http://schemas.android.com/apk/res/android"
   android:layout_width = "fill_parent"
   android:layout_height = "fill_parent">
  <ImageView
      android:id = "@+id/ImageView1"
      android:scaleType = "matrix"
      android:layout_height = "fill_parent"
      android:layout_width = "fill_parent"
      android:src = "@drawable/img1" />
   <TextView
      android:layout_width = "fill_parent"
      android:layout_height = "wrap_content"
      android:textSize = "50dp"
      android:textColor = "#000"
      android:text = "This is a Lake" />
   <TextView
      android:gravity = "right"
      android:layout_width = "fill_parent"
      android:layout_height = "wrap_content"
      android:textSize = "50dp"
      android:text = "A very Deep Lake"
      android:layout_gravity = "bottom"
      android:textColor = "#fff" />
</FrameLayout>
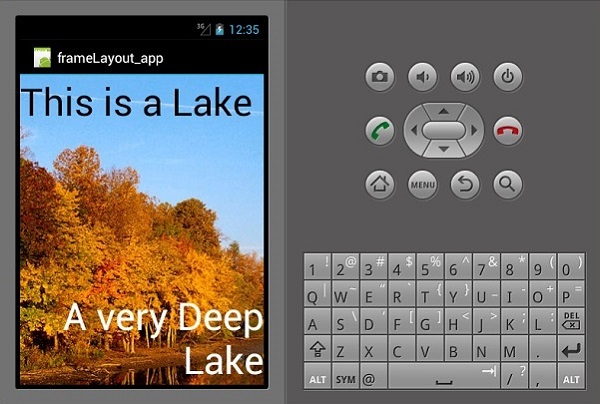
โค้ดด้านบนสร้างไฟล์ imageViewซึ่งจะเต็มหน้าจอทั้งหมด มุมมองข้อความสองรายการแล้วลอยอยู่เหนือไฟล์imageView.
ตอนนี้สร้างและเรียกใช้แอปพลิเคชันของคุณ มันจะแสดงผลลัพธ์ต่อไปนี้ -

เค้าโครงตาราง
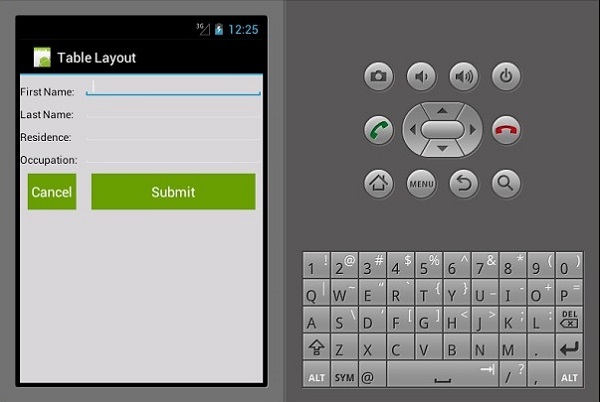
ในเค้าโครงนี้มุมมองจะถูกจัดเรียงเป็น rows และ columns. เรามาดูวิธีการทำงาน
<?xml version = "1.0" encoding = "utf-8"?>
<TableLayout xmlns:android = "http://schemas.android.com/apk/res/android"
   android:layout_width = "fill_parent"
   android:background = "#d3d3d3"
   android:layout_height = "fill_parent"
   android:stretchColumns = "1">

   <TableRow>
      <TextView
         android:text = "First Name:"
         android:layout_width = "wrap_content"
         android:layout_height = "wrap_content"
         android:textColor = "@android:color/black" />
      <EditText
         android:width = "100px"
         android:layout_width = "fill_parent"
         android:layout_height = "30dp"
         android:textColor = "@android:color/black" />
   </TableRow>

   <TableRow>
      <TextView
         android:text = "Last Name:"
         android:layout_width = "wrap_content"
         android:layout_height = "wrap_content"
         android:textColor = "@android:color/black" />
      <EditText
         android:width = "50px"
         android:layout_width = "fill_parent"
         android:layout_height = "30dp"
         android:textColor = "@android:color/black" />
   </TableRow>

   <TableRow>
      <TextView
         android:text = "Residence:"
         android:layout_width = "wrap_content"
         android:layout_height = "wrap_content"
         android:textColor = "@android:color/black" />
      <EditText
         android:width = "100px"
         android:layout_width = "fill_parent"
         android:layout_height = "30dp"
         android:textColor = "@android:color/black" />
   </TableRow>

   <TableRow>
      <TextView
         android:text = "Occupation:"
         android:layout_width = "wrap_content"
         android:layout_height = "wrap_content"
         android:textColor = "@android:color/black" />
      <EditText
         android:width = "100px"
         android:layout_width = "fill_parent"
         android:layout_height = "30dp"
         android:textColor = "@android:color/black" />
   </TableRow>

   <TableRow>
      <Button
         android:text = "Cancel"
         android:layout_width = "wrap_content"
         android:layout_margin = "10dp"
         android:layout_height = "wrap_content"
         android:background = "@android:color/holo_green_dark" />
      <Button
         android:text = "Submit"
         android:width = "100px"
         android:layout_margin = "10dp"
         android:layout_width = "wrap_content"
         android:layout_height = "wrap_content"
         android:background = "@android:color/holo_green_dark" />
   </TableRow>
</TableLayout>
รหัสด้านบนสร้างแบบฟอร์มการป้อนข้อมูลอย่างง่ายที่จัดเรียงโดยใช้ tables และ rows.
