Xamarin - คู่มือฉบับย่อ
Xamarin สร้างขึ้นบน. NET Framework ช่วยให้สามารถสร้างแอพที่ทำงานบนหลายแพลตฟอร์มได้อย่างง่ายดาย ในบทช่วยสอนนี้เราจะอธิบายว่าคุณสามารถใช้ Xamarin เพื่อส่งมอบแอป iOS, Android และ Windows ได้อย่างไร
เริ่มบทช่วยสอนด้วยการอภิปรายเกี่ยวกับวิธีการติดตั้ง Xamarin ในระบบ Windows และ Mac
ความต้องการของระบบ
Windows
คอมพิวเตอร์ที่มี RAM อย่างน้อย 2GB และใช้ Windows 7 ขึ้นไป(แนะนำให้ใช้ Windows 8-10)
Visual Studio 2012 Professional หรือสูงกว่า
Xamarin สำหรับ Visual Studio
Mac
- คอมพิวเตอร์ Mac ที่ใช้ OS X Yosemite (10.10) หรือสูงกว่า
- Xamarin iOS SDK
- Xcode ของ Apple (7+) IDE และ iOS SDK
- Xamarin Studio
การติดตั้งบน Windows
ดาวน์โหลด Xamarin Installer จาก https://www.xamarin.com/download ก่อนเรียกใช้โปรแกรมติดตั้ง Xamarin ตรวจสอบให้แน่ใจว่าคุณได้ติดตั้ง Android SDK และ Java SDK บนคอมพิวเตอร์ของคุณแล้ว
เรียกใช้โปรแกรมติดตั้งที่ดาวน์โหลดมาเพื่อเริ่มกระบวนการติดตั้ง -
หน้าจอข้อตกลงสิทธิ์การใช้งาน Xamarin จะปรากฏขึ้น คลิกNext ปุ่มเพื่อยอมรับข้อตกลง
โปรแกรมติดตั้งจะค้นหาส่วนประกอบที่ขาดหายไปและแจ้งให้คุณดาวน์โหลดและติดตั้ง
หลังจากการติดตั้ง Xamarin เสร็จสมบูรณ์ให้คลิกที่ไฟล์ Close ปุ่มเพื่อออกและเตรียมพร้อมที่จะเริ่มใช้ Xamarin
การติดตั้งบน Mac
ดาวน์โหลด Xamarin Studio Installer บนระบบ Mac ของคุณ
เรียกใช้โปรแกรมติดตั้ง Xamarin ที่คุณดาวน์โหลดและทำตามขั้นตอนที่ระบุในวิซาร์ดการติดตั้ง
หลังจากการติดตั้งเสร็จสมบูรณ์คุณสามารถเริ่มใช้ Xamarin บนระบบของคุณได้
ในบทนี้เราจะดูวิธีสร้างแอปพลิเคชัน Android ขนาดเล็กโดยใช้ Xamarin
สวัสดี Xamarin! ใบสมัคร
ก่อนอื่นให้เริ่มอินสแตนซ์ใหม่ของ Visual Studio แล้วไปที่ File → New → Project.

ในกล่องโต้ตอบเมนูที่ปรากฏขึ้นให้ไปที่ Templates → Visual C# → Android → Blank App (Android).
ตั้งชื่อที่เหมาะสมสำหรับใบสมัครของคุณ ในกรณีของเราเราตั้งชื่อมัน“helloWorld”และบันทึกไว้ในตำแหน่งเริ่มต้นที่ให้ไว้ จากนั้นคลิกปุ่ม OK สำหรับใหม่“helloXamarin” โครงการที่จะโหลด
บน solution, เปิด Resources → layout → Main.axmlไฟล์. เปลี่ยนจากมุมมองการออกแบบและไปที่ไฟล์Source ไฟล์และพิมพ์โค้ดบรรทัดต่อไปนี้เพื่อสร้างแอปของคุณ
<?xml version = "1.0" encoding = "utf-8"?>
<LinearLayout xmlns:android = "http://schemas.android.com/apk/res/android"
   android:orientation = "vertical"
   android:background = "#d3d3d3"
   android:layout_width = "fill_parent"
   android:layout_height = "fill_parent">
   <TextView
      android:text = "@string/HelloXamarin"
      android:textAppearance = "?android:attr/textAppearanceLarge"
      android:layout_width = "match_parent"
      android:layout_height = "wrap_content"
      android:id = "@+id/textView2"
      android:textColor = "@android:color/black" />
</LinearLayout>
ในโค้ดด้านบนเราได้สร้าง Android ใหม่ textview. จากนั้นเปิดค่าโฟลเดอร์และดับเบิลคลิกStrings.xmlเพื่อเปิด ที่นี่เราจะจัดเก็บข้อมูลและค่าเกี่ยวกับไฟล์button สร้างขึ้นด้านบน
<?xml version = "1.0" encoding = "utf-8"?>
<resources>
   <string name = "HelloXamarin">Hello World, I am Xamarin!</string>
   <string name = "ApplicationName">helloWorld</string>
</resources>
เปิด MainActivity.cs ไฟล์และแทนที่โค้ดที่มีอยู่ด้วยโค้ดบรรทัดต่อไปนี้
using System;
using Android.App;
using Android.Content;
using Android.Runtime;
using Android.Views;
using Android.Widget;
using Android.OS;

namespace HelloXamarin {
   public class MainActivity : Activity {
      protected override void OnCreate(Bundle bundle) {
         base.OnCreate(bundle);
         SetContentView(Resource.Layout.Main);
      }
   }
}
บันทึกแอปพลิเคชัน สร้างแล้วเรียกใช้เพื่อแสดงแอพที่สร้างขึ้นใน Android Emulator

หากคุณไม่มี Android Emulator ให้ทำตามขั้นตอนที่ระบุในหัวข้อถัดไปเพื่อสร้าง
การตั้งค่า Android Emulator
บนเมนู Visual Studio ของคุณไปที่ Tools → Android → Android Emulator Manager. ในหน้าต่างป๊อปอัปที่ปรากฏขึ้นให้คลิกไฟล์Createปุ่ม. จะแสดงหน้าจอต่อไปนี้
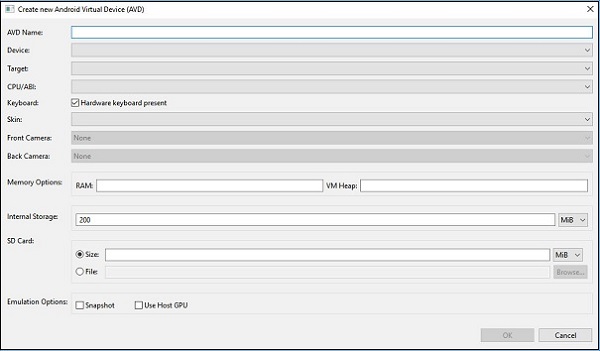
ในหน้าจอด้านบนให้ใส่ไฟล์ AVD nameคุณต้องการ. เลือกdeviceที่เหมาะสมกับจอแสดงผลของคุณเช่นจอแสดงผล Nexus 4” เลือกไฟล์target platform. ขอแนะนำให้ทดสอบบนแพลตฟอร์มเป้าหมายขั้นต่ำเสมอเช่น API 10 Android 2.3 (Gingerbread) เพื่อให้แน่ใจว่าแอปของคุณใช้งานได้กับทุกแพลตฟอร์ม Android
กรอกข้อมูลในฟิลด์ที่เหลือแล้วคลิกปุ่มตกลง โปรแกรมจำลองของคุณพร้อมแล้ว คุณสามารถเลือกได้จากรายการอุปกรณ์เสมือน Android ที่มีอยู่แล้วคลิกStart เพื่อเปิดใช้งาน

การปรับเปลี่ยนแอป HelloXamarin
ในส่วนนี้เราจะแก้ไขโครงการของเราและสร้างปุ่มที่จะแสดงข้อความเมื่อคลิก เปิดmain.axml และเปลี่ยนเป็น source view. หลังจากของเราtextview ที่เราสร้างขึ้นเราจะเพิ่มปุ่มดังที่แสดงด้านล่าง
<Button
   android:id = "@+id/MyButton"
   android:layout_width = "fill_parent"
   android:layout_height = "wrap_content"
   android:text = "@string/ButtonClick" />
หลังจากเพิ่มปุ่มแล้วรหัสเต็มของเราจะมีลักษณะดังนี้ -
<?xml version = "1.0" encoding = "utf-8"?>
<LinearLayout xmlns:android = "http://schemas.android.com/apk/res/android"
   android:orientation = "vertical"
   android:layout_width = "fill_parent"
   android:layout_height = "fill_parent">
   <TextView
      android:text = "@string/HelloXamarin"
      android:textAppearance = "?android:attr/textAppearanceLarge"
      android:layout_width = "match_parent"
      android:layout_height = "wrap_content"
      android:id = "@+id/textView2" />

   <Button
      android:id = "@+id/MyButton"
      android:layout_width = "fill_parent"
      android:layout_height = "wrap_content"
      android:text = "@string/ButtonClick" />
</LinearLayout>
ต่อไปเราจะลงทะเบียนค่าปุ่มของเราในไฟล์ strings.xml ไฟล์.
<string name = "ButtonClick">Click Me!</string>หลังจากเพิ่มปุ่มของเราในไฟล์ strings.xml เราจะเปิดไฟล์ MainActivity.cs เพื่อเพิ่มการดำเนินการสำหรับปุ่มของเราเมื่อมีการคลิกดังที่แสดงในรหัสต่อไปนี้
using System;
using Android.App;
using Android.Content;
using Android.Runtime;
using Android.Views;
using Android.Widget;
using Android.OS;

namespace HelloXamarin {
   [Activity(Label = "HelloXamarin", MainLauncher = true, Icon = "@drawable/icon")]
   public class MainActivity : Activity {
      protected override void OnCreate(Bundle bundle) {
         base.OnCreate(bundle);
         SetContentView(Resource.Layout.Main);
         Button button = FindViewById<Button>(Resource.Id.MyButton);
         button.Click += delegate { button.Text = "Hello world I am your first App"; };
      }
   }
}
จากนั้นสร้างและเรียกใช้แอปพลิเคชันของคุณ

หลังจากคลิกที่ปุ่มคุณจะได้ผลลัพธ์ดังต่อไปนี้ -

แอพ Android ทั้งหมดมีไฟล์ manifest file เรียกกันทั่วไปว่า AndroidManifest.xml. ไฟล์รายการประกอบด้วยทุกอย่างเกี่ยวกับแพลตฟอร์ม Android ที่แอปต้องการเพื่อให้ทำงานได้สำเร็จ
ที่นี่เราได้ระบุฟังก์ชันที่สำคัญบางอย่างของไฟล์รายการ -
มันประกาศ minimum API level ต้องการโดยแอปพลิเคชัน
มันประกาศการอนุญาตที่จำเป็นโดยแอปพลิเคชันเช่นกล้องถ่ายรูปตำแหน่ง ฯลฯ
ให้สิทธิ์ในคุณสมบัติฮาร์ดแวร์และซอฟต์แวร์ที่แอปพลิเคชันใช้หรือต้องการ
มันแสดงรายการไลบรารีที่ต้องเชื่อมโยงแอปพลิเคชัน
ภาพหน้าจอต่อไปนี้แสดงไฟล์ Manifest
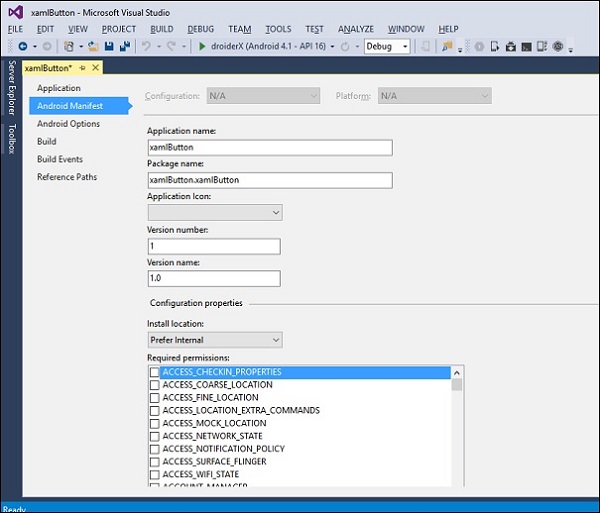
Application name - หมายถึงชื่อแอปของคุณ
Package name - เป็นชื่อเฉพาะที่ใช้ระบุแอปของคุณ
Application Icon - เป็นไอคอนที่แสดงบนหน้าจอหลักของ Android สำหรับแอปของคุณ
Version Number - เป็นหมายเลขเดียวที่ใช้เพื่อแสดงเวอร์ชันหนึ่งของแอปของคุณเป็นเวอร์ชันล่าสุดมากกว่าเวอร์ชันอื่น
<manifest xmlns:android="http://schemas.android.com/apk/res/android"
   android:versionCode="1" >
Version Name- เป็นสตริงเวอร์ชันที่ใช้งานง่ายสำหรับแอปของคุณซึ่งผู้ใช้จะเห็นในการตั้งค่าแอปของคุณและบน Google PlayStore โค้ดต่อไปนี้แสดงตัวอย่างชื่อเวอร์ชัน
<manifest xmlns:android="http://schemas.android.com/apk/res/android"
   android:versionName="1.0.0">
Minimum Android Version - เป็นแพลตฟอร์ม Android เวอร์ชันต่ำสุดที่แอปพลิเคชันของคุณรองรับ
<uses-sdk android:minSdkVersion="16" />ในตัวอย่างข้างต้นเวอร์ชัน Android ขั้นต่ำของเราคือ API ระดับ 16 ซึ่งโดยทั่วไปเรียกว่า JELLY BEAN.
Target Android Version - เป็นเวอร์ชัน Android ที่แอปของคุณคอมไพล์
เมื่อสร้างโปรเจ็กต์ Android ใหม่จะมีไฟล์บางไฟล์ที่ถูกเพิ่มลงในโปรเจ็กต์โดยค่าเริ่มต้น เราเรียกไฟล์และโฟลเดอร์โปรเจ็กต์เริ่มต้นเหล่านี้ว่าAndroid Resources. ดูภาพหน้าจอต่อไปนี้

ทรัพยากรเริ่มต้นของ Android มีดังต่อไปนี้ -
AndroidManifest.xml file - มีข้อมูลเกี่ยวกับแอปพลิเคชัน Android ของคุณเช่นชื่อแอปพลิเคชันสิทธิ์ ฯลฯ
Resources folder - ทรัพยากรอาจเป็นรูปภาพเลย์เอาต์สตริงและอื่น ๆ ที่สามารถโหลดผ่านระบบทรัพยากรของ Android
Resources/drawable folder - จัดเก็บภาพทั้งหมดที่คุณจะใช้ในแอปพลิเคชันของคุณ
Resources/layout folder - มีไฟล์ XML ของ Android (.axml) ทั้งหมดที่ Android ใช้สร้างอินเทอร์เฟซผู้ใช้
The Resources/values folder- มีไฟล์ XML เพื่อประกาศคู่คีย์ - ค่าสำหรับสตริง (และประเภทอื่น ๆ ) ตลอดทั้งแอปพลิเคชัน นี่คือวิธีการตั้งค่าการแปลหลายภาษาตามปกติบน Android
Resources.designer.cs - ไฟล์นี้สร้างขึ้นโดยอัตโนมัติเมื่อมีการสร้าง Android ที่ฉายและมีตัวระบุเฉพาะที่อ้างอิงทรัพยากร Android
MainActivity.cs file - นี่เป็นกิจกรรมแรกของแอปพลิเคชัน Android ของคุณและจากจุดเริ่มต้นของการกระทำของแอปพลิเคชันหลัก
ไฟล์ทรัพยากรสามารถเข้าถึงได้โดยทางโปรแกรมผ่านไฟล์ unique ID ซึ่งเก็บไว้ในไฟล์ resources.designer.csไฟล์. ID อยู่ภายใต้คลาสที่เรียกว่าResource. ทรัพยากรใด ๆ ที่เพิ่มลงในโครงการจะถูกสร้างขึ้นโดยอัตโนมัติภายในไฟล์resource class.
รหัสต่อไปนี้แสดงวิธีสร้างโครงการ gridview ที่มีรูปภาพเจ็ดภาพ -
namespace HelloGridView {
   [System.CodeDom.Compiler.GeneratedCodeAttribute
      ("Xamarin.Android.Build.Tas ks",
      "1.0.0.0")]
   public partial class Resource {
      static Resource() {
         global::Android.Runtime.ResourceIdManager.UpdateIdValues();
      }

      public static void UpdateIdValues() {}
      public partial class Attribute {
         static Attribute() {
            global::Android.Runtime.ResourceIdManager.UpdateIdValues();
         }

         private Attribute() {}
      }

      public partial class Drawable {
         // aapt resource value: 0x7f020000
         public const int Icon = 2130837504;

         // aapt resource value: 0x7f020001
         public const int img1 = 2130837505;

         // aapt resource value: 0x7f020002
         public const int img2 = 2130837506;

         // aapt resource value: 0x7f020003
         public const int img3 = 2130837507;

         // aapt resource value: 0x7f020004
         public const int img4 = 2130837508;

         // aapt resource value: 0x7f020005
         public const int img5 = 2130837509;

         // aapt resource value: 0x7f020006
         public const int img6 = 2130837510;

         // aapt resource value: 0x7f020007
         public const int img7 = 2130837511;

         static Drawable() {
            global::Android.Runtime.ResourceIdManager.UpdateIdValues();
         }

         private Drawable() {}
      }

      public partial class Id {
         // aapt resource value: 0x7f050000
         public const int gridview = 2131034112;

         static Id() {
            global::Android.Runtime.ResourceIdManager.UpdateIdValues();
         }

         private Id() {}
      }

      public partial class Layout {
         // aapt resource value: 0x7f030000
         public const int Main = 2130903040;
         static Layout() {
            global::Android.Runtime.ResourceIdManager.UpdateIdValues();
         }
         private Layout() {}
      }

      public partial class String {
         // aapt resource value: 0x7f040001
         public const int ApplicationName = 2130968577;

         // aapt resource value: 0x7f040000
         public const int Hello = 2130968576;

         static String() {
            global::Android.Runtime.ResourceIdManager.UpdateIdValues();
         }
         private String() {}
      }
   }
}
จากโค้ดด้านบนภาพทั้งเจ็ดถูกอ้างอิงในคลาสที่เรียกว่า drawable. รูปภาพเหล่านี้ถูกเพิ่มโดยทางโปรแกรม หากผู้ใช้เพิ่มรูปภาพอื่นในโปรเจ็กต์ภาพนั้นจะถูกเพิ่มลงในไฟล์drawableชั้นเรียน. gridviewที่อยู่ในโปรเจ็กต์จะถูกเพิ่มและจัดเก็บไว้ในคลาสด้วยตัวมันเอง แต่ละรายการที่มีอยู่ในไฟล์resources folder จะถูกสร้างและจัดเก็บโดยอัตโนมัติในชั้นเรียน
เมื่อผู้ใช้นำทางผ่านแอพ Android เหตุการณ์ต่างๆจะเกิดขึ้น ตัวอย่างเช่นเมื่อผู้ใช้เปิดแอพเช่นแอพ Facebook แอพจะเริ่มและปรากฏให้ผู้ใช้เห็นในเบื้องหน้าonCreate() → onStart() → onResume().
หากกิจกรรมอื่นเริ่มต้นขึ้นเช่นมีโทรศัพท์เข้ามาแอพ Facebook จะไปที่พื้นหลังและสายจะมาที่เบื้องหน้า ตอนนี้เรามีสองกระบวนการที่กำลังทำงานอยู่
onPause() --- > onStop()เมื่อการโทรสิ้นสุดลงแอพ Facebook จะกลับสู่เบื้องหน้า เรียกว่าสามวิธี
onRestart() --- > onStart() --- > onResume()มี 7 กระบวนการตลอดอายุการใช้งานในกิจกรรม Android ได้แก่ -
onCreate - เรียกเมื่อสร้างกิจกรรมครั้งแรก
onStart - เรียกเมื่อกิจกรรมเริ่มต้นและผู้ใช้สามารถมองเห็นได้
onResume- เรียกเมื่อกิจกรรมเริ่มโต้ตอบกับผู้ใช้ การป้อนข้อมูลของผู้ใช้จะเกิดขึ้นในขั้นตอนนี้
onPause - เรียกเมื่อกิจกรรมทำงานในพื้นหลัง แต่ยังไม่ถูกฆ่า
onStop - เรียกเมื่อผู้ใช้มองไม่เห็นกิจกรรมอีกต่อไป
onRestart- เรียกว่าหลังจากหยุดกิจกรรมแล้วก่อนจะเริ่มอีกครั้ง โดยปกติจะเรียกเมื่อผู้ใช้กลับไปที่กิจกรรมก่อนหน้านี้ที่ถูกหยุด
onDestroy - นี่คือการโทรครั้งสุดท้ายก่อนที่กิจกรรมจะถูกลบออกจากหน่วยความจำ
ภาพประกอบต่อไปนี้แสดงวงจรชีวิตของกิจกรรม Android -

โดยค่าเริ่มต้นใน Android ไม่มีแอปพลิเคชันใดที่มีสิทธิ์ดำเนินการใด ๆ ที่จะมีผลกระทบต่อผู้ใช้หรือระบบปฏิบัติการ เพื่อให้แอปทำงานได้แอปจะต้องประกาศสิทธิ์ แอปไม่สามารถทำงานได้จนกว่าจะได้รับอนุญาตจากระบบ Android กลไกการอนุญาตนี้จะหยุดไม่ให้แอปพลิเคชันทำตามที่ต้องการโดยไม่ได้รับความยินยอมจากผู้ใช้
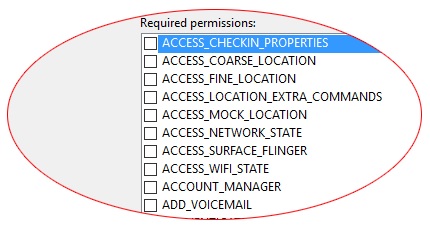
สิทธิ์จะถูกบันทึกไว้ใน AndroidManifest.xmlไฟล์. ในการเพิ่มสิทธิ์ให้ดับเบิลคลิกที่คุณสมบัติจากนั้นไปที่ Android ManRequired permissionsจะปรากฏขึ้น ตรวจสอบสิทธิ์ที่เหมาะสมที่คุณต้องการเพิ่ม
Camera - ให้สิทธิ์ในการเข้าถึงกล้องของอุปกรณ์
<uses-permission android:name="android.permission.CAMERA" />Internet - ให้การเข้าถึงทรัพยากรเครือข่าย
<uses-permission android:name="android.permission.INTERNET" />ReadContacts - ให้การเข้าถึงเพื่ออ่านรายชื่อบนอุปกรณ์ของคุณ
<uses-permission android:name="android.permission.READ_CONTACTS" />ReadExternalStorage - ให้การเข้าถึงเพื่ออ่านและจัดเก็บข้อมูลในที่จัดเก็บข้อมูลภายนอก
<uses-permission android:name="android.permission.READ_EXTERNAL_STORAGE" />Calendars- อนุญาตให้แอปเข้าถึงปฏิทินบนอุปกรณ์และกิจกรรมของผู้ใช้ การอนุญาตนี้อาจเป็นอันตรายเนื่องจากทำให้แอปสามารถส่งอีเมลถึงแขกโดยที่เจ้าของไม่รับรู้ ไวยากรณ์สำหรับการเพิ่มสิทธิ์นี้มีดังที่แสดงด้านล่าง -
<uses-permission android:name="android.permission-group.CALENADAR" />SMS- แอพที่ได้รับอนุญาตนี้มีความสามารถในการใช้บริการส่งข้อความของอุปกรณ์ รวมถึงการอ่านเขียนและแก้ไขข้อความ SMS และ MMS ไวยากรณ์ดังที่แสดงด้านล่าง
<uses-permission android:name="android.permission-group.SMS" />Location - แอปที่ได้รับอนุญาตนี้สามารถเข้าถึงตำแหน่งของอุปกรณ์โดยใช้เครือข่าย GPS
<uses-permission android:name="android.permission-group.LOCATION" />Bluetooth - แอปที่ได้รับอนุญาตนี้สามารถแลกเปลี่ยนไฟล์ข้อมูลกับอุปกรณ์ที่ใช้ Bluetooth อื่น ๆ แบบไร้สาย
<uses-permission android:name="android.permission.BLUETOOTH" />TextView
TextView เป็นส่วนประกอบที่สำคัญมากของวิดเจ็ต Android ส่วนใหญ่จะใช้สำหรับการแสดงข้อความบนหน้าจอ Android
ในการสร้างมุมมองข้อความเพียงแค่เปิด main.axml และเพิ่มรหัสต่อไปนี้ระหว่างแท็กโครงร่างเชิงเส้น
<TextView
   android:text = "Hello I am a text View"
   android:layout_width = "match_parent"
   android:layout_height = "wrap_content"
   android:id = "@+id/textview1" />
ปุ่ม
ปุ่มคือตัวควบคุมที่ใช้เพื่อทริกเกอร์เหตุการณ์เมื่อมีการคลิก ภายใต้Main.axml พิมพ์รหัสต่อไปนี้เพื่อสร้างปุ่ม
<Button
   android:id = "@+id/MyButton"
   android:layout_width = "fill_parent"
   android:layout_height = "wrap_content"
   android:text = "@string/Hello" />
เปิด Resources\Values\Strings.xml และพิมพ์โค้ดบรรทัดต่อไปนี้ระหว่างแท็ก <resources>
<string name="Hello">Click Me!</string>โค้ดด้านบนแสดงมูลค่าของปุ่มที่เราสร้างขึ้น ต่อไปเราจะเปิดMainActivity.csและสร้างการดำเนินการที่จะดำเนินการเมื่อคลิกปุ่ม พิมพ์รหัสต่อไปนี้ภายใต้base.OnCreate (มัด) วิธีการ
Button button = FindViewById<Button>(Resource.Id.MyButton);
button.Click += delegate { button.Text = "You clicked me"; };
โค้ดด้านบนแสดง“ คุณคลิกฉัน” เมื่อผู้ใช้คลิกที่ปุ่ม
FindViewById<< -->วิธีนี้จะค้นหา ID ของข้อมูลพร็อพเพอร์ตี้ที่ระบุ มันค้นหา id ในไฟล์เลย์เอาต์. maxml

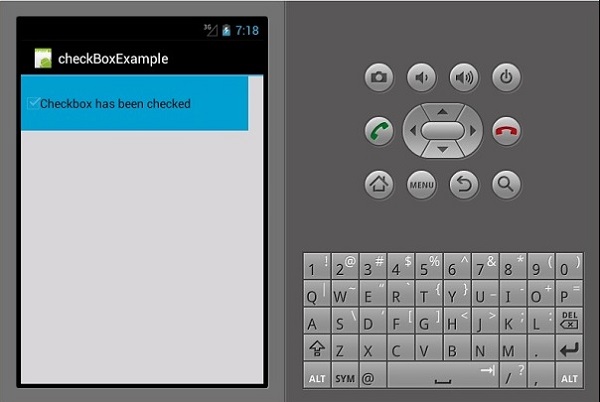
ช่องทำเครื่องหมาย
ช่องทำเครื่องหมายถูกใช้เมื่อต้องการเลือกมากกว่าหนึ่งตัวเลือกจากกลุ่มตัวเลือก ในตัวอย่างนี้เราจะสร้างช่องทำเครื่องหมายที่เลือกไว้จะแสดงข้อความว่าได้รับการตรวจสอบแล้วมิฉะนั้นจะแสดงว่าไม่เลือก
เริ่มต้นด้วยการเปิด Main.axml ไฟล์ในโครงการของเราและพิมพ์โค้ดบรรทัดต่อไปนี้เพื่อสร้างช่องทำเครื่องหมาย
<?xml version = "1.0" encoding = "utf-8"?>
<LinearLayout xmlns:android = "http://schemas.android.com/apk/res/android"
   android:orientation = "vertical"
   android:background = "#d3d3d3"
   android:layout_width = "fill_parent"
   android:layout_height = "fill_parent">
   <CheckBox
      android:text = "CheckBox"
      android:padding = "25dp"
      android:layout_width = "300dp"
      android:layout_height = "wrap_content"
      android:id = "@+id/checkBox1"
      android:textColor = "@android:color/black"
      android:background = "@android:color/holo_blue_dark" />
</LinearLayout>
จากนั้นไปที่ MainActivity.cs เพื่อเพิ่มรหัสการทำงาน
CheckBox checkMe = FindViewById<CheckBox>(Resource.Id.checkBox1);
checkMe.CheckedChange += (object sender, CompoundButton.CheckedChangeEventArgs e) => {
   CheckBox check = (CheckBox)sender;
   if(check.Checked) {
      check.Text = "Checkbox has been checked";
   } else {
      check.Text = "Checkbox has not been checked";
   }
};
จากรหัสด้านบนเราจะพบช่องทำเครื่องหมายโดยใช้ findViewById. ต่อไปเราจะสร้างวิธีการจัดการสำหรับช่องทำเครื่องหมายของเราและในตัวจัดการของเราเราสร้างคำสั่ง if else ซึ่งจะแสดงข้อความขึ้นอยู่กับผลลัพธ์ที่เลือก
CompoundButton.CheckedChangeEventArgs →วิธีนี้ทำให้เหตุการณ์เริ่มทำงานเมื่อสถานะช่องทำเครื่องหมายเปลี่ยนไป
แถบความคืบหน้า
แถบความคืบหน้าคือส่วนควบคุมที่ใช้เพื่อแสดงความคืบหน้าของการดำเนินการ หากต้องการเพิ่มแถบความคืบหน้าให้เพิ่มบรรทัดรหัสต่อไปนี้ในMain.axml ไฟล์.
<ProgressBar
   style="?android:attr/progressBarStyleHorizontal"
   android:layout_width = "match_parent"
   android:layout_height = "wrap_content"
   android:id = "@+id/progressBar1" />
จากนั้นไปที่ MainActivity.cs และตั้งค่าของแถบความคืบหน้า
ProgressBar pb = FindViewById<ProgressBar>(Resource.Id.progressBar1);
pb.Progress = 35;
ในโค้ดด้านบนเราได้สร้างแถบความคืบหน้าด้วยค่า 35
ปุ่มวิทยุ
นี่คือวิดเจ็ต Android ที่ช่วยให้บุคคลสามารถเลือกหนึ่งจากชุดตัวเลือก ในส่วนนี้เราจะสร้างกลุ่มวิทยุที่มีรายชื่อรถซึ่งจะดึงปุ่มตัวเลือกที่เลือกไว้
ขั้นแรกเราเพิ่มกลุ่มวิทยุและไฟล์ textview ดังแสดงในรหัสต่อไปนี้ -
<?xml version = "1.0" encoding = "utf-8"?>
<LinearLayout xmlns:android = "http://schemas.android.com/apk/res/android"
   android:orientation = "vertical"
   android:background = "@android:color/darker_gray"
   android:layout_width = "fill_parent"
   android:layout_height = "fill_parent">
   <TextView
      android:text = "What is your favourite Car"
      android:layout_width = "match_parent"
      android:layout_height = "wrap_content"
      android:id = "@+id/textView1"
      android:textColor = "@android:color/black" />
   <RadioGroup
      android:layout_width = "match_parent"
      android:layout_height = "wrap_content"
      android:id = "@+id/radioGroup1"
      android:backgroundTint = "#a52a2aff"
      android:background = "@android:color/holo_green_dark">
   <RadioButton
      android:layout_width = "wrap_content"
      android:layout_height = "wrap_content"
      android:text = "Ferrari"
      android:id = "@+id/radioFerrari" />
   <RadioButton
      android:layout_width = "wrap_content"
      android:layout_height = "wrap_content"
      android:text = "Mercedes"
      android:id = "@+id/radioMercedes" />
   <RadioButton
      android:layout_width = "wrap_content"
      android:layout_height = "wrap_content"
      android:text = "Lamborghini"
      android:id = "@+id/radioLamborghini" />
   <RadioButton
      android:text = "Audi"
      android:layout_width = "match_parent"
      android:layout_height = "wrap_content"
      android:id = "@+id/radioAudi" />
   </RadioGroup>
</LinearLayout>
ในการดำเนินการเมื่อคลิกปุ่มตัวเลือกเราจะเพิ่มกิจกรรม ไปที่MainActivity.cs และสร้างตัวจัดการเหตุการณ์ใหม่ดังที่แสดงด้านล่าง
private void onClickRadioButton(object sender, EventArgs e) {
   RadioButton cars = (RadioButton)sender;
   Toast.MakeText(this, cars.Text, ToastLength.Short).Show
   ();
}
Toast.MakeText() →นี่เป็นวิธีการดูที่ใช้เพื่อแสดงข้อความ / เอาต์พุตในป๊อปอัปขนาดเล็ก ที่ด้านล่างของไฟล์OnCreate() วิธีการหลังจากนั้น SetContentView()เพิ่มรหัสต่อไปนี้ สิ่งนี้จะจับปุ่มตัวเลือกแต่ละปุ่มและเพิ่มลงในตัวจัดการเหตุการณ์ที่เราสร้างขึ้น
RadioButton radio_Ferrari = FindViewById<RadioButton>
   (Resource.Id.radioFerrari);
   RadioButton radio_Mercedes = FindViewById<RadioButton>
   (Resource.Id.radioMercedes);
   RadioButton radio_Lambo = FindViewById<RadioButton>
   (Resource.Id.radioLamborghini);
   RadioButton radio_Audi = FindViewById<RadioButton>
   (Resource.Id.radioAudi);
   radio_Ferrari.Click += onClickRadioButton;
   radio_Mercedes.Click += onClickRadioButton;
   radio_Lambo.Click += onClickRadioButton;
   radio_Audi.Click += onClickRadioButton;
ตอนนี้เรียกใช้แอปพลิเคชันของคุณ ควรแสดงหน้าจอต่อไปนี้เป็นผลลัพธ์ -

สลับปุ่ม
ปุ่มสลับใช้เพื่อสลับระหว่างสองสถานะเช่นสามารถสลับระหว่างเปิดและปิดได้ เปิดResources\layout\Main.axml และเพิ่มบรรทัดของโค้ดต่อไปนี้เพื่อสร้างปุ่มสลับ
<?xml version = "1.0" encoding = "utf-8"?>
<LinearLayout xmlns:android = "http://schemas.android.com/apk/res/android"
   android:orientation = "vertical"
   android:background = "#d3d3d3"
   android:layout_width = "fill_parent"
   android:layout_height = "fill_parent">
   <ToggleButton
      android:id = "@+id/togglebutton"
      android:layout_width = "wrap_content"
      android:layout_height = "wrap_content"
      android:textOn = "Torch ON"
      android:textOff = "Torch OFF"
      android:textColor = "@android:color/black" />
</LinearLayout>
เราสามารถเพิ่มการดำเนินการในแถบสลับเมื่อมีการคลิก เปิดMainActivity.cs และเพิ่มบรรทัดของโค้ดต่อไปนี้หลังไฟล์ OnCreate() คลาสวิธีการ
ToggleButton togglebutton = FindViewById<ToggleButton> (Resource.Id.togglebutton);
togglebutton.Click += (o, e) => {
   if (togglebutton.Checked)
      Toast.MakeText(this, "Torch is ON", ToastLength.Short).Show ();
   else
      Toast.MakeText(this, "Torch is OFF",
      ToastLength.Short).Show();
};
ตอนนี้เมื่อคุณเรียกใช้แอพควรแสดงผลลัพธ์ต่อไปนี้ -

แถบการให้คะแนน
แถบการให้คะแนนคือองค์ประกอบรูปแบบที่ประกอบด้วยดาวซึ่งผู้ใช้แอปสามารถใช้เพื่อให้คะแนนสิ่งต่างๆที่คุณให้ไว้ ในไฟล์Main.axml สร้างแถบการจัดอันดับใหม่ด้วย 5 ดาว
<?xml version = "1.0" encoding = "utf-8"?>
<LinearLayout xmlns:android = "http://schemas.android.com/apk/res/android"
   android:orientation = "vertical"
   android:background = "#d3d3d3"
   android:layout_width = "fill_parent"
   android:layout_height = "fill_parent">
   <RatingBar
      android:layout_width = "wrap_content"
      android:layout_height = "wrap_content"
      android:id = "@+id/ratingBar1"
      android:numStars = "5"
      android:stepSize = "1.0" />
</LinearLayout>
ในการเรียกใช้แอพควรแสดงผลลัพธ์ต่อไปนี้ -

การเติมข้อความอัตโนมัติ
นี่คือมุมมองข้อความที่แสดงคำแนะนำทั้งหมดในขณะที่ผู้ใช้พิมพ์ เรากำลังจะสร้างมุมมองข้อความเติมข้อความอัตโนมัติที่มีรายชื่อผู้คนและปุ่มซึ่งเมื่อคลิกจะแสดงชื่อที่เลือก
เปิด Main.axml และเขียนรหัสต่อไปนี้
<?xml version = "1.0" encoding = "utf-8"?>
<LinearLayout xmlns:android = "http://schemas.android.com/apk/res/android"
   android:orientation = "vertical"
   android:layout_width = "fill_parent"
   android:background = "#d3d3d3"
   android:layout_height = "fill_parent">
   <TextView
      android:text = "Enter Name"
      android:textAppearance = "?android:attr/textAppearanceMedium"
      android:layout_width = "fill_parent"
      android:layout_height = "wrap_content"
      android:id = "@+id/textView1"
      android:padding = "5dp"
      android:textColor = "@android:color/black" />
   <AutoCompleteTextView
      android:layout_width = "fill_parent"
      android:layout_height = "wrap_content"
      android:id = "@+id/autoComplete1"
      android:textColor = "@android:color/black" />
   <Button
      android:text = "Submit"
      android:layout_width = "fill_parent"
      android:layout_height = "wrap_content"
      android:id = "@+id/btn_Submit"
      android:background="@android:color/holo_green_dark" />
</LinearLayout>
โค้ดด้านบนสร้าง TextView สำหรับพิมพ์ AutoCompleteTextViewสำหรับแสดงคำแนะนำและปุ่มสำหรับแสดงชื่อที่ป้อนจาก TextView ไปที่MainActivity.cs เพื่อเพิ่มฟังก์ชัน
สร้างวิธีการจัดการเหตุการณ์ใหม่ดังที่แสดงด้านล่าง
protected void ClickedBtnSubmit(object sender, System.EventArgs e){
   if (autoComplete1.Text != ""){
      Toast.MakeText(this, "The Name Entered ="
         + autoComplete1.Text, ToastLength.Short).Show();
   } else {
      Toast.MakeText(this, "Enter a Name!", ToastLength.Short).Show();
   }
}
ตัวจัดการที่สร้างขึ้นจะตรวจสอบว่าการเติมข้อความอัตโนมัติว่างเปล่า หากไม่ว่างเปล่าก็จะแสดงข้อความเติมข้อความอัตโนมัติที่เลือก พิมพ์รหัสต่อไปนี้ภายในไฟล์OnCreate() ชั้นเรียน.
autoComplete1 = FindViewById<AutoCompleteTextView>(Resource.Id.autoComplete1);
btn_Submit = FindViewById<Button>(Resource.Id.btn_Submit);
var names = new string[] { "John", "Peter", "Jane", "Britney" };
ArrayAdapter adapter = new ArrayAdapter<string>(this,
   Android.Resource.Layout.SimpleSpinnerItem, names);
autoComplete1.Adapter = adapter;
btn_Submit.Click += ClickedBtnSubmit;
ArrayAdapter - นี่คือตัวจัดการคอลเลกชันที่อ่านรายการข้อมูลจากคอลเลกชันรายการและส่งคืนเป็นมุมมองหรือแสดงบนหน้าจอ
ตอนนี้เมื่อคุณเรียกใช้แอปพลิเคชันควรแสดงผลลัพธ์ต่อไปนี้

เมนูป๊อปอัป
เมนูป๊อปอัปหมายถึงเมนูที่แนบมากับมุมมอง เรียกอีกอย่างว่าไฟล์shortcut menu. มาดูวิธีเพิ่มเมนูป๊อปอัพลงในแอพ Android
สร้างโครงการใหม่และเรียกมัน popUpMenu App. เปิดMain.axml และสร้างปุ่มที่จะใช้เพื่อแสดงเมนูป๊อปอัป
<?xml version = "1.0" encoding = "utf-8"?>
<LinearLayout xmlns:android = "http://schemas.android.com/apk/res/android"
   android:orientation = "vertical"
   android:background = "#d3d3d3"
   android:layout_width = "fill_parent"
   android:layout_height = "fill_parent">
   <Button
      android:id = "@+id/popupButton"
      android:layout_width = "fill_parent"
      android:layout_height = "wrap_content"
      android:text = "Show popup menu"
      android:background = "@android:color/holo_green_dark"
      android:textColor = "@android:color/black" />
</LinearLayout>
สร้างโฟลเดอร์ใหม่ภายใต้ไฟล์ Resources โฟลเดอร์และเรียกมัน Menu. ภายในโฟลเดอร์เมนูให้เพิ่มไฟล์ xml ใหม่ที่เรียกว่าpopMenu.xml.
ภายใต้ popMenu.xmlเพิ่มรายการเมนูต่อไปนี้
<?xml version = "1.0" encoding="utf-8"?>
<menu xmlns:android = "http://schemas.android.com/apk/res/android">
   <item
      android:id = "@+id/file_settings"
      android:icon = "@drawable/img_settings"
      android:title = "Settings"
      android:showAsAction = "ifRoom">

      <item
         android:id = "@+id/new_game1"
         android:icon = "@drawable/imgNew"
         android:title = "New File Settings"/>
      <item
         android:id = "@+id/help"
         android:icon = "@drawable/img_help"
         android:title = "Help" />
      <item
         android:id = "@+id/about_app"
         android:icon = "@drawable/img_help"
         android:title = "About app"/>
   </item>
</menu>
หลังจากเพิ่มรายการเมนูแล้วให้ไปที่ mainActivity.cs เพื่อแสดงเมนูป๊อปอัพเมื่อคลิกปุ่ม
protected override void OnCreate(Bundle bundle) {
   base.OnCreate(bundle);
   SetContentView(Resource.Layout.Main);
   Button showPopupMenu = FindViewById<Button>(Resource.Id.popupButton);
   showPopupMenu.Click += (s, arg) => {
      PopupMenu menu = new PopupMenu(this, showPopupMenu);
      menu.Inflate(Resource.Menu.popMenu);
      menu.Show();
   };
}
ตอนนี้สร้างและเรียกใช้แอปพลิเคชันของคุณ ควรให้ผลลัพธ์ดังต่อไปนี้ -

เมนูตัวเลือก
เมนูตัวเลือกคือชุดของเมนูที่เป็นเมนูหลักของแอพและส่วนใหญ่จะใช้ในการจัดเก็บการตั้งค่าการค้นหาและอื่น ๆ ที่นี่เราจะสร้างเมนูสำหรับการตั้งค่าที่มีสามรายการอยู่ภายในนั่นคือ New File Settings, Help, and About App.
ในการสร้างเมนูตัวเลือกเราต้องสร้างไฟล์เลย์เอาต์ XML ใหม่ในโฟลเดอร์ทรัพยากร ก่อนอื่นเราจะเพิ่มไฟล์ XML ใหม่ คลิกขวาที่ไฟล์Layout folderจากนั้นไปที่ Add → New item → Visual C# → XML File.
เลือกชื่อที่เหมาะสมสำหรับ layout file. ในตัวอย่างของเราเราจะเรียกไฟล์ของเราmyMenu.xml.
ข้างใน myMenu.xmlเราจะสร้างเมนูใหม่และเพิ่มรายการภายใน รหัสต่อไปนี้แสดงวิธีการทำ
<?xml version = "1.0" encoding = "utf-8"?>
<menu xmlns:android = "http://schemas.android.com/apk/res/android">
  <item
      android:id = "@+id/file_settings"
      android:icon = "@drawable/img_settings"
      android:title = "Settings"
      android:showAsAction = "ifRoom">

      <menu>
         <item
            android:id = "@+id/new_game1"
            android:icon = "@drawable/imgNew"
            android:title = "New File Settings" />
         <item
            android:id = "@+id/help"
            android:icon = "@drawable/img_help"
            android:title = "Help" />
         <item
            android:id = "@+id/about_app"
            android:icon = "@drawable/img_help"
            android:title = "About app"/>
      </menu>
   </item>
</menu>
ต่อไปเราไปที่ MainActivity.cs และสร้างคลาสแทนที่สำหรับ onOptionsMenu().
public override bool OnCreateOptionsMenu(IMenu menu) {
   MenuInflater.Inflate(Resource.Menu.myMenu, menu);
   return base.OnPrepareOptionsMenu(menu);
}
ต่อไปเราจะสร้างการดำเนินการเพื่อตอบสนองต่อไฟล์ settings menuเมื่อถูกเลือก ในการทำเช่นนี้เราสร้างคลาสการแทนที่อื่นสำหรับOnOptionsItemSelected() เมนู.
public override bool OnOptionsItemSelected(IMenuItem item) {
   if (item.ItemId == Resource.Id.file_settings) {
      // do something here...
      return true;
   }
   return base.OnOptionsItemSelected(item);
}
รหัสสุดท้ายของเราจะมีลักษณะดังนี้ -
namespace optionsMenuApp {
   [Activity(Label = "options Menu", MainLauncher = true, Icon = "@drawable/icon")]
   public class MainActivity : Activity {
      public override bool OnCreateOptionsMenu(IMenu menu) {
         MenuInflater.Inflate(Resource.Menu.myMenu, menu);
         return base.OnPrepareOptionsMenu(menu);
      }
      public override bool OnOptionsItemSelected(IMenuItem item) {
         if (item.ItemId == Resource.Id.file_settings) {
            // do something here...
            return true;
         }
         return base.OnOptionsItemSelected(item);
      }
   }
}
ตอนนี้สร้างและเรียกใช้แอปพลิเคชันของคุณ ควรให้ผลลัพธ์ดังต่อไปนี้ -

เค้าโครงเชิงเส้น
ในรูปแบบเชิงเส้นเนื้อหาจะถูกจัดเรียงในแนวนอนหรือแนวตั้ง
เลย์เอาต์เชิงเส้น─แนวนอน
เนื้อหาของเค้าโครงนี้จัดเรียงในแนวนอน สำหรับการสาธิตนี้เราจะสร้างปุ่ม 3 ปุ่มและจัดเรียงในแนวนอนในรูปแบบเชิงเส้น
<?xml version = "1.0" encoding = "utf-8"?>
<LinearLayout xmlns:android = "http://schemas.android.com/apk/res/android"
   android:orientation = "horizontal"
   android:layout_width = "fill_parent"
   android:layout_height = "fill_parent"
   android:background = "#d3d3d3"
   android:minWidth="25px"
   android:minHeight="25px">
   <Button
      android:id="@+id/MyButton1"
      android:layout_width="wrap_content"
      android:layout_margin="10dp"
      android:layout_height="wrap_content"
      android:text="Button 1"
      android:background="@android:color/holo_green_dark" />
   <Button
      android:id="@+id/MyButton2"
      android:layout_width="wrap_content"
      android:layout_margin="10dp"
      android:layout_height="wrap_content"
      android:text="Button 2"
      android:background="@android:color/holo_green_dark" />
   <Button
      android:id="@+id/MyButton3"
      android:layout_width="wrap_content"
      android:layout_margin="10dp"
      android:layout_height="wrap_content"
      android:text="Button 3"
      android:background="@android:color/holo_green_dark" />
</LinearLayout>
ผลลัพธ์ที่ได้จะเป็นดังที่แสดงด้านล่าง -

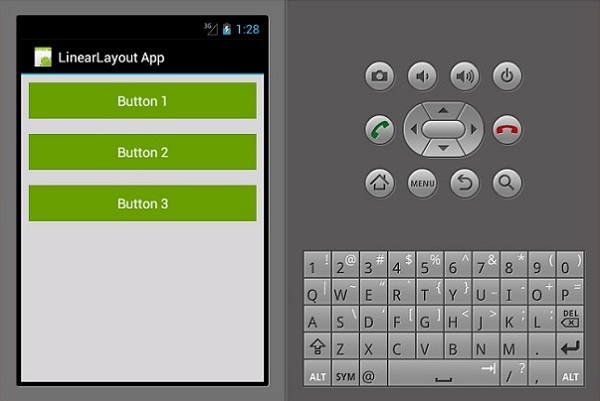
เลย์เอาต์เชิงเส้น─แนวตั้ง
เค้าโครงประเภทนี้จะวางมุมมองเด็กในลักษณะแนวตั้ง
<?xml version = "1.0" encoding = "utf-8"?>
<LinearLayout xmlns:android = "http://schemas.android.com/apk/res/android"
   android:orientation = "vertical"
   android:layout_width = "fill_parent"
   android:layout_height = "fill_parent"
   android:background = "#d3d3d3"
   android:minWidth = "25px"
   android:minHeight = "25px">
   <Button
      android:id = "@+id/MyButton1"
      android:layout_width = "fill_parent"
      android:layout_margin = "10dp"
      android:layout_height = "wrap_content"
      android:text = "Button 1"
      android:background = "@android:color/holo_green_dark" />
   <Button
      android:id = "@+id/MyButton2"
      android:layout_width = "fill_parent"
      android:layout_margin = "10dp"
      android:layout_height = "wrap_content"
      android:text = "Button 2"
      android:background = "@android:color/holo_green_dark" />
   <Button
      android:id = "@+id/MyButton3"
      android:layout_width = "fill_parent"
      android:layout_margin = "10dp"
      android:layout_height = "wrap_content"
      android:text="Button 3"
      android:background = "@android:color/holo_green_dark" />
</LinearLayout>
ผลลัพธ์ที่ได้มีดังนี้ -
เค้าโครงสัมพัทธ์
ในมุมมองนี้ตำแหน่งของมุมมองลูกจะสัมพันธ์กับมุมมองระดับบนสุดหรือกับมุมมองพี่น้อง ในตัวอย่างต่อไปนี้เราจะสร้าง 3 มุมมอง EditText และปุ่มจากนั้นจัดแนวให้ตรงกัน
สร้างโครงการใหม่และเรียกมัน relative layout app. เปิดmain.axml และเพิ่มรหัสต่อไปนี้
<?xml version = "1.0" encoding = "utf-8"?>
<RelativeLayout xmlns:android = "http://schemas.android.com/apk/res/android"
   android:layout_width = "match_parent"
   android:layout_height = "match_parent"
   android:paddingLeft = "16dp"
   android:background = "#d3d3d3"
   android:paddingRight = "16dp">
   <EditText
      android:id = "@+id/name"
      android:layout_width = "match_parent"
      android:layout_height = "wrap_content"
      android:hint = "First Name"
      android:textColorHint = "@android:color/background_dark"
      android:textColor = "@android:color/background_dark" />
   <EditText
      android:id = "@+id/lastName"
      android:layout_width = "0dp"
      android:layout_height = "wrap_content"
      android:hint = "Last Name"
      android:layout_below = "@id/name"
      android:textColorHint = "@android:color/background_dark"
      android:textColor = "@android:color/background_dark"
      android:layout_alignParentLeft = "true"
      android:layout_toLeftOf = "@+id/age" />
   <EditText
      android:id = "@id/age"
      android:layout_width = "80dp"
      android:layout_height = "wrap_content"
      android:layout_below = "@id/name"
      android:hint = "Age"
      android:textColorHint = "@android:color/background_dark"
      android:textColor = "@android:color/background_dark"
      android:layout_alignParentRight = "true" />
   <Button
      android:layout_width = "85dp"
      android:layout_height = "wrap_content"
      android:layout_below = "@id/age"
      android:layout_alignParentRight = "true"
      android:text = "Submit"
      android:background = "@android:color/holo_green_dark" />
</RelativeLayout>
พารามิเตอร์ที่สำคัญที่เราใช้ในโค้ดนี้คือ -
android:layout_below - จัดแนวองค์ประกอบมุมมองเด็กด้านล่างระดับบนสุด
android:layout_alignParentLeft - จัดตำแหน่งองค์ประกอบหลักไปทางซ้าย
android:layout_toLeftOf - คุณสมบัตินี้จะจัดแนวองค์ประกอบทางด้านซ้ายขององค์ประกอบอื่น
android:layout_alignParentRight - จัดตำแหน่งพาเรนต์ไปทางขวา
เมื่อคุณสร้างและเรียกใช้แอพตอนนี้มันจะสร้างหน้าจอผลลัพธ์ต่อไปนี้ -

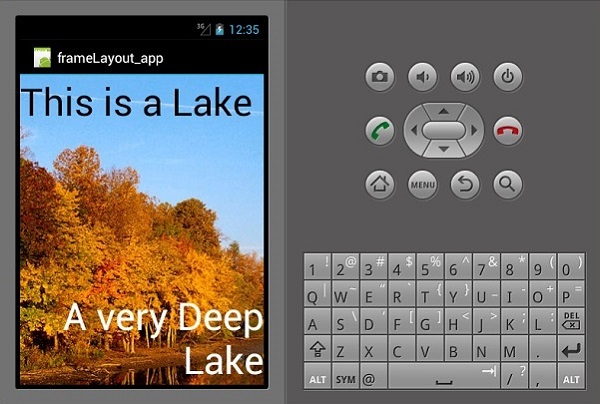
เค้าโครงกรอบ
เค้าโครงเฟรมใช้เพื่อแสดงรายการเดียวเท่านั้น เป็นการยากที่จะจัดเรียงรายการหลายรายการในเค้าโครงนี้โดยไม่ให้ซ้อนทับกัน
เริ่มโครงการใหม่และเรียกมันว่า frameLayoutApp. สร้างเค้าโครงเฟรมใหม่ดังที่แสดงด้านล่าง
<?xml version = "1.0" encoding = "utf-8"?>
<FrameLayout xmlns:android = "http://schemas.android.com/apk/res/android"
   android:layout_width = "fill_parent"
   android:layout_height = "fill_parent">
  <ImageView
      android:id = "@+id/ImageView1"
      android:scaleType = "matrix"
      android:layout_height = "fill_parent"
      android:layout_width = "fill_parent"
      android:src = "@drawable/img1" />
   <TextView
      android:layout_width = "fill_parent"
      android:layout_height = "wrap_content"
      android:textSize = "50dp"
      android:textColor = "#000"
      android:text = "This is a Lake" />
   <TextView
      android:gravity = "right"
      android:layout_width = "fill_parent"
      android:layout_height = "wrap_content"
      android:textSize = "50dp"
      android:text = "A very Deep Lake"
      android:layout_gravity = "bottom"
      android:textColor = "#fff" />
</FrameLayout>
โค้ดด้านบนสร้างไฟล์ imageViewซึ่งจะเต็มหน้าจอทั้งหมด มุมมองข้อความสองรายการจากนั้นลอยอยู่เหนือไฟล์imageView.
ตอนนี้สร้างและเรียกใช้แอปพลิเคชันของคุณ มันจะแสดงผลลัพธ์ต่อไปนี้ -
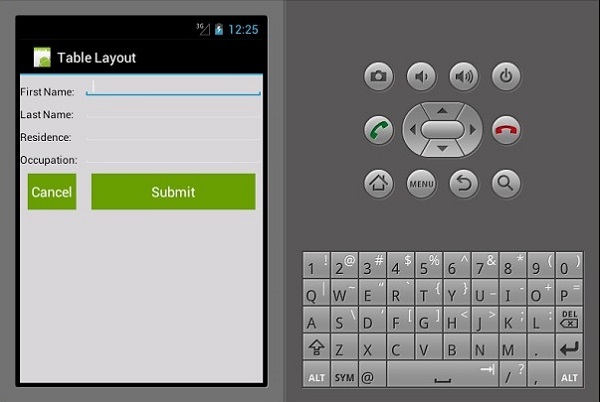
เค้าโครงตาราง
ในเค้าโครงนี้มุมมองจะถูกจัดเรียงเป็น rows และ columns. เรามาดูวิธีการทำงาน
<?xml version = "1.0" encoding = "utf-8"?>
<TableLayout xmlns:android = "http://schemas.android.com/apk/res/android"
   android:layout_width = "fill_parent"
   android:background = "#d3d3d3"
   android:layout_height = "fill_parent"
   android:stretchColumns = "1">

   <TableRow>
      <TextView
         android:text = "First Name:"
         android:layout_width = "wrap_content"
         android:layout_height = "wrap_content"
         android:textColor = "@android:color/black" />
      <EditText
         android:width = "100px"
         android:layout_width = "fill_parent"
         android:layout_height = "30dp"
         android:textColor = "@android:color/black" />
   </TableRow>

   <TableRow>
      <TextView
         android:text = "Last Name:"
         android:layout_width = "wrap_content"
         android:layout_height = "wrap_content"
         android:textColor = "@android:color/black" />
      <EditText
         android:width = "50px"
         android:layout_width = "fill_parent"
         android:layout_height = "30dp"
         android:textColor = "@android:color/black" />
   </TableRow>

   <TableRow>
      <TextView
         android:text = "Residence:"
         android:layout_width = "wrap_content"
         android:layout_height = "wrap_content"
         android:textColor = "@android:color/black" />
      <EditText
         android:width = "100px"
         android:layout_width = "fill_parent"
         android:layout_height = "30dp"
         android:textColor = "@android:color/black" />
   </TableRow>

   <TableRow>
      <TextView
         android:text = "Occupation:"
         android:layout_width = "wrap_content"
         android:layout_height = "wrap_content"
         android:textColor = "@android:color/black" />
      <EditText
         android:width = "100px"
         android:layout_width = "fill_parent"
         android:layout_height = "30dp"
         android:textColor = "@android:color/black" />
   </TableRow>

   <TableRow>
      <Button
         android:text = "Cancel"
         android:layout_width = "wrap_content"
         android:layout_margin = "10dp"
         android:layout_height = "wrap_content"
         android:background = "@android:color/holo_green_dark" />
      <Button
         android:text = "Submit"
         android:width = "100px"
         android:layout_margin = "10dp"
         android:layout_width = "wrap_content"
         android:layout_height = "wrap_content"
         android:background = "@android:color/holo_green_dark" />
   </TableRow>
</TableLayout>
รหัสด้านบนสร้างแบบฟอร์มการป้อนข้อมูลอย่างง่ายที่จัดเรียงโดยใช้ tables และ rows.
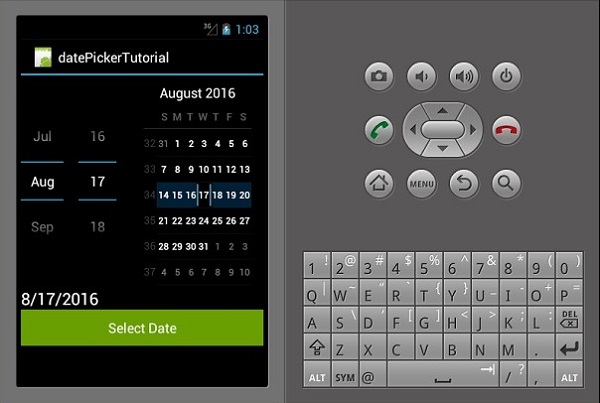
เลือกวันที่
นี่คือวิดเจ็ตที่ใช้แสดงวันที่ ในตัวอย่างนี้เราจะสร้างตัวเลือกวันที่ซึ่งจะแสดงวันที่ที่ตั้งไว้ในมุมมองข้อความ
ก่อนอื่นให้สร้างโครงการใหม่และเรียกมันว่า datePickerExample. เปิดMain.axml และสร้างไฟล์ datepicker, textviewและก button.
<?xml version = "1.0" encoding = "utf-8"?>
<LinearLayout xmlns:android = "http://schemas.android.com/apk/res/android"
   android:orientation = "vertical"
   android:layout_width = "fill_parent"
   android:layout_height = "fill_parent">
   <DatePicker
      android:layout_width = "match_parent"
      android:layout_height = "wrap_content"
      android:id = "@+id/datePicker1" />
   <TextView
      android:text = "Current Date"
      android:textAppearance = "?android:attr/textAppearanceLarge"
      android:layout_width = "match_parent"
      android:layout_height = "wrap_content"
      android:id = "@+id/txtShowDate" />
   <Button
      android:text = "Select Date"
      android:layout_width = "match_parent"
      android:layout_height = "wrap_content"
      android:id = "@+id/btnSetDate" />
</LinearLayout>
จากนั้นไปที่ Mainactivity.cs. ก่อนอื่นเราสร้างอินสแตนซ์ส่วนตัวของมุมมองข้อความภายในไฟล์mainActivity:Activity ชั้นเรียน.
อินสแตนซ์จะถูกใช้เพื่อจัดเก็บวันที่ที่เลือกหรือวันที่เริ่มต้น
private TextView showCurrentDate;จากนั้นเพิ่มรหัสต่อไปนี้หลัง setContentView() วิธี.
DatePicker pickDate = FindViewById<DatePicker>(Resource.Id.datePicker1);
showCurrentDate = FindViewById<TextView>(Resource.Id.txtShowDate);
setCurrentDate();
Button button = FindViewById<Button>(Resource.Id.btnSetDate);
button.Click += delegate {
   showCurrentDate.Text = String.Format("{0}/{1}/{2}",
      pickDate.Month, pickDate.DayOfMonth, pickDate.Year);
};
ในโค้ดด้านบนเราได้อ้างอิง datepicker, textview และปุ่มของเราโดยค้นหาจากไฟล์ main.axml ไฟล์โดยใช้ FindViewById ชั้นเรียน.
หลังจากอ้างอิงแล้วเราตั้งค่าเหตุการณ์การคลิกปุ่มซึ่งรับผิดชอบในการส่งวันที่ที่เลือกจากตัวเลือกวันที่ไปยัง textview
ต่อไปเราจะสร้างไฟล์ setCurrentDate()วิธีการแสดงวันที่ปัจจุบันเริ่มต้นให้กับ textview ของเรา รหัสต่อไปนี้อธิบายถึงวิธีการทำ
private void setCurrentDate() {
   string TodaysDate = string.Format("{0}",
      DateTime.Now.ToString("M/d/yyyy").PadLeft(2, '0'));
   showCurrentDate.Text = TodaysDate;
}
DateTime.Now.ToString() คลาสผูกเวลาของวันนี้กับวัตถุสตริง
ตอนนี้สร้างและเรียกใช้แอพ ควรแสดงผลลัพธ์ต่อไปนี้ -
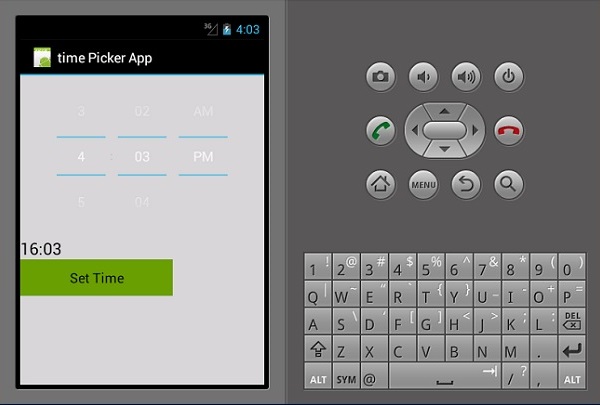
ตัวเลือกเวลา
Time Picker เป็นวิดเจ็ตที่ใช้ในการแสดงเวลาและช่วยให้ผู้ใช้สามารถเลือกและตั้งเวลาได้ เรากำลังจะสร้างแอพตัวเลือกเวลาพื้นฐานที่แสดงเวลาและยังอนุญาตให้ผู้ใช้เปลี่ยนเวลาได้
ไปที่ main.axml และเพิ่มปุ่มใหม่มุมมองข้อความและตัวเลือกเวลาดังที่แสดงในรหัสต่อไปนี้
<?xml version = "1.0" encoding = "utf-8"?>
<LinearLayout xmlns:android = "http://schemas.android.com/apk/res/android"
   android:orientation = "vertical"
   android:background = "#d3d3d3"
   android:layout_width = "fill_parent"
   android:layout_height = "fill_parent">
   <TimePicker
      android:layout_width = "match_parent"
      android:layout_height = "wrap_content"
      android:id = "@+id/timePicker1" />
   <TextView
      android:text = "Time"
      android:textAppearance = "?android:attr/textAppearanceLarge"
      android:layout_width = "match_parent"
      android:layout_height = "wrap_content"
      android:id = "@+id/txt_showTime"
      android:textColor = "@android:color/black" />
   <Button
      android:text = "Set Time"
      android:layout_width = "200dp"
      android:layout_height = "wrap_content"
      android:id = "@+id/btnSetTime"
      android:textColor = "@android:color/black"
      android:background = "@android:color/holo_green_dark" />
</LinearLayout>
ไปที่ MainActivity.cs เพื่อเพิ่มฟังก์ชั่นสำหรับการแสดงวันที่ที่กำหนดบน textview ที่เราสร้างขึ้น
public class MainActivity : Activity {

   private TextView showCurrentTime;

   protected override void OnCreate(Bundle bundle) {

      base.OnCreate(bundle);
      SetContentView(Resource.Layout.Main);
      TimePicker Tpicker = FindViewById<TimePicker>(Resource.Id.timePicker1);
      showCurrentTime = FindViewById<TextView>(Resource.Id.txt_showTime);
      setCurrentTime();
      Button button = FindViewById<Button>(Resource.Id.btnSetTime);

      button.Click += delegate {
         showCurrentTime.Text = String.Format("{0}:{1}",
            Tpicker.CurrentHour, Tpicker.CurrentMinute);
      };
   }
   private void setCurrentTime() {
      string time = string.Format("{0}",
         DateTime.Now.ToString("HH:mm").PadLeft(2, '0'));
      showCurrentTime.Text = time;
   }
}
ในโค้ดด้านบนเราอ้างถึงไฟล์ timepicker,set time ปุ่มและมุมมองข้อความสำหรับแสดงเวลาผ่านไฟล์ FindViewById<>ชั้นเรียน. จากนั้นเราสร้างเหตุการณ์การคลิกสำหรับปุ่มตั้งเวลาซึ่งเมื่อคลิกจะตั้งเวลาเป็นเวลาที่บุคคลเลือก โดยค่าเริ่มต้นจะแสดงเวลาของระบบปัจจุบัน
setCurrentTime() คลาสเมธอดเริ่มต้น txt_showTime textview เพื่อแสดงเวลาปัจจุบัน
ตอนนี้สร้างและเรียกใช้แอปพลิเคชันของคุณ ควรแสดงผลลัพธ์ต่อไปนี้ -
ตัวหมุน
สปินเนอร์เป็นวิดเจ็ตที่ใช้เพื่อเลือกหนึ่งตัวเลือกจากชุด มันเทียบเท่ากับกล่องดรอปดาวน์ / คอมโบ ก่อนอื่นให้สร้างโครงการใหม่และเรียกมันว่าSpinner App Tutorial.
เปิด Main.axml ภายใต้ layout folder และสร้างไฟล์ spinner.
<?xml version = "1.0" encoding = "utf-8"?>
<LinearLayout xmlns:android = "http://schemas.android.com/apk/res/android"
   android:orientation = "vertical"
   android:layout_width = "fill_parent"
   android:layout_height = "fill_parent">
   <Spinner
      android:layout_width = "match_parent"
      android:layout_height = "wrap_content"
      android:id = "@+id/spinner1"
      android:prompt = "@string/daysOfWeek" />
</LinearLayout>
เปิด Strings.xml ไฟล์อยู่ภายใต้ values folder และเพิ่มรหัสต่อไปนี้เพื่อสร้างไฟล์ spinner items.
<resources>
  <string name = "daysOfWeek">Choose a planet</string>
  <string-array name = "days_array">
      <item>Sunday</item>
      <item>Monday</item>
      <item>Tuesday</item>
      <item>Wednesday</item>
      <item>Thursday</item>
      <item>Friday</item>
      <item>Saturday</item>
      <item>Sunday</item>
   </string-array>
</resources>
ถัดไปเปิด MainActivity.cs เพื่อเพิ่มฟังก์ชันสำหรับการแสดงวันที่เลือกในสัปดาห์
protected override void OnCreate(Bundle bundle) {
   base.OnCreate(bundle);
   // Set our view from the "main" layout resource
   SetContentView(Resource.Layout.Main);
   Spinner spinnerDays = FindViewById<Spinner>(Resource.Id.spinner1);
   spinnerDays.ItemSelected += new EventHandler
      <AdapterView.ItemSelectedEventArgs>(SelectedDay);
   var adapter = ArrayAdapter.CreateFromResource(this,
      Resource.Array.days_array, Android.Resource.Layout.SimpleSpinnerItem);
   adapter.SetDropDownViewResource(Android.Resource.Layout.SimpleSpinnerDropD ownItem);
   spinnerDays.Adapter = adapter;
}
private void SelectedDay(object sender, AdapterView.ItemSelectedEventArgs e) {
   Spinner spinner = (Spinner)sender;
   string toast = string.Format("The selected
      day is {0}", spinner.GetItemAtPosition(e.Position));
   Toast.MakeText(this, toast, ToastLength.Long).Show();
}
ตอนนี้สร้างและเรียกใช้แอปพลิเคชัน ควรแสดงผลลัพธ์ต่อไปนี้ -

ในโค้ดด้านบนเราอ้างอิงสปินเนอร์ที่เราสร้างในไฟล์ main.axml ไฟล์ผ่านไฟล์ FindViewById<>ชั้นเรียน. จากนั้นเราได้สร้างไฟล์arrayAdapter() ซึ่งเราใช้ในการผูกรายการอาร์เรย์ของเราจากไฟล์ strings.xml ชั้นเรียน.
ในที่สุดเราก็สร้างเมธอด SelectedDay() ซึ่งเราใช้เพื่อแสดงวันที่เลือกของสัปดาห์
กล่องโต้ตอบการแจ้งเตือน
ในส่วนนี้เราจะสร้างปุ่มซึ่งเมื่อคลิกแล้วจะแสดงกล่องโต้ตอบการแจ้งเตือน กล่องโต้ตอบประกอบด้วยปุ่มสองปุ่มกล่าวคือDelete และ Cancel ปุ่ม
ก่อนอื่นไปที่ main.axml และสร้างปุ่มใหม่ภายในเค้าโครงเชิงเส้นดังที่แสดงในรหัสต่อไปนี้
<?xml version = "1.0" encoding = "utf-8"?>
<LinearLayout xmlns:android = "http://schemas.android.com/apk/res/android"
   android:orientation = "vertical"
   android:layout_width = "fill_parent"
   android:background = "#d3d3d3"
   android:layout_height = "fill_parent">
   <Button
      android:id="@+id/MyButton"
      android:layout_width = "fill_parent"
      android:layout_height = "wrap_content"
      android:text = "Click to Delete"
      android:textColor = "@android:color/background_dark"
      android:background = "@android:color/holo_green_dark" />
</LinearLayout>
ถัดไปเปิด MainActivity.cs เพื่อสร้างกล่องโต้ตอบการแจ้งเตือนและเพิ่มฟังก์ชันการทำงาน
protected override void OnCreate(Bundle bundle) {
   base.OnCreate(bundle);
   SetContentView(Resource.Layout.Main);
   Button button = FindViewById<Button>(Resource.Id.MyButton);
   button.Click += delegate {
      AlertDialog.Builder alertDiag = new AlertDialog.Builder(this);
      alertDiag.SetTitle("Confirm delete");
      alertDiag.SetMessage("Once deleted the move cannot be undone");
      alertDiag.SetPositiveButton("Delete", (senderAlert, args) => {
         Toast.MakeText(this, "Deleted", ToastLength.Short).Show();
      });
      alertDiag.SetNegativeButton("Cancel", (senderAlert, args) => {
         alertDiag.Dispose();
      });
      Dialog diag = alertDiag.Create();
      diag.Show();
   };
}
เมื่อเสร็จแล้วให้สร้างและเรียกใช้แอปพลิเคชันของคุณเพื่อดูผลลัพธ์

ในโค้ดด้านบนเราได้สร้างกล่องโต้ตอบการแจ้งเตือนที่เรียกว่า alertDiag โดยมีปุ่มสองปุ่มต่อไปนี้ -
setPositiveButton - ประกอบด้วยไฟล์ Delete การทำงานของปุ่มซึ่งเมื่อคลิกแล้วจะแสดงข้อความยืนยัน Deleted.
setNegativeButton - ประกอบด้วยไฟล์ Cancel ซึ่งเมื่อคลิกเพียงแค่ปิดกล่องโต้ตอบการแจ้งเตือน
แกลเลอรีคือมุมมองประเภทหนึ่งที่ใช้เพื่อแสดงรายการในรายการที่เลื่อนได้ในแนวนอน จากนั้นรายการที่เลือกจะแสดงที่กึ่งกลาง ในตัวอย่างนี้คุณจะสร้างแกลเลอรีที่มีรูปภาพที่เลื่อนได้ในแนวนอน รูปภาพเมื่อคลิกจะแสดงตัวเลขสำหรับรูปภาพที่เลือก
ก่อนอื่นให้สร้างโปรเจ็กต์ใหม่และตั้งชื่อให้เช่น Gallery App Tutorial ก่อนเริ่มเขียนโค้ดให้วางภาพ 7 ภาพลงในไฟล์resource /drawable folder. นำทางไปยังmain.axml ภายใต้ resources folder และแกลเลอรีที่อยู่ระหว่างแท็กเค้าโครงเชิงเส้น
<?xml version="1.0" encoding="utf-8"?>
<LinearLayout xmlns:android="http://schemas.android.com/apk/res/android"
   android:orientation="vertical"
   android:layout_width="fill_parent"
   android:layout_height="fill_parent"
   android:background="#d3d3d3">
   <Gallery
      android:id="@+id/gallery"
      android:layout_width="fill_parent"
      android:layout_height="wrap_content"
      android:padding="10dp" />
</LinearLayout>
สร้างคลาสใหม่ชื่อ ImageAdapter. คลาสนี้จะใช้ในการผูกรูปภาพเข้ากับแกลเลอรีที่เราสร้างไว้ด้านบน
ขั้นตอนแรกคือการเพิ่มคลาสที่มีบริบท cont ซึ่งเราใช้ในการจัดเก็บฟิลด์
public class ImageAdapter : BaseAdapter {
   Context cont;
   public ImageAdapter(Context ct) {
      cont = ct;
   }
}
ต่อไปเราจะนับรายการอาร์เรย์ที่มีรูปภาพของเราและส่งคืนขนาดของมัน
public override int Count {
   get {
      return imageArraylist.Length;
   }
}
ในขั้นตอนต่อไปเราจะได้รับตำแหน่งของรายการ รหัสต่อไปนี้แสดงวิธีการทำ
public override Java.Lang.Object GetItem(int position) {
   return null;
}
public override long GetItemId(int position) {
   return 0;
}
ในขั้นตอนต่อไปเราจะสร้างไฟล์ imageview สำหรับรายการที่อ้างอิงโดยอะแด็ปเตอร์
public override View GetView(int position,View convertView, ViewGroup parent) {
   ImageView img = new ImageView(cont);
   img.SetImageResource(imageArraylist[position]);
   img.SetScaleType(ImageView.ScaleType.FitXy);
   img.LayoutParameters = new Gallery.LayoutParams(200, 100);
   return img;
}
ในขั้นตอนสุดท้ายเราสร้างการอ้างอิงถึงรูปภาพที่เราเพิ่มในไฟล์ resources.drawableโฟลเดอร์ ในการทำเช่นนี้เราสร้างอาร์เรย์เพื่อเก็บคอลเลกชันของรูปภาพ รหัสต่อไปนี้อธิบายวิธีการทำ
int[] imageArraylist = {
   Resource.Drawable.img1,
   Resource.Drawable.img2,
   Resource.Drawable.img3,
   Resource.Drawable.img4,
   Resource.Drawable.img5,
   Resource.Drawable.img6,
  };
}
ต่อไปเราไปที่ mainActivity.cs และใส่รหัสต่อไปนี้ภายใต้วิธี OnCreate ()
Gallery myGallery = (Gallery)FindViewById<Gallery>(Resource.Id.gallery);
myGallery.Adapter = new ImageAdapter(this);
myGallery.ItemClick += delegate(object sender, AdapterView.ItemClickEventArgs args) {
   Toast.MakeText(this,
      args.Position.ToString(), ToastLength.Short).Show();
}
สุดท้ายสร้างและเรียกใช้แอปพลิเคชันของคุณเพื่อดูผลลัพธ์

ListViews
Listview คือองค์ประกอบส่วนติดต่อผู้ใช้ที่แสดงรายการของรายการที่เลื่อนได้
การเชื่อมโยงข้อมูลกับมุมมองรายการ
ในตัวอย่างนี้คุณจะสร้าง listView ที่แสดงวันในสัปดาห์ เริ่มต้นด้วยการให้เราสร้างไฟล์ XML ใหม่และตั้งชื่อlistViewTemplate.xml.
ใน listViewTemplate.xmlเราเพิ่มมุมมองข้อความใหม่ตามที่แสดงด้านล่าง
<?xml version = "1.0" encoding = "utf-8" ?>
<TextView xmlns:android = "http://schemas.android.com/apk/res/android"
android:id = "@+id/textItem"
android:textSize ="20sp"
android:layout_width = "fill_parent"
android:layout_height = "wrap_content"/>
จากนั้นไปที่ Main.axml และสร้างมุมมองรายการใหม่ภายใน Linear Layout
<ListView
   android:minWidth="25px"
   android:minHeight="25px"
   android:layout_width="match_parent"
   android:layout_height="match_parent"
   android:id="@+id/listView1" />
เปิด MainActivity.csและพิมพ์รหัสต่อไปนี้เพื่อผูกข้อมูลกับมุมมองรายการที่เราสร้างขึ้น ต้องเขียนโค้ดไว้ในไฟล์OnCreate() วิธี.
SetContentView(Resource.Layout.Main);
var listView = FindViewById<ListView>(Resource.Id.listView1);
var data = new string[] {
   "Sunday", "Monday", "Tuesday", "Wednesday", "Thursday", "Friday", "Saturday"
};
listView.Adapter = new ArrayAdapter(this, Resource.Layout.ListViewTemplate, data);
Var data = new string[] เพียงแค่ถือรายการของเราเป็นอาร์เรย์
Array Adapter ส่งคืนรายการในคอลเลกชันของเราเป็นมุมมอง ตามค่าเริ่มต้น Array Adapter ใช้ textView เริ่มต้นเพื่อแสดงแต่ละรายการ ในโค้ดด้านบนเราได้สร้าง textview ของเราเองในListViewTemplate.xml และอ้างอิงโดยใช้ตัวสร้างที่แสดงด้านล่าง
ArrayAdapter(this, Resource.Layout.ListViewTemplate, data);สุดท้ายสร้างและเรียกใช้แอปพลิเคชันของคุณเพื่อดูผลลัพธ์

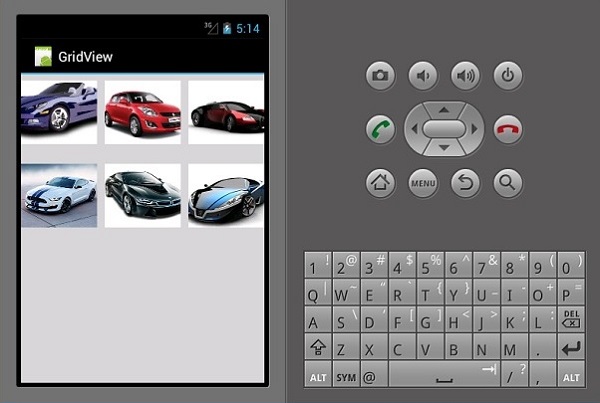
GridViews
gridView คือกลุ่มมุมมองที่ช่วยให้แอปพลิเคชันจัดเค้าโครงเนื้อหาในรูปแบบสองมิติกริดที่เลื่อนได้
ในการเพิ่ม GridView ให้สร้างโปรเจ็กต์ใหม่และเรียกมัน gridViewApp. ไปที่Main.axml และเพิ่มเส้นตารางตามที่แสดงด้านล่าง
<?xml version = "1.0" encoding="utf-8"?>
<GridView xmlns:android = "http://schemas.android.com/apk/res/android"
   android:id = "@+id/gridview"
   android:layout_width = "fill_parent"
   android:layout_height = "fill_parent"
   android:columnWidth = "90dp"
   android:numColumns = "auto_fit"
   android:verticalSpacing = "10dp"
   android:horizontalSpacing = "10dp"
   android:stretchMode = "columnWidth"
   android:gravity = "center" />
จากนั้นสร้างคลาสใหม่และตั้งชื่อ ImageAdpter.cs. คลาสนี้จะมีคลาสอะแด็ปเตอร์สำหรับไอเท็มทั้งหมดซึ่งจะแสดงในตาราง
ข้างใน ImageAdapterเพิ่มรหัสต่อไปนี้ -
public class ImageAdapter : BaseAdapter {
   Context context;
   public ImageAdapter(Context ch) {
      context = ch;
   }

   public override int Count {
      get {
         return cars.Length;
      }
   }

   public override long GetItemId(int position) {
   return 0;
   }

   public override Java.Lang.Object GetItem(int position) {
      return null;
   }

   public override View GetView(int position,
      View convertView, ViewGroup parent) {
      ImageView imageView;
      if (convertView == null) {
         imageView = new ImageView(context);
         imageView.LayoutParameters = new GridView.LayoutParams(100, 100);
         imageView.SetScaleType(ImageView.ScaleType.CenterCrop);
         imageView.SetPadding(8, 8, 8, 8);
      } else {
         imageView = (ImageView)convertView;
      }

      imageView.SetImageResource(cars[position]);
      return imageView;
   }

   int[] cars = {
      Resource.Drawable.img1, Resource.Drawable.img2,
      Resource.Drawable.img3, Resource.Drawable.img4,
      Resource.Drawable.img5, Resource.Drawable.img6,
   };
}
ในโค้ดด้านบนเราได้ผูกภาพรถของเราเข้ากับอะแดปเตอร์ภาพ ถัดไปเปิดMainActivity.cs และเพิ่มรหัสต่อไปนี้หลัง setContentView().
var gridview = FindViewById<GridView>(Resource.Id.gridview);
gridview.Adapter = new ImageAdapter(this);
gridview.ItemClick += delegate(object sender,
   AdapterView.ItemClickEventArgs args) {
      Toast.MakeText(this,
         args.Position.ToString(), ToastLength.Short).Show();
};
โค้ดด้านบนค้นหา gridView ใน main.axml และผูกเข้ากับไฟล์ imageAdapter ชั้นเรียน. Gridview.ItemClick สร้างไฟล์ onClick เหตุการณ์ที่ส่งคืนตำแหน่งของรูปภาพที่เลือกเมื่อผู้ใช้คลิกที่รูปภาพ
ตอนนี้สร้างและเรียกใช้แอปพลิเคชันของคุณเพื่อดูผลลัพธ์
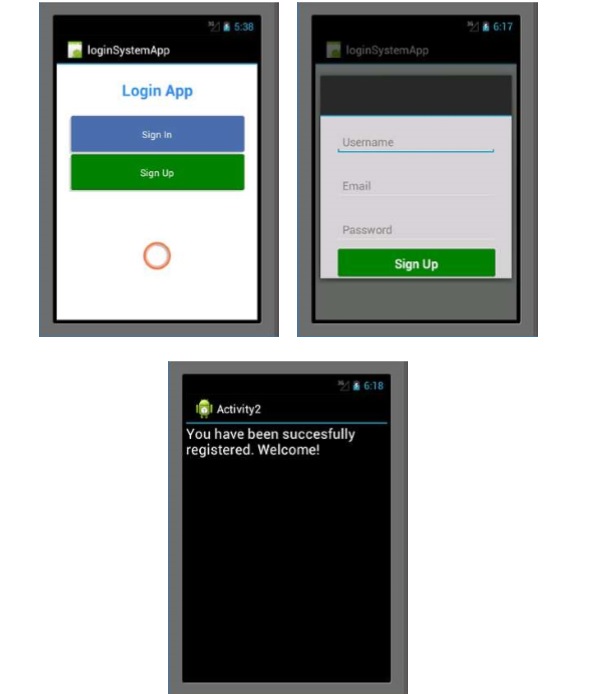
ในบทนี้เราจะสร้างระบบล็อกอินที่ช่วยให้ผู้ใช้สามารถลงทะเบียนได้ จากนั้นเราจะนำผู้ใช้ที่ลงทะเบียนไปที่หน้าจอหลักของแอพของเราเมื่อเข้าสู่ระบบสำเร็จ
ก่อนอื่นให้สร้างโครงการใหม่และเรียกมันว่า Login System. ในโปรเจ็กต์ใหม่ของคุณไปที่main.axml และเพิ่มปุ่มสองปุ่มและแถบความคืบหน้าตามที่แสดงด้านล่าง
<?xml version = "1.0" encoding = "utf-8"?>
<LinearLayout xmlns:android = "http://schemas.android.com/apk/res/android"
   android:orientation = "vertical"
   android:layout_width = "fill_parent"
   android:layout_height = "fill_parent"
   android:background = "@android:color/background_light"
   android:weightSum = "100"
   android:minWidth = "25px"
   android:minHeight = "25px">
   <TextView
      android:text = "Login App"
      android:textAppearance = "?android:attr/textAppearanceMedium"
      android:layout_width = "match_parent"
      android:layout_weight = "20"
      android:layout_height = "0dp"
      android:textColor = "#368DEB"
      android:id = "@+id/txtCreatAccount"
      android:gravity = "center"
      android:textStyle = "bold"
      android:textSize = "25sp" />
   <Button
      android:text = "Sign In"
      android:layout_width = "match_parent"
      android:layout_weight = "15"
      android:layout_height = "0dp"
      android:background = "@drawable/btnSignInStyle"
      android:id = "@+id/btnSignIn"
      android:layout_marginLeft = "20dp"
      android:layout_marginRight = "20dp"
      android:textSize = "15sp" />
   <Button
      android:text = "Sign Up"
      android:layout_width = "match_parent"
      android:layout_weight = "15"
      android:layout_height = "0dp"
      android:background = "@drawable/btnSignUpStyle"
      android:id = "@+id/btnSignUp"
      android:layout_marginLeft = "20dp"
      android:layout_marginRight = "20dp"
      android:textSize = "15sp" />
   <RelativeLayout
      android:layout_width = "match_parent"
      android:layout_height = "0dp"
      android:layout_weight = "50"
      android:minWidth = "25px"
      android:minHeight = "25px">
      <ProgressBar
         android:layout_width = "wrap_content"
         android:layout_height = "wrap_content"
         android:id = "@+id/progressBar1"
         android:background = "@drawable/progressBarStyle"
         android:layout_centerInParent="true"
         android:indeterminate = "true"
         xmlns:tools = "
            http://schemas.android.com/tools"
         tools:visibility = "invisible" />
   </RelativeLayout>
</LinearLayout>
หลังจากสร้างอินเทอร์เฟซผู้ใช้แล้วสิ่งสำคัญคือต้องจัดรูปแบบปุ่มเพื่อให้ดูน่าสนใจยิ่งขึ้น ในการดำเนินการนี้ให้สร้างไฟล์ XML ใหม่ภายใต้drawable folder และตั้งชื่อไฟล์เป็น btnSignInStyle.xml.
ในไฟล์ XML ให้เพิ่มโค้ดบรรทัดต่อไปนี้ -
<selector xmlns:android = "http://schemas.android.com/apk/res/android">
   <item android:state_pressed = "false">
      <layer-list>
         <item android:right = "5dp" android:top = "5dp">
            <shape>
               <corners android:radius = "2dp"/>
               <solid android:color = "#D6D6D6"/>
            </shape>
         </item>
         <item android:left = "2dp" android:bottom = "2dp">
            <shape>
               <corners android:radius = "4dp"/>
               <gradient android:angle = "270"
                  android:endColor = "#486EA9" android:startColor = "#486EA9"/>
               <stroke android:width = "1dp" android:color = "#BABABA"/>
               <padding android:bottom = "10dp"
                  android:right = "10dp" android:left = "10dp" android:top = "10dp"/>
            </shape>
         </item>
      </layer-list>
   </item>
   <item android:state_pressed = "true">
      <layer-list>
         <item android:right = "5dp" android:top = "5dp">
            <shape>
               <corners android:radius = "2dp"/>
               <solid android:color = "#D6D6D6"/>
            </shape>
         </item>
         <item android:left = "2dp" android:bottom = "2dp">
            <shape>
               <corners android:radius = "4dp"/>
               <gradient android:angle = "270"
                  android:endColor = "#79C791" android:startColor = "#486EA9"/>
               <stroke android:radius = "4dp" android:color = "#BABABA"/>
               <padding android:bottom = "10dp"
                  android:right = "10dp" android:left = "10dp" android:top = "10dp"/>
            </shape>
         </item>
      </layer-list>
  </item>
</selector>
รหัสด้านบนจะกำหนดสีของปุ่มเมื่อโหลดและเมื่อคลิกมันยังกำหนดรัศมีขอบของปุ่ม
ต่อไปเราจะสร้าง XML สไตล์ที่คล้ายกันดังที่กล่าวมาข้างต้นสำหรับไฟล์ signupปุ่ม. ในการดำเนินการนี้ให้สร้าง XML อื่นภายใต้drawable โฟลเดอร์และเรียกมัน btnSignUpStyle.xml. มันจะสืบทอดทุกอย่างจากbtnSignInStyle.xml. ความแตกต่างเพียงอย่างเดียวคือการไล่ระดับสีเริ่มต้นและสีสิ้นสุดของปุ่ม
เปลี่ยน startColor และ endColor ใน btnSignUpStyle.xml ถึง
<gradient android:angle="270"
   android:endColor="#008000" android:startColor="#008000"/>
ไปที่ layout folderและสร้างไฟล์ AXML ใหม่และเรียกมันว่า registerDailog.axml ไฟล์นี้จะมีรายละเอียดการลงทะเบียนสำหรับผู้ใช้ใหม่ในแอพของเรา หน้านี้จะมีสามEditTextsและปุ่มสำหรับส่งข้อมูล เพิ่มรหัสต่อไปนี้ภายในรหัสโครงร่างเชิงเส้นของคุณ
<EditText
   android:layout_width = "match_parent"
   android:layout_marginBottom = "10dp"
   android:layout_marginTop = "25dp"
   android:layout_marginRight = "25dp"
   android:layout_marginLeft = "25dp"
   android:layout_height = "35dp"
   android:paddingLeft = "10dp"
   android:id = "@+id/txtUsername"
   android:hint = "Username"
   android:textColor = "#000" />
<EditText
   android:layout_width = "match_parent"
   android:layout_height = "35dp"
   android:id = "@+id/txtEmail"
   android:layout_marginBottom = "10dp"
   android:layout_marginTop = "25dp"
   android:layout_marginRight = "25dp"
   android:layout_marginLeft = "25dp"
   android:paddingLeft = "10dp"
   android:textColor = "#000"
   android:hint = "Email" />
<EditText
   android:layout_width = "match_parent"
   android:layout_height = "35dp"
   android:layout_marginBottom = "10dp"
   android:layout_marginTop = "25dp"
   android:layout_marginRight = "25dp"
   android:layout_marginLeft = "25dp"
   android:paddingLeft = "10dp"
   android:textColor = "#000"
   android:id = "@+id/txtPassword"
   android:hint = "Password" />
<Button
   android:text = "Sign Up"
   android:layout_width = "match_parent"
   android:layout_height = "wrap_content"
   android:id = "@+id/btnSave"
   android:textSize = "20dp"
   android:textColor = "#fff"
   android:textStyle = "bold"
   android:height = "70dp"
   android:background = "@drawable/btnSignUpStyle"
   android:paddingLeft = "5dp"
   android:paddingRight = "5dp"
   android:paddingTop = "5dp"
   android:paddingBottom = "5dp"
   android:layout_marginLeft = "25dp"
   android:layout_marginRight = "25dp"
   android:layout_centerHorizontal = "true" />
จากนั้นเพิ่มคลาสใหม่ที่เรียกว่า signUpDialog.cs. คลาสนี้จะมีรหัสที่จำเป็นในการสร้างกล่องโต้ตอบ ตัวอย่างต่อไปนี้แสดงรหัส
public class OnSignUpEvent:EventArgs {
   private string myUserName;
   private string myEmail;
   private string myPassword;
   public string UserName {
      get {
         return myUserName;
      }
      set{
         myUserName = value;
      }
   }

   public string Email {
      get {
         return myEmail;
      }
      set {
         myEmail = value;
      }
   }

   public string Password {
      get {
         return myPassword;
      }
      set {
         myPassword = value;
      }
   }
   public OnSignUpEvent(string username, string
      email, string password):base() {
      UserName = username;
      Email = email;
      Password = password;
   }

   class SignUpDialog:DialogFragment {
      private EditText txtUsername;
      private EditText txtEmail;
      private EditText txtPassword;
      private Button btnSaveSignUp;
      public event EventHandler<OnSignUpEvent> onSignUpComplete;
      public override View OnCreateView(LayoutInflater inflater,
         ViewGroup container, Bundle savedInstanceState) {
         base.OnCreateView(inflater, container, savedInstanceState);
         var view = inflater.Inflate(Resource.Layout.registerDialog, container, false);
         txtUsername = view.FindViewById<EditText>(Resource.Id.txtUsername);
         txtEmail = view.FindViewById<EditText>(Resource.Id.txtEmail);
         txtPassword = view.FindViewById<EditText>(Resource.Id.txtPassword);
         btnSaveSignUp = view.FindViewById<Button>(Resource.Id.btnSave);
         btnSaveSignUp.Click += btnSaveSignUp_Click;
         return view;
      }
      void btnSaveSignUp_Click(object sender, EventArgs e) {
         onSignUpComplete.Invoke(this, new OnSignUpEvent(txtUsername.Text,

            txtEmail.Text, txtPassword.Text));
         this.Dismiss();
      }
   }
}
ในโค้ดด้านบนเราได้ใช้ไฟล์ get และ setคุณสมบัติ. get วิธีการคืนค่าตัวแปรในขณะที่ setวิธีการกำหนดค่าให้กับตัวแปรที่ส่งคืน นี่คือตัวอย่าง -
public string Color {
   get {
      return color;
   }
   set {
      color = value;
   }
}
ในตัวอย่างก่อนหน้านี้เราได้สร้างเมธอดที่แทนที่มุมมอง ภายในเมธอดเราได้สร้างไฟล์var เรียกว่า view ซึ่งอ้างอิงถึงไฟล์ registerDialog.axml อยู่ในโฟลเดอร์เค้าโครง
จากนั้นไปที่ mainActivity.cs เพื่อสร้างส่วนโต้ตอบ
private Button signUp;
private Button submitNewUser;
private EditText txtUsername;
private EditText txtEmail;
private EditText txtPassword;

protected override void OnCreate(Bundle bundle) {
   base.OnCreate(bundle);
   SetContentView(Resource.Layout.Main);
   signUp = FindViewById<Button>(Resource.Id.btnSignUp);
   submitNewUser = FindViewById<Button>(Resource.Id.btnSave);
   txtUsername = FindViewById<EditText>(Resource.Id.txtUsername);
   txtEmail = FindViewById<EditText>(Resource.Id.txtEmail);
   txtPassword = FindViewById<EditText>(Resource.Id.txtPassword);

   signUp.Click += (object sender, EventArgs args) => {
      FragmentTransaction transFrag = FragmentManager.BeginTransaction();
      SignUpDialog diagSignUp = new SignUpDialog();
      diagSignUp.Show(transFrag, "Fragment Dialog");
      diagSignUp.onSignUpComplete += diagSignUp_onSignUpComplete;
   };
}
void diagSignUp_onSignUpComplete(object sender, OnSignUpEvent e) {
   StartActivity(typeof(Activity2));
}
โค้ดด้านบนประกอบด้วยเหตุการณ์การคลิกปุ่มซึ่งเมื่อคลิกจะโหลดกล่องโต้ตอบลงชื่อสมัครใช้ ภายในคลิกปุ่มเราได้สร้างไฟล์SignUpDialog คลาสซึ่งโหลดไฟล์ registerDialog.axml ไฟล์.
จากนั้นเราก็นำมาใช้ FragmentTransaction transFrag = FragmentManager.BeginTransaction(); เพื่อแสดงไฟล์ registerDialog หน้าเป็น Android Dialog Fragment
เราจะเพิ่มอีก .axml เรียกว่าไฟล์ home.axml. เค้าโครงนี้จะเป็นหน้าจอเริ่มต้นเมื่อผู้ใช้เข้าสู่ระบบสำเร็จ ภายในเลย์เอาต์นี้เราจะเพิ่ม textview ดังที่แสดงในโค้ดต่อไปนี้
<TextView
   android:text = "You have been succesfully registered. Welcome!"
   android:textAppearance = "?android:attr/textAppearanceLarge"
   android:layout_width = "match_parent"
   android:layout_height = "wrap_content"
   android:id = "@+id/textView1" />
ต่อไปเราจะสร้างกิจกรรมสุดท้ายที่เรียกว่า Activity2.cs. ในกิจกรรมนี้เราจะพบกับไฟล์home.axml โดยใช้ findViewById.
สุดท้ายสร้างและเรียกใช้แอปของคุณ จะแสดงหน้าจอต่อไปนี้เป็นเอาต์พุต
หลังจากเสร็จสิ้นขั้นตอนการสร้างแอปของคุณสิ่งสำคัญคือต้องใช้แอปนี้บนอุปกรณ์ Android จริงหรืออนุญาตให้ผู้อื่นดาวน์โหลดแอปของคุณและติดตั้งบนอุปกรณ์ของตน
การเปิดตัวแอปของคุณ
ก่อนปล่อยแอปของคุณสิ่งสำคัญคือต้องแปลงเป็นรูปแบบที่ระบบ Android สามารถอ่านได้ รูปแบบประเภทนี้เรียกว่าไฟล์apk file. เพื่อสร้างไฟล์apk file.
เปิดโครงการของคุณ
ไปที่ Build Menu และเลือก Configuration Manager
บน Configuration Manager ให้ตั้งค่า Active Solution Configuration เพื่อเปิดตัวแอพ

จากนั้นคลิกไฟล์ Build Menu อีกครั้งและเลือก Export Android Package(.apk).

เมื่อเสร็จแล้วไฟล์ apk ไฟล์จะถูกเก็บไว้ในโฟลเดอร์โครงการของคุณ /bin/Release.
การเผยแพร่แอปของคุณ
มี 3 วิธีในการเผยแพร่แอป -
เอกสารแนบออนไลน์
มันเกี่ยวข้องกับการอัปโหลดไฟล์ apkไฟล์ออนไลน์เป็นไฟล์แนบ จากนั้นผู้ใช้ที่มีอุปกรณ์ Android จะสามารถดาวน์โหลดและติดตั้งแอปของคุณบนอุปกรณ์ได้โดยตรง
Google PlayStore
PlayStore เป็นตลาดที่ใหญ่ที่สุดสำหรับแอพ Android ในการอัปโหลดแอปของคุณไปยัง PlayStore คุณต้องมีบัญชีผู้พัฒนากับ Google บัญชีผู้พัฒนาสร้างขึ้นเพียงครั้งเดียวและมีค่าใช้จ่าย $ 25 เพื่อรับใบอนุญาต
การติดตั้งด้วยตนเอง
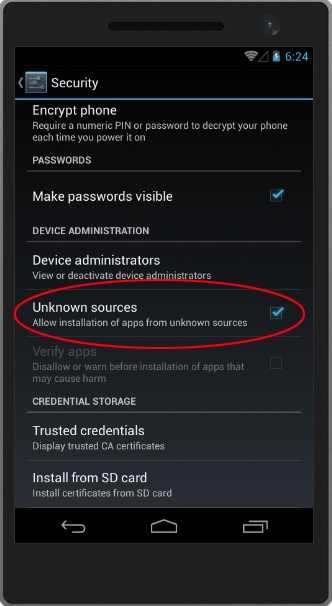
การติดตั้งด้วยตนเองเกี่ยวข้องกับการติดตั้งไฟล์ .apkไฟล์ที่สร้างขึ้นโดยตรงบนอุปกรณ์จริง คัดลอกไฟล์ไปยังหน่วยความจำกายภาพของอุปกรณ์ Android หรือการ์ด SD จากนั้นเรียกใช้ไฟล์จากอุปกรณ์ของคุณ
โดยค่าเริ่มต้น Android จะบล็อกการติดตั้งแอพที่ไม่ได้มาจาก PlayStore ในการติดตั้งแอพของคุณคุณต้องเปิดใช้งานเพื่อยอมรับการติดตั้งแอพจากไฟล์Settings. โดยไปที่Settings บนอุปกรณ์ของคุณมองหา Security จากนั้นเลือก "อนุญาตการติดตั้งแอปจากแหล่งที่ไม่รู้จัก"