Xamarin - แอพ Multiscreen
ในบทนี้เราจะสร้างระบบล็อกอินที่ช่วยให้ผู้ใช้สามารถลงทะเบียนได้ จากนั้นเราจะนำผู้ใช้ที่ลงทะเบียนไปที่หน้าจอหลักของแอพของเราเมื่อเข้าสู่ระบบสำเร็จ
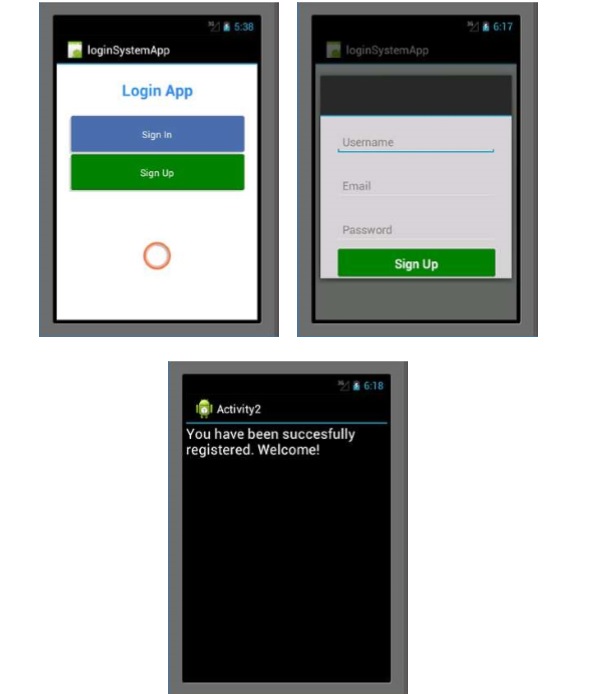
ก่อนอื่นให้สร้างโครงการใหม่และเรียกมันว่า Login System. ในโปรเจ็กต์ใหม่ของคุณไปที่main.axml และเพิ่มปุ่มสองปุ่มและแถบความคืบหน้าตามที่แสดงด้านล่าง
<?xml version = "1.0" encoding = "utf-8"?>
<LinearLayout xmlns:android = "http://schemas.android.com/apk/res/android"
   android:orientation = "vertical"
   android:layout_width = "fill_parent"
   android:layout_height = "fill_parent"
   android:background = "@android:color/background_light"
   android:weightSum = "100"
   android:minWidth = "25px"
   android:minHeight = "25px">
   <TextView
      android:text = "Login App"
      android:textAppearance = "?android:attr/textAppearanceMedium"
      android:layout_width = "match_parent"
      android:layout_weight = "20"
      android:layout_height = "0dp"
      android:textColor = "#368DEB"
      android:id = "@+id/txtCreatAccount"
      android:gravity = "center"
      android:textStyle = "bold"
      android:textSize = "25sp" />
   <Button
      android:text = "Sign In"
      android:layout_width = "match_parent"
      android:layout_weight = "15"
      android:layout_height = "0dp"
      android:background = "@drawable/btnSignInStyle"
      android:id = "@+id/btnSignIn"
      android:layout_marginLeft = "20dp"
      android:layout_marginRight = "20dp"
      android:textSize = "15sp" />
   <Button
      android:text = "Sign Up"
      android:layout_width = "match_parent"
      android:layout_weight = "15"
      android:layout_height = "0dp"
      android:background = "@drawable/btnSignUpStyle"
      android:id = "@+id/btnSignUp"
      android:layout_marginLeft = "20dp"
      android:layout_marginRight = "20dp"
      android:textSize = "15sp" />
   <RelativeLayout
      android:layout_width = "match_parent"
      android:layout_height = "0dp"
      android:layout_weight = "50"
      android:minWidth = "25px"
      android:minHeight = "25px">
      <ProgressBar
         android:layout_width = "wrap_content"
         android:layout_height = "wrap_content"
         android:id = "@+id/progressBar1"
         android:background = "@drawable/progressBarStyle"
         android:layout_centerInParent="true"
         android:indeterminate = "true"
         xmlns:tools = "
            http://schemas.android.com/tools"
         tools:visibility = "invisible" />
   </RelativeLayout>
</LinearLayout>
หลังจากสร้างอินเทอร์เฟซผู้ใช้แล้วสิ่งสำคัญคือต้องจัดรูปแบบปุ่มเพื่อให้ดูน่าสนใจยิ่งขึ้น ในการดำเนินการนี้ให้สร้างไฟล์ XML ใหม่ภายใต้drawable folder และตั้งชื่อไฟล์เป็น btnSignInStyle.xml.
ในไฟล์ XML ให้เพิ่มโค้ดบรรทัดต่อไปนี้ -
<selector xmlns:android = "http://schemas.android.com/apk/res/android">
   <item android:state_pressed = "false">
      <layer-list>
         <item android:right = "5dp" android:top = "5dp">
            <shape>
               <corners android:radius = "2dp"/>
               <solid android:color = "#D6D6D6"/>
            </shape>
         </item>
         <item android:left = "2dp" android:bottom = "2dp">
            <shape>
               <corners android:radius = "4dp"/>
               <gradient android:angle = "270"
                  android:endColor = "#486EA9" android:startColor = "#486EA9"/>
               <stroke android:width = "1dp" android:color = "#BABABA"/>
               <padding android:bottom = "10dp"
                  android:right = "10dp" android:left = "10dp" android:top = "10dp"/>
            </shape>
         </item>
      </layer-list>
   </item>
   <item android:state_pressed = "true">
      <layer-list>
         <item android:right = "5dp" android:top = "5dp">
            <shape>
               <corners android:radius = "2dp"/>
               <solid android:color = "#D6D6D6"/>
            </shape>
         </item>
         <item android:left = "2dp" android:bottom = "2dp">
            <shape>
               <corners android:radius = "4dp"/>
               <gradient android:angle = "270"
                  android:endColor = "#79C791" android:startColor = "#486EA9"/>
               <stroke android:radius = "4dp" android:color = "#BABABA"/>
               <padding android:bottom = "10dp"
                  android:right = "10dp" android:left = "10dp" android:top = "10dp"/>
            </shape>
         </item>
      </layer-list>
  </item>
</selector>
รหัสด้านบนจะกำหนดสีของปุ่มเมื่อโหลดและเมื่อคลิกมันจะกำหนดรัศมีขอบของปุ่มด้วย
ต่อไปเราจะสร้าง XML สไตล์ที่คล้ายกันดังที่กล่าวมาข้างต้นสำหรับไฟล์ signupปุ่ม. ในการดำเนินการนี้ให้สร้าง XML อื่นภายใต้drawable โฟลเดอร์และเรียกมัน btnSignUpStyle.xml. มันจะสืบทอดทุกอย่างจากbtnSignInStyle.xml. ความแตกต่างเพียงอย่างเดียวคือการไล่ระดับสีเริ่มต้นและสีสิ้นสุดของปุ่ม
เปลี่ยน startColor และ endColor ใน btnSignUpStyle.xml ถึง
<gradient android:angle="270"
   android:endColor="#008000" android:startColor="#008000"/>
ไปที่ layout folderและสร้างไฟล์ AXML ใหม่และเรียกมันว่า registerDailog.axml ไฟล์นี้จะมีรายละเอียดการลงทะเบียนสำหรับผู้ใช้ใหม่ในแอพของเรา หน้านี้จะมีสามEditTextsและปุ่มสำหรับส่งข้อมูล เพิ่มรหัสต่อไปนี้ภายในรหัสโครงร่างเชิงเส้นของคุณ
<EditText
   android:layout_width = "match_parent"
   android:layout_marginBottom = "10dp"
   android:layout_marginTop = "25dp"
   android:layout_marginRight = "25dp"
   android:layout_marginLeft = "25dp"
   android:layout_height = "35dp"
   android:paddingLeft = "10dp"
   android:id = "@+id/txtUsername"
   android:hint = "Username"
   android:textColor = "#000" />
<EditText
   android:layout_width = "match_parent"
   android:layout_height = "35dp"
   android:id = "@+id/txtEmail"
   android:layout_marginBottom = "10dp"
   android:layout_marginTop = "25dp"
   android:layout_marginRight = "25dp"
   android:layout_marginLeft = "25dp"
   android:paddingLeft = "10dp"
   android:textColor = "#000"
   android:hint = "Email" />
<EditText
   android:layout_width = "match_parent"
   android:layout_height = "35dp"
   android:layout_marginBottom = "10dp"
   android:layout_marginTop = "25dp"
   android:layout_marginRight = "25dp"
   android:layout_marginLeft = "25dp"
   android:paddingLeft = "10dp"
   android:textColor = "#000"
   android:id = "@+id/txtPassword"
   android:hint = "Password" />
<Button
   android:text = "Sign Up"
   android:layout_width = "match_parent"
   android:layout_height = "wrap_content"
   android:id = "@+id/btnSave"
   android:textSize = "20dp"
   android:textColor = "#fff"
   android:textStyle = "bold"
   android:height = "70dp"
   android:background = "@drawable/btnSignUpStyle"
   android:paddingLeft = "5dp"
   android:paddingRight = "5dp"
   android:paddingTop = "5dp"
   android:paddingBottom = "5dp"
   android:layout_marginLeft = "25dp"
   android:layout_marginRight = "25dp"
   android:layout_centerHorizontal = "true" />
จากนั้นเพิ่มคลาสใหม่ที่เรียกว่า signUpDialog.cs. คลาสนี้จะมีรหัสที่จำเป็นในการสร้างกล่องโต้ตอบ ตัวอย่างต่อไปนี้แสดงรหัส
public class OnSignUpEvent:EventArgs {
   private string myUserName;
   private string myEmail;
   private string myPassword;
   public string UserName {
      get {
         return myUserName;
      }
      set{
         myUserName = value;
      }
   }

   public string Email {
      get {
         return myEmail;
      }
      set {
         myEmail = value;
      }
   }

   public string Password {
      get {
         return myPassword;
      }
      set {
         myPassword = value;
      }
   }
   public OnSignUpEvent(string username, string
      email, string password):base() {
      UserName = username;
      Email = email;
      Password = password;
   }

   class SignUpDialog:DialogFragment {
      private EditText txtUsername;
      private EditText txtEmail;
      private EditText txtPassword;
      private Button btnSaveSignUp;
      public event EventHandler<OnSignUpEvent> onSignUpComplete;
      public override View OnCreateView(LayoutInflater inflater,
         ViewGroup container, Bundle savedInstanceState) {
         base.OnCreateView(inflater, container, savedInstanceState);
         var view = inflater.Inflate(Resource.Layout.registerDialog, container, false);
         txtUsername = view.FindViewById<EditText>(Resource.Id.txtUsername);
         txtEmail = view.FindViewById<EditText>(Resource.Id.txtEmail);
         txtPassword = view.FindViewById<EditText>(Resource.Id.txtPassword);
         btnSaveSignUp = view.FindViewById<Button>(Resource.Id.btnSave);
         btnSaveSignUp.Click += btnSaveSignUp_Click;
         return view;
      }
      void btnSaveSignUp_Click(object sender, EventArgs e) {
         onSignUpComplete.Invoke(this, new OnSignUpEvent(txtUsername.Text,

            txtEmail.Text, txtPassword.Text));
         this.Dismiss();
      }
   }
}
ในโค้ดด้านบนเราได้ใช้ไฟล์ get และ setคุณสมบัติ. get วิธีการคืนค่าตัวแปรในขณะที่ setวิธีการกำหนดค่าให้กับตัวแปรที่ส่งคืน นี่คือตัวอย่าง -
public string Color {
   get {
      return color;
   }
   set {
      color = value;
   }
}
ในตัวอย่างก่อนหน้านี้เราได้สร้างเมธอดที่แทนที่มุมมอง ภายในเมธอดเราได้สร้างไฟล์var เรียกว่า view ซึ่งอ้างอิงถึงไฟล์ registerDialog.axml อยู่ในโฟลเดอร์เค้าโครง
จากนั้นไปที่ mainActivity.cs เพื่อสร้างส่วนโต้ตอบ
private Button signUp;
private Button submitNewUser;
private EditText txtUsername;
private EditText txtEmail;
private EditText txtPassword;

protected override void OnCreate(Bundle bundle) {
   base.OnCreate(bundle);
   SetContentView(Resource.Layout.Main);
   signUp = FindViewById<Button>(Resource.Id.btnSignUp);
   submitNewUser = FindViewById<Button>(Resource.Id.btnSave);
   txtUsername = FindViewById<EditText>(Resource.Id.txtUsername);
   txtEmail = FindViewById<EditText>(Resource.Id.txtEmail);
   txtPassword = FindViewById<EditText>(Resource.Id.txtPassword);

   signUp.Click += (object sender, EventArgs args) => {
      FragmentTransaction transFrag = FragmentManager.BeginTransaction();
      SignUpDialog diagSignUp = new SignUpDialog();
      diagSignUp.Show(transFrag, "Fragment Dialog");
      diagSignUp.onSignUpComplete += diagSignUp_onSignUpComplete;
   };
}
void diagSignUp_onSignUpComplete(object sender, OnSignUpEvent e) {
   StartActivity(typeof(Activity2));
}
โค้ดด้านบนประกอบด้วยเหตุการณ์การคลิกปุ่มซึ่งเมื่อคลิกจะโหลดกล่องโต้ตอบการลงชื่อสมัครใช้ ภายในคลิกปุ่มเราได้สร้างไฟล์SignUpDialog คลาสซึ่งโหลดไฟล์ registerDialog.axml ไฟล์.
จากนั้นเราก็นำมาใช้ FragmentTransaction transFrag = FragmentManager.BeginTransaction(); เพื่อแสดงไฟล์ registerDialog หน้าเป็น Android Dialog Fragment
เราจะเพิ่มอีก .axml เรียกว่าไฟล์ home.axml. เค้าโครงนี้จะเป็นหน้าจอเริ่มต้นเมื่อผู้ใช้เข้าสู่ระบบสำเร็จ ภายในเลย์เอาต์นี้เราจะเพิ่ม textview ดังที่แสดงในโค้ดต่อไปนี้
<TextView
   android:text = "You have been succesfully registered. Welcome!"
   android:textAppearance = "?android:attr/textAppearanceLarge"
   android:layout_width = "match_parent"
   android:layout_height = "wrap_content"
   android:id = "@+id/textView1" />
ต่อไปเราจะสร้างกิจกรรมสุดท้ายที่เรียกว่า Activity2.cs. ในกิจกรรมนี้เราจะพบกับไฟล์home.axml โดยใช้ findViewById.
สุดท้ายสร้างและเรียกใช้แอปของคุณ จะแสดงหน้าจอต่อไปนี้เป็นเอาต์พุต
