GWT - UiBinder
Giriş
UiBinder, İşlevselliği ve Kullanıcı Arayüzünün Görünümünü ayırmak için tasarlanmış bir çerçevedir.
UiBinder çerçevesi, geliştiricilerin kendi içinde yapılandırılmış GWT parçacıklarıyla HTML sayfaları olarak gwt uygulamaları oluşturmalarına olanak tanır.
UiBinder çerçevesi, XML, HTML ve CSS ile Java kaynak kodundan daha rahat olan UI tasarımcıları ile daha kolay işbirliğini sağlar
UIBinder, Kullanıcı Arayüzünü tanımlamanın açıklayıcı bir yolunu sağlar.
UIBinder, programlama mantığını UI'den ayırır.
UIBinder, JSP'nin Servletler için ne olduğuna benzer.
UiBinder İş Akışı
Adım 1 - UI Bildirimi XML Dosyası Oluşturun
XML / HTML tabanlı bir Kullanıcı Arabirimi bildirim dosyası oluşturun. Bir yarattıkLogin.ui.xml örneğimizdeki dosyası.
<ui:UiBinder xmlns:ui = 'urn:ui:com.google.gwt.uibinder'
   xmlns:gwt = 'urn:import:com.google.gwt.user.client.ui'
   xmlns:res = 'urn:with:com.tutorialspoint.client.LoginResources'>
   <ui:with type = "com.tutorialspoint.client.LoginResources" field = "res">
   </ui:with>
   <gwt:HTMLPanel>
   ...
   </gwt:HTMLPanel>
</ui:UiBinder>
Adım 2 - Daha Sonra Bağlama için ui: alanını kullanın
Daha sonra bağlama için XML'deki UI alanını JAVA dosyasındaki UI alanıyla ilişkilendirmek için XML / HTML öğesinde ui: field niteliğini kullanın.
<gwt:Label ui:field = "completionLabel1" />
<gwt:Label ui:field = "completionLabel2" />
Adım 3 - UI XML'in Java karşılığını oluşturun
Bileşik parçacığını genişleterek XML tabanlı düzenin Java tabanlı karşılığını oluşturun. Bir yarattıkLogin.java örneğimizdeki dosyası.
package com.tutorialspoint.client;
   ...
public class Login extends Composite {
   ...
}
Adım 4 - Java kullanıcı arayüzü alanlarını UiField ek açıklamasıyla bağlayın
@UiField ek açıklamasını kullanın Login.java XML tabanlı alanlara bağlanmak üzere karşı sınıf üyelerini belirlemek için Login.ui.xml
public class Login extends Composite {
   ...
   @UiField
   Label completionLabel1;

   @UiField
   Label completionLabel2;
   ...
}
Adım 5 - Java UI'yi UiTemplate ek açıklamasıyla UI XML ile bağlayın
GWT'ye java tabanlı bileşeni bağlamasını söyleyin Login.java ve XML tabanlı düzen Login.ui.xml @UiTemplate ek açıklamasını kullanma
public class Login extends Composite {

   private static LoginUiBinder uiBinder = GWT.create(LoginUiBinder.class);

   /*
    * @UiTemplate is not mandatory but allows multiple XML templates
    * to be used for the same widget.
    * Default file loaded will be <class-name>.ui.xml
    */

   @UiTemplate("Login.ui.xml")
   interface LoginUiBinder extends UiBinder<Widget, Login> {
   }
   ...
}
Adım 6 - CSS Dosyası Oluşturun
Harici bir CSS dosyası oluşturunLogin.css ve Java tabanlı Kaynak LoginResources.java css stillerine eşdeğer dosya
.blackText {
   font-family: Arial, Sans-serif;
   color: #000000;
   font-size: 11px;
   text-align: left;
}
...
Adım 7 - CSS Dosyası için Java tabanlı Kaynak Dosyası Oluşturun
package com.tutorialspoint.client;
...
public interface LoginResources extends ClientBundle {
   public interface MyCss extends CssResource {
      String blackText();

      ...
   }

   @Source("Login.css")
   MyCss style();
}
Adım 8 - Java UI Code dosyasına CSS kaynağı ekleyin.
Harici bir CSS dosyası ekleyinLogin.css Java tabanlı widget sınıfının Oluşturucusunu kullanma Login.java
public Login() {
   this.res = GWT.create(LoginResources.class);
   res.style().ensureInjected();
   initWidget(uiBinder.createAndBindUi(this));
}
UIBinder Tam Örneği
Bu örnek, GWT'de bir UIBinder'ın kullanımını göstermek için sizi basit adımlardan geçirecektir. GWT - Uygulama Oluştur bölümünde oluşturduğumuz GWT uygulamasını güncellemek için aşağıdaki adımları izleyin -
| Adım | Açıklama |
|---|---|
| 1 | GWT - Uygulama Oluştur bölümünde açıklandığı gibi com.tutorialspoint paketinin altında HelloWorld adıyla bir proje oluşturun . |
| 2 | Değiştir HelloWorld.gwt.xml , HelloWorld.css , HelloWorld.html ve HelloWorld.java olarak aşağıda açıklanmıştır. Geri kalan dosyaları değiştirmeden tutun. |
| 3 | Uygulanan mantığın sonucunu doğrulamak için uygulamayı derleyin ve çalıştırın. |
Değiştirilmiş modül tanımlayıcısının içeriği aşağıdadır src/com.tutorialspoint/HelloWorld.gwt.xml.
<?xml version = "1.0" encoding = "UTF-8"?>
<module rename-to = 'helloworld'>
   <!-- Inherit the core Web Toolkit stuff.                        -->
   <inherits name = 'com.google.gwt.user.User'/>

   <!-- Inherit the default GWT style sheet.                       -->
   <inherits name = 'com.google.gwt.user.theme.clean.Clean'/>
   <!-- Inherit the UiBinder module.                               -->
   <inherits name = "com.google.gwt.uibinder.UiBinder"/>
   <!-- Specify the app entry point class.                         -->
   <entry-point class = 'com.tutorialspoint.client.HelloWorld'/>

   <!-- Specify the paths for translatable code                    -->
   <source path ='client'/>
   <source path = 'shared'/>

</module>
Değiştirilen Stil Sayfası dosyasının içeriği aşağıdadır war/HelloWorld.css.
body {
   text-align: center;
   font-family: verdana, sans-serif;
}

h1 {
   font-size: 2em;
   font-weight: bold;
   color: #777777;
   margin: 40px 0px 70px;
   text-align: center;
}
Aşağıda, değiştirilmiş HTML ana bilgisayar dosyasının içeriği verilmiştir war/HelloWorld.html.
<html>
<head>
<title>Hello World</title>
<link rel = "stylesheet" href = "HelloWorld.css"/>
<script language = "javascript" src = "helloworld/helloworld.nocache.js">
</script>
</head>
<body>
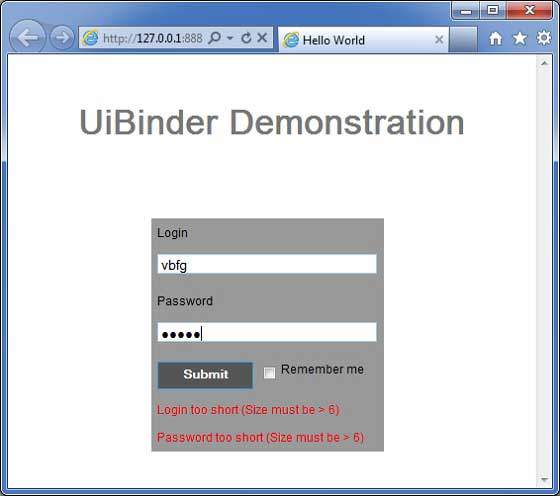
<h1>UiBinder Demonstration</h1>
<div id = "gwtContainer"></div>
</body>
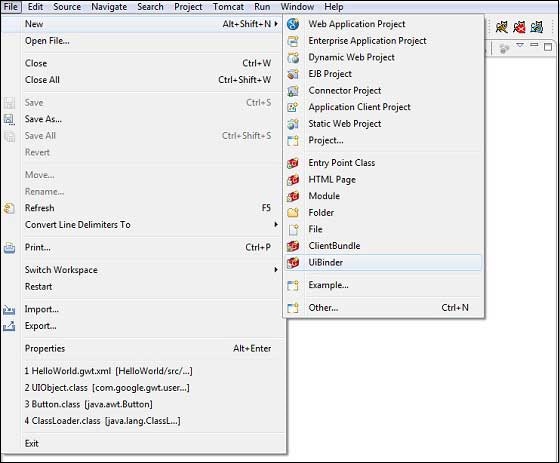
</html>Şimdi yeni bir UiBinder şablonu ve sahip sınıfı (Dosya → Yeni → UiBinder) oluşturun.
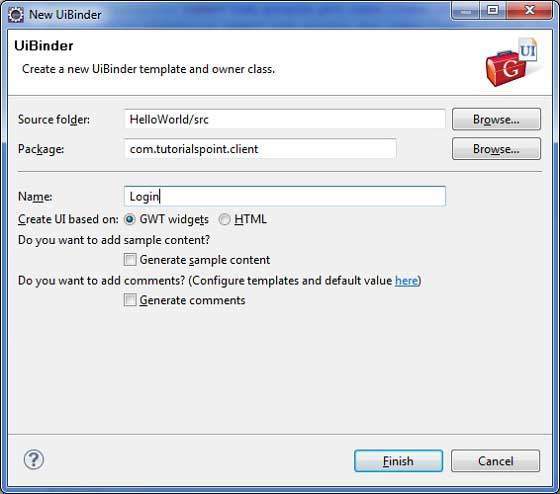
Proje için istemci paketini seçin ve ardından Login olarak adlandırın. Diğer tüm varsayılanları bırakın. Bitir düğmesine tıklayın ve eklenti yeni bir UiBinder şablonu ve sahip sınıfı oluşturacaktır.
Şimdi Login.css dosyasını src/com.tutorialspoint/client aşağıdaki içeriği paketleyin ve içine yerleştirin
.blackText {
   font-family: Arial, Sans-serif;
   color: #000000;
   font-size: 11px;
   text-align: left;
}

.redText {
   font-family: Arial, Sans-serif;
   color: #ff0000;
   font-size: 11px;
   text-align: left;
}

.loginButton {
   border: 1px solid #3399DD;
   color: #FFFFFF;
   background: #555555;
   font-size: 11px;
   font-weight: bold;
   margin: 0 5px 0 0;
   padding: 4px 10px 5px;
   text-shadow: 0 -1px 0 #3399DD;
}

.box {
   border: 1px solid #AACCEE;
   display: block;
   font-size: 12px;
   margin: 0 0 5px;
   padding: 3px;
   width: 203px;
}

.background {
   background-color: #999999;
   border: 1px none transparent;
   color: #000000;
   font-size: 11px;
   margin-left: -8px;
   margin-top: 5px;
   padding: 6px;
}
Şimdi LoginResources.java dosyasını src/com.tutorialspoint/client aşağıdaki içeriği paketleyin ve içine yerleştirin
package com.tutorialspoint.client;

import com.google.gwt.resources.client.ClientBundle;
import com.google.gwt.resources.client.CssResource;

public interface LoginResources extends ClientBundle {
   /**
    * Sample CssResource.
    */
   public interface MyCss extends CssResource {
      String blackText();

      String redText();

      String loginButton();

      String box();

      String background();
   }

   @Source("Login.css")
   MyCss style();
}
Login.ui.xml içeriğini şurada değiştirin: src/com.tutorialspoint/client aşağıdaki ile paket
<ui:UiBinder xmlns:ui = 'urn:ui:com.google.gwt.uibinder'
   xmlns:gwt = 'urn:import:com.google.gwt.user.client.ui'
   xmlns:res = 'urn:with:com.tutorialspoint.client.LoginResources'>

   <ui:with type = "com.tutorialspoint.client.LoginResources" field = "res">
   </ui:with>

   <gwt:HTMLPanel>
      <div align = "center">

         <gwt:VerticalPanel res:styleName = "style.background">
            <gwt:Label text = "Login" res:styleName = "style.blackText" />
            <gwt:TextBox ui:field="loginBox" res:styleName = "style.box" />
            <gwt:Label text = "Password" res:styleName = "style.blackText" />
            <gwt:PasswordTextBox ui:field = "passwordBox" res:styleName = "style.box" />

            <gwt:HorizontalPanel verticalAlignment = "middle">
               <gwt:Button ui:field = "buttonSubmit" text="Submit"
                  res:styleName = "style.loginButton" />
               <gwt:CheckBox ui:field = "myCheckBox" />
               <gwt:Label ui:field = "myLabel" text = "Remember me"
                  res:styleName = "style.blackText" />
            </gwt:HorizontalPanel>

            <gwt:Label ui:field = "completionLabel1" res:styleName = "style.blackText" />
            <gwt:Label ui:field = "completionLabel2" res:styleName = "style.blackText" />
         </gwt:VerticalPanel>

      </div>
   </gwt:HTMLPanel>

</ui:UiBinder>
Login.java içeriğini değiştirin src/com.tutorialspoint/client aşağıdaki ile paket
package com.tutorialspoint.client;

import com.google.gwt.core.client.GWT;
import com.google.gwt.event.dom.client.ClickEvent;
import com.google.gwt.event.logical.shared.ValueChangeEvent;
import com.google.gwt.uibinder.client.UiBinder;
import com.google.gwt.uibinder.client.UiField;
import com.google.gwt.uibinder.client.UiHandler;
import com.google.gwt.uibinder.client.UiTemplate;
import com.google.gwt.user.client.Window;
import com.google.gwt.user.client.ui.Composite;
import com.google.gwt.user.client.ui.Label;
import com.google.gwt.user.client.ui.TextBox;
import com.google.gwt.user.client.ui.Widget;

public class Login extends Composite {

   private static LoginUiBinder uiBinder = GWT.create(LoginUiBinder.class);

   /*
    * @UiTemplate is not mandatory but allows multiple XML templates
    * to be used for the same widget.
    * Default file loaded will be <class-name>.ui.xml
    */
   @UiTemplate("Login.ui.xml")
   interface LoginUiBinder extends UiBinder<Widget, Login> {
   }

   @UiField(provided = true)
   final LoginResources res;

   public Login() {
      this.res = GWT.create(LoginResources.class);
      res.style().ensureInjected();
      initWidget(uiBinder.createAndBindUi(this));
   }

   @UiField
   TextBox loginBox;

   @UiField
   TextBox passwordBox;

   @UiField
   Label completionLabel1;

   @UiField
   Label completionLabel2;

   private Boolean tooShort = false;

   /*
    * Method name is not relevant, the binding is done according to the class
    * of the parameter.
    */
   @UiHandler("buttonSubmit")
   void doClickSubmit(ClickEvent event) {
      if (!tooShort) {
         Window.alert("Login Successful!");
      } else {
         Window.alert("Login or Password is too short!");
      }
   }

   @UiHandler("loginBox")
   void handleLoginChange(ValueChangeEvent<String> event) {
      if (event.getValue().length() < 6) {
         completionLabel1.setText("Login too short (Size must be > 6)");
         tooShort = true;
      } else {
         tooShort = false;
         completionLabel1.setText("");
      }
   }

   @UiHandler("passwordBox")
   void handlePasswordChange(ValueChangeEvent<String> event) {
      if (event.getValue().length() < 6) {
         tooShort = true;
         completionLabel2.setText("Password too short (Size must be > 6)");
      } else {
         tooShort = false;
         completionLabel2.setText("");
      }
   }
}
Aşağıdaki Java dosyası içeriğine sahip olalım src/com.tutorialspoint/HelloWorld.java UiBinder'in kullanımını gösterecektir.
package com.tutorialspoint.client;

import com.google.gwt.core.client.EntryPoint;
import com.google.gwt.user.client.ui.RootPanel;

public class HelloWorld implements EntryPoint {
   public void onModuleLoad() {
      RootPanel.get().add(new Login());
   }
}
Yapılan tüm değişikliklere hazır olduğunuzda, uygulamayı GWT - Uygulama Oluştur bölümünde yaptığımız gibi geliştirme modunda derleyip çalıştıralım . Başvurunuzda her şey yolundaysa, bu aşağıdaki sonucu verecektir -