JavaScript - Guía rápida
¿Qué es JavaScript?
JavaScript es un lenguaje dinámico de programación de computadoras. Es liviano y se usa más comúnmente como parte de las páginas web, cuyas implementaciones permiten que los scripts del lado del cliente interactúen con el usuario y creen páginas dinámicas. Es un lenguaje de programación interpretado con capacidades orientadas a objetos.
JavaScript se conoció por primera vez como LiveScript,pero Netscape cambió su nombre a JavaScript, posiblemente debido a la emoción que genera Java. JavaScript hizo su primera aparición en Netscape 2.0 en 1995 con el nombreLiveScript. El núcleo de uso general del lenguaje se ha integrado en Netscape, Internet Explorer y otros navegadores web.
La Especificación ECMA-262 definió una versión estándar del lenguaje JavaScript central.
- JavaScript es un lenguaje de programación ligero interpretado.
- Diseñado para crear aplicaciones centradas en la red.
- Complementario e integrado con Java.
- Complementario e integrado con HTML.
- Abierto y multiplataforma
JavaScript del lado del cliente
JavaScript del lado del cliente es la forma más común del lenguaje. El script debe estar incluido o referenciado en un documento HTML para que el navegador interprete el código.
Significa que una página web no necesita ser un HTML estático, pero puede incluir programas que interactúan con el usuario, controlan el navegador y crean contenido HTML de forma dinámica.
El mecanismo del lado del cliente de JavaScript ofrece muchas ventajas sobre los scripts tradicionales del lado del servidor CGI. Por ejemplo, puede utilizar JavaScript para comprobar si el usuario ha introducido una dirección de correo electrónico válida en un campo de formulario.
El código JavaScript se ejecuta cuando el usuario envía el formulario, y solo si todas las entradas son válidas, se enviarán al servidor web.
JavaScript se puede utilizar para atrapar eventos iniciados por el usuario, como clics en botones, navegación de enlaces y otras acciones que el usuario inicia explícita o implícitamente.
Ventajas de JavaScript
Los méritos de usar JavaScript son:
Less server interaction- Puede validar la entrada del usuario antes de enviar la página al servidor. Esto ahorra tráfico en el servidor, lo que significa menos carga en su servidor.
Immediate feedback to the visitors - No tienen que esperar a que se vuelva a cargar una página para ver si se han olvidado de ingresar algo.
Increased interactivity - Puede crear interfaces que reaccionen cuando el usuario pasa el mouse sobre ellas o las activa a través del teclado.
Richer interfaces - Puede usar JavaScript para incluir elementos tales como componentes de arrastrar y soltar y controles deslizantes para brindar una interfaz enriquecida a los visitantes de su sitio.
Limitaciones de JavaScript
No podemos tratar a JavaScript como un lenguaje de programación completo. Carece de las siguientes características importantes:
JavaScript del lado del cliente no permite la lectura o escritura de archivos. Esto se ha mantenido por motivos de seguridad.
JavaScript no se puede utilizar para aplicaciones de red porque no hay tal soporte disponible.
JavaScript no tiene capacidades de multiprocesador ni subprocesos múltiples.
Una vez más, JavaScript es un lenguaje de programación ligero e interpretado que le permite crear interactividad en páginas HTML que de otro modo serían estáticas.
Herramientas de desarrollo de JavaScript
Una de las principales fortalezas de JavaScript es que no requiere costosas herramientas de desarrollo. Puede comenzar con un editor de texto simple como el Bloc de notas. Dado que es un lenguaje interpretado dentro del contexto de un navegador web, ni siquiera necesita comprar un compilador.
Para hacer nuestra vida más sencilla, varios proveedores han creado herramientas de edición de JavaScript muy agradables. Algunos de ellos se enumeran aquí:
Microsoft FrontPage- Microsoft ha desarrollado un popular editor de HTML llamado FrontPage. FrontPage también proporciona a los desarrolladores web una serie de herramientas JavaScript para ayudar en la creación de sitios web interactivos.
Macromedia Dreamweaver MX- Macromedia Dreamweaver MX es un editor de HTML y JavaScript muy popular entre el público del desarrollo web profesional. Proporciona varios útiles componentes JavaScript prediseñados, se integra bien con bases de datos y se ajusta a nuevos estándares como XHTML y XML.
Macromedia HomeSite 5 - HomeSite 5 es un editor de HTML y JavaScript popular de Macromedia que se puede utilizar para administrar sitios web personales de manera eficaz.
¿Dónde está JavaScript hoy?
El estándar ECMAScript Edition 5 será la primera actualización que se lanzará en más de cuatro años. JavaScript 2.0 cumple con la Edición 5 del estándar ECMAScript, y la diferencia entre los dos es extremadamente pequeña.
La especificación de JavaScript 2.0 se puede encontrar en el siguiente sitio: http://www.ecmascript.org/
Hoy en día, JavaScript de Netscape y JScript de Microsoft cumplen con el estándar ECMAScript, aunque ambos lenguajes aún admiten las funciones que no forman parte del estándar.
JavaScript se puede implementar mediante declaraciones de JavaScript que se colocan dentro de la <script>... </script> Etiquetas HTML en una página web.
Puedes colocar el <script> etiquetas, que contienen su JavaScript, en cualquier lugar dentro de su página web, pero normalmente se recomienda que lo mantenga dentro del <head> etiquetas.
La etiqueta <script> alerta al programa del navegador para que comience a interpretar todo el texto entre estas etiquetas como un script. Aparecerá una sintaxis simple de su JavaScript de la siguiente manera.
<script ...>
   JavaScript code
</script>
La etiqueta de secuencia de comandos tiene dos atributos importantes:
Language- Este atributo especifica qué lenguaje de secuencias de comandos está utilizando. Normalmente, su valor será javascript. Aunque las versiones recientes de HTML (y XHTML, su sucesor) han eliminado el uso de este atributo.
Type - Este atributo es el que ahora se recomienda para indicar el lenguaje de secuencias de comandos en uso y su valor debe establecerse en "texto / javascript".
Entonces su segmento de JavaScript se verá así:
<script language = "javascript" type = "text/javascript">
   JavaScript code
</script>
Su primer código JavaScript
Tomemos un ejemplo de muestra para imprimir "Hola mundo". Agregamos un comentario HTML opcional que rodea nuestro código JavaScript. Esto es para guardar nuestro código de un navegador que no es compatible con JavaScript. El comentario termina con "// ->". Aquí "//" significa un comentario en JavaScript, así que lo agregamos para evitar que un navegador lea el final del comentario HTML como un fragmento de código JavaScript. A continuación, llamamos a una funcióndocument.write que escribe una cadena en nuestro documento HTML.
Esta función se puede utilizar para escribir texto, HTML o ambos. Eche un vistazo al siguiente código.
<html>
   <body>
      <script language = "javascript" type = "text/javascript">
         <!--
            document.write("Hello World!")
         //-->
      </script>
   </body>
</html>
Este código producirá el siguiente resultado:
Hello World!Espacios en blanco y saltos de línea
JavaScript ignora los espacios, las pestañas y las nuevas líneas que aparecen en los programas JavaScript. Puede usar espacios, pestañas y nuevas líneas libremente en su programa y puede formatear y sangrar sus programas de una manera ordenada y consistente que hace que el código sea fácil de leer y comprender.
Los puntos y comas son opcionales
Las declaraciones simples en JavaScript generalmente van seguidas de un punto y coma, al igual que en C, C ++ y Java. JavaScript, sin embargo, le permite omitir este punto y coma si cada una de sus declaraciones se coloca en una línea separada. Por ejemplo, el siguiente código podría escribirse sin punto y coma.
<script language = "javascript" type = "text/javascript">
   <!--
      var1 = 10
      var2 = 20
   //-->
</script>
Pero cuando se formatea en una sola línea de la siguiente manera, debe usar punto y coma:
<script language = "javascript" type = "text/javascript">
   <!--
      var1 = 10; var2 = 20;
   //-->
</script>
Note - Es una buena práctica de programación utilizar punto y coma.
Sensibilidad de mayúsculas y minúsculas
JavaScript es un lenguaje que distingue entre mayúsculas y minúsculas. Esto significa que las palabras clave del idioma, las variables, los nombres de las funciones y cualquier otro identificador deben escribirse siempre con mayúsculas coherentes.
Entonces los identificadores Time y TIME transmitirá diferentes significados en JavaScript.
NOTE - Se debe tener cuidado al escribir nombres de variables y funciones en JavaScript.
Comentarios en JavaScript
JavaScript admite comentarios de estilo C y C ++, por lo tanto:
Cualquier texto entre // y el final de una línea se trata como un comentario y JavaScript lo ignora.
Cualquier texto entre los caracteres / * y * / se trata como un comentario. Esto puede abarcar varias líneas.
JavaScript también reconoce la secuencia de apertura de comentarios HTML <! -. JavaScript trata esto como un comentario de una sola línea, al igual que lo hace con el // comentario.
La secuencia de cierre del comentario HTML -> no es reconocida por JavaScript, por lo que debería escribirse como // ->.
Ejemplo
El siguiente ejemplo muestra cómo utilizar comentarios en JavaScript.
<script language = "javascript" type = "text/javascript">
   <!--
      // This is a comment. It is similar to comments in C++

      /*
      * This is a multi-line comment in JavaScript
      * It is very similar to comments in C Programming
      */
   //-->
</script>
Todos los navegadores modernos vienen con soporte integrado para JavaScript. Con frecuencia, es posible que deba habilitar o deshabilitar este soporte manualmente. Este capítulo explica el procedimiento para habilitar y deshabilitar la compatibilidad con JavaScript en sus navegadores: Internet Explorer, Firefox, Chrome y Opera.
JavaScript en Internet Explorer
A continuación, se indican unos sencillos pasos para activar o desactivar JavaScript en Internet Explorer:
Seguir Tools → Internet Options del menú.
Seleccione Security pestaña del cuadro de diálogo.
Haga clic en el Custom Level botón.
Desplácese hacia abajo hasta encontrar Scripting opción.
Seleccione Habilitar el botón de opción debajo deActive scripting.
Finalmente haga clic en Aceptar y salga
Para deshabilitar la compatibilidad con JavaScript en su Internet Explorer, debe seleccionar Disable botón de radio debajo Active scripting.
JavaScript en Firefox
Estos son los pasos para activar o desactivar JavaScript en Firefox:
Abra una nueva pestaña → escriba about: config en la barra de direcciones.
Luego encontrará el cuadro de diálogo de advertencia. SeleccioneI’ll be careful, I promise!
Entonces encontrarás la lista de configure options en el navegador.
En la barra de búsqueda, escriba javascript.enabled.
Allí encontrará la opción para habilitar o deshabilitar javascript haciendo clic derecho en el valor de esa opción → select toggle.
Si javascript.enabled es verdadero; se convierte en falso al hacer clictoogle. Si javascript está deshabilitado; se habilita al hacer clic en alternar.
JavaScript en Chrome
Estos son los pasos para activar o desactivar JavaScript en Chrome:
Haga clic en el menú de Chrome en la esquina superior derecha de su navegador.
Seleccione Settings.
Hacer clic Show advanced settings al final de la página.
Bajo la Privacy sección, haga clic en el botón Configuración de contenido.
En la sección "Javascript", seleccione "No permitir que ningún sitio ejecute JavaScript" o "Permitir que todos los sitios ejecuten JavaScript (recomendado)".
JavaScript en Opera
Estos son los pasos para activar o desactivar JavaScript en Opera:
Seguir Tools → Preferences del menú.
Seleccione Advanced opción del cuadro de diálogo.
Seleccione Content de los elementos enumerados.
Seleccione Enable JavaScript caja.
Finalmente haga clic en Aceptar y salga.
Para deshabilitar el soporte de JavaScript en su Opera, no debe seleccionar el Enable JavaScript checkbox.
Advertencia para navegadores que no utilizan JavaScript
Si tiene que hacer algo importante usando JavaScript, puede mostrar un mensaje de advertencia al usuario usando <noscript> etiquetas.
Puede agregar un noscript bloque inmediatamente después del bloque de script de la siguiente manera:
<html>
   <body>
      <script language = "javascript" type = "text/javascript">
         <!--
            document.write("Hello World!")
         //-->
      </script>

      <noscript>
         Sorry...JavaScript is needed to go ahead.
      </noscript>
   </body>
</html>
Ahora, si el navegador del usuario no es compatible con JavaScript o JavaScript no está habilitado, el mensaje de </noscript> se mostrará en la pantalla.
Existe una flexibilidad para incluir código JavaScript en cualquier lugar de un documento HTML. Sin embargo, las formas más preferidas de incluir JavaScript en un archivo HTML son las siguientes:
Secuencia de comandos en la sección <head> ... </head>.
Script en la sección <body> ... </body>.
Script en las secciones <body> ... </body> y <head> ... </head>.
Script en un archivo externo y luego incluirlo en la sección <head> ... </head>.
En la siguiente sección, veremos cómo podemos colocar JavaScript en un archivo HTML de diferentes formas.
JavaScript en la sección <head> ... </head>
Si desea que un script se ejecute en algún evento, como cuando un usuario hace clic en algún lugar, colocará ese script en la cabecera de la siguiente manera:
<html>
   <head>
      <script type = "text/javascript">
         <!--
            function sayHello() {
               alert("Hello World")
            }
         //-->
      </script>
   </head>

   <body>
      <input type = "button" onclick = "sayHello()" value = "Say Hello" />
   </body>
</html>
Este código producirá los siguientes resultados:
JavaScript en la sección <body> ... </body>
Si necesita que se ejecute una secuencia de comandos mientras se carga la página para que la secuencia de comandos genere contenido en la página, la secuencia de comandos se coloca en la parte <body> del documento. En este caso, no tendría ninguna función definida usando JavaScript. Eche un vistazo al siguiente código.
<html>
   <head>
   </head>

   <body>
      <script type = "text/javascript">
         <!--
            document.write("Hello World")
         //-->
      </script>

      <p>This is web page body </p>
   </body>
</html>
Este código producirá los siguientes resultados:
JavaScript en las secciones <body> y <head>
Puede poner su código JavaScript en la sección <head> y <body> de la siguiente manera:
<html>
   <head>
      <script type = "text/javascript">
         <!--
            function sayHello() {
               alert("Hello World")
            }
         //-->
      </script>
   </head>

   <body>
      <script type = "text/javascript">
         <!--
            document.write("Hello World")
         //-->
      </script>

      <input type = "button" onclick = "sayHello()" value = "Say Hello" />
   </body>
</html>
Este código producirá el siguiente resultado:
JavaScript en archivo externo
A medida que comience a trabajar más extensamente con JavaScript, es probable que encuentre casos en los que está reutilizando código JavaScript idéntico en varias páginas de un sitio.
No está restringido a mantener un código idéntico en varios archivos HTML. losscript La etiqueta proporciona un mecanismo que le permite almacenar JavaScript en un archivo externo y luego incluirlo en sus archivos HTML.
Aquí hay un ejemplo para mostrar cómo puede incluir un archivo JavaScript externo en su código HTML usando script etiqueta y su src atributo.
<html>
   <head>
      <script type = "text/javascript" src = "filename.js" ></script>
   </head>

   <body>
      .......
   </body>
</html>
Para usar JavaScript desde una fuente de archivo externa, debe escribir todo su código fuente JavaScript en un archivo de texto simple con la extensión ".js" y luego incluir ese archivo como se muestra arriba.
Por ejemplo, puede mantener el siguiente contenido en filename.js archivo y luego puede usar sayHello en su archivo HTML después de incluir el archivo filename.js.
function sayHello() {
   alert("Hello World")
}
Tipos de datos JavaScript
Una de las características más fundamentales de un lenguaje de programación es el conjunto de tipos de datos que admite. Estos son el tipo de valores que se pueden representar y manipular en un lenguaje de programación.
JavaScript le permite trabajar con tres tipos de datos primitivos:
Numbers,p.ej. 123, 120,50 etc.
Strings de texto, por ejemplo, "Esta cadena de texto", etc.
Boolean por ejemplo, verdadero o falso.
JavaScript también define dos tipos de datos triviales, null y undefined,cada uno de los cuales define un solo valor. Además de estos tipos de datos primitivos, JavaScript admite un tipo de datos compuestos conocido comoobject. Cubriremos los objetos en detalle en un capítulo separado.
Note- JavaScript no distingue entre valores enteros y valores de punto flotante. Todos los números en JavaScript se representan como valores de punto flotante. JavaScript representa números utilizando el formato de punto flotante de 64 bits definido por el estándar IEEE 754.
Variables de JavaScript
Como muchos otros lenguajes de programación, JavaScript tiene variables. Las variables pueden considerarse contenedores con nombre. Puede colocar datos en estos contenedores y luego hacer referencia a los datos simplemente nombrando el contenedor.
Antes de utilizar una variable en un programa JavaScript, debe declararla. Las variables se declaran con lavar palabra clave de la siguiente manera.
<script type = "text/javascript">
   <!--
      var money;
      var name;
   //-->
</script>
También puede declarar múltiples variables con el mismo var palabra clave de la siguiente manera:
<script type = "text/javascript">
   <!--
      var money, name;
   //-->
</script>
Almacenar un valor en una variable se llama variable initialization. Puede realizar la inicialización de la variable en el momento de la creación de la variable o en un momento posterior cuando necesite esa variable.
Por ejemplo, puede crear una variable llamada moneyy luego asignarle el valor 2000,50. Para otra variable, puede asignar un valor en el momento de la inicialización de la siguiente manera.
<script type = "text/javascript">
   <!--
      var name = "Ali";
      var money;
      money = 2000.50;
   //-->
</script>
Note - Utilice el varpalabra clave solo para declaración o inicialización, una vez durante la vida de cualquier nombre de variable en un documento. No debe volver a declarar la misma variable dos veces.
JavaScript es untypedidioma. Esto significa que una variable de JavaScript puede contener un valor de cualquier tipo de datos. A diferencia de muchos otros lenguajes, no tiene que decirle a JavaScript durante la declaración de variable qué tipo de valor tendrá la variable. El tipo de valor de una variable puede cambiar durante la ejecución de un programa y JavaScript se encarga de ello automáticamente.
Alcance variable de JavaScript
El alcance de una variable es la región de su programa en la que está definida. Las variables de JavaScript tienen solo dos ámbitos.
Global Variables - Una variable global tiene alcance global, lo que significa que se puede definir en cualquier parte de su código JavaScript.
Local Variables- Una variable local será visible solo dentro de una función donde esté definida. Los parámetros de la función son siempre locales para esa función.
Dentro del cuerpo de una función, una variable local tiene prioridad sobre una variable global con el mismo nombre. Si declara una variable local o un parámetro de función con el mismo nombre que una variable global, efectivamente oculta la variable global. Eche un vistazo al siguiente ejemplo.
<html>
   <body onload = checkscope();>
      <script type = "text/javascript">
         <!--
            var myVar = "global";      // Declare a global variable
            function checkscope( ) {
               var myVar = "local";    // Declare a local variable
               document.write(myVar);
            }
         //-->
      </script>
   </body>
</html>
Esto produce el siguiente resultado:
localNombres de variables de JavaScript
Al nombrar sus variables en JavaScript, tenga en cuenta las siguientes reglas.
No debe utilizar ninguna de las palabras clave reservadas de JavaScript como nombre de variable. Estas palabras clave se mencionan en la siguiente sección. Por ejemplo,break o boolean los nombres de las variables no son válidos.
Los nombres de variables de JavaScript no deben comenzar con un número (0-9). Deben comenzar con una letra o un carácter de subrayado. Por ejemplo,123test es un nombre de variable inválido pero _123test es válido.
Los nombres de las variables de JavaScript distinguen entre mayúsculas y minúsculas. Por ejemplo,Name y name son dos variables diferentes.
Palabras reservadas de JavaScript
En la siguiente tabla se proporciona una lista de todas las palabras reservadas en JavaScript. No se pueden utilizar como variables de JavaScript, funciones, métodos, etiquetas de bucle ni nombres de objeto.
| resumen | más | en vez de | cambiar |
| booleano | enumeración | En t | sincronizado |
| romper | exportar | interfaz | esta |
| byte | extiende | largo | lanzar |
| caso | falso | nativo | lanza |
| captura | final | nuevo | transitorio |
| carbonizarse | finalmente | nulo | cierto |
| clase | flotador | paquete | tratar |
| constante | para | privado | tipo de |
| Seguir | función | protegido | var |
| depurador | ir | público | vacío |
| defecto | Si | regreso | volátil |
| Eliminar | implementos | corto | mientras |
| hacer | importar | estático | con |
| doble | en | súper |
¿Qué es un operador?
Tomemos una expresión simple 4 + 5 is equal to 9. Aquí 4 y 5 se llamanoperands y '+' se llama operator. JavaScript admite los siguientes tipos de operadores.
- Operadores aritméticos
- Operadores de comparación
- Operadores lógicos (o relacionales)
- Operadores de Asignación
- Operadores condicionales (o ternarios)
Echemos un vistazo a todos los operadores uno por uno.
Operadores aritméticos
JavaScript admite los siguientes operadores aritméticos:
Suponga que la variable A tiene 10 y la variable B tiene 20, entonces -
| No Señor. | Operador y descripción |
|---|---|
| 1 | + (Addition) Agrega dos operandos Ex: A + B dará 30 |
| 2 | - (Subtraction) Resta el segundo operando del primero Ex: A - B dará -10 |
| 3 | * (Multiplication) Multiplica ambos operandos Ex: A * B dará 200 |
| 4 | / (Division) Divide el numerador entre el denominador Ex: B / A dará 2 |
| 5 | % (Modulus) Genera el resto de una división entera Ex: B% A dará 0 |
| 6 | ++ (Increment) Aumenta un valor entero en uno Ex: A ++ dará 11 |
| 7 | -- (Decrement) Disminuye un valor entero en uno. Ex: A-- dará 9 |
Note- El operador de suma (+) funciona tanto para números como para cadenas. por ejemplo, "a" + 10 dará "a10".
Ejemplo
El siguiente código muestra cómo utilizar operadores aritméticos en JavaScript.
<html>
   <body>

      <script type = "text/javascript">
         <!--
            var a = 33;
            var b = 10;
            var c = "Test";
            var linebreak = "<br />";

            document.write("a + b = ");
            result = a + b;
            document.write(result);
            document.write(linebreak);

            document.write("a - b = ");
            result = a - b;
            document.write(result);
            document.write(linebreak);

            document.write("a / b = ");
            result = a / b;
            document.write(result);
            document.write(linebreak);

            document.write("a % b = ");
            result = a % b;
            document.write(result);
            document.write(linebreak);

            document.write("a + b + c = ");
            result = a + b + c;
            document.write(result);
            document.write(linebreak);

            a = ++a;
            document.write("++a = ");
            result = ++a;
            document.write(result);
            document.write(linebreak);

            b = --b;
            document.write("--b = ");
            result = --b;
            document.write(result);
            document.write(linebreak);
         //-->
      </script>

      Set the variables to different values and then try...
   </body>
</html>
Salida
a + b = 43
a - b = 23
a / b = 3.3
a % b = 3
a + b + c = 43Test
++a = 35
--b = 8
Set the variables to different values and then try...
Operadores de comparación
JavaScript admite los siguientes operadores de comparación:
Suponga que la variable A tiene 10 y la variable B tiene 20, entonces -
| No Señor. | Operador y descripción |
|---|---|
| 1 | = = (Equal) Comprueba si el valor de dos operandos es igual o no, en caso afirmativo, la condición se cumple. Ex: (A == B) no es cierto. |
| 2 | != (Not Equal) Comprueba si el valor de dos operandos es igual o no, si los valores no son iguales, la condición se vuelve verdadera. Ex: (A! = B) es cierto. |
| 3 | > (Greater than) Comprueba si el valor del operando izquierdo es mayor que el valor del operando derecho; si es así, la condición se cumple. Ex: (A> B) no es cierto. |
| 4 | < (Less than) Comprueba si el valor del operando izquierdo es menor que el valor del operando derecho; en caso afirmativo, la condición se cumple. Ex: (A <B) es cierto. |
| 5 | >= (Greater than or Equal to) Comprueba si el valor del operando izquierdo es mayor o igual que el valor del operando derecho; si es así, la condición se convierte en verdadera. Ex: (A> = B) no es cierto. |
| 6 | <= (Less than or Equal to) Comprueba si el valor del operando izquierdo es menor o igual que el valor del operando derecho; si es así, la condición se cumple. Ex: (A <= B) es cierto. |
Ejemplo
El siguiente código muestra cómo utilizar operadores de comparación en JavaScript.
<html>
   <body>
      <script type = "text/javascript">
         <!--
            var a = 10;
            var b = 20;
            var linebreak = "<br />";

            document.write("(a == b) => ");
            result = (a == b);
            document.write(result);
            document.write(linebreak);

            document.write("(a < b) => ");
            result = (a < b);
            document.write(result);
            document.write(linebreak);

            document.write("(a > b) => ");
            result = (a > b);
            document.write(result);
            document.write(linebreak);

            document.write("(a != b) => ");
            result = (a != b);
            document.write(result);
            document.write(linebreak);

            document.write("(a >= b) => ");
            result = (a >= b);
            document.write(result);
            document.write(linebreak);

            document.write("(a <= b) => ");
            result = (a <= b);
            document.write(result);
            document.write(linebreak);
         //-->
      </script>
      Set the variables to different values and different operators and then try...
   </body>
</html>
Salida
(a == b) => false
(a < b) => true
(a > b) => false
(a != b) => true
(a >= b) => false
a <= b) => true
Set the variables to different values and different operators and then try...
Operadores logicos
JavaScript admite los siguientes operadores lógicos:
Suponga que la variable A tiene 10 y la variable B tiene 20, entonces -
| No Señor. | Operador y descripción |
|---|---|
| 1 | && (Logical AND) Si ambos operandos son distintos de cero, la condición se cumple. Ex: (A && B) es cierto. |
| 2 | || (Logical OR) Si alguno de los dos operandos es distinto de cero, la condición se cumple. Ex: (A || B) es cierto. |
| 3 | ! (Logical NOT) Invierte el estado lógico de su operando. Si una condición es verdadera, entonces el operador lógico NOT la convertirá en falsa. Ex:! (A && B) es falso. |
Ejemplo
Pruebe el siguiente código para aprender a implementar operadores lógicos en JavaScript.
<html>
   <body>
      <script type = "text/javascript">
         <!--
            var a = true;
            var b = false;
            var linebreak = "<br />";

            document.write("(a && b) => ");
            result = (a && b);
            document.write(result);
            document.write(linebreak);

            document.write("(a || b) => ");
            result = (a || b);
            document.write(result);
            document.write(linebreak);

            document.write("!(a && b) => ");
            result = (!(a && b));
            document.write(result);
            document.write(linebreak);
         //-->
      </script>
      <p>Set the variables to different values and different operators and then try...</p>
   </body>
</html>
Salida
(a && b) => false
(a || b) => true
!(a && b) => true
Set the variables to different values and different operators and then try...
Operadores bit a bit
JavaScript admite los siguientes operadores bit a bit:
Suponga que la variable A tiene 2 y la variable B tiene 3, entonces -
| No Señor. | Operador y descripción |
|---|---|
| 1 | & (Bitwise AND) Realiza una operación booleana AND en cada bit de sus argumentos enteros. Ex: (A y B) es 2. |
| 2 | | (BitWise OR) Realiza una operación booleana OR en cada bit de sus argumentos enteros. Ex: (A | B) es 3. |
| 3 | ^ (Bitwise XOR) Realiza una operación OR exclusiva booleana en cada bit de sus argumentos enteros. OR exclusivo significa que el operando uno es verdadero o el operando dos es verdadero, pero no ambos. Ex: (A ^ B) es 1. |
| 4 | ~ (Bitwise Not) Es un operador unario y opera invirtiendo todos los bits del operando. Ex: (~ B) es -4. |
| 5 | << (Left Shift) Mueve todos los bits de su primer operando a la izquierda el número de lugares especificado en el segundo operando. Los nuevos bits se llenan de ceros. Cambiar un valor a la izquierda en una posición equivale a multiplicarlo por 2, cambiar dos posiciones equivale a multiplicar por 4, y así sucesivamente. Ex: (A << 1) es 4. |
| 6 | >> (Right Shift) Operador de cambio a la derecha binario. El valor del operando izquierdo se mueve hacia la derecha por el número de bits especificado por el operando derecho. Ex: (A >> 1) es 1. |
| 7 | >>> (Right shift with Zero) Este operador es como el operador >>, excepto que los bits desplazados hacia la izquierda son siempre cero. Ex: (A >>> 1) es 1. |
Ejemplo
Pruebe el siguiente código para implementar el operador Bitwise en JavaScript.
<html>
   <body>
      <script type = "text/javascript">
         <!--
            var a = 2; // Bit presentation 10
            var b = 3; // Bit presentation 11
            var linebreak = "<br />";

            document.write("(a & b) => ");
            result = (a & b);
            document.write(result);
            document.write(linebreak);

            document.write("(a | b) => ");
            result = (a | b);
            document.write(result);
            document.write(linebreak);

            document.write("(a ^ b) => ");
            result = (a ^ b);
            document.write(result);
            document.write(linebreak);

            document.write("(~b) => ");
            result = (~b);
            document.write(result);
            document.write(linebreak);

            document.write("(a << b) => ");
            result = (a << b);
            document.write(result);
            document.write(linebreak);

            document.write("(a >> b) => ");
            result = (a >> b);
            document.write(result);
            document.write(linebreak);
         //-->
      </script>
      <p>Set the variables to different values and different operators and then try...</p>
   </body>
</html>
(a & b) => 2
(a | b) => 3
(a ^ b) => 1
(~b) => -4
(a << b) => 16
(a >> b) => 0
Set the variables to different values and different operators and then try...Operadores de Asignación
JavaScript admite los siguientes operadores de asignación:
| No Señor. | Operador y descripción |
|---|---|
| 1 | = (Simple Assignment ) Asigna valores del operando del lado derecho al operando del lado izquierdo Ex: C = A + B asignará el valor de A + B a C |
| 2 | += (Add and Assignment) Agrega el operando derecho al operando izquierdo y asigna el resultado al operando izquierdo. Ex: C + = A es equivalente a C = C + A |
| 3 | −= (Subtract and Assignment) Resta el operando derecho del operando izquierdo y asigna el resultado al operando izquierdo. Ex: C - = A es equivalente a C = C - A |
| 4 | *= (Multiply and Assignment) Multiplica el operando derecho por el operando izquierdo y asigna el resultado al operando izquierdo. Ex: C * = A es equivalente a C = C * A |
| 5 | /= (Divide and Assignment) Divide el operando izquierdo con el operando derecho y asigna el resultado al operando izquierdo. Ex: C / = A es equivalente a C = C / A |
| 6 | %= (Modules and Assignment) Toma el módulo usando dos operandos y asigna el resultado al operando izquierdo. Ex: C% = A es equivalente a C = C% A |
Note - La misma lógica se aplica a los operadores bit a bit, por lo que se convertirán en << =, >> =, >> =, & =, | = y ^ =.
Ejemplo
Pruebe el siguiente código para implementar el operador de asignación en JavaScript.
<html>
   <body>
      <script type = "text/javascript">
         <!--
            var a = 33;
            var b = 10;
            var linebreak = "<br />";

            document.write("Value of a => (a = b) => ");
            result = (a = b);
            document.write(result);
            document.write(linebreak);

            document.write("Value of a => (a += b) => ");
            result = (a += b);
            document.write(result);
            document.write(linebreak);

            document.write("Value of a => (a -= b) => ");
            result = (a -= b);
            document.write(result);
            document.write(linebreak);

            document.write("Value of a => (a *= b) => ");
            result = (a *= b);
            document.write(result);
            document.write(linebreak);

            document.write("Value of a => (a /= b) => ");
            result = (a /= b);
            document.write(result);
            document.write(linebreak);

            document.write("Value of a => (a %= b) => ");
            result = (a %= b);
            document.write(result);
            document.write(linebreak);
         //-->
      </script>
      <p>Set the variables to different values and different operators and then try...</p>
   </body>
</html>
Salida
Value of a => (a = b) => 10
Value of a => (a += b) => 20
Value of a => (a -= b) => 10
Value of a => (a *= b) => 100
Value of a => (a /= b) => 10
Value of a => (a %= b) => 0
Set the variables to different values and different operators and then try...
Operador misceláneo
Aquí discutiremos dos operadores que son bastante útiles en JavaScript: conditional operator (? :) y el typeof operator.
Operador condicional (? :)
El operador condicional primero evalúa una expresión para un valor verdadero o falso y luego ejecuta una de las dos declaraciones dadas dependiendo del resultado de la evaluación.
| No Señor. | Operador y descripción |
|---|---|
| 1 | ? : (Conditional ) ¿Si la condición es verdadera? Entonces valor X: De lo contrario valor Y |
Ejemplo
Pruebe el siguiente código para comprender cómo funciona el operador condicional en JavaScript.
<html>
   <body>
      <script type = "text/javascript">
         <!--
            var a = 10;
            var b = 20;
            var linebreak = "<br />";

            document.write ("((a > b) ? 100 : 200) => ");
            result = (a > b) ? 100 : 200;
            document.write(result);
            document.write(linebreak);

            document.write ("((a < b) ? 100 : 200) => ");
            result = (a < b) ? 100 : 200;
            document.write(result);
            document.write(linebreak);
         //-->
      </script>
      <p>Set the variables to different values and different operators and then try...</p>
   </body>
</html>
Salida
((a > b) ? 100 : 200) => 200
((a < b) ? 100 : 200) => 100
Set the variables to different values and different operators and then try...
tipo de operador
los typeofEl operador es un operador unario que se coloca antes de su único operando, que puede ser de cualquier tipo. Su valor es una cadena que indica el tipo de datos del operando.
El operador typeof se evalúa como "número", "cadena" o "booleano" si su operando es un número, cadena o valor booleano y devuelve verdadero o falso según la evaluación.
Aquí hay una lista de los valores devueltos para el typeof Operador.
| Tipo | Cadena devuelta por typeof |
|---|---|
| Número | "número" |
| Cuerda | "cuerda" |
| Booleano | "booleano" |
| Objeto | "objeto" |
| Función | "función" |
| Indefinido | "indefinido" |
| Nulo | "objeto" |
Ejemplo
El siguiente código muestra cómo implementar typeof operador.
<html>
   <body>
      <script type = "text/javascript">
         <!--
            var a = 10;
            var b = "String";
            var linebreak = "<br />";

            result = (typeof b == "string" ? "B is String" : "B is Numeric");
            document.write("Result => ");
            document.write(result);
            document.write(linebreak);

            result = (typeof a == "string" ? "A is String" : "A is Numeric");
            document.write("Result => ");
            document.write(result);
            document.write(linebreak);
         //-->
      </script>
      <p>Set the variables to different values and different operators and then try...</p>
   </body>
</html>
Salida
Result => B is String
Result => A is Numeric
Set the variables to different values and different operators and then try...
Mientras escribe un programa, puede haber una situación en la que necesite adoptar uno de un conjunto determinado de rutas. En tales casos, debe utilizar declaraciones condicionales que permitan a su programa tomar decisiones correctas y realizar acciones correctas.
JavaScript admite declaraciones condicionales que se utilizan para realizar diferentes acciones en función de diferentes condiciones. Aquí explicaremos elif..else declaración.
Diagrama de flujo de if-else
El siguiente diagrama de flujo muestra cómo funciona la instrucción if-else.

JavaScript admite las siguientes formas de if..else declaración -
si declaración
declaración if ... else
if ... else if ... declaración.
si declaración
los if declaración es la declaración de control fundamental que permite a JavaScript tomar decisiones y ejecutar declaraciones de forma condicional.
Sintaxis
La sintaxis de una instrucción if básica es la siguiente:
if (expression) {
   Statement(s) to be executed if expression is true
}
Aquí se evalúa una expresión de JavaScript. Si el valor resultante es verdadero, se ejecutan las declaraciones dadas. Si la expresión es falsa, no se ejecutará ninguna declaración. La mayoría de las veces, utilizará operadores de comparación al tomar decisiones.
Ejemplo
Pruebe el siguiente ejemplo para comprender cómo if funciona la declaración.
<html>
   <body>
      <script type = "text/javascript">
         <!--
            var age = 20;

            if( age > 18 ) {
               document.write("<b>Qualifies for driving</b>");
            }
         //-->
      </script>
      <p>Set the variable to different value and then try...</p>
   </body>
</html>
Salida
Qualifies for driving
Set the variable to different value and then try...
declaración if ... else
los 'if...else' declaración es la siguiente forma de declaración de control que permite a JavaScript ejecutar declaraciones de una manera más controlada.
Sintaxis
if (expression) {
   Statement(s) to be executed if expression is true
} else {
   Statement(s) to be executed if expression is false
}
Aquí se evalúa la expresión de JavaScript. Si el valor resultante es verdadero, se ejecutan las declaraciones dadas en el bloque 'if'. Si la expresión es falsa, entonces se ejecutan las declaraciones dadas en el bloque else.
Ejemplo
Pruebe el siguiente código para aprender a implementar una declaración if-else en JavaScript.
<html>
   <body>
      <script type = "text/javascript">
         <!--
            var age = 15;

            if( age > 18 ) {
               document.write("<b>Qualifies for driving</b>");
            } else {
               document.write("<b>Does not qualify for driving</b>");
            }
         //-->
      </script>
      <p>Set the variable to different value and then try...</p>
   </body>
</html>
Salida
Does not qualify for driving
Set the variable to different value and then try...
if ... else if ... declaración
los if...else if... declaración es una forma avanzada de if…else que permite a JavaScript tomar una decisión correcta a partir de varias condiciones.
Sintaxis
La sintaxis de una instrucción if-else-if es la siguiente:
if (expression 1) {
   Statement(s) to be executed if expression 1 is true
} else if (expression 2) {
   Statement(s) to be executed if expression 2 is true
} else if (expression 3) {
   Statement(s) to be executed if expression 3 is true
} else {
   Statement(s) to be executed if no expression is true
}
No hay nada especial en este código. Es solo una serie deif declaraciones, donde cada if es parte del elsecláusula de la declaración anterior. Las declaraciones se ejecutan en función de la condición verdadera, si ninguna de las condiciones es verdadera,else se ejecuta el bloque.
Ejemplo
Pruebe el siguiente código para aprender a implementar una instrucción if-else-if en JavaScript.
<html>
   <body>
      <script type = "text/javascript">
         <!--
            var book = "maths";
            if( book == "history" ) {
               document.write("<b>History Book</b>");
            } else if( book == "maths" ) {
               document.write("<b>Maths Book</b>");
            } else if( book == "economics" ) {
               document.write("<b>Economics Book</b>");
            } else {
               document.write("<b>Unknown Book</b>");
            }
         //-->
      </script>
      <p>Set the variable to different value and then try...</p>
   </body>
<html>
Salida
Maths Book
Set the variable to different value and then try...
Puede utilizar varios if...else…ifdeclaraciones, como en el capítulo anterior, para realizar una rama de múltiples vías. Sin embargo, esta no es siempre la mejor solución, especialmente cuando todas las ramas dependen del valor de una sola variable.
A partir de JavaScript 1.2, puede utilizar un switch declaración que maneja exactamente esta situación, y lo hace de manera más eficiente que la repetida if...else if declaraciones.
Diagrama de flujo
El siguiente diagrama de flujo explica que funciona una declaración de caso de cambio.
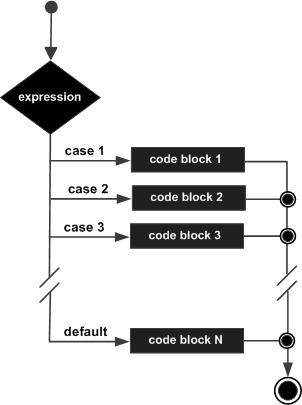
Sintaxis
El objetivo de un switchdeclaración es dar una expresión para evaluar y varias declaraciones diferentes para ejecutar en función del valor de la expresión. El intérprete revisa cadacasecontra el valor de la expresión hasta que se encuentre una coincidencia. Si nada coincide, undefault se utilizará la condición.
switch (expression) {
   case condition 1: statement(s)
   break;

   case condition 2: statement(s)
   break;
   ...

   case condition n: statement(s)
   break;

   default: statement(s)
}
los breakLas declaraciones indican el final de un caso particular. Si se omitieran, el intérprete continuaría ejecutando cada declaración en cada uno de los siguientes casos.
Te explicaremos break declaración en Loop Control capítulo.
Ejemplo
Pruebe el siguiente ejemplo para implementar la instrucción switch-case.
<html>
   <body>
      <script type = "text/javascript">
         <!--
            var grade = 'A';
            document.write("Entering switch block<br />");
            switch (grade) {
               case 'A': document.write("Good job<br />");
               break;

               case 'B': document.write("Pretty good<br />");
               break;

               case 'C': document.write("Passed<br />");
               break;

               case 'D': document.write("Not so good<br />");
               break;

               case 'F': document.write("Failed<br />");
               break;

               default:  document.write("Unknown grade<br />")
            }
            document.write("Exiting switch block");
         //-->
      </script>
      <p>Set the variable to different value and then try...</p>
   </body>
</html>
Salida
Entering switch block
Good job
Exiting switch block
Set the variable to different value and then try...
Las declaraciones de ruptura juegan un papel importante en las declaraciones de caso de cambio. Pruebe el siguiente código que usa la instrucción switch-case sin ninguna instrucción break.
<html>
   <body>
      <script type = "text/javascript">
         <!--
            var grade = 'A';
            document.write("Entering switch block<br />");
            switch (grade) {
               case 'A': document.write("Good job<br />");
               case 'B': document.write("Pretty good<br />");
               case 'C': document.write("Passed<br />");
               case 'D': document.write("Not so good<br />");
               case 'F': document.write("Failed<br />");
               default: document.write("Unknown grade<br />")
            }
            document.write("Exiting switch block");
         //-->
      </script>
      <p>Set the variable to different value and then try...</p>
   </body>
</html>
Salida
Entering switch block
Good job
Pretty good
Passed
Not so good
Failed
Unknown grade
Exiting switch block
Set the variable to different value and then try...
Mientras escribe un programa, puede encontrarse con una situación en la que necesite realizar una acción una y otra vez. En tales situaciones, necesitaría escribir declaraciones de bucle para reducir el número de líneas.
JavaScript admite todos los bucles necesarios para aliviar la presión de la programación.
El bucle while
El ciclo más básico en JavaScript es el whilebucle que se discutirá en este capítulo. El propósito de unwhile bucle es ejecutar una declaración o bloque de código repetidamente siempre que un expressiones verdad. Una vez que la expresión se vuelvefalse, el bucle termina.
Diagrama de flujo
El diagrama de flujo de while loop se ve como sigue -
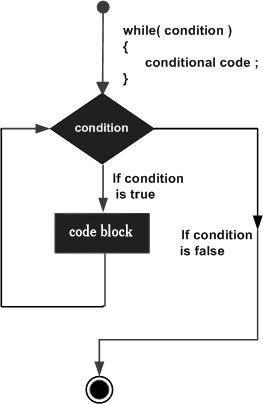
Sintaxis
La sintaxis de while loop en JavaScript es el siguiente:
while (expression) {
   Statement(s) to be executed if expression is true
}
Ejemplo
Pruebe el siguiente ejemplo para implementar el bucle while.
<html>
   <body>

      <script type = "text/javascript">
         <!--
            var count = 0;
            document.write("Starting Loop ");

            while (count < 10) {
               document.write("Current Count : " + count + "<br />");
               count++;
            }

            document.write("Loop stopped!");
         //-->
      </script>

      <p>Set the variable to different value and then try...</p>
   </body>
</html>
Salida
Starting Loop
Current Count : 0
Current Count : 1
Current Count : 2
Current Count : 3
Current Count : 4
Current Count : 5
Current Count : 6
Current Count : 7
Current Count : 8
Current Count : 9
Loop stopped!
Set the variable to different value and then try...
El do ... while Loop
los do...while bucle es similar al whilebucle excepto que la verificación de condición ocurre al final del bucle. Esto significa que el ciclo siempre se ejecutará al menos una vez, incluso si la condición esfalse.
Diagrama de flujo
El diagrama de flujo de un do-while bucle sería el siguiente:
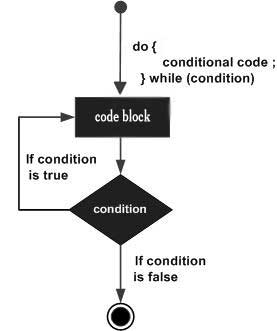
Sintaxis
La sintaxis de do-while bucle en JavaScript es el siguiente:
do {
   Statement(s) to be executed;
} while (expression);
Note - No se pierda el punto y coma que se utiliza al final de la do...while lazo.
Ejemplo
Pruebe el siguiente ejemplo para aprender a implementar un do-while bucle en JavaScript.
<html>
   <body>
      <script type = "text/javascript">
         <!--
            var count = 0;

            document.write("Starting Loop" + "<br />");
            do {
               document.write("Current Count : " + count + "<br />");
               count++;
            }

            while (count < 5);
            document.write ("Loop stopped!");
         //-->
      </script>
      <p>Set the variable to different value and then try...</p>
   </body>
</html>
Salida
Starting Loop
Current Count : 0
Current Count : 1
Current Count : 2
Current Count : 3
Current Count : 4
Loop Stopped!
Set the variable to different value and then try...
Los 'for'bucle es la forma más compacta de bucle. Incluye las siguientes tres partes importantes:
los loop initializationdonde inicializamos nuestro contador a un valor inicial. La instrucción de inicialización se ejecuta antes de que comience el ciclo.
los test statementque probará si una condición dada es verdadera o no. Si la condición es verdadera, entonces se ejecutará el código dado dentro del ciclo; de lo contrario, el control saldrá del ciclo.
los iteration statement donde puede aumentar o disminuir su contador.
Puede poner las tres partes en una sola línea separadas por punto y coma.
Diagrama de flujo
El diagrama de flujo de un for bucle en JavaScript sería el siguiente:
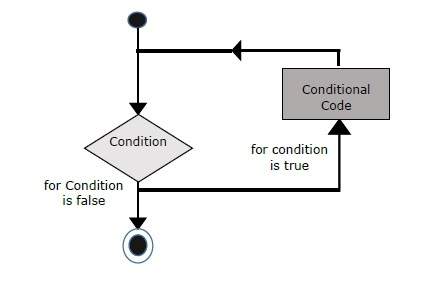
Sintaxis
La sintaxis de for loop es JavaScript es el siguiente:
for (initialization; test condition; iteration statement) {
   Statement(s) to be executed if test condition is true
}
Ejemplo
Pruebe el siguiente ejemplo para aprender cómo for bucle funciona en JavaScript.
<html>
   <body>
      <script type = "text/javascript">
         <!--
            var count;
            document.write("Starting Loop" + "<br />");

            for(count = 0; count < 10; count++) {
               document.write("Current Count : " + count );
               document.write("<br />");
            }
            document.write("Loop stopped!");
         //-->
      </script>
      <p>Set the variable to different value and then try...</p>
   </body>
</html>
Salida
Starting Loop
Current Count : 0
Current Count : 1
Current Count : 2
Current Count : 3
Current Count : 4
Current Count : 5
Current Count : 6
Current Count : 7
Current Count : 8
Current Count : 9
Loop stopped!
Set the variable to different value and then try...
los for...inEl bucle se utiliza para recorrer las propiedades de un objeto. Como todavía no hemos hablado de Objetos, es posible que no se sienta cómodo con este bucle. Pero una vez que comprenda cómo se comportan los objetos en JavaScript, este ciclo le resultará muy útil.
Sintaxis
for (variablename in object) {
   statement or block to execute
}
En cada iteración, una propiedad de object está asignado a variablename y este ciclo continúa hasta que se agotan todas las propiedades del objeto.
Ejemplo
Pruebe el siguiente ejemplo para implementar el bucle 'for-in'. Imprime el navegador webNavigator objeto.
<html>
   <body>
      <script type = "text/javascript">
         <!--
            var aProperty;
            document.write("Navigator Object Properties<br /> ");
            for (aProperty in navigator) {
               document.write(aProperty);
               document.write("<br />");
            }
            document.write ("Exiting from the loop!");
         //-->
      </script>
      <p>Set the variable to different object and then try...</p>
   </body>
</html>
Salida
Navigator Object Properties
serviceWorker
webkitPersistentStorage
webkitTemporaryStorage
geolocation
doNotTrack
onLine
languages
language
userAgent
product
platform
appVersion
appName
appCodeName
hardwareConcurrency
maxTouchPoints
vendorSub
vendor
productSub
cookieEnabled
mimeTypes
plugins
javaEnabled
getStorageUpdates
getGamepads
webkitGetUserMedia
vibrate
getBattery
sendBeacon
registerProtocolHandler
unregisterProtocolHandler
Exiting from the loop!
Set the variable to different object and then try...
JavaScript proporciona control total para manejar bucles y cambiar declaraciones. Puede haber una situación en la que necesite salir de un bucle sin llegar a su fondo. También puede haber una situación en la que desee omitir una parte de su bloque de código e iniciar la siguiente iteración del ciclo.
Para manejar todas estas situaciones, JavaScript proporciona break y continuedeclaraciones. Estas declaraciones se utilizan para salir inmediatamente de cualquier bucle o para iniciar la siguiente iteración de cualquier bucle, respectivamente.
La declaración de descanso
los breakLa instrucción, que se introdujo brevemente con la instrucción switch , se usa para salir de un bucle antes de tiempo, saliendo de las llaves que lo encierran.
Diagrama de flujo
El diagrama de flujo de una declaración de ruptura se vería de la siguiente manera:
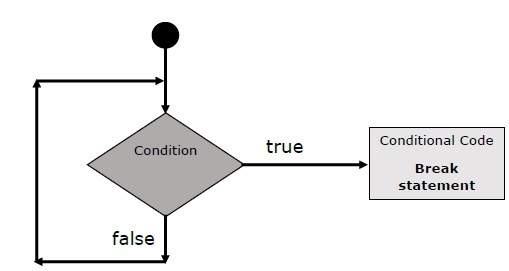
Ejemplo
El siguiente ejemplo ilustra el uso de un breakdeclaración con un bucle while. Observe cómo el bucle se rompe temprano una vezx llega a 5 y llega a document.write (..) declaración justo debajo de la llave de cierre -
<html>
   <body>
      <script type = "text/javascript">
         <!--
         var x = 1;
         document.write("Entering the loop<br /> ");

         while (x < 20) {
            if (x == 5) {
               break;   // breaks out of loop completely
            }
            x = x + 1;
            document.write( x + "<br />");
         }
         document.write("Exiting the loop!<br /> ");
         //-->
      </script>

      <p>Set the variable to different value and then try...</p>
   </body>
</html>
Salida
Entering the loop
2
3
4
5
Exiting the loop!
Set the variable to different value and then try...
Ya hemos visto el uso de break declaración en el interior a switch declaración.
La declaración continue
los continueLa instrucción le dice al intérprete que comience inmediatamente la siguiente iteración del ciclo y salte el bloque de código restante. Cuando unacontinue se encuentra la instrucción, el flujo del programa se mueve a la expresión de verificación del ciclo inmediatamente y si la condición permanece verdadera, entonces comienza la siguiente iteración; de lo contrario, el control sale del ciclo.
Ejemplo
Este ejemplo ilustra el uso de un continuedeclaración con un bucle while. Note como elcontinue La declaración se usa para omitir la impresión cuando el índice se mantiene en la variable x llega a 5 -
<html>
   <body>
      <script type = "text/javascript">
         <!--
            var x = 1;
            document.write("Entering the loop<br /> ");

            while (x < 10) {
               x = x + 1;

               if (x == 5) {
                  continue;   // skip rest of the loop body
               }
               document.write( x + "<br />");
            }
            document.write("Exiting the loop!<br /> ");
         //-->
      </script>
      <p>Set the variable to different value and then try...</p>
   </body>
</html>
Salida
Entering the loop
2
3
4
6
7
8
9
10
Exiting the loop!
Set the variable to different value and then try...
Uso de etiquetas para controlar el flujo
A partir de JavaScript 1.2, se puede utilizar una etiqueta con break y continuepara controlar el flujo con mayor precisión. UNlabeles simplemente un identificador seguido de dos puntos (:) que se aplica a una declaración o un bloque de código. Veremos dos ejemplos diferentes para entender cómo usar etiquetas con romper y continuar.
Note - No se permiten saltos de línea entre ‘continue’ o ‘break’declaración y su nombre de etiqueta. Además, no debería haber ninguna otra declaración entre el nombre de una etiqueta y el bucle asociado.
Pruebe los siguientes dos ejemplos para comprender mejor las etiquetas.
Ejemplo 1
El siguiente ejemplo muestra cómo implementar Label con una declaración break.
<html>
   <body>
      <script type = "text/javascript">
         <!--
            document.write("Entering the loop!<br /> ");
            outerloop:        // This is the label name
            for (var i = 0; i < 5; i++) {
               document.write("Outerloop: " + i + "<br />");
               innerloop:
               for (var j = 0; j < 5; j++) {
                  if (j > 3 ) break ;           // Quit the innermost loop
                  if (i == 2) break innerloop;  // Do the same thing
                  if (i == 4) break outerloop;  // Quit the outer loop
                  document.write("Innerloop: " + j + " <br />");
               }
            }
            document.write("Exiting the loop!<br /> ");
         //-->
      </script>
   </body>
</html>
Salida
Entering the loop!
Outerloop: 0
Innerloop: 0
Innerloop: 1
Innerloop: 2
Innerloop: 3
Outerloop: 1
Innerloop: 0
Innerloop: 1
Innerloop: 2
Innerloop: 3
Outerloop: 2
Outerloop: 3
Innerloop: 0
Innerloop: 1
Innerloop: 2
Innerloop: 3
Outerloop: 4
Exiting the loop!
Ejemplo 2
<html>
   <body>

      <script type = "text/javascript">
         <!--
         document.write("Entering the loop!<br /> ");
         outerloop:     // This is the label name

         for (var i = 0; i < 3; i++) {
            document.write("Outerloop: " + i + "<br />");
            for (var j = 0; j < 5; j++) {
               if (j == 3) {
                  continue outerloop;
               }
               document.write("Innerloop: " + j + "<br />");
            }
         }

         document.write("Exiting the loop!<br /> ");
         //-->
      </script>

   </body>
</html>
Salida
Entering the loop!
Outerloop: 0
Innerloop: 0
Innerloop: 1
Innerloop: 2
Outerloop: 1
Innerloop: 0
Innerloop: 1
Innerloop: 2
Outerloop: 2
Innerloop: 0
Innerloop: 1
Innerloop: 2
Exiting the loop!
Una función es un grupo de código reutilizable que se puede llamar en cualquier parte de su programa. Esto elimina la necesidad de escribir el mismo código una y otra vez. Ayuda a los programadores a escribir códigos modulares. Las funciones permiten al programador dividir un programa grande en varias funciones pequeñas y manejables.
Como cualquier otro lenguaje de programación avanzado, JavaScript también admite todas las características necesarias para escribir código modular usando funciones. Debes haber visto funciones comoalert() y write()en los capítulos anteriores. Usábamos estas funciones una y otra vez, pero se habían escrito en JavaScript central solo una vez.
JavaScript también nos permite escribir nuestras propias funciones. Esta sección explica cómo escribir sus propias funciones en JavaScript.
Definición de función
Antes de usar una función, necesitamos definirla. La forma más común de definir una función en JavaScript es utilizando elfunction palabra clave, seguida de un nombre de función único, una lista de parámetros (que pueden estar vacíos) y un bloque de instrucciones rodeado de llaves.
Sintaxis
Aquí se muestra la sintaxis básica.
<script type = "text/javascript">
   <!--
      function functionname(parameter-list) {
         statements
      }
   //-->
</script>
Ejemplo
Pruebe el siguiente ejemplo. Define una función llamada sayHello que no toma parámetros -
<script type = "text/javascript">
   <!--
      function sayHello() {
         alert("Hello there");
      }
   //-->
</script>
Llamar a una función
Para invocar una función más adelante en el script, simplemente necesitaría escribir el nombre de esa función como se muestra en el siguiente código.
<html>
   <head>
      <script type = "text/javascript">
         function sayHello() {
            document.write ("Hello there!");
         }
      </script>

   </head>

   <body>
      <p>Click the following button to call the function</p>
      <form>
         <input type = "button" onclick = "sayHello()" value = "Say Hello">
      </form>
      <p>Use different text in write method and then try...</p>
   </body>
</html>
Salida
Parámetros de función
Hasta ahora, hemos visto funciones sin parámetros. Pero existe la posibilidad de pasar diferentes parámetros al llamar a una función. Estos parámetros pasados se pueden capturar dentro de la función y cualquier manipulación se puede realizar sobre esos parámetros. Una función puede tomar varios parámetros separados por comas.
Ejemplo
Pruebe el siguiente ejemplo. Hemos modificado nuestrosayHellofuncionar aquí. Ahora se necesitan dos parámetros.
<html>
   <head>
      <script type = "text/javascript">
         function sayHello(name, age) {
            document.write (name + " is " + age + " years old.");
         }
      </script>
   </head>

   <body>
      <p>Click the following button to call the function</p>
      <form>
         <input type = "button" onclick = "sayHello('Zara', 7)" value = "Say Hello">
      </form>
      <p>Use different parameters inside the function and then try...</p>
   </body>
</html>
Salida
La declaración de devolución
Una función de JavaScript puede tener una returndeclaración. Esto es necesario si desea devolver un valor de una función. Esta declaración debe ser la última declaración de una función.
Por ejemplo, puede pasar dos números en una función y luego puede esperar que la función devuelva su multiplicación en su programa de llamada.
Ejemplo
Pruebe el siguiente ejemplo. Define una función que toma dos parámetros y los concatena antes de devolver la resultante en el programa de llamada.
<html>
   <head>
      <script type = "text/javascript">
         function concatenate(first, last) {
            var full;
            full = first + last;
            return full;
         }
         function secondFunction() {
            var result;
            result = concatenate('Zara', 'Ali');
            document.write (result );
         }
      </script>
   </head>

   <body>
      <p>Click the following button to call the function</p>
      <form>
         <input type = "button" onclick = "secondFunction()" value = "Call Function">
      </form>
      <p>Use different parameters inside the function and then try...</p>
  </body>
</html>
Salida
Hay mucho que aprender sobre las funciones de JavaScript, sin embargo, hemos cubierto los conceptos más importantes en este tutorial.
Funciones anidadas de JavaScript
Constructor de funciones JavaScript ()
Literales de funciones de JavaScript
¿Qué es un evento?
La interacción de JavaScript con HTML se maneja a través de eventos que ocurren cuando el usuario o el navegador manipula una página.
Cuando se carga la página, se denomina evento. Cuando el usuario hace clic en un botón, ese clic también es un evento. Otros ejemplos incluyen eventos como presionar cualquier tecla, cerrar una ventana, cambiar el tamaño de una ventana, etc.
Los desarrolladores pueden utilizar estos eventos para ejecutar respuestas codificadas en JavaScript, lo que hace que los botones cierren ventanas, que se muestren mensajes a los usuarios, que se validen datos y prácticamente cualquier otro tipo de respuesta imaginable.
Los eventos son parte del Nivel 3 del Modelo de Objetos de Documento (DOM) y cada elemento HTML contiene un conjunto de eventos que pueden activar el Código JavaScript.
Consulte este pequeño tutorial para comprender mejor la referencia de eventos HTML . Aquí veremos algunos ejemplos para comprender una relación entre Event y JavaScript:
Tipo de evento al hacer clic
Este es el tipo de evento más utilizado que ocurre cuando un usuario hace clic con el botón izquierdo de su mouse. Puede poner su validación, advertencia, etc., contra este tipo de evento.
Ejemplo
Pruebe el siguiente ejemplo.
<html>
   <head>
      <script type = "text/javascript">
         <!--
            function sayHello() {
               alert("Hello World")
            }
         //-->
      </script>
   </head>

   <body>
      <p>Click the following button and see result</p>
      <form>
         <input type = "button" onclick = "sayHello()" value = "Say Hello" />
      </form>
   </body>
</html>
Salida
Tipo de evento onsubmit
onsubmites un evento que ocurre cuando intenta enviar un formulario. Puede comparar la validación de su formulario con este tipo de evento.
Ejemplo
El siguiente ejemplo muestra cómo usar onsubmit. Aquí estamos llamando avalidate()función antes de enviar un formulario de datos al servidor web. Sivalidate() La función devuelve verdadero, se enviará el formulario; de lo contrario, no enviará los datos.
Pruebe el siguiente ejemplo.
<html>
   <head>
      <script type = "text/javascript">
         <!--
            function validation() {
               all validation goes here
               .........
               return either true or false
            }
         //-->
      </script>
   </head>

   <body>
      <form method = "POST" action = "t.cgi" onsubmit = "return validate()">
         .......
         <input type = "submit" value = "Submit" />
      </form>
   </body>
</html>
onmouseover y onmouseout
Estos dos tipos de eventos te ayudarán a crear efectos agradables con imágenes o incluso con texto. losonmouseover El evento se activa cuando coloca el mouse sobre cualquier elemento y el onmouseoutse activa cuando mueve el mouse fuera de ese elemento. Pruebe el siguiente ejemplo.
<html>
   <head>
      <script type = "text/javascript">
         <!--
            function over() {
               document.write ("Mouse Over");
            }
            function out() {
               document.write ("Mouse Out");
            }
         //-->
      </script>
   </head>

   <body>
      <p>Bring your mouse inside the division to see the result:</p>
      <div onmouseover = "over()" onmouseout = "out()">
         <h2> This is inside the division </h2>
      </div>
   </body>
</html>
Salida
Eventos estándar HTML 5
Los eventos estándar de HTML 5 se enumeran aquí para su referencia. Aquí el script indica una función de Javascript que se ejecutará contra ese evento.
| Atributo | Valor | Descripción |
|---|---|---|
| Desconectado | guión | Se activa cuando el documento se desconecta |
| Onabort | guión | Desencadenantes de un evento de aborto |
| onafterprint | guión | Se activa después de que se imprime el documento |
| onbeforeonload | guión | Se activa antes de que se cargue el documento |
| onbeforeprint | guión | Se activa antes de que se imprima el documento |
| en la falta de definición | guión | Se activa cuando la ventana pierde el foco |
| oncanplay | guión | Se activa cuando los medios pueden comenzar a reproducirse, pero es posible que deba detenerse para almacenar en búfer |
| oncanplaythrough | guión | Se activa cuando los medios se pueden reproducir hasta el final, sin detenerse para almacenar en búfer |
| onchange | guión | Se activa cuando cambia un elemento |
| al hacer clic | guión | Disparadores con un clic del mouse |
| oncontextmenu | guión | Se activa cuando se activa un menú contextual |
| ondblclick | guión | Disparadores en un doble clic del mouse |
| ondrag | guión | Se activa cuando se arrastra un elemento |
| ondragend | guión | Disparadores al final de una operación de arrastre |
| ondragenter | guión | Se activa cuando un elemento se ha arrastrado a un destino de colocación válido |
| ondragleave | guión | Se activa cuando un elemento se arrastra sobre un destino de colocación válido |
| ondragover | guión | Desencadenantes al inicio de una operación de arrastre |
| ondragstart | guión | Desencadenantes al inicio de una operación de arrastre |
| ondrop | guión | Se activa cuando se suelta el elemento arrastrado |
| ondurationchange | guión | Se activa cuando se cambia la longitud del medio |
| uno vacio | guión | Se activa cuando un elemento de recurso multimedia se vacía de repente. |
| terminado | guión | Se activa cuando los medios han llegado al final |
| onerror | guión | Se activa cuando ocurre un error |
| enfocado | guión | Se activa cuando la ventana se enfoca |
| onformchange | guión | Se activa cuando cambia un formulario |
| onforminput | guión | Se activa cuando un formulario recibe la entrada del usuario |
| onhaschange | guión | Se activa cuando el documento ha cambiado |
| en entrada | guión | Se activa cuando un elemento recibe la entrada del usuario |
| no válido | guión | Se activa cuando un elemento no es válido |
| onkeydown | guión | Se activa cuando se presiona una tecla |
| onkeypress | guión | Se activa cuando se presiona y se suelta una tecla |
| onkeyup | guión | Se activa cuando se suelta una tecla |
| onload | guión | Se activa cuando se carga el documento |
| onloadeddata | guión | Se activa cuando se cargan datos de medios |
| onloadedmetadata | guión | Se activa cuando se carga la duración y otros datos multimedia de un elemento multimedia |
| onloadstart | guión | Se activa cuando el navegador comienza a cargar los datos multimedia. |
| onmensaje | guión | Se activa cuando se activa el mensaje |
| onmousedown | guión | Se activa cuando se presiona un botón del mouse |
| onmousemove | guión | Se activa cuando se mueve el puntero del mouse |
| onmouseout | guión | Se activa cuando el puntero del mouse se mueve fuera de un elemento |
| el ratón por encima | guión | Se activa cuando el puntero del mouse se mueve sobre un elemento |
| onmouseup | guión | Se activa cuando se suelta un botón del mouse |
| onmousewheel | guión | Se activa cuando se gira la rueda del mouse |
| en línea | guión | Se activa cuando el documento se desconecta |
| onoine | guión | Se activa cuando el documento entra en línea |
| en línea | guión | Se activa cuando el documento entra en línea |
| onpagehide | guión | Se activa cuando la ventana está oculta |
| onpagehow | guión | Se activa cuando la ventana se vuelve visible |
| en pausa | guión | Se activa cuando los datos multimedia están en pausa |
| onplay | guión | Se activa cuando los datos multimedia van a comenzar a reproducirse |
| jugando | guión | Se activa cuando los datos multimedia comienzan a reproducirse |
| onpopstate | guión | Se activa cuando cambia el historial de la ventana |
| en progreso | guión | Se activa cuando el navegador está recuperando los datos multimedia. |
| onratechange | guión | Se activa cuando la velocidad de reproducción de los datos multimedia ha cambiado |
| onreadystatechange | guión | Se activa cuando cambia el estado listo |
| onredo | guión | Se activa cuando el documento realiza un rehacer |
| onresize | guión | Se activa cuando se cambia el tamaño de la ventana |
| onscroll | guión | Se activa cuando se desplaza la barra de desplazamiento de un elemento |
| buscado | guión | Se activa cuando el atributo de búsqueda de un elemento de los medios ya no es verdadero y la búsqueda ha finalizado. |
| en busca | guión | Se activa cuando el atributo de búsqueda de un elemento de los medios es verdadero y la búsqueda ha comenzado |
| en seleccionar | guión | Se activa cuando se selecciona un elemento |
| instalado | guión | Se activa cuando hay un error al obtener datos multimedia. |
| almacenamiento | guión | Se activa cuando se carga un documento |
| onsubmit | guión | Se activa cuando se envía un formulario |
| suspender | guión | Se activa cuando el navegador ha estado obteniendo datos multimedia, pero se detuvo antes de que se obtuviera todo el archivo multimedia. |
| ontimeupdate | guión | Se activa cuando el medio cambia su posición de reproducción |
| onundo | guión | Se activa cuando un documento realiza una operación de deshacer |
| descargar | guión | Se activa cuando el usuario abandona el documento. |
| onvolumechange | guión | Se activa cuando los medios cambian el volumen, también cuando el volumen está configurado en "silencio" |
| en espera | guión | Se activa cuando el contenido multimedia ha dejado de reproducirse, pero se espera que se reanude |
¿Qué son las cookies?
Los navegadores y servidores web utilizan el protocolo HTTP para comunicarse y HTTP es un protocolo sin estado. Pero para un sitio web comercial, se requiere mantener la información de la sesión entre diferentes páginas. Por ejemplo, el registro de un usuario finaliza después de completar muchas páginas. Pero cómo mantener la información de la sesión de los usuarios en todas las páginas web.
En muchas situaciones, el uso de cookies es el método más eficiente para recordar y rastrear preferencias, compras, comisiones y otra información requerida para una mejor experiencia del visitante o estadísticas del sitio.
Cómo funciona ?
Su servidor envía algunos datos al navegador del visitante en forma de cookie. El navegador puede aceptar la cookie. Si es así, se almacena como un registro de texto sin formato en el disco duro del visitante. Ahora, cuando el visitante llega a otra página de su sitio, el navegador envía la misma cookie al servidor para su recuperación. Una vez recuperado, su servidor sabe / recuerda lo que se almacenó anteriormente.
Las cookies son un registro de datos de texto sin formato de 5 campos de longitud variable:
Expires- La fecha de caducidad de la cookie. Si está en blanco, la cookie caducará cuando el visitante salga del navegador.
Domain - El nombre de dominio de su sitio.
Path- La ruta al directorio o página web que instaló la cookie. Esto puede estar en blanco si desea recuperar la cookie de cualquier directorio o página.
Secure- Si este campo contiene la palabra "seguro", la cookie solo se puede recuperar con un servidor seguro. Si este campo está en blanco, no existe tal restricción.
Name=Value - Las cookies se configuran y recuperan en forma de pares clave-valor
Las cookies se diseñaron originalmente para la programación CGI. Los datos contenidos en una cookie se transmiten automáticamente entre el navegador web y el servidor web, por lo que los scripts CGI en el servidor pueden leer y escribir valores de cookies que se almacenan en el cliente.
JavaScript también puede manipular las cookies mediante el cookie propiedad de la Documentobjeto. JavaScript puede leer, crear, modificar y eliminar las cookies que se aplican a la página web actual.
Almacenamiento de cookies
La forma más sencilla de crear una cookie es asignar un valor de cadena al objeto document.cookie, que tiene este aspecto.
document.cookie = "key1 = value1;key2 = value2;expires = date";Aquí el expiresEl atributo es opcional. Si proporciona a este atributo una fecha u hora válida, la cookie caducará en una fecha u hora determinadas y, a partir de entonces, no se podrá acceder al valor de las cookies.
Note- Los valores de las cookies no pueden incluir punto y coma, comas ni espacios en blanco. Por esta razón, es posible que desee utilizar JavaScriptescape()función para codificar el valor antes de almacenarlo en la cookie. Si hace esto, también tendrá que usar el correspondienteunescape() función cuando lee el valor de la cookie.
Ejemplo
Intente lo siguiente. Establece un nombre de cliente en una cookie de entrada.
<html>
   <head>
      <script type = "text/javascript">
         <!--
            function WriteCookie() {
               if( document.myform.customer.value == "" ) {
                  alert("Enter some value!");
                  return;
               }
               cookievalue = escape(document.myform.customer.value) + ";";
               document.cookie = "name=" + cookievalue;
               document.write ("Setting Cookies : " + "name=" + cookievalue );
            }
         //-->
      </script>
   </head>

   <body>
      <form name = "myform" action = "">
         Enter name: <input type = "text" name = "customer"/>
         <input type = "button" value = "Set Cookie" onclick = "WriteCookie();"/>
      </form>
   </body>
</html>
Salida
Ahora su máquina tiene una cookie llamada name. Puede configurar varias cookies utilizando varios pares clave = valor separados por comas.
Leer cookies
Leer una cookie es tan simple como escribir una, porque el valor del objeto document.cookie es la cookie. Por lo tanto, puede utilizar esta cadena siempre que desee acceder a la cookie. La cadena document.cookie mantendrá una lista de pares nombre = valor separados por punto y coma, dondename es el nombre de una cookie y el valor es su valor de cadena.
Puedes usar cadenas ' split() función para dividir una cadena en clave y valores de la siguiente manera:
Ejemplo
Pruebe el siguiente ejemplo para obtener todas las cookies.
<html>
   <head>
      <script type = "text/javascript">
         <!--
            function ReadCookie() {
               var allcookies = document.cookie;
               document.write ("All Cookies : " + allcookies );

               // Get all the cookies pairs in an array
               cookiearray = allcookies.split(';');

               // Now take key value pair out of this array
               for(var i=0; i<cookiearray.length; i++) {
                  name = cookiearray[i].split('=')[0];
                  value = cookiearray[i].split('=')[1];
                  document.write ("Key is : " + name + " and Value is : " + value);
               }
            }
         //-->
      </script>
   </head>

   <body>
      <form name = "myform" action = "">
         <p> click the following button and see the result:</p>
         <input type = "button" value = "Get Cookie" onclick = "ReadCookie()"/>
      </form>
   </body>
</html>
Note - aquí length es un método de Arrayclase que devuelve la longitud de una matriz. Discutiremos las matrices en un capítulo aparte. En ese momento, intente digerirlo.
Note- Es posible que ya haya otras cookies configuradas en su máquina. El código anterior mostrará todas las cookies configuradas en su máquina.
Configuración de la fecha de vencimiento de las cookies
Puede extender la vida de una cookie más allá de la sesión actual del navegador configurando una fecha de vencimiento y guardando la fecha de vencimiento dentro de la cookie. Esto se puede hacer configurando el‘expires’ atribuir a una fecha y hora.
Ejemplo
Pruebe el siguiente ejemplo. Ilustra cómo extender la fecha de caducidad de una cookie en 1 mes.
<html>
   <head>
      <script type = "text/javascript">
         <!--
            function WriteCookie() {
               var now = new Date();
               now.setMonth( now.getMonth() + 1 );
               cookievalue = escape(document.myform.customer.value) + ";"

               document.cookie = "name=" + cookievalue;
               document.cookie = "expires=" + now.toUTCString() + ";"
               document.write ("Setting Cookies : " + "name=" + cookievalue );
            }
         //-->
      </script>
   </head>

   <body>
      <form name = "myform" action = "">
         Enter name: <input type = "text" name = "customer"/>
         <input type = "button" value = "Set Cookie" onclick = "WriteCookie()"/>
      </form>
   </body>
</html>
Salida
Eliminar una cookie
A veces, querrá eliminar una cookie para que los intentos posteriores de leer la cookie no devuelvan nada. Para hacer esto, solo necesita establecer la fecha de vencimiento en un tiempo en el pasado.
Ejemplo
Pruebe el siguiente ejemplo. Ilustra cómo eliminar una cookie estableciendo su fecha de vencimiento en un mes por detrás de la fecha actual.
<html>
   <head>
      <script type = "text/javascript">
         <!--
            function WriteCookie() {
               var now = new Date();
               now.setMonth( now.getMonth() - 1 );
               cookievalue = escape(document.myform.customer.value) + ";"

               document.cookie = "name=" + cookievalue;
               document.cookie = "expires=" + now.toUTCString() + ";"
               document.write("Setting Cookies : " + "name=" + cookievalue );
            }
          //-->
      </script>
   </head>

   <body>
      <form name = "myform" action = "">
         Enter name: <input type = "text" name = "customer"/>
         <input type = "button" value = "Set Cookie" onclick = "WriteCookie()"/>
      </form>
   </body>
</html>
Salida
¿Qué es la redirección de página?
Es posible que haya encontrado una situación en la que hizo clic en una URL para llegar a una página X, pero internamente se le dirigió a otra página Y. Ocurre debido a page redirection. Este concepto es diferente al de Actualización de página de JavaScript .
Puede haber varias razones por las que le gustaría redirigir a un usuario desde la página original. Enumeramos algunas de las razones:
No le gustó el nombre de su dominio y se está mudando a uno nuevo. En tal escenario, es posible que desee dirigir a todos sus visitantes al nuevo sitio. Aquí puede mantener su antiguo dominio, pero coloque una sola página con una redirección de página de modo que todos los visitantes de su antiguo dominio puedan acceder a su nuevo dominio.
Ha creado varias páginas según las versiones del navegador o sus nombres o puede estar basado en diferentes países, entonces, en lugar de utilizar la redirección de la página del lado del servidor, puede utilizar la redirección de la página del lado del cliente para que sus usuarios accedan a la página correspondiente.
Es posible que los motores de búsqueda ya hayan indexado sus páginas. Pero mientras se traslada a otro dominio, no le gustaría perder a sus visitantes provenientes de los motores de búsqueda. Entonces puede usar la redirección de página del lado del cliente. Pero tenga en cuenta que esto no debe hacerse para engañar al motor de búsqueda, ya que podría hacer que su sitio sea prohibido.
¿Cómo funciona la redirección de página?
Las implementaciones de Page-Redirection son las siguientes.
Ejemplo 1
Es bastante simple hacer una redirección de página usando JavaScript en el lado del cliente. Para redirigir a los visitantes de su sitio a una nueva página, solo necesita agregar una línea en la sección de encabezado de la siguiente manera.
<html>
   <head>
      <script type = "text/javascript">
         <!--
            function Redirect() {
               window.location = "https://www.tutorialspoint.com";
            }
         //-->
      </script>
   </head>

   <body>
      <p>Click the following button, you will be redirected to home page.</p>

      <form>
         <input type = "button" value = "Redirect Me" onclick = "Redirect();" />
      </form>

   </body>
</html>
Salida
Ejemplo 2
Puede mostrar un mensaje apropiado a los visitantes de su sitio antes de redirigirlos a una nueva página. Esto necesitaría un poco de retraso para cargar una nueva página. El siguiente ejemplo muestra cómo implementar el mismo. aquísetTimeout() es una función JavaScript incorporada que se puede utilizar para ejecutar otra función después de un intervalo de tiempo determinado.
<html>
   <head>
      <script type = "text/javascript">
         <!--
            function Redirect() {
               window.location = "https://www.tutorialspoint.com";
            }
            document.write("You will be redirected to main page in 10 sec.");
            setTimeout('Redirect()', 10000);
         //-->
      </script>
   </head>

   <body>
   </body>
</html>
Salida
You will be redirected to tutorialspoint.com main page in 10 seconds!Ejemplo 3
El siguiente ejemplo muestra cómo redirigir a los visitantes de su sitio a una página diferente según sus navegadores.
<html>
   <head>
      <script type = "text/javascript">
         <!--
            var browsername = navigator.appName;
            if( browsername == "Netscape" ) {
               window.location = "http://www.location.com/ns.htm";
            } else if ( browsername =="Microsoft Internet Explorer") {
               window.location = "http://www.location.com/ie.htm";
            } else {
               window.location = "http://www.location.com/other.htm";
            }
         //-->
      </script>
   </head>

   <body>
   </body>
</html>
JavaScript admite tres tipos importantes de cuadros de diálogo. Estos cuadros de diálogo se pueden usar para generar y alertar, o para obtener confirmación sobre cualquier entrada o para tener algún tipo de entrada de los usuarios. Aquí discutiremos cada cuadro de diálogo uno por uno.
Cuadro de diálogo de alerta
Un cuadro de diálogo de alerta se utiliza principalmente para dar un mensaje de advertencia a los usuarios. Por ejemplo, si un campo de entrada requiere ingresar algún texto pero el usuario no proporciona ninguna entrada, entonces, como parte de la validación, puede usar un cuadro de alerta para dar un mensaje de advertencia.
No obstante, un cuadro de alerta aún se puede usar para mensajes más amigables. El cuadro de alerta proporciona solo un botón "Aceptar" para seleccionar y continuar.
Ejemplo
<html>
   <head>
      <script type = "text/javascript">
         <!--
            function Warn() {
               alert ("This is a warning message!");
               document.write ("This is a warning message!");
            }
         //-->
      </script>
   </head>

   <body>
      <p>Click the following button to see the result: </p>
      <form>
         <input type = "button" value = "Click Me" onclick = "Warn();" />
      </form>
   </body>
</html>
Salida
Cuadro de diálogo de confirmación
Un cuadro de diálogo de confirmación se utiliza principalmente para obtener el consentimiento del usuario sobre cualquier opción. Muestra un cuadro de diálogo con dos botones:OK y Cancel.
Si el usuario hace clic en el botón Aceptar, el método de la ventana confirm()volverá verdadero. Si el usuario hace clic en el botón Cancelar, entoncesconfirm()devuelve falso. Puede utilizar un cuadro de diálogo de confirmación de la siguiente manera.
Ejemplo
<html>
   <head>
      <script type = "text/javascript">
         <!--
            function getConfirmation() {
               var retVal = confirm("Do you want to continue ?");
               if( retVal == true ) {
                  document.write ("User wants to continue!");
                  return true;
               } else {
                  document.write ("User does not want to continue!");
                  return false;
               }
            }
         //-->
      </script>
   </head>

   <body>
      <p>Click the following button to see the result: </p>
      <form>
         <input type = "button" value = "Click Me" onclick = "getConfirmation();" />
      </form>
   </body>
</html>
Salida
Cuadro de diálogo de solicitud
El cuadro de diálogo de solicitud es muy útil cuando desea que aparezca un cuadro de texto para obtener la entrada del usuario. Por lo tanto, le permite interactuar con el usuario. El usuario debe completar el campo y luego hacer clic en Aceptar.
Este cuadro de diálogo se muestra mediante un método llamado prompt() que toma dos parámetros: (i) una etiqueta que desea mostrar en el cuadro de texto y (ii) una cadena predeterminada para mostrar en el cuadro de texto.
Este cuadro de diálogo tiene dos botones: OK y Cancel. Si el usuario hace clic en el botón Aceptar, el método de la ventanaprompt()devolverá el valor introducido en el cuadro de texto. Si el usuario hace clic en el botón Cancelar, el método de la ventanaprompt() devoluciones null.
Ejemplo
El siguiente ejemplo muestra cómo utilizar un cuadro de diálogo de solicitud:
<html>
   <head>
      <script type = "text/javascript">
         <!--
            function getValue() {
               var retVal = prompt("Enter your name : ", "your name here");
               document.write("You have entered : " + retVal);
            }
         //-->
      </script>
   </head>

   <body>
      <p>Click the following button to see the result: </p>
      <form>
         <input type = "button" value = "Click Me" onclick = "getValue();" />
      </form>
   </body>
</html>
Salida
voides una palabra clave importante en JavaScript que puede usarse como un operador unario que aparece antes de su único operando, que puede ser de cualquier tipo. Este operador especifica una expresión que se evaluará sin devolver un valor.
Sintaxis
La sintaxis de void puede ser cualquiera de los dos siguientes:
<head>
   <script type = "text/javascript">
      <!--
         void func()
         javascript:void func()
         or:
         void(func())
         javascript:void(func())
      //-->
   </script>
</head>
Ejemplo 1
El uso más común de este operador es en un javascript: URL del lado del cliente , donde le permite evaluar una expresión por sus efectos secundarios sin que el navegador muestre el valor de la expresión evaluada.
Aquí la expresión alert ('Warning!!!') se evalúa pero no se vuelve a cargar en el documento actual -
<html>
   <head>
      <script type = "text/javascript">
         <!--
         //-->
      </script>
   </head>

   <body>
      <p>Click the following, This won't react at all...</p>
      <a href = "javascript:void(alert('Warning!!!'))">Click me!</a>
   </body>
</html>
Salida
Ejemplo 2
Eche un vistazo al siguiente ejemplo. El siguiente enlace no hace nada porque la expresión "0" no tiene ningún efecto en JavaScript. Aquí se evalúa la expresión "0", pero no se vuelve a cargar en el documento actual.
<html>
   <head>
      <script type = "text/javascript">
         <!--
         //-->
      </script>
   </head>

   <body>
      <p>Click the following, This won't react at all...</p>
      <a href = "javascript:void(0)">Click me!</a>
   </body>
</html>
Salida
Ejemplo 3
Otro uso de void es generar deliberadamente el undefined valor de la siguiente manera.
<html>
   <head>
      <script type = "text/javascript">
         <!--
            function getValue() {
               var a,b,c;

               a = void ( b = 5, c = 7 );
               document.write('a = ' + a + ' b = ' + b +' c = ' + c );
            }
         //-->
      </script>
   </head>

   <body>
      <p>Click the following to see the result:</p>
      <form>
         <input type = "button" value = "Click Me" onclick = "getValue();" />
      </form>
   </body>
</html>
Salida
Muchas veces le gustaría colocar un botón en su página web para imprimir el contenido de esa página web a través de una impresora real. JavaScript le ayuda a implementar esta funcionalidad utilizando elprint funcion de window objeto.
La función de impresión de JavaScript window.print()imprime la página web actual cuando se ejecuta. Puede llamar a esta función directamente usando elonclick evento como se muestra en el siguiente ejemplo.
Ejemplo
Pruebe el siguiente ejemplo.
<html>
   <head>
      <script type = "text/javascript">
         <!--
         //-->
      </script>
   </head>

   <body>
      <form>
         <input type = "button" value = "Print" onclick = "window.print()" />
      </form>
   </body>
<html>
Salida
Aunque sirve para obtener una impresión, no es una forma recomendada. Una página fácil de imprimir es realmente una página con texto, sin imágenes, gráficos o publicidad.
Puede imprimir una página de las siguientes formas:
Haga una copia de la página y omita el texto y los gráficos no deseados, luego enlace a esa página para imprimir desde el original. Ver ejemplo .
Si no desea conservar una copia adicional de una página, puede marcar su texto imprimible utilizando comentarios adecuados como <! y luego puede usar PERL o cualquier otro script en segundo plano para purgar el texto imprimible y mostrarlo para la impresión final. En Tutorialspoint utilizamos este método para proporcionar la posibilidad de imprimir a los visitantes de nuestro sitio.
¿Cómo imprimir una página?
Si no encuentra las funciones anteriores en una página web, puede utilizar la barra de herramientas estándar del navegador para imprimir la página web. Siga el enlace de la siguiente manera.
File → Print → Click OK button.JavaScript es un lenguaje de programación orientada a objetos (OOP). Un lenguaje de programación puede llamarse orientado a objetos si proporciona cuatro capacidades básicas a los desarrolladores:
Encapsulation - la capacidad de almacenar información relacionada, ya sean datos o métodos, juntos en un objeto.
Aggregation - la capacidad de almacenar un objeto dentro de otro objeto.
Inheritance - la capacidad de una clase de depender de otra clase (o número de clases) para algunas de sus propiedades y métodos.
Polymorphism - la capacidad de escribir una función o método que funcione de diversas formas.
Los objetos se componen de atributos. Si un atributo contiene una función, se considera un método del objeto; de lo contrario, el atributo se considera una propiedad.
Propiedades del objeto
Las propiedades del objeto pueden ser cualquiera de los tres tipos de datos primitivos o cualquiera de los tipos de datos abstractos, como otro objeto. Las propiedades del objeto suelen ser variables que se utilizan internamente en los métodos del objeto, pero también pueden ser variables visibles globalmente que se utilizan en toda la página.
La sintaxis para agregar una propiedad a un objeto es:
objectName.objectProperty = propertyValue;For example - El siguiente código obtiene el título del documento usando el "title" propiedad de la document objeto.
var str = document.title;Métodos de objetos
Los métodos son las funciones que permiten que el objeto haga algo o que le hagan algo. Hay una pequeña diferencia entre una función y un método: en una función hay una unidad independiente de declaraciones y un método se adjunta a un objeto y puede ser referenciado por elthis palabra clave.
Los métodos son útiles para todo, desde mostrar el contenido del objeto en la pantalla hasta realizar operaciones matemáticas complejas en un grupo de propiedades y parámetros locales.
For example - A continuación se muestra un ejemplo sencillo para mostrar cómo utilizar el write() método de objeto de documento para escribir cualquier contenido en el documento.
document.write("This is test");Objetos definidos por el usuario
Todos los objetos definidos por el usuario y los objetos integrados son descendientes de un objeto llamado Object.
El nuevo operador
los newEl operador se utiliza para crear una instancia de un objeto. Para crear un objeto, elnew El operador es seguido por el método constructor.
En el siguiente ejemplo, los métodos de constructor son Object (), Array () y Date (). Estos constructores son funciones JavaScript integradas.
var employee = new Object();
var books = new Array("C++", "Perl", "Java");
var day = new Date("August 15, 1947");
El constructor Object ()
Un constructor es una función que crea e inicializa un objeto. JavaScript proporciona una función de constructor especial llamadaObject()para construir el objeto. El valor de retorno delObject() El constructor se asigna a una variable.
La variable contiene una referencia al nuevo objeto. Las propiedades asignadas al objeto no son variables y no están definidas con elvar palabra clave.
Ejemplo 1
Pruebe el siguiente ejemplo; demuestra cómo crear un objeto.
<html>
   <head>
      <title>User-defined objects</title>
      <script type = "text/javascript">
         var book = new Object();   // Create the object
         book.subject = "Perl";     // Assign properties to the object
         book.author  = "Mohtashim";
      </script>
   </head>

   <body>
      <script type = "text/javascript">
         document.write("Book name is : " + book.subject + "<br>");
         document.write("Book author is : " + book.author + "<br>");
      </script>
   </body>
</html>
Salida
Book name is : Perl
Book author is : Mohtashim
Ejemplo 2
Este ejemplo demuestra cómo crear un objeto con una función definida por el usuario. aquíthis La palabra clave se utiliza para hacer referencia al objeto que se ha pasado a una función.
<html>
   <head>
   <title>User-defined objects</title>
      <script type = "text/javascript">
         function book(title, author) {
            this.title = title;
            this.author  = author;
         }
      </script>
   </head>

   <body>
      <script type = "text/javascript">
         var myBook = new book("Perl", "Mohtashim");
         document.write("Book title is : " + myBook.title + "<br>");
         document.write("Book author is : " + myBook.author + "<br>");
      </script>
   </body>
</html>
Salida
Book title is : Perl
Book author is : Mohtashim
Definición de métodos para un objeto
Los ejemplos anteriores demuestran cómo el constructor crea el objeto y asigna propiedades. Pero necesitamos completar la definición de un objeto asignándole métodos.
Ejemplo
Pruebe el siguiente ejemplo; muestra cómo agregar una función junto con un objeto.
<html>

   <head>
   <title>User-defined objects</title>
      <script type = "text/javascript">
         // Define a function which will work as a method
         function addPrice(amount) {
            this.price = amount;
         }

         function book(title, author) {
            this.title = title;
            this.author  = author;
            this.addPrice = addPrice;  // Assign that method as property.
         }
      </script>
   </head>

   <body>
      <script type = "text/javascript">
         var myBook = new book("Perl", "Mohtashim");
         myBook.addPrice(100);

         document.write("Book title is : " + myBook.title + "<br>");
         document.write("Book author is : " + myBook.author + "<br>");
         document.write("Book price is : " + myBook.price + "<br>");
      </script>
   </body>
</html>
Salida
Book title is : Perl
Book author is : Mohtashim
Book price is : 100
La palabra clave 'con'
los ‘with’ La palabra clave se utiliza como una especie de abreviatura para hacer referencia a las propiedades o métodos de un objeto.
El objeto especificado como argumento para withse convierte en el objeto predeterminado durante la duración del bloque que sigue. Las propiedades y métodos del objeto se pueden utilizar sin nombrar el objeto.
Sintaxis
La sintaxis de with object es la siguiente:
with (object) {
   properties used without the object name and dot
}
Ejemplo
Pruebe el siguiente ejemplo.
<html>
   <head>
   <title>User-defined objects</title>
      <script type = "text/javascript">
         // Define a function which will work as a method
         function addPrice(amount) {
            with(this) {
               price = amount;
            }
         }
         function book(title, author) {
            this.title = title;
            this.author = author;
            this.price = 0;
            this.addPrice = addPrice;  // Assign that method as property.
         }
      </script>
   </head>

   <body>
      <script type = "text/javascript">
         var myBook = new book("Perl", "Mohtashim");
         myBook.addPrice(100);

         document.write("Book title is : " + myBook.title + "<br>");
         document.write("Book author is : " + myBook.author + "<br>");
         document.write("Book price is : " + myBook.price + "<br>");
      </script>
   </body>
</html>
Salida
Book title is : Perl
Book author is : Mohtashim
Book price is : 100
Objetos nativos de JavaScript
JavaScript tiene varios objetos nativos o integrados. Estos objetos son accesibles en cualquier parte de su programa y funcionarán de la misma manera en cualquier navegador que se ejecute en cualquier sistema operativo.
Aquí está la lista de todos los objetos nativos JavaScript importantes:
Objeto de número de JavaScript
Objeto booleano JavaScript
Objeto de cadena JavaScript
Objeto de matriz de JavaScript
Objeto de fecha de JavaScript
Objeto matemático JavaScript
Objeto JavaScript RegExp
los NumberEl objeto representa una fecha numérica, ya sea enteros o números de punto flotante. En general, no necesita preocuparse porNumber objetos porque el navegador convierte automáticamente literales numéricos en instancias de la clase numérica.
Sintaxis
La sintaxis para crear un number El objeto es el siguiente:
var val = new Number(number);En lugar de número, si proporciona cualquier argumento que no sea un número, entonces el argumento no se puede convertir en un número, devuelve NaN (No un número).
Propiedades numéricas
Aquí hay una lista de cada propiedad y su descripción.
| No Señor. | Descripción de propiedad |
|---|---|
| 1 | VALOR MÁXIMO El valor más grande posible que un número en JavaScript puede tener 1.7976931348623157E + 308 |
| 2 | MIN_VALUE El valor más pequeño posible que puede tener un número en JavaScript 5E-324 |
| 3 | Yaya Igual a un valor que no es un número. |
| 4 | NEGATIVE_INFINITY Un valor menor que MIN_VALUE. |
| 5 | POSITIVE_INFINITY Un valor mayor que MAX_VALUE |
| 6 | prototipo Una propiedad estática del objeto Number. Utilice la propiedad de prototipo para asignar nuevas propiedades y métodos al objeto Número en el documento actual |
| 7 | constructor Returns the function that created this object's instance. By default this is the Number object. |
In the following sections, we will take a few examples to demonstrate the properties of Number.
Number Methods
The Number object contains only the default methods that are a part of every object's definition.
| Sr.No. | Method & Description |
|---|---|
| 1 | toExponential() Forces a number to display in exponential notation, even if the number is in the range in which JavaScript normally uses standard notation. |
| 2 | toFixed() Formats a number with a specific number of digits to the right of the decimal. |
| 3 | toLocaleString() Returns a string value version of the current number in a format that may vary according to a browser's local settings. |
| 4 | toPrecision() Defines how many total digits (including digits to the left and right of the decimal) to display of a number. |
| 5 | toString() Returns the string representation of the number's value. |
| 6 | valueOf() Returns the number's value. |
In the following sections, we will have a few examples to explain the methods of Number.
The Boolean object represents two values, either "true" or "false". If value parameter is omitted or is 0, -0, null, false, NaN, undefined, or the empty string (""), the object has an initial value of false.
Syntax
Use the following syntax to create a boolean object.
var val = new Boolean(value);Boolean Properties
Here is a list of the properties of Boolean object −
| Sr.No. | Property & Description |
|---|---|
| 1 | constructor Returns a reference to the Boolean function that created the object. |
| 2 | prototype The prototype property allows you to add properties and methods to an object. |
In the following sections, we will have a few examples to illustrate the properties of Boolean object.
Boolean Methods
Here is a list of the methods of Boolean object and their description.
| Sr.No. | Method & Description |
|---|---|
| 1 | toSource() Returns a string containing the source of the Boolean object; you can use this string to create an equivalent object. |
| 2 | toString() Returns a string of either "true" or "false" depending upon the value of the object. |
| 3 | valueOf() Returns the primitive value of the Boolean object. |
In the following sections, we will have a few examples to demonstrate the usage of the Boolean methods.
The String object lets you work with a series of characters; it wraps Javascript's string primitive data type with a number of helper methods.
As JavaScript automatically converts between string primitives and String objects, you can call any of the helper methods of the String object on a string primitive.
Syntax
Use the following syntax to create a String object −
var val = new String(string);The String parameter is a series of characters that has been properly encoded.
String Properties
Here is a list of the properties of String object and their description.
| Sr.No. | Property & Description |
|---|---|
| 1 | constructor Returns a reference to the String function that created the object. |
| 2 | length Returns the length of the string. |
| 3 | prototype The prototype property allows you to add properties and methods to an object. |
In the following sections, we will have a few examples to demonstrate the usage of String properties.
String Methods
Here is a list of the methods available in String object along with their description.
| Sr.No. | Method & Description |
|---|---|
| 1 | charAt() Returns the character at the specified index. |
| 2 | charCodeAt() Returns a number indicating the Unicode value of the character at the given index. |
| 3 | concat() Combines the text of two strings and returns a new string. |
| 4 | indexOf() Returns the index within the calling String object of the first occurrence of the specified value, or -1 if not found. |
| 5 | lastIndexOf() Returns the index within the calling String object of the last occurrence of the specified value, or -1 if not found. |
| 6 | localeCompare() Returns a number indicating whether a reference string comes before or after or is the same as the given string in sort order. |
| 7 | match() Used to match a regular expression against a string. |
| 8 | replace() Used to find a match between a regular expression and a string, and to replace the matched substring with a new substring. |
| 9 | search() Executes the search for a match between a regular expression and a specified string. |
| 10 | slice() Extracts a section of a string and returns a new string. |
| 11 | split() Splits a String object into an array of strings by separating the string into substrings. |
| 12 | substr() Returns the characters in a string beginning at the specified location through the specified number of characters. |
| 13 | substring() Returns the characters in a string between two indexes into the string. |
| 14 | toLocaleLowerCase() The characters within a string are converted to lower case while respecting the current locale. |
| 15 | toLocaleUpperCase() The characters within a string are converted to upper case while respecting the current locale. |
| 16 | toLowerCase() Returns the calling string value converted to lower case. |
| 17 | toString() Returns a string representing the specified object. |
| 18 | toUpperCase() Returns the calling string value converted to uppercase. |
| 19 | valueOf() Returns the primitive value of the specified object. |
String HTML Wrappers
Here is a list of the methods that return a copy of the string wrapped inside an appropriate HTML tag.
| Sr.No. | Method & Description |
|---|---|
| 1 | anchor() Creates an HTML anchor that is used as a hypertext target. |
| 2 | big() Creates a string to be displayed in a big font as if it were in a <big> tag. |
| 3 | blink() Creates a string to blink as if it were in a <blink> tag. |
| 4 | bold() Creates a string to be displayed as bold as if it were in a <b> tag. |
| 5 | fixed() Causes a string to be displayed in fixed-pitch font as if it were in a <tt> tag |
| 6 | fontcolor() Causes a string to be displayed in the specified color as if it were in a <font color="color"> tag. |
| 7 | fontsize() Causes a string to be displayed in the specified font size as if it were in a <font size="size"> tag. |
| 8 | italics() Causes a string to be italic, as if it were in an <i> tag. |
| 9 | link() Creates an HTML hypertext link that requests another URL. |
| 10 | small() Causes a string to be displayed in a small font, as if it were in a <small> tag. |
| 11 | strike() Causes a string to be displayed as struck-out text, as if it were in a <strike> tag. |
| 12 | sub() Causes a string to be displayed as a subscript, as if it were in a <sub> tag |
| 13 | sup() Causes a string to be displayed as a superscript, as if it were in a <sup> tag |
In the following sections, we will have a few examples to demonstrate the usage of String methods.
The Array object lets you store multiple values in a single variable. It stores a fixed-size sequential collection of elements of the same type. An array is used to store a collection of data, but it is often more useful to think of an array as a collection of variables of the same type.
Syntax
Use the following syntax to create an Array object −
var fruits = new Array( "apple", "orange", "mango" );The Array parameter is a list of strings or integers. When you specify a single numeric parameter with the Array constructor, you specify the initial length of the array. The maximum length allowed for an array is 4,294,967,295.
You can create array by simply assigning values as follows −
var fruits = [ "apple", "orange", "mango" ];You will use ordinal numbers to access and to set values inside an array as follows.
fruits[0] is the first element
fruits[1] is the second element
fruits[2] is the third element
Array Properties
Here is a list of the properties of the Array object along with their description.
| Sr.No. | Property & Description |
|---|---|
| 1 | constructor Returns a reference to the array function that created the object. |
| 2 | index The property represents the zero-based index of the match in the string |
| 3 | input This property is only present in arrays created by regular expression matches. |
| 4 | length Reflects the number of elements in an array. |
| 5 | prototype The prototype property allows you to add properties and methods to an object. |
In the following sections, we will have a few examples to illustrate the usage of Array properties.
Array Methods
Here is a list of the methods of the Array object along with their description.
| Sr.No. | Method & Description |
|---|---|
| 1 | concat() Returns a new array comprised of this array joined with other array(s) and/or value(s). |
| 2 | every() Returns true if every element in this array satisfies the provided testing function. |
| 3 | filter() Creates a new array with all of the elements of this array for which the provided filtering function returns true. |
| 4 | forEach() Calls a function for each element in the array. |
| 5 | indexOf() Returns the first (least) index of an element within the array equal to the specified value, or -1 if none is found. |
| 6 | join() Joins all elements of an array into a string. |
| 7 | lastIndexOf() Returns the last (greatest) index of an element within the array equal to the specified value, or -1 if none is found. |
| 8 | map() Creates a new array with the results of calling a provided function on every element in this array. |
| 9 | pop() Removes the last element from an array and returns that element. |
| 10 | push() Adds one or more elements to the end of an array and returns the new length of the array. |
| 11 | reduce() Apply a function simultaneously against two values of the array (from left-to-right) as to reduce it to a single value. |
| 12 | reduceRight() Apply a function simultaneously against two values of the array (from right-to-left) as to reduce it to a single value. |
| 13 | reverse() Reverses the order of the elements of an array -- the first becomes the last, and the last becomes the first. |
| 14 | shift() Removes the first element from an array and returns that element. |
| 15 | slice() Extracts a section of an array and returns a new array. |
| 16 | some() Returns true if at least one element in this array satisfies the provided testing function. |
| 17 | toSource() Represents the source code of an object |
| 18 | sort() Sorts the elements of an array |
| 19 | splice() Adds and/or removes elements from an array. |
| 20 | toString() Returns a string representing the array and its elements. |
| 21 | unshift() Adds one or more elements to the front of an array and returns the new length of the array. |
In the following sections, we will have a few examples to demonstrate the usage of Array methods.
The Date object is a datatype built into the JavaScript language. Date objects are created with the new Date( ) as shown below.
Once a Date object is created, a number of methods allow you to operate on it. Most methods simply allow you to get and set the year, month, day, hour, minute, second, and millisecond fields of the object, using either local time or UTC (universal, or GMT) time.
The ECMAScript standard requires the Date object to be able to represent any date and time, to millisecond precision, within 100 million days before or after 1/1/1970. This is a range of plus or minus 273,785 years, so JavaScript can represent date and time till the year 275755.
Syntax
You can use any of the following syntaxes to create a Date object using Date() constructor.
new Date( )
new Date(milliseconds)
new Date(datestring)
new Date(year,month,date[,hour,minute,second,millisecond ])
Note − Parameters in the brackets are always optional.
Here is a description of the parameters −
No Argument − With no arguments, the Date() constructor creates a Date object set to the current date and time.
milliseconds − When one numeric argument is passed, it is taken as the internal numeric representation of the date in milliseconds, as returned by the getTime() method. For example, passing the argument 5000 creates a date that represents five seconds past midnight on 1/1/70.
datestring − When one string argument is passed, it is a string representation of a date, in the format accepted by the Date.parse() method.
7 agruments − To use the last form of the constructor shown above. Here is a description of each argument −
year − Integer value representing the year. For compatibility (in order to avoid the Y2K problem), you should always specify the year in full; use 1998, rather than 98.
month − Integer value representing the month, beginning with 0 for January to 11 for December.
date − Integer value representing the day of the month.
hour − Integer value representing the hour of the day (24-hour scale).
minute − Integer value representing the minute segment of a time reading.
second − Integer value representing the second segment of a time reading.
millisecond − Integer value representing the millisecond segment of a time reading.
Date Properties
Here is a list of the properties of the Date object along with their description.
| Sr.No. | Property & Description |
|---|---|
| 1 | constructor Specifies the function that creates an object's prototype. |
| 2 | prototype The prototype property allows you to add properties and methods to an object |
In the following sections, we will have a few examples to demonstrate the usage of different Date properties.
Date Methods
Here is a list of the methods used with Date and their description.
| Sr.No. | Method & Description |
|---|---|
| 1 | Date() Returns today's date and time |
| 2 | getDate() Returns the day of the month for the specified date according to local time. |
| 3 | getDay() Returns the day of the week for the specified date according to local time. |
| 4 | getFullYear() Returns the year of the specified date according to local time. |
| 5 | getHours() Returns the hour in the specified date according to local time. |
| 6 | getMilliseconds() Returns the milliseconds in the specified date according to local time. |
| 7 | getMinutes() Returns the minutes in the specified date according to local time. |
| 8 | getMonth() Returns the month in the specified date according to local time. |
| 9 | getSeconds() Returns the seconds in the specified date according to local time. |
| 10 | getTime() Returns the numeric value of the specified date as the number of milliseconds since January 1, 1970, 00:00:00 UTC. |
| 11 | getTimezoneOffset() Returns the time-zone offset in minutes for the current locale. |
| 12 | getUTCDate() Returns the day (date) of the month in the specified date according to universal time. |
| 13 | getUTCDay() Returns the day of the week in the specified date according to universal time. |
| 14 | getUTCFullYear() Returns the year in the specified date according to universal time. |
| 15 | getUTCHours() Returns the hours in the specified date according to universal time. |
| 16 | getUTCMilliseconds() Returns the milliseconds in the specified date according to universal time. |
| 17 | getUTCMinutes() Returns the minutes in the specified date according to universal time. |
| 18 | getUTCMonth() Returns the month in the specified date according to universal time. |
| 19 | getUTCSeconds() Returns the seconds in the specified date according to universal time. |
| 20 | getYear() Deprecated - Returns the year in the specified date according to local time. Use getFullYear instead. |
| 21 | setDate() Sets the day of the month for a specified date according to local time. |
| 22 | setFullYear() Sets the full year for a specified date according to local time. |
| 23 | setHours() Sets the hours for a specified date according to local time. |
| 24 | setMilliseconds() Sets the milliseconds for a specified date according to local time. |
| 25 | setMinutes() Sets the minutes for a specified date according to local time. |
| 26 | setMonth() Sets the month for a specified date according to local time. |
| 27 | setSeconds() Sets the seconds for a specified date according to local time. |
| 28 | setTime() Sets the Date object to the time represented by a number of milliseconds since January 1, 1970, 00:00:00 UTC. |
| 29 | setUTCDate() Sets the day of the month for a specified date according to universal time. |
| 30 | setUTCFullYear() Sets the full year for a specified date according to universal time. |
| 31 | setUTCHours() Sets the hour for a specified date according to universal time. |
| 32 | setUTCMilliseconds() Sets the milliseconds for a specified date according to universal time. |
| 33 | setUTCMinutes() Sets the minutes for a specified date according to universal time. |
| 34 | setUTCMonth() Sets the month for a specified date according to universal time. |
| 35 | setUTCSeconds() Sets the seconds for a specified date according to universal time. |
| 36 | setYear() Deprecated - Sets the year for a specified date according to local time. Use setFullYear instead. |
| 37 | toDateString() Returns the "date" portion of the Date as a human-readable string. |
| 38 | toGMTString() Deprecated - Converts a date to a string, using the Internet GMT conventions. Use toUTCString instead. |
| 39 | toLocaleDateString() Returns the "date" portion of the Date as a string, using the current locale's conventions. |
| 40 | toLocaleFormat() Converts a date to a string, using a format string. |
| 41 | toLocaleString() Converts a date to a string, using the current locale's conventions. |
| 42 | toLocaleTimeString() Returns the "time" portion of the Date as a string, using the current locale's conventions. |
| 43 | toSource() Returns a string representing the source for an equivalent Date object; you can use this value to create a new object. |
| 44 | toString() Returns a string representing the specified Date object. |
| 45 | toTimeString() Returns the "time" portion of the Date as a human-readable string. |
| 46 | toUTCString() Converts a date to a string, using the universal time convention. |
| 47 | valueOf() Returns the primitive value of a Date object. |
Converts a date to a string, using the universal time convention.
Date Static Methods
In addition to the many instance methods listed previously, the Date object also defines two static methods. These methods are invoked through the Date() constructor itself.
| Sr.No. | Method & Description |
|---|---|
| 1 | Date.parse( ) Parses a string representation of a date and time and returns the internal millisecond representation of that date. |
| 2 | Date.UTC( ) Returns the millisecond representation of the specified UTC date and time. |
In the following sections, we will have a few examples to demonstrate the usages of Date Static methods.
The math object provides you properties and methods for mathematical constants and functions. Unlike other global objects, Math is not a constructor. All the properties and methods of Math are static and can be called by using Math as an object without creating it.
Thus, you refer to the constant pi as Math.PI and you call the sine function as Math.sin(x), where x is the method's argument.
Syntax
The syntax to call the properties and methods of Math are as follows
var pi_val = Math.PI;
var sine_val = Math.sin(30);
Math Properties
Here is a list of all the properties of Math and their description.
| Sr.No. | Property & Description |
|---|---|
| 1 | E \ Euler's constant and the base of natural logarithms, approximately 2.718. |
| 2 | LN2 Natural logarithm of 2, approximately 0.693. |
| 3 | LN10 Natural logarithm of 10, approximately 2.302. |
| 4 | LOG2E Base 2 logarithm of E, approximately 1.442. |
| 5 | LOG10E Base 10 logarithm of E, approximately 0.434. |
| 6 | PI Ratio of the circumference of a circle to its diameter, approximately 3.14159. |
| 7 | SQRT1_2 Square root of 1/2; equivalently, 1 over the square root of 2, approximately 0.707. |
| 8 | SQRT2 Square root of 2, approximately 1.414. |
In the following sections, we will have a few examples to demonstrate the usage of Math properties.
Math Methods
Here is a list of the methods associated with Math object and their description
| Sr.No. | Method & Description |
|---|---|
| 1 | abs() Returns the absolute value of a number. |
| 2 | acos() Returns the arccosine (in radians) of a number. |
| 3 | asin() Returns the arcsine (in radians) of a number. |
| 4 | atan() Returns the arctangent (in radians) of a number. |
| 5 | atan2() Returns the arctangent of the quotient of its arguments. |
| 6 | ceil() Returns the smallest integer greater than or equal to a number. |
| 7 | cos() Returns the cosine of a number. |
| 8 | exp() Returns EN, where N is the argument, and E is Euler's constant, the base of the natural logarithm. |
| 9 | floor() Returns the largest integer less than or equal to a number. |
| 10 | log() Returns the natural logarithm (base E) of a number. |
| 11 | max() Returns the largest of zero or more numbers. |
| 12 | min() Returns the smallest of zero or more numbers. |
| 13 | pow() Returns base to the exponent power, that is, base exponent. |
| 14 | random() Returns a pseudo-random number between 0 and 1. |
| 15 | round() Returns the value of a number rounded to the nearest integer. |
| 16 | sin() Returns the sine of a number. |
| 17 | sqrt() Returns the square root of a number. |
| 18 | tan() Returns the tangent of a number. |
| 19 | toSource() Returns the string "Math". |
En las siguientes secciones, tendremos algunos ejemplos para demostrar el uso de los métodos asociados con Math.
Una expresión regular es un objeto que describe un patrón de caracteres.
El JavaScript RegExp La clase representa expresiones regulares, y tanto String como RegExp definir métodos que utilicen expresiones regulares para realizar potentes funciones de búsqueda y reemplazo de patrones y búsqueda de texto.
Sintaxis
Una expresión regular se podría definir con la RegExp () constructor, como sigue -
var pattern = new RegExp(pattern, attributes);
or simply
var pattern = /pattern/attributes;
Aquí está la descripción de los parámetros:
pattern : Una cadena que especifica el patrón de la expresión regular u otra expresión regular.
attributes - Una cadena opcional que contiene cualquiera de los atributos "g", "i" y "m" que especifican coincidencias globales, que no distinguen entre mayúsculas y minúsculas, y de varias líneas, respectivamente.
Soportes
Los corchetes ([]) tienen un significado especial cuando se usan en el contexto de expresiones regulares. Se utilizan para encontrar una variedad de personajes.
| No Señor. | Expresión y descripción |
|---|---|
| 1 | [...] Cualquier carácter entre corchetes. |
| 2 | [^...] Cualquier carácter que no esté entre corchetes. |
| 3 | [0-9] Coincide con cualquier dígito decimal del 0 al 9. |
| 4 | [a-z] Coincide con cualquier carácter de minúsculas a en minúsculas z. |
| 5 | [A-Z] Coincide con cualquier carácter de mayúsculas A a través de mayúsculas Z. |
| 6 | [a-Z] Coincide con cualquier carácter de minúsculas a a través de mayúsculas Z. |
Los rangos que se muestran arriba son generales; también puede usar el rango [0-3] para hacer coincidir cualquier dígito decimal entre 0 y 3, o el rango [bv] para hacer coincidir cualquier carácter en minúscula entreb mediante v.
Cuantificadores
La frecuencia o posición de las secuencias de caracteres entre corchetes y los caracteres individuales se pueden indicar mediante un carácter especial. Cada carácter especial tiene una connotación específica. Los indicadores +, *,? Y $ siguen una secuencia de caracteres.
| No Señor. | Expresión y descripción |
|---|---|
| 1 | p+ Coincide con cualquier cadena que contenga una o más p. |
| 2 | p* Coincide con cualquier cadena que contenga cero o más p. |
| 3 | p? Coincide con cualquier cadena que contenga como máximo una p. |
| 4 | p{N} Coincide con cualquier cadena que contenga una secuencia de N PD |
| 5 | p{2,3} Coincide con cualquier cadena que contenga una secuencia de dos o tres p. |
| 6 | p{2, } Coincide con cualquier cadena que contenga una secuencia de al menos dos p. |
| 7 | p$ Coincide con cualquier cadena con p al final de la misma. |
| 8 | ^p Coincide con cualquier cadena con p al principio de la misma. |
Ejemplos
Los siguientes ejemplos explican más sobre la coincidencia de caracteres.
| No Señor. | Expresión y descripción |
|---|---|
| 1 | [^a-zA-Z] Coincide con cualquier cadena que no contenga ninguno de los caracteres que van desde a mediante z y A a través de Z. |
| 2 | p.p Coincide con cualquier cadena que contenga p, seguido de cualquier carácter, seguido a su vez por otro p. |
| 3 | ^.{2}$ Coincide con cualquier cadena que contenga exactamente dos caracteres. |
| 4 | <b>(.*)</b> Coincide con cualquier cadena incluida entre <b> y </b>. |
| 5 | p(hp)* Coincide con cualquier cadena que contenga un p seguido de cero o más instancias de la secuencia hp. |
Caracteres literales
| No Señor. | Descripción del personaje |
|---|---|
| 1 | Alphanumeric Sí mismo |
| 2 | \0 El carácter NUL (\ u0000) |
| 3 | \t Pestaña (\ u0009 |
| 4 | \n Nueva línea (\ u000A) |
| 5 | \v Pestaña vertical (\ u000B) |
| 6 | \f Formulario de alimentación (\ u000C) |
| 7 | \r Retorno de carro (\ u000D) |
| 8 | \xnn El carácter latino especificado por el número hexadecimal nn; por ejemplo, \ x0A es lo mismo que \ n |
| 9 | \uxxxx El carácter Unicode especificado por el número hexadecimal xxxx; por ejemplo, \ u0009 es lo mismo que \ t |
| 10 | \cX El carácter de control ^ X; por ejemplo, \ cJ es equivalente al carácter de nueva línea \ n |
Metacaracteres
Un metacarácter es simplemente un carácter alfabético precedido por una barra invertida que actúa para dar a la combinación un significado especial.
Por ejemplo, puede buscar una gran suma de dinero utilizando el metacarácter '\ d': /([\d]+)000/, Aquí \d buscará cualquier cadena de caracteres numéricos.
La siguiente tabla enumera un conjunto de metacaracteres que se pueden usar en expresiones regulares de estilo PERL.
| No Señor. | Descripción del personaje |
|---|---|
| 1 | . un solo personaje |
| 2 | \s un carácter de espacio en blanco (espacio, tabulación, nueva línea) |
| 3 | \S carácter que no es un espacio en blanco |
| 4 | \d un dígito (0-9) |
| 5 | \D un no digito |
| 6 | \w un carácter de palabra (az, AZ, 0-9, _) |
| 7 | \W un personaje que no es una palabra |
| 8 | [\b] un retroceso literal (caso especial). |
| 9 | [aeiou] coincide con un solo carácter en el conjunto dado |
| 10 | [^aeiou] coincide con un solo carácter fuera del conjunto dado |
| 11 | (foo|bar|baz) coincide con cualquiera de las alternativas especificadas |
Modificadores
Hay varios modificadores disponibles que pueden simplificar la forma en que trabaja con regexps, como la distinción entre mayúsculas y minúsculas, búsqueda en varias líneas, etc.
| No Señor. | Modificador y descripción |
|---|---|
| 1 | i Realice una coincidencia que no distinga entre mayúsculas y minúsculas. |
| 2 | m Especifica que si la cadena tiene caracteres de retorno de carro o de línea nueva, los operadores ^ y $ ahora coincidirán con un límite de línea nueva, en lugar de un límite de cadena |
| 3 | g Realiza una coincidencia global, es decir, encuentra todas las coincidencias en lugar de detenerse después de la primera coincidencia. |
Propiedades de expresión regular
Aquí hay una lista de las propiedades asociadas con RegExp y su descripción.
| No Señor. | Descripción de propiedad |
|---|---|
| 1 | constructor Specifies the function that creates an object's prototype. |
| 2 | global Specifies if the "g" modifier is set. |
| 3 | ignoreCase Specifies if the "i" modifier is set. |
| 4 | lastIndex The index at which to start the next match. |
| 5 | multiline Specifies if the "m" modifier is set. |
| 6 | source The text of the pattern. |
In the following sections, we will have a few examples to demonstrate the usage of RegExp properties.
RegExp Methods
Here is a list of the methods associated with RegExp along with their description.
| Sr.No. | Method & Description |
|---|---|
| 1 | exec() Executes a search for a match in its string parameter. |
| 2 | test() Tests for a match in its string parameter. |
| 3 | toSource() Returns an object literal representing the specified object; you can use this value to create a new object. |
| 4 | toString() Returns a string representing the specified object. |
In the following sections, we will have a few examples to demonstrate the usage of RegExp methods.
Every web page resides inside a browser window which can be considered as an object.
A Document object represents the HTML document that is displayed in that window. The Document object has various properties that refer to other objects which allow access to and modification of document content.
The way a document content is accessed and modified is called the Document Object Model, or DOM. The Objects are organized in a hierarchy. This hierarchical structure applies to the organization of objects in a Web document.
Window object − Top of the hierarchy. It is the outmost element of the object hierarchy.
Document object − Each HTML document that gets loaded into a window becomes a document object. The document contains the contents of the page.
Form object − Everything enclosed in the <form>...</form> tags sets the form object.
Form control elements − The form object contains all the elements defined for that object such as text fields, buttons, radio buttons, and checkboxes.
Here is a simple hierarchy of a few important objects −
There are several DOMs in existence. The following sections explain each of these DOMs in detail and describe how you can use them to access and modify document content.
The Legacy DOM − This is the model which was introduced in early versions of JavaScript language. It is well supported by all browsers, but allows access only to certain key portions of documents, such as forms, form elements, and images.
The W3C DOM − This document object model allows access and modification of all document content and is standardized by the World Wide Web Consortium (W3C). This model is supported by almost all the modern browsers.
The IE4 DOM − This document object model was introduced in Version 4 of Microsoft's Internet Explorer browser. IE 5 and later versions include support for most basic W3C DOM features.
DOM compatibility
If you want to write a script with the flexibility to use either W3C DOM or IE 4 DOM depending on their availability, then you can use a capability-testing approach that first checks for the existence of a method or property to determine whether the browser has the capability you desire. For example −
if (document.getElementById) {
   // If the W3C method exists, use it
} else if (document.all) {
   // If the all[] array exists, use it
} else {
   // Otherwise use the legacy DOM
}
There are three types of errors in programming: (a) Syntax Errors, (b) Runtime Errors, and (c) Logical Errors.
Syntax Errors
Syntax errors, also called parsing errors, occur at compile time in traditional programming languages and at interpret time in JavaScript.
For example, the following line causes a syntax error because it is missing a closing parenthesis.
<script type = "text/javascript">
   <!--
      window.print(;
   //-->
</script>
When a syntax error occurs in JavaScript, only the code contained within the same thread as the syntax error is affected and the rest of the code in other threads gets executed assuming nothing in them depends on the code containing the error.
Runtime Errors
Runtime errors, also called exceptions, occur during execution (after compilation/interpretation).
For example, the following line causes a runtime error because here the syntax is correct, but at runtime, it is trying to call a method that does not exist.
<script type = "text/javascript">
   <!--
      window.printme();
   //-->
</script>
Exceptions also affect the thread in which they occur, allowing other JavaScript threads to continue normal execution.
Logical Errors
Logic errors can be the most difficult type of errors to track down. These errors are not the result of a syntax or runtime error. Instead, they occur when you make a mistake in the logic that drives your script and you do not get the result you expected.
You cannot catch those errors, because it depends on your business requirement what type of logic you want to put in your program.
The try...catch...finally Statement
The latest versions of JavaScript added exception handling capabilities. JavaScript implements the try...catch...finally construct as well as the throw operator to handle exceptions.
You can catch programmer-generated and runtime exceptions, but you cannot catch JavaScript syntax errors.
Here is the try...catch...finally block syntax −
<script type = "text/javascript">
   <!--
      try {
         // Code to run
         [break;]
      }

      catch ( e ) {
         // Code to run if an exception occurs
         [break;]
      }

      [ finally {
         // Code that is always executed regardless of
         // an exception occurring
      }]
   //-->
</script>
The try block must be followed by either exactly one catch block or one finally block (or one of both). When an exception occurs in the try block, the exception is placed in e and the catch block is executed. The optional finally block executes unconditionally after try/catch.
Examples
Here is an example where we are trying to call a non-existing function which in turn is raising an exception. Let us see how it behaves without try...catch−
<html>
   <head>
      <script type = "text/javascript">
         <!--
            function myFunc() {
               var a = 100;
               alert("Value of variable a is : " + a );
            }
         //-->
      </script>
   </head>

   <body>
      <p>Click the following to see the result:</p>

      <form>
         <input type = "button" value = "Click Me" onclick = "myFunc();" />
      </form>
   </body>
</html>
Output
Now let us try to catch this exception using try...catch and display a user-friendly message. You can also suppress this message, if you want to hide this error from a user.
<html>
   <head>

      <script type = "text/javascript">
         <!--
            function myFunc() {
               var a = 100;
               try {
                  alert("Value of variable a is : " + a );
               }
               catch ( e ) {
                  alert("Error: " + e.description );
               }
            }
         //-->
      </script>

   </head>
   <body>
      <p>Click the following to see the result:</p>

      <form>
         <input type = "button" value = "Click Me" onclick = "myFunc();" />
      </form>

   </body>
</html>
Output
You can use finally block which will always execute unconditionally after the try/catch. Here is an example.
<html>
   <head>

      <script type = "text/javascript">
         <!--
            function myFunc() {
               var a = 100;

               try {
                  alert("Value of variable a is : " + a );
               }
               catch ( e ) {
                  alert("Error: " + e.description );
               }
               finally {
                  alert("Finally block will always execute!" );
               }
            }
         //-->
      </script>

   </head>
   <body>
      <p>Click the following to see the result:</p>

      <form>
         <input type = "button" value = "Click Me" onclick = "myFunc();" />
      </form>

   </body>
</html>
Output
The throw Statement
You can use throw statement to raise your built-in exceptions or your customized exceptions. Later these exceptions can be captured and you can take an appropriate action.
Example
The following example demonstrates how to use a throw statement.
<html>
   <head>

      <script type = "text/javascript">
         <!--
            function myFunc() {
               var a = 100;
               var b = 0;

               try {
                  if ( b == 0 ) {
                     throw( "Divide by zero error." );
                  } else {
                     var c = a / b;
                  }
               }
               catch ( e ) {
                  alert("Error: " + e );
               }
            }
         //-->
      </script>

   </head>
   <body>
      <p>Click the following to see the result:</p>

      <form>
         <input type = "button" value = "Click Me" onclick = "myFunc();" />
      </form>

   </body>
</html>
Output
You can raise an exception in one function using a string, integer, Boolean, or an object and then you can capture that exception either in the same function as we did above, or in another function using a try...catch block.
The onerror() Method
The onerror event handler was the first feature to facilitate error handling in JavaScript. The error event is fired on the window object whenever an exception occurs on the page.
<html>
   <head>

      <script type = "text/javascript">
         <!--
            window.onerror = function () {
               alert("An error occurred.");
            }
         //-->
      </script>

   </head>
   <body>
      <p>Click the following to see the result:</p>

      <form>
         <input type = "button" value = "Click Me" onclick = "myFunc();" />
      </form>

   </body>
</html>
Output
The onerror event handler provides three pieces of information to identify the exact nature of the error −
Error message − The same message that the browser would display for the given error
URL − The file in which the error occurred
Line number− The line number in the given URL that caused the error
Here is the example to show how to extract this information.
Example
<html>
   <head>

      <script type = "text/javascript">
         <!--
            window.onerror = function (msg, url, line) {
               alert("Message : " + msg );
               alert("url : " + url );
               alert("Line number : " + line );
            }
         //-->
      </script>

   </head>
   <body>
      <p>Click the following to see the result:</p>

      <form>
         <input type = "button" value = "Click Me" onclick = "myFunc();" />
      </form>

   </body>
</html>
Output
You can display extracted information in whatever way you think it is better.
You can use an onerror method, as shown below, to display an error message in case there is any problem in loading an image.
<img src="myimage.gif" onerror="alert('An error occurred loading the image.')" />You can use onerror with many HTML tags to display appropriate messages in case of errors.
Form validation normally used to occur at the server, after the client had entered all the necessary data and then pressed the Submit button. If the data entered by a client was incorrect or was simply missing, the server would have to send all the data back to the client and request that the form be resubmitted with correct information. This was really a lengthy process which used to put a lot of burden on the server.
JavaScript provides a way to validate form's data on the client's computer before sending it to the web server. Form validation generally performs two functions.
Basic Validation − First of all, the form must be checked to make sure all the mandatory fields are filled in. It would require just a loop through each field in the form and check for data.
Data Format Validation − Secondly, the data that is entered must be checked for correct form and value. Your code must include appropriate logic to test correctness of data.
Example
We will take an example to understand the process of validation. Here is a simple form in html format.
<html>
   <head>
      <title>Form Validation</title>
      <script type = "text/javascript">
         <!--
            // Form validation code will come here.
         //-->
      </script>
   </head>

   <body>
      <form action = "/cgi-bin/test.cgi" name = "myForm" onsubmit = "return(validate());">
         <table cellspacing = "2" cellpadding = "2" border = "1">

            <tr>
               <td align = "right">Name</td>
               <td><input type = "text" name = "Name" /></td>
            </tr>

            <tr>
               <td align = "right">EMail</td>
               <td><input type = "text" name = "EMail" /></td>
            </tr>

            <tr>
               <td align = "right">Zip Code</td>
               <td><input type = "text" name = "Zip" /></td>
            </tr>

            <tr>
               <td align = "right">Country</td>
               <td>
                  <select name = "Country">
                     <option value = "-1" selected>[choose yours]</option>
                     <option value = "1">USA</option>
                     <option value = "2">UK</option>
                     <option value = "3">INDIA</option>
                  </select>
               </td>
            </tr>

            <tr>
               <td align = "right"></td>
               <td><input type = "submit" value = "Submit" /></td>
            </tr>

         </table>
      </form>
   </body>
</html>
Output
Basic Form Validation
First let us see how to do a basic form validation. In the above form, we are calling validate() to validate data when onsubmit event is occurring. The following code shows the implementation of this validate() function.
<script type = "text/javascript">
   <!--
      // Form validation code will come here.
      function validate() {

         if( document.myForm.Name.value == "" ) {
            alert( "Please provide your name!" );
            document.myForm.Name.focus() ;
            return false;
         }
         if( document.myForm.EMail.value == "" ) {
            alert( "Please provide your Email!" );
            document.myForm.EMail.focus() ;
            return false;
         }
         if( document.myForm.Zip.value == "" || isNaN( document.myForm.Zip.value ) ||
            document.myForm.Zip.value.length != 5 ) {

            alert( "Please provide a zip in the format #####." );
            document.myForm.Zip.focus() ;
            return false;
         }
         if( document.myForm.Country.value == "-1" ) {
            alert( "Please provide your country!" );
            return false;
         }
         return( true );
      }
   //-->
</script>
Data Format Validation
Now we will see how we can validate our entered form data before submitting it to the web server.
The following example shows how to validate an entered email address. An email address must contain at least a ‘@’ sign and a dot (.). Also, the ‘@’ must not be the first character of the email address, and the last dot must at least be one character after the ‘@’ sign.
Example
Try the following code for email validation.
<script type = "text/javascript">
   <!--
      function validateEmail() {
         var emailID = document.myForm.EMail.value;
         atpos = emailID.indexOf("@");
         dotpos = emailID.lastIndexOf(".");

         if (atpos < 1 || ( dotpos - atpos < 2 )) {
            alert("Please enter correct email ID")
            document.myForm.EMail.focus() ;
            return false;
         }
         return( true );
      }
   //-->
</script>
You can use JavaScript to create a complex animation having, but not limited to, the following elements −
- Fireworks
- Fade Effect
- Roll-in or Roll-out
- Page-in or Page-out
- Object movements
You might be interested in existing JavaScript based animation library: Script.Aculo.us.
This tutorial provides a basic understanding of how to use JavaScript to create an animation.
JavaScript can be used to move a number of DOM elements (<img />, <div> or any other HTML element) around the page according to some sort of pattern determined by a logical equation or function.
JavaScript provides the following two functions to be frequently used in animation programs.
setTimeout( function, duration) − This function calls function after duration milliseconds from now.
setInterval(function, duration) − This function calls function after every duration milliseconds.
clearTimeout(setTimeout_variable) − This function calls clears any timer set by the setTimeout() functions.
JavaScript can also set a number of attributes of a DOM object including its position on the screen. You can set top and left attribute of an object to position it anywhere on the screen. Here is its syntax.
// Set distance from left edge of the screen.
object.style.left = distance in pixels or points;

or

// Set distance from top edge of the screen.
object.style.top = distance in pixels or points;
Manual Animation
So let's implement one simple animation using DOM object properties and JavaScript functions as follows. The following list contains different DOM methods.
We are using the JavaScript function getElementById() to get a DOM object and then assigning it to a global variable imgObj.
We have defined an initialization function init() to initialize imgObj where we have set its position and left attributes.
We are calling initialization function at the time of window load.
Finally, we are calling moveRight() function to increase the left distance by 10 pixels. You could also set it to a negative value to move it to the left side.
Example
Try the following example.
<html>
   <head>
      <title>JavaScript Animation</title>
      <script type = "text/javascript">
         <!--
            var imgObj = null;

            function init() {
               imgObj = document.getElementById('myImage');
               imgObj.style.position= 'relative';
               imgObj.style.left = '0px';
            }
            function moveRight() {
               imgObj.style.left = parseInt(imgObj.style.left) + 10 + 'px';
            }

            window.onload = init;
         //-->
      </script>
   </head>

   <body>
      <form>
         <img id = "myImage" src = "/images/html.gif" />
         <p>Click button below to move the image to right</p>
         <input type = "button" value = "Click Me" onclick = "moveRight();" />
      </form>
   </body>
</html>
Output
Automated Animation
In the above example, we saw how an image moves to right with every click. We can automate this process by using the JavaScript function setTimeout() as follows −
Here we have added more methods. So let's see what is new here −
The moveRight() function is calling setTimeout() function to set the position of imgObj.
We have added a new function stop() to clear the timer set by setTimeout() function and to set the object at its initial position.
Example
Try the following example code.
<html>
   <head>
      <title>JavaScript Animation</title>
      <script type = "text/javascript">
         <!--
            var imgObj = null;
            var animate ;

            function init() {
               imgObj = document.getElementById('myImage');
               imgObj.style.position= 'relative';
               imgObj.style.left = '0px';
            }
            function moveRight() {
               imgObj.style.left = parseInt(imgObj.style.left) + 10 + 'px';
               animate = setTimeout(moveRight,20);    // call moveRight in 20msec
            }
            function stop() {
               clearTimeout(animate);
               imgObj.style.left = '0px';
            }

            window.onload = init;
         //-->
      </script>
   </head>

   <body>
      <form>
         <img id = "myImage" src = "/images/html.gif" />
         <p>Click the buttons below to handle animation</p>
         <input type = "button" value = "Start" onclick = "moveRight();" />
         <input type = "button" value = "Stop" onclick = "stop();" />
      </form>
   </body>
</html>
Rollover with a Mouse Event
Here is a simple example showing image rollover with a mouse event.
Let's see what we are using in the following example −
At the time of loading this page, the ‘if’ statement checks for the existence of the image object. If the image object is unavailable, this block will not be executed.
The Image() constructor creates and preloads a new image object called image1.
The src property is assigned the name of the external image file called /images/html.gif.
Similarly, we have created image2 object and assigned /images/http.gif in this object.
The # (hash mark) disables the link so that the browser does not try to go to a URL when clicked. This link is an image.
The onMouseOver event handler is triggered when the user's mouse moves onto the link, and the onMouseOut event handler is triggered when the user's mouse moves away from the link (image).
When the mouse moves over the image, the HTTP image changes from the first image to the second one. When the mouse is moved away from the image, the original image is displayed.
When the mouse is moved away from the link, the initial image html.gif will reappear on the screen.
<html>

   <head>
      <title>Rollover with a Mouse Events</title>

      <script type = "text/javascript">
         <!--
            if(document.images) {
               var image1 = new Image();     // Preload an image
               image1.src = "/images/html.gif";
               var image2 = new Image();     // Preload second image
               image2.src = "/images/http.gif";
            }
         //-->
      </script>
   </head>

   <body>
      <p>Move your mouse over the image to see the result</p>

      <a href = "#" onMouseOver = "document.myImage.src = image2.src;"
         onMouseOut = "document.myImage.src = image1.src;">
         <img name = "myImage" src = "/images/html.gif" />
      </a>
   </body>
</html>
The JavaScript navigator object includes a child object called plugins. This object is an array, with one entry for each plug-in installed on the browser. The navigator.plugins object is supported only by Netscape, Firefox, and Mozilla only.
Example
Here is an example that shows how to list down all the plug-on installed in your browser −
<html>
   <head>
      <title>List of Plug-Ins</title>
   </head>

   <body>
      <table border = "1">
         <tr>
            <th>Plug-in Name</th>
            <th>Filename</th>
            <th>Description</th>
         </tr>

         <script language = "JavaScript" type = "text/javascript">
            for (i = 0; i<navigator.plugins.length; i++) {
               document.write("<tr><td>");
               document.write(navigator.plugins[i].name);
               document.write("</td><td>");
               document.write(navigator.plugins[i].filename);
               document.write("</td><td>");
               document.write(navigator.plugins[i].description);
               document.write("</td></tr>");
            }
         </script>
      </table>
   </body>
</html>
Output
Checking for Plug-Ins
Each plug-in has an entry in the array. Each entry has the following properties −
name − is the name of the plug-in.
filename − is the executable file that was loaded to install the plug-in.
description − is a description of the plug-in, supplied by the developer.
mimeTypes − is an array with one entry for each MIME type supported by the plug-in.
You can use these properties in a script to find out the installed plug-ins, and then using JavaScript, you can play appropriate multimedia file. Take a look at the following example.
<html>
   <head>
      <title>Using Plug-Ins</title>
   </head>

   <body>
      <script language = "JavaScript" type = "text/javascript">
         media = navigator.mimeTypes["video/quicktime"];

         if (media) {
            document.write("<embed src = 'quick.mov' height = 100 width = 100>");
         } else {
            document.write("<img src = 'quick.gif' height = 100 width = 100>");
         }
      </script>
   </body>
</html>
Output
NOTE − Here we are using HTML <embed> tag to embed a multimedia file.
Controlling Multimedia
Let us take one real example which works in almost all the browsers −
<html>
   <head>
      <title>Using Embeded Object</title>

      <script type = "text/javascript">
         <!--
            function play() {
               if (!document.demo.IsPlaying()) {
                  document.demo.Play();
               }
            }
            function stop() {
               if (document.demo.IsPlaying()) {
                  document.demo.StopPlay();
               }
            }
            function rewind() {
               if (document.demo.IsPlaying()) {
                  document.demo.StopPlay();
               }
               document.demo.Rewind();
            }
         //-->
      </script>
   </head>

   <body>
      <embed id = "demo" name = "demo"
         src = "http://www.amrood.com/games/kumite.swf"
         width = "318" height = "300" play = "false" loop = "false"
         pluginspage = "http://www.macromedia.com/go/getflashplayer"
         swliveconnect = "true">

      <form name = "form" id = "form" action = "#" method = "get">
         <input type = "button" value = "Start" onclick = "play();" />
         <input type = "button" value = "Stop" onclick = "stop();" />
         <input type = "button" value = "Rewind" onclick = "rewind();" />
      </form>
   </body>
</html>
Output
If you are using Mozilla, Firefox or Netscape, then
Every now and then, developers commit mistakes while coding. A mistake in a program or a script is referred to as a bug.
The process of finding and fixing bugs is called debugging and is a normal part of the development process. This section covers tools and techniques that can help you with debugging tasks..
Error Messages in IE
The most basic way to track down errors is by turning on error information in your browser. By default, Internet Explorer shows an error icon in the status bar when an error occurs on the page.
Double-clicking this icon takes you to a dialog box showing information about the specific error that occurred.
Since this icon is easy to overlook, Internet Explorer gives you the option to automatically show the Error dialog box whenever an error occurs.
To enable this option, select Tools → Internet Options → Advanced tab. and then finally check the "Display a Notification About Every Script Error" box option as shown below −
Error Messages in Firefox or Mozilla
Other browsers like Firefox, Netscape, and Mozilla send error messages to a special window called the JavaScript Console or Error Consol. To view the console, select Tools → Error Consol or Web Development.
Unfortunately, since these browsers give no visual indication when an error occurs, you must keep the Console open and watch for errors as your script executes.
Error Notifications
Error notifications that show up on Console or through Internet Explorer dialog boxes are the result of both syntax and runtime errors. These error notification include the line number at which the error occurred.
If you are using Firefox, then you can click on the error available in the error console to go to the exact line in the script having error.
How to debug a Script
There are various ways to debug your JavaScript −
Use a JavaScript Validator
One way to check your JavaScript code for strange bugs is to run it through a program that checks it to make sure it is valid and that it follows the official syntax rules of the language. These programs are called validating parsers or just validators for short, and often come with commercial HTML and JavaScript editors.
The most convenient validator for JavaScript is Douglas Crockford's JavaScript Lint, which is available for free at Douglas Crockford's JavaScript Lint.
Simply visit that web page, paste your JavaScript (Only JavaScript) code into the text area provided, and click the jslint button. This program will parse through your JavaScript code, ensuring that all the variable and function definitions follow the correct syntax. It will also check JavaScript statements, such as if and while, to ensure they too follow the correct format
Add Debugging Code to Your Programs
You can use the alert() or document.write() methods in your program to debug your code. For example, you might write something as follows −
var debugging = true;
var whichImage = "widget";

if( debugging )
   alert( "Calls swapImage() with argument: " + whichImage );
   var swapStatus = swapImage( whichImage );

if( debugging )
   alert( "Exits swapImage() with swapStatus=" + swapStatus );
By examining the content and order of the alert() as they appear, you can examine the health of your program very easily.
Use a JavaScript Debugger
A debugger is an application that places all aspects of script execution under the control of the programmer. Debuggers provide fine-grained control over the state of the script through an interface that allows you to examine and set values as well as control the flow of execution.
Once a script has been loaded into a debugger, it can be run one line at a time or instructed to halt at certain breakpoints. Once execution is halted, the programmer can examine the state of the script and its variables in order to determine if something is amiss. You can also watch variables for changes in their values.
The latest version of the Mozilla JavaScript Debugger (code-named Venkman) for both Mozilla and Netscape browsers can be downloaded at http://www.hacksrus.com/~ginda/venkman
Useful Tips for Developers
You can keep the following tips in mind to reduce the number of errors in your scripts and simplify the debugging process −
Use plenty of comments. Comments enable you to explain why you wrote the script the way you did and to explain particularly difficult sections of code.
Always use indentation to make your code easy to read. Indenting statements also makes it easier for you to match up beginning and ending tags, curly braces, and other HTML and script elements.
Write modular code. Whenever possible, group your statements into functions. Functions let you group related statements, and test and reuse portions of code with minimal effort.
Be consistent in the way you name your variables and functions. Try using names that are long enough to be meaningful and that describe the contents of the variable or the purpose of the function.
Use consistent syntax when naming variables and functions. In other words, keep them all lowercase or all uppercase; if you prefer Camel-Back notation, use it consistently.
Test long scripts in a modular fashion. In other words, do not try to write the entire script before testing any portion of it. Write a piece and get it to work before adding the next portion of code.
Use descriptive variable and function names and avoid using single-character names.
Watch your quotation marks. Remember that quotation marks are used in pairs around strings and that both quotation marks must be of the same style (either single or double).
Watch your equal signs. You should not used a single = for comparison purpose.
Declare variables explicitly using the var keyword.
You can use JavaScript to create client-side image map. Client-side image maps are enabled by the usemap attribute for the <img /> tag and defined by special <map> and <area> extension tags.
The image that is going to form the map is inserted into the page using the <img /> element as normal, except that it carries an extra attribute called usemap. The value of the usemap attribute is the value of the name attribute on the <map> element, which you are about to meet, preceded by a pound or hash sign.
The <map> element actually creates the map for the image and usually follows directly after the <img /> element. It acts as a container for the <area /> elements that actually define the clickable hotspots. The <map> element carries only one attribute, the name attribute, which is the name that identifies the map. This is how the <img /> element knows which <map> element to use.
The <area> element specifies the shape and the coordinates that define the boundaries of each clickable hotspot.
The following code combines imagemaps and JavaScript to produce a message in a text box when the mouse is moved over different parts of an image.
<html>
   <head>
      <title>Using JavaScript Image Map</title>

      <script type = "text/javascript">
         <!--
            function showTutorial(name) {
               document.myform.stage.value = name
            }
         //-->
      </script>
   </head>

   <body>
      <form name = "myform">
         <input type = "text" name = "stage" size = "20" />
      </form>

      <!-- Create  Mappings -->
      <img src = "/images/usemap.gif" alt = "HTML Map" border = "0" usemap = "#tutorials"/>

      <map name = "tutorials">
         <area shape="poly"
            coords = "74,0,113,29,98,72,52,72,38,27"
            href = "/perl/index.htm" alt = "Perl Tutorial"
            target = "_self"
            onMouseOver = "showTutorial('perl')"
            onMouseOut = "showTutorial('')"/>

         <area shape = "rect"
            coords = "22,83,126,125"
            href = "/html/index.htm" alt = "HTML Tutorial"
            target = "_self"
            onMouseOver = "showTutorial('html')"
            onMouseOut = "showTutorial('')"/>

         <area shape = "circle"
            coords = "73,168,32"
            href = "/php/index.htm" alt = "PHP Tutorial"
            target = "_self"
            onMouseOver = "showTutorial('php')"
            onMouseOut = "showTutorial('')"/>
      </map>
   </body>
</html>
Salida
Puede sentir el concepto del mapa colocando el cursor del mouse sobre el objeto de la imagen.
Es importante comprender las diferencias entre los diferentes navegadores para poder manejar cada uno de la forma esperada. Por eso es importante saber en qué navegador se ejecuta su página web.
Para obtener información sobre el navegador en el que se ejecuta actualmente su página web, utilice el navigator objeto.
Propiedades del navegador
Hay varias propiedades relacionadas con Navigator que puede utilizar en su página web. La siguiente es una lista de los nombres y descripciones de cada uno.
| No Señor. | Descripción de propiedad |
|---|---|
| 1 | appCodeName Esta propiedad es una cadena que contiene el nombre de código del navegador, Netscape para Netscape y Microsoft Internet Explorer para Internet Explorer. |
| 2 | appVersion Esta propiedad es una cadena que contiene la versión del navegador, así como otra información útil como su idioma y compatibilidad. |
| 3 | language Esta propiedad contiene la abreviatura de dos letras del idioma que utiliza el navegador. Solo Netscape. |
| 4 | mimTypes[] Esta propiedad es una matriz que contiene todos los tipos MIME admitidos por el cliente. Solo Netscape. |
| 5 | platform[] Esta propiedad es una cadena que contiene la plataforma para la que se compiló el navegador. "Win32" para sistemas operativos Windows de 32 bits |
| 6 | plugins[] Esta propiedad es una matriz que contiene todos los complementos que se han instalado en el cliente. Solo Netscape. |
| 7 | userAgent[] Esta propiedad es una cadena que contiene el nombre del código y la versión del navegador. Este valor se envía al servidor de origen para identificar al cliente. |
Métodos de navegador
Hay varios métodos específicos de Navigator. Aquí hay una lista de sus nombres y descripciones.
| No Señor. | Descripción |
|---|---|
| 1 | javaEnabled() Este método determina si JavaScript está habilitado en el cliente. Si JavaScript está habilitado, este método devuelve verdadero; de lo contrario, devuelve falso. |
| 2 | plugings.refresh Este método hace que los complementos recién instalados estén disponibles y llena la matriz de complementos con todos los nombres de complementos nuevos. Solo Netscape. |
| 3 | preference(name,value) Este método permite que un script firmado obtenga y configure algunas preferencias de Netscape. Si se omite el segundo parámetro, este método devolverá el valor de la preferencia especificada; de lo contrario, establece el valor. Solo Netscape. |
| 4 | taintEnabled() Este método devuelve verdadero si la contaminación de datos está habilitada; falso de lo contrario. |
Detección del navegador
Hay un JavaScript simple que se puede utilizar para averiguar el nombre de un navegador y, en consecuencia, se puede entregar una página HTML al usuario.
<html>
   <head>
      <title>Browser Detection Example</title>
   </head>

   <body>
      <script type = "text/javascript">
         <!--
            var userAgent   = navigator.userAgent;
            var opera       = (userAgent.indexOf('Opera') != -1);
            var ie          = (userAgent.indexOf('MSIE') != -1);
            var gecko       = (userAgent.indexOf('Gecko') != -1);
            var netscape    = (userAgent.indexOf('Mozilla') != -1);
            var version     = navigator.appVersion;

            if (opera) {
               document.write("Opera based browser");
               // Keep your opera specific URL here.
            } else if (gecko) {
               document.write("Mozilla based browser");
               // Keep your gecko specific URL here.
            } else if (ie) {
               document.write("IE based browser");
               // Keep your IE specific URL here.
            } else if (netscape) {
               document.write("Netscape based browser");
               // Keep your Netscape specific URL here.
            } else {
               document.write("Unknown browser");
            }

            // You can include version to along with any above condition.
            document.write("<br /> Browser version info : " + version );
         //-->
      </script>
   </body>
</html>