Spring MVC - Genera esempio XML
L'esempio seguente mostra come generare XML utilizzando Spring Web MVC Framework. Per cominciare, disponiamo di un IDE Eclipse funzionante e atteniamo ai seguenti passaggi per sviluppare un'applicazione Web basata su modulo dinamico utilizzando Spring Web Framework.
| Passo | Descrizione |
|---|---|
| 1 | Crea un progetto con un nome TestWeb sotto un pacchetto com.tutorialspoint come spiegato nel capitolo Spring MVC - Hello World. |
| 2 | Creare le classi Java User e UserController nel pacchetto com.tutorialspoint. |
| 3 | Il passaggio finale è creare il contenuto dei file sorgente e di configurazione ed esportare l'applicazione come spiegato di seguito. |
User.java
package com.tutorialspoint;

import javax.xml.bind.annotation.XmlElement;
import javax.xml.bind.annotation.XmlRootElement;

@XmlRootElement(name = "user")
public class User {
   private String name;
   private int id;
   public String getName() {
      return name;
   }
   @XmlElement
   public void setName(String name) {
      this.name = name;
   }
   public int getId() {
      return id;
   }
   @XmlElement
   public void setId(int id) {
      this.id = id;
   }
}
UserController.java
package com.tutorialspoint;

import org.springframework.stereotype.Controller;
import org.springframework.web.bind.annotation.PathVariable;
import org.springframework.web.bind.annotation.RequestMapping;
import org.springframework.web.bind.annotation.RequestMethod;
import org.springframework.web.bind.annotation.ResponseBody;

@Controller
@RequestMapping("/user")
public class UserController {

   @RequestMapping(value="{name}", method = RequestMethod.GET)
   public @ResponseBody User getUser(@PathVariable String name) {

      User user = new User();

      user.setName(name);
      user.setId(1);
      return user;
   }
}
TestWeb-servlet.xml
<beans xmlns = "http://www.springframework.org/schema/beans"
   xmlns:context = "http://www.springframework.org/schema/context"
   xmlns:xsi = "http://www.w3.org/2001/XMLSchema-instance"
   xmlns:mvc = "http://www.springframework.org/schema/mvc"
   xsi:schemaLocation = "
   http://www.springframework.org/schema/beans
   http://www.springframework.org/schema/beans/spring-beans-3.0.xsd
   http://www.springframework.org/schema/context
   http://www.springframework.org/schema/context/spring-context-3.0.xsd
   http://www.springframework.org/schema/mvc
   http://www.springframework.org/schema/mvc/spring-mvc-3.0.xsd">
   <context:component-scan base-package = "com.tutorialspoint" />
   <mvc:annotation-driven />
</beans>
Qui, abbiamo creato un utente POJO mappato XML e in UserController, abbiamo restituito l'utente. Spring gestisce automaticamente la conversione XML basata suRequestMapping.
Una volta terminata la creazione dei file sorgente e di configurazione, esporta la tua applicazione. Fai clic con il tasto destro sulla tua applicazione, usaExport → WAR File opzione e salva il tuo TestWeb.war file nella cartella webapps di Tomcat.
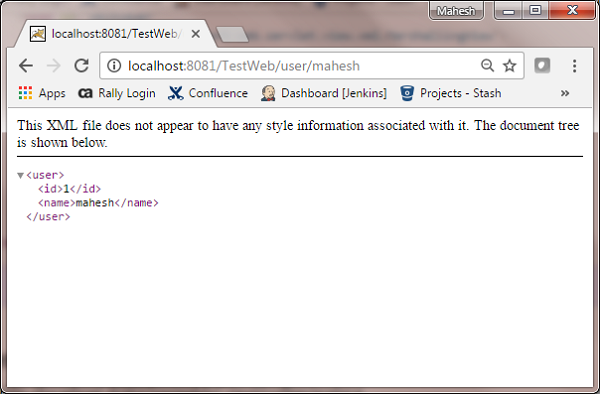
Ora, avvia il server Tomcat e assicurati di essere in grado di accedere ad altre pagine web dalla cartella webapps utilizzando un browser standard. Prova un URL -http://localhost:8080/TestWeb/mahesh e vedremo la seguente schermata.