Flex - Criar aplicativo
Usaremos o Flash Builder 4.5 para criar aplicativos Flex. Vamos começar com um simplesHelloWorld inscrição.
Etapa 1 - Criar Projeto
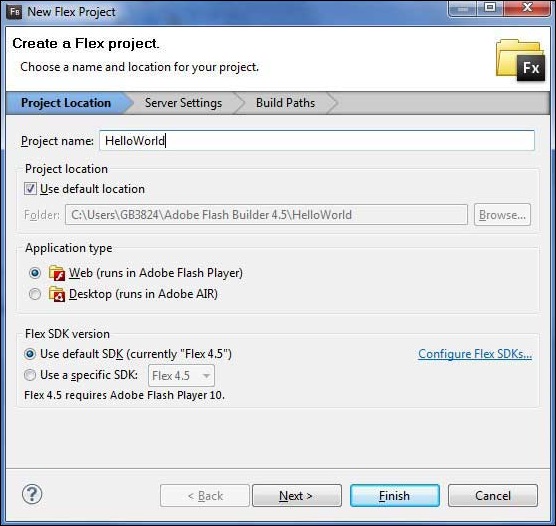
A primeira etapa é criar um projeto Flex simples usando o IDE do Flash Builder. Inicie o assistente de projeto usando a opçãoFile > New > Flex Project. Agora nomeie seu projeto como HelloWorld usando a janela do assistente da seguinte forma -

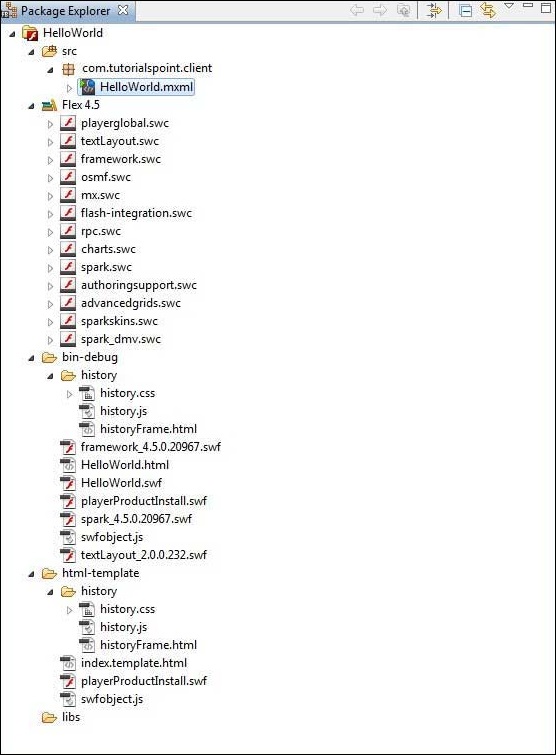
Selecione o tipo de aplicativo Web (runs in Adobe Flash Player). No entanto, se não estiver selecionado, deixe os outros valores padrão como estão e clique no botão Concluir. Assim que seu projeto for criado com sucesso, você terá o seguinte conteúdo em seu Project Explorer -

Aqui está uma breve descrição de todas as pastas importantes -
| Pasta | Localização |
|---|---|
| mesa com borda de mesa | Arquivos de código-fonte (mxml / as classes). Criamos a estrutura de pasta com / tutorialspoint / client contendo as classes java específicas do lado do cliente responsáveis pela exibição da IU do cliente. |
| bin-debug | Esta é a parte de saída, ela representa o aplicativo da web implementável real. A pasta de histórico contém arquivos de suporte para gerenciamento de histórico do aplicativo Flex. framework_xxx.swf, os arquivos de estrutura flex devem ser usados pelo aplicativo flex. HelloWorld.html, arquivo HTML wrapper / host para aplicativo flex. HelloWorld.swf, nosso aplicativo baseado em flex. playerProductInstall.swf, instalador expresso do flash player. spark_xxx.swf, biblioteca para suporte ao componente spark. swfobject.js, JavaScript responsável por carregar HelloWorld.swf em HelloWorld.html. Ele verifica a versão do flash player e passa o parâmetro de inicialização para o arquivo HelloWorld.swf. textLayout_xxx.swf, biblioteca para suporte a componentes de texto. |
| html-template | Isso representa o aplicativo da web configurável. O Flash Builder compila arquivos da pasta html-template para a pasta bin-debug. A pasta de histórico contém arquivos de suporte para gerenciamento de histórico do aplicativo Flex. index.template.html, wrapper / host Arquivo HTML para aplicativos flex com espaços reservados para configuração específica do Flash Builder. É compilado em HelloWorld.html na pasta bin-debug durante a compilação. playerProductInstall.swf, o instalador expresso do flash player é copiado para a pasta bin-debug durante a compilação. swfobject.js, JavaScript responsável por carregar HelloWorld.swf em HelloWorld.html. Ele verifica a versão do flash player e passa o parâmetro de inicialização para o arquivo HelloWorld.swf que é copiado para a pasta bindebug durante a compilação. |
Etapa 2 - Criar arquivo CSS externo
Crie um arquivo CSS styles.css para a página Wrapper HTML em html-template pasta.
html, body {
   height:100%;
}

body {
   margin:0;
   padding:0;
   overflow:auto;
   text-align:center;
}

object:focus {
   outline:none;
}

#flashContent {
   display:none;
}

.pluginHeader {
   font-family:Arial, Helvetica, sans-serif;
   font-size:14px;
   color:#9b1204;
   text-decoration:none;
   font-weight:bold;
}

.pluginInstallText {
   font-family:Arial, Helvetica, sans-serif;
   font-size:12px;
   color:#000000;
   line-height:18px;
   font-style:normal;
}

.pluginText {
   font-family:Arial, Helvetica, sans-serif;
   font-size:12px;
   color:#000000;
   line-height:18px;
   font-style:normal;
}
Etapa 3 - Modificar modelo de página HTML Wrapper
Modificar modelo de página HTML de wrapper index.template.html dentro htmltemplatepasta. O Flash Builder criará um modelo de página HTML Wrapper padrão html-template / index.template.html , que será compilado em HelloWorld.html.
Este arquivo contém espaços reservados que o Flash Builder substitui durante o processo de compilação. Por exemplo, versão do flash player, nome do aplicativo, etc.
Vamos modificar este arquivo para exibir mensagens personalizadas caso o plugin Flash não esteja instalado.
<!DOCTYPE html PUBLIC "-//W3C//DTD XHTML 1.0 Transitional//EN"
"http://www.w3.org/TR/xhtml1/DTD/xhtml1-transitional.dtd">
<html xmlns = "http://www.w3.org/1999/xhtml" lang = "en" xml:lang = "en">

   <head>
      <title>${title}</title>
      <meta name = "google" value = "notranslate" />
      <meta http-equiv = "Content-Type" content = "text/html; charset = utf-8" />
      <link rel = "stylesheet" href = "styles.css" type = "text/css"></link>
      <link rel = "stylesheet" type = "text/css" href = "history/history.css" />
      <script type = "text/javascript" table table-bordered = "history/history.js">
      </script>
      <script type = "text/javascript" table table-bordered = "swfobject.js"></script>

      <script type = "text/javascript">
         // For version detection, set to min. required Flash Player version,
         //or 0 (or 0.0.0), for no version detection.
         var swfVersionStr = "${version_major}.${version_minor}.${version_revision}";

         // To use express install, set to playerProductInstall.swf,
         //otherwise the empty string.
         var xiSwfUrlStr = "${expressInstallSwf}";
         var flashvars = {};
         var params = {};
         params.quality = "high";
         params.bgcolor = "${bgcolor}";
         params.allowscriptaccess = "sameDomain";
         params.allowfullscreen = "true";

         var attributes = {};
         attributes.id = "${application}";
         attributes.name = "${application}";
         attributes.align = "middle";
         swfobject.embedSWF (
            "${swf}.swf", "flashContent",
            "${width}", "${height}",
            swfVersionStr, xiSwfUrlStr,
            flashvars, params, attributes);

         // JavaScript enabled so display the flashContent div in case
         //it is not replaced with a swf object.
         swfobject.createCSS("#flashContent", "display:block;text-align:left;");
      </script>
   </head>

   <body>
      <div id = "flashContent">
         <p style = "margin:100px;">

            <table width = "700" cellpadding = "10" cellspacing = "2" border = "0">
               <tr>
                  <td class = "pluginHeader">Flash Player Required</td>
               </tr>

               <tr>
                  <td class = "pluginText">The Adobe Flash Player version
                     10.2.0 or greater is required.</td>
               </tr>

               <tr>
                  <td class = "pluginInstallText" align = "left">

                  <table border = "0" width = "100%">
                     <tr class = "pluginInstallText" >
                        <td>Click here to download and install Adobe Flash Player:</td>
                        <td> </td>
                        <td align = "right">
                           <script type = "text/javascript">
                              var pageHost
                                 = ((document.location.protocol == "https:") ? "https://" : "http://");
                              document.write("<a target = '_blank'"
                                 +" href = 'http://get.adobe.com/flashplayer/'><"
                                 +"img style = 'border-style: none' table table-bordered = '"
                                 +pageHost
                                 +"www.adobe.com/images/shared/download_buttons/get_flash_player.gif'"
                                 +" alt = 'Get Adobe Flash player' /></a>" );
                           </script>
                        </td>
                     </tr>
                  </table>
               </tr>
            </table>
         </p>
      </div>

      <noscript>
         <object classid = "clsid:D27CDB6E-AE6D-11cf-96B8-444553540000"
            width = "${width}" height = "${height}" id = "${application}">
            <param name = "movie" value = "${swf}.swf" />
            <param name = "quality" value = "high" />
            <param name = "bgcolor" value = "${bgcolor}" />
            <param name = "allowScriptAccess" value = "sameDomain" />
            <param name = "allowFullScreen" value = "true" />

            <!--[if !IE]>-->
            <object type = "application/x-shockwave-flash" data = "${swf}.swf"
               width = "${width}" height = "${height}">
               <param name = "quality" value = "high" />
               <param name = "bgcolor" value = "${bgcolor}" />
               <param name = "allowScriptAccess" value = "sameDomain" />
               <param name = "allowFullScreen" value = "true" />
            <!--<![endif]-->

            <!--[if gte IE 6]>-->
               <p>
                  <p style = "margin:100px;">
                     <table width = "700" cellpadding = "10" cellspacing = "2"
                        border = "0">
                        <tr>
                           <td class = "pluginHeader">Flash Player Required</td>
                        </tr>

                        <tr>
                           <td class = "pluginText">The Adobe Flash Player version
                           10.2.0 or greater is required.</td>
                        </tr>

                        <tr>
                           <td class = "pluginInstallText" align = "left">

                           <table border = "0" width = "100%">
                              <tr class = "pluginInstallText" >
                                 <td>Click here to download and install Adobe Flash
                                    Player:</td>
                                 <td> </td>
                                 <td align = "right">
                                    <script type = "text/javascript">
                                       var pageHost
                                          = ((document.location.protocol == "https:") ? "https://" : "http://");
                                       document.write("<a target = '_blank'"
                                          +" href = 'http://get.adobe.com/flashplayer/'><"
                                          +"img style = 'border-style: none' table table-bordered = '"
                                          +pageHost
                                          +"www.adobe.com/images/shared/download_buttons/get_flash_player.gif'"
                                          +" alt = 'Get Adobe Flash player' /></a>" );
                                    </script>
                                 </td>
                              </tr>
                           </table>
                        </tr>
                     </table>
                  </p>
               </p>
            <!--<![endif]-->

            <p style = "margin:100px;">
               <table width = "700" cellpadding = "10" cellspacing = "2" border = "0">
                  <tr><td class = "pluginHeader">Flash Player Required</td></tr>
                  <tr><td class = "pluginText">The Adobe Flash Player version
                     10.2.0 or greater is required.</td></tr>
                  <tr>
                     <td class = "pluginInstallText" align = "left">
                        <table border = "0" width = "100%">
                           <tr class = "pluginInstallText" >
                              <td>Click here to download and install Adobe Flash
                                 Player:</td>
                              <td> </td>
                              <td align = "right">
                                 <script type = "text/javascript">
                                    var pageHost
                                       = ((document.location.protocol == "https:") ? "https://" : "http://");
                                    document.write("<a target = '_blank'"
                                       +" href = 'http://get.adobe.com/flashplayer/'><"
                                       +"img style = 'border-style: none' table table-bordered = '"
                                       +pageHost
                                       +"www.adobe.com/images/shared/download_buttons/get_flash_player.gif'"
                                       +" alt = 'Get Adobe Flash player' /></a>" );
                                 </script>
                              </td>
                           </tr>
                        </table>
                     </td>
                  </tr>
               </table>
            </p>
         <!--[if !IE]>-->
         </object>
         <!--<![endif]-->
         </object>
      </noscript>
   </body>
</html>
Etapa 4 - Criar arquivo CSS interno
Crie um arquivo CSS Style.css para HelloWorld.mxml dentro table tablebordered/com/tutorialspointpasta. O Flex fornece estilos css semelhantes para seus controles de IU, pois há estilos de css para controles de IU em HTML.
/* CSS file */
@namespace s "library://ns.adobe.com/flex/spark";
@namespace mx "library://ns.adobe.com/flex/mx";

.heading {
   fontFamily: Arial, Helvetica, sans-serif;
   fontSize: 17px;
   color: #9b1204;
   textDecoration:none;
   fontWeight:normal;
}

.button {
   fontWeight: bold;
}

.container {
   cornerRadius :10;
   horizontalCenter :0;
   borderColor: #777777;
   verticalCenter:0;
   backgroundColor: #efefef;
}
Etapa 5 - Modificar classe de nível de entrada
O Flash Builder criará uma tabela de arquivo mxml padrão tablebordered / com.tutorialspoint / HelloWorld.mxml , que possui um contêiner de tag raiz <application> para o aplicativo. Vamos modificar este arquivo para exibir "Hello, World!" -
<?xml version = "1.0" encoding = "utf-8"?>
<s:Application xmlns:fx = "http://ns.adobe.com/mxml/2009"
   xmlns:s = "library://ns.adobe.com/flex/spark"
   xmlns:mx = "library://ns.adobe.com/flex/mx
   width = "100%" height = "100%"
      minWidth = "500" minHeight = "500"
      initialize = "application_initializeHandler(event)">

   <fx:Style source = "/com/tutorialspoint/client/Style.css" />
   <fx:Script>
      <![CDATA[
         import mx.controls.Alert;
         import mx.events.FlexEvent;
         protected function btnClickMe_clickHandler(event:MouseEvent):void {
            Alert.show("Hello World!");
         }

         protected function application_initializeHandler(event:FlexEvent):void {
            lblHeader.text = "My Hello World Application";
         }
      ]]>
   </fx:Script>

   <s:BorderContainer width = "500" height = "500" id = "mainContainer"
      styleName = "container">
      <s:VGroup width = "100%" height = "100%" gap = "50" horizontalAlign = "center"
         verticalAlign = "middle">
         <s:Label id = "lblHeader" fontSize = "40" color = "0x777777"
            styleName = "heading" />
         <s:Button label = "Click Me!" id = "btnClickMe"
            click = "btnClickMe_clickHandler(event)" styleName = "button" />
      </s:VGroup>
   </s:BorderContainer>
</s:Application>
Você pode criar mais arquivos mxml ou actionscript no mesmo diretório de origem para definir novos aplicativos ou para definir rotinas auxiliares.
Etapa 6 - Criar aplicativo
O Flash Builder tem Build Automaticallypor padrão marcada. Basta verificar oProblemsVeja se há algum erro. Depois de concluir as alterações, você não verá nenhum erro.
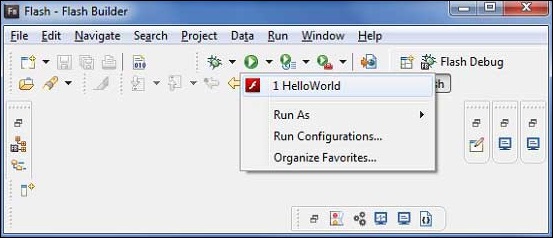
Etapa 7 - Executar o aplicativo
Agora clique no

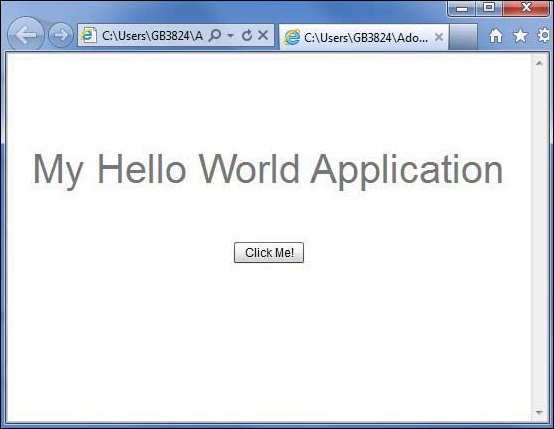
Se tudo estiver bem, você deve ver o pop-up do navegador, o aplicativo instalado e funcionando. Se tudo estiver bem com o seu aplicativo, ele produzirá o seguinte resultado: [ Experimente online ]
Porque, você está executando seu aplicativo no flash player, então será necessário instalar o plugin do Flash Player para o seu navegador. Basta seguir as instruções na tela para instalar o plugin. Se você já tem o plugin Flash Player definido para o seu navegador, então você deve ser capaz de ver o seguinte resultado -

Parabéns! Você implementou seu primeiro aplicativo usandoFlex.