Flutter - แอนิเมชั่น
ภาพเคลื่อนไหวเป็นขั้นตอนที่ซับซ้อนในแอปพลิเคชันมือถือใด ๆ แม้จะมีความซับซ้อน แต่แอนิเมชั่นก็ช่วยเพิ่มประสบการณ์ของผู้ใช้ไปอีกระดับและให้การโต้ตอบกับผู้ใช้ที่หลากหลาย เนื่องจากความมีชีวิตชีวาแอนิเมชั่นจึงกลายเป็นส่วนสำคัญของแอปพลิเคชันมือถือสมัยใหม่ เฟรมเวิร์ก Flutter ตระหนักถึงความสำคัญของแอนิเมชั่นและมอบเฟรมเวิร์กที่เรียบง่ายและใช้งานง่ายในการพัฒนาแอนิเมชั่นทุกประเภท
บทนำ
แอนิเมชั่นคือกระบวนการแสดงชุดภาพ / ภาพตามลำดับเฉพาะภายในช่วงเวลาที่กำหนดเพื่อให้เกิดภาพลวงตาของการเคลื่อนไหว สิ่งที่สำคัญที่สุดของแอนิเมชั่นมีดังนี้ -
ภาพเคลื่อนไหวมีค่าที่แตกต่างกัน 2 ค่า ได้แก่ ค่าเริ่มต้นและค่าสิ้นสุด ภาพเคลื่อนไหวเริ่มต้นจากค่าเริ่มต้นและผ่านชุดของค่ากลางและสุดท้ายจะสิ้นสุดที่ค่าสิ้นสุด ตัวอย่างเช่นหากต้องการทำให้วิดเจ็ตเคลื่อนไหวให้จางหายไปค่าเริ่มต้นจะเป็นค่าความทึบเต็มและค่าสุดท้ายจะเป็นค่าความทึบเป็นศูนย์
ค่ากลางอาจเป็นเชิงเส้นหรือไม่เป็นเชิงเส้น (เส้นโค้ง) และสามารถกำหนดค่าได้ ทำความเข้าใจว่าภาพเคลื่อนไหวทำงานตามที่กำหนดค่าไว้ การกำหนดค่าแต่ละแบบให้ความรู้สึกที่แตกต่างกันกับภาพเคลื่อนไหว ตัวอย่างเช่นการซีดจางวิดเจ็ตจะมีลักษณะเป็นเส้นตรงในขณะที่การกระดอนของลูกบอลจะไม่เป็นเส้นตรง
ระยะเวลาของกระบวนการแอนิเมชั่นมีผลต่อความเร็ว (ความช้าหรือความเร็ว) ของแอนิเมชั่น
ความสามารถในการควบคุมกระบวนการแอนิเมชั่นเช่นการเริ่มแอนิเมชั่นการหยุดแอนิเมชั่นการทำซ้ำแอนิเมชั่นเพื่อกำหนดจำนวนครั้งการย้อนกระบวนการของแอนิเมชั่นเป็นต้น
ใน Flutter ระบบแอนิเมชั่นไม่ได้ทำแอนิเมชั่นจริง แต่จะให้เฉพาะค่าที่จำเป็นในทุกเฟรมเพื่อแสดงภาพ
คลาสแอนิเมชั่น
ระบบภาพเคลื่อนไหวกระพือขึ้นอยู่กับวัตถุแอนิเมชั่น คลาสแอนิเมชั่นหลักและการใช้งานมีดังนี้ -
ภาพเคลื่อนไหว
สร้างค่าที่ถูกแก้ไขระหว่างตัวเลขสองตัวในช่วงเวลาหนึ่ง คลาสแอนิเมชั่นที่พบมากที่สุด ได้แก่ -
Animation<double> - แก้ไขค่าระหว่างทศนิยมสองจำนวน
Animation<Color> - สอดแทรกสีระหว่างสองสี
Animation<Size> - สอดแทรกขนาดระหว่างสองขนาด
AnimationController- ออบเจ็กต์แอนิเมชั่นพิเศษเพื่อควบคุมแอนิเมชั่นเอง สร้างค่าใหม่เมื่อใดก็ตามที่แอปพลิเคชันพร้อมสำหรับเฟรมใหม่ รองรับแอนิเมชั่นเชิงเส้นและค่าเริ่มตั้งแต่ 0.0 ถึง 1.0
controller = AnimationController(duration: const Duration(seconds: 2), vsync: this);ที่นี่ตัวควบคุมจะควบคุมตัวเลือกภาพเคลื่อนไหวและระยะเวลาควบคุมระยะเวลาของกระบวนการแอนิเมชั่น vsync เป็นตัวเลือกพิเศษที่ใช้เพื่อเพิ่มประสิทธิภาพทรัพยากรที่ใช้ในภาพเคลื่อนไหว
CurvedAnimation
คล้ายกับ AnimationController แต่รองรับภาพเคลื่อนไหวที่ไม่ใช่เชิงเส้น CurvedAnimation สามารถใช้ร่วมกับวัตถุ Animation ได้ดังนี้ -
controller = AnimationController(duration: const Duration(seconds: 2), vsync: this);
animation = CurvedAnimation(parent: controller, curve: Curves.easeIn)
ทวี <T>
ได้มาจาก Animatable <T> และใช้เพื่อสร้างตัวเลขระหว่างตัวเลขสองตัวใด ๆ ที่ไม่ใช่ 0 และ 1 สามารถใช้ร่วมกับออบเจ็กต์แอนิเมชั่นโดยใช้วิธีการเคลื่อนไหวและส่งผ่านวัตถุแอนิเมชั่นจริง
AnimationController controller = AnimationController(
   duration: const Duration(milliseconds: 1000),
vsync: this); Animation<int> customTween = IntTween(
   begin: 0, end: 255).animate(controller);
Tween ยังสามารถใช้ร่วมกับ CurvedAnimation ได้ดังนี้ -
AnimationController controller = AnimationController(
   duration: const Duration(milliseconds: 500), vsync: this);
final Animation curve = CurvedAnimation(parent: controller, curve: Curves.easeOut);
Animation<int> customTween = IntTween(begin: 0, end: 255).animate(curve);
ที่นี่ตัวควบคุมคือตัวควบคุมภาพเคลื่อนไหวที่แท้จริง เส้นโค้งให้ประเภทของความไม่เป็นเชิงเส้นและ customTween ให้ช่วงที่กำหนดเองตั้งแต่ 0 ถึง 255
ขั้นตอนการทำงานของ Flutter Animation
ขั้นตอนการทำงานของภาพเคลื่อนไหวมีดังนี้ -
กำหนดและเริ่มตัวควบคุมแอนิเมชันใน initState ของ StatefulWidget
AnimationController(duration: const Duration(seconds: 2), vsync: this);
animation = Tween<double>(begin: 0, end: 300).animate(controller);
controller.forward();
เพิ่มแอนิเมชั่นตามฟัง addListener เพื่อเปลี่ยนสถานะของวิดเจ็ต
animation = Tween<double>(begin: 0, end: 300).animate(controller) ..addListener(() {
   setState(() {
      // The state that has changed here is the animation object’s value.
   });
});
สามารถใช้วิดเจ็ต Build-in, AnimatedWidget และ AnimatedBuilder เพื่อข้ามขั้นตอนนี้ วิดเจ็ตทั้งสองยอมรับออบเจ็กต์ Animation และรับค่าปัจจุบันที่จำเป็นสำหรับภาพเคลื่อนไหว
รับค่าแอนิเมชั่นระหว่างขั้นตอนการสร้างวิดเจ็ตจากนั้นนำไปใช้กับความกว้างความสูงหรือคุณสมบัติที่เกี่ยวข้องแทนค่าเดิม
child: Container(
   height: animation.value,
   width: animation.value,
   child: <Widget>,
)
แอปพลิเคชันการทำงาน
ให้เราเขียนแอปพลิเคชั่นที่ใช้แอนิเมชั่นอย่างง่ายเพื่อทำความเข้าใจแนวคิดของแอนิเมชั่นใน Flutter framework
สร้างแอปพลิเคชันFlutterใหม่ใน Android studio, product_animation_app
คัดลอกโฟลเดอร์ assets จาก product_nav_app ไปยัง product_animation_app และเพิ่มเนื้อหาภายในไฟล์ pubspec.yaml
flutter:
   assets:
   - assets/appimages/floppy.png
   - assets/appimages/iphone.png
   - assets/appimages/laptop.png
   - assets/appimages/pendrive.png
   - assets/appimages/pixel.png
   - assets/appimages/tablet.png
ลบรหัสเริ่มต้นเริ่มต้น (main.dart)
เพิ่มการนำเข้าและฟังก์ชันหลักพื้นฐาน
import 'package:flutter/material.dart';
void main() => runApp(MyApp());
สร้างวิดเจ็ต MyApp ที่ได้มาจาก StatefulWidgtet
class MyApp extends StatefulWidget {
   _MyAppState createState() => _MyAppState();
}
สร้างวิดเจ็ต _MyAppState และใช้งาน initState และกำจัดนอกเหนือจากวิธีการสร้างเริ่มต้น
class _MyAppState extends State<MyApp> with SingleTickerProviderStateMixin {
   Animation<double> animation;
   AnimationController controller;
   @override void initState() {
      super.initState();
      controller = AnimationController(
         duration: const Duration(seconds: 10), vsync: this
      );
      animation = Tween<double>(begin: 0.0, end: 1.0).animate(controller);
      controller.forward();
   }
   // This widget is the root of your application.
   @override
   Widget build(BuildContext context) {
      controller.forward();
      return MaterialApp(
         title: 'Flutter Demo',
         theme: ThemeData(primarySwatch: Colors.blue,),
         home: MyHomePage(title: 'Product layout demo home page', animation: animation,)
      );
   }
   @override
   void dispose() {
      controller.dispose();
      super.dispose();
   }
}
ที่นี่
ในวิธีการ initState เราได้สร้างออบเจ็กต์ตัวควบคุมแอนิเมชั่น (ตัวควบคุม) วัตถุแอนิเมชั่น (ภาพเคลื่อนไหว) และเริ่มการเคลื่อนไหวโดยใช้ controller.forward
ในวิธีการกำจัดเราได้กำจัดออบเจ็กต์ตัวควบคุมแอนิเมชั่น (คอนโทรลเลอร์)
ในวิธีการสร้างส่งภาพเคลื่อนไหวไปยังวิดเจ็ต MyHomePage ผ่านตัวสร้าง ตอนนี้วิดเจ็ต MyHomePage สามารถใช้ออบเจ็กต์แอนิเมชั่นเพื่อทำให้เนื้อหาเคลื่อนไหวได้
ตอนนี้เพิ่มวิดเจ็ต ProductBox
class ProductBox extends StatelessWidget {
   ProductBox({Key key, this.name, this.description, this.price, this.image})
      : super(key: key);
   final String name;
   final String description;
   final int price;
   final String image;

   Widget build(BuildContext context) {
      return Container(
         padding: EdgeInsets.all(2),
         height: 140,
         child: Card(
            child: Row(
               mainAxisAlignment: MainAxisAlignment.spaceEvenly,
               children: <Widget>[
                  Image.asset("assets/appimages/" + image),
                  Expanded(
                     child: Container(
                        padding: EdgeInsets.all(5),
                        child: Column(
                           mainAxisAlignment: MainAxisAlignment.spaceEvenly,
                           children: <Widget>[
                              Text(this.name, style:
                                 TextStyle(fontWeight: FontWeight.bold)),
                              Text(this.description),
                                 Text("Price: " + this.price.toString()),
                           ],
                        )
                     )
                  )
               ]
            )
         )
      );
   }
}
สร้างวิดเจ็ตใหม่ MyAnimateWidget เพื่อสร้างแอนิเมชั่นจาง ๆ ง่ายๆโดยใช้ความทึบ
class MyAnimatedWidget extends StatelessWidget {
   MyAnimatedWidget({this.child, this.animation});

   final Widget child;
   final Animation<double> animation;

   Widget build(BuildContext context) => Center(
   child: AnimatedBuilder(
      animation: animation,
      builder: (context, child) => Container(
         child: Opacity(opacity: animation.value, child: child),
      ),
      child: child),
   );
}
ที่นี่เราได้ใช้ AniatedBuilder เพื่อสร้างแอนิเมชั่นของเรา AnimatedBuilder เป็นวิดเจ็ตที่สร้างเนื้อหาในขณะที่ทำแอนิเมชั่นในเวลาเดียวกัน ยอมรับออบเจ็กต์แอนิเมชั่นเพื่อรับค่าแอนิเมชันปัจจุบัน เราได้ใช้ค่าภาพเคลื่อนไหว animation.value เพื่อตั้งค่าความทึบของวิดเจ็ตลูก ผลกระทบวิดเจ็ตจะทำให้วิดเจ็ตลูกเคลื่อนไหวโดยใช้แนวคิดความทึบ
สุดท้ายสร้างวิดเจ็ต MyHomePage และใช้ออบเจ็กต์แอนิเมชั่นเพื่อทำให้เนื้อหาใด ๆ ของมันเคลื่อนไหว
class MyHomePage extends StatelessWidget {
MyHomePage({Key key, this.title, this.animation}) : super(key: key);
final String title;
final Animation<double>
animation;
@override
Widget build(BuildContext context) {
return Scaffold(
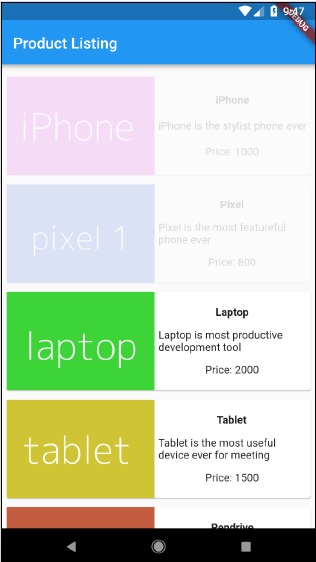
appBar: AppBar(title: Text("Product Listing")),body: ListView(
shrinkWrap: true,
padding: const EdgeInsets.fromLTRB(2.0, 10.0, 2.0, 10.0),
children: <Widget>[
FadeTransition(
child: ProductBox(
name: "iPhone",
description: "iPhone is the stylist phone ever",
price: 1000,
image: "iphone.png"
), opacity: animation
),
MyAnimatedWidget(child: ProductBox(
name: "Pixel",
description: "Pixel is the most featureful phone ever",
price: 800,
image: "pixel.png"
), animation: animation),
ProductBox(
name: "Laptop",
description: "Laptop is most productive development tool",
price: 2000,
image: "laptop.png"
),
ProductBox(
name: "Tablet",
description: "Tablet is the most useful device ever for meeting",
price: 1500,
image: "tablet.png"
),
ProductBox(
name: "Pendrive",
description: "Pendrive is useful storage medium",
price: 100,
image: "pendrive.png"
),
ProductBox(
name: "Floppy Drive",
description: "Floppy drive is useful rescue storage medium",
price: 20,
image: "floppy.png"
),
],
)
);
}
}ที่นี่เราได้ใช้ FadeAnimation และ MyAnimationWidget เพื่อทำให้สองรายการแรกในรายการเคลื่อนไหว FadeAnimation เป็นคลาสแอนิเมชั่นในตัวซึ่งเราใช้ในการทำให้เด็กเคลื่อนไหวโดยใช้แนวคิดทึบแสง
รหัสที่สมบูรณ์มีดังนี้ -
import 'package:flutter/material.dart';
void main() => runApp(MyApp());

class MyApp extends StatefulWidget {
   _MyAppState createState() => _MyAppState();
}
class _MyAppState extends State<MyApp> with SingleTickerProviderStateMixin {
   Animation<double> animation;
   AnimationController controller;

   @override
   void initState() {
      super.initState();
      controller = AnimationController(
         duration: const Duration(seconds: 10), vsync: this);
      animation = Tween<double>(begin: 0.0, end: 1.0).animate(controller);
      controller.forward();
   }
   // This widget is the root of your application.
   @override
   Widget build(BuildContext context) {
      controller.forward();
      return MaterialApp(
         title: 'Flutter Demo', theme: ThemeData(primarySwatch: Colors.blue,),
         home: MyHomePage(title: 'Product layout demo home page', animation: animation,)
      );
   }
   @override
   void dispose() {
      controller.dispose();
      super.dispose();
   }
}
class MyHomePage extends StatelessWidget {
   MyHomePage({Key key, this.title, this.animation}): super(key: key);
   final String title;
   final Animation<double> animation;

   @override
   Widget build(BuildContext context) {
      return Scaffold(
         appBar: AppBar(title: Text("Product Listing")),
         body: ListView(
            shrinkWrap: true,
            padding: const EdgeInsets.fromLTRB(2.0, 10.0, 2.0, 10.0),
            children: <Widget>[
               FadeTransition(
                  child: ProductBox(
                     name: "iPhone",
                     description: "iPhone is the stylist phone ever",
                     price: 1000,
                     image: "iphone.png"
                  ),
                  opacity: animation
               ),
               MyAnimatedWidget(
                  child: ProductBox(
                     name: "Pixel",
                     description: "Pixel is the most featureful phone ever",
                     price: 800,
                     image: "pixel.png"
                  ),
                  animation: animation
               ),
               ProductBox(
                  name: "Laptop",
                  description: "Laptop is most productive development tool",
                  price: 2000,
                  image: "laptop.png"
               ),
               ProductBox(
                  name: "Tablet",
                  description: "Tablet is the most useful device ever for meeting",
                  price: 1500,
                  image: "tablet.png"
               ),
               ProductBox(
                  name: "Pendrive",
                  description: "Pendrive is useful storage medium",
                  price: 100,
                  image: "pendrive.png"
               ),
               ProductBox(
                  name: "Floppy Drive",
                  description: "Floppy drive is useful rescue storage medium",
                  price: 20,
                  image: "floppy.png"
               ),
            ],
         )
      );
   }
}
class ProductBox extends StatelessWidget {
   ProductBox({Key key, this.name, this.description, this.price, this.image}) :
      super(key: key);
   final String name;
   final String description;
   final int price;
   final String image;
   Widget build(BuildContext context) {
      return Container(
         padding: EdgeInsets.all(2),
         height: 140,
         child: Card(
            child: Row(
               mainAxisAlignment: MainAxisAlignment.spaceEvenly,
               children: <Widget>[
                  Image.asset("assets/appimages/" + image),
                  Expanded(
                     child: Container(
                        padding: EdgeInsets.all(5),
                        child: Column(
                           mainAxisAlignment: MainAxisAlignment.spaceEvenly,
                           children: <Widget>[
                              Text(
                                 this.name, style: TextStyle(
                                    fontWeight: FontWeight.bold
                                 )
                              ),
                              Text(this.description), Text(
                                 "Price: " + this.price.toString()
                              ),
                           ],
                        )
                     )
                  )
               ]
            )
         )
      );
   }
}
class MyAnimatedWidget extends StatelessWidget {
   MyAnimatedWidget({this.child, this.animation});
   final Widget child;
   final Animation<double> animation;

   Widget build(BuildContext context) => Center(
      child: AnimatedBuilder(
         animation: animation,
         builder: (context, child) => Container(
            child: Opacity(opacity: animation.value, child: child),
         ),
         child: child
      ),
   );
}
รวบรวมและเรียกใช้แอปพลิเคชันเพื่อดูผลลัพธ์ เวอร์ชันเริ่มต้นและเวอร์ชันสุดท้ายของแอปพลิเคชันมีดังนี้ -