GWT - การสนับสนุนบุ๊กมาร์ก
GWT รองรับการจัดการประวัติเบราว์เซอร์โดยใช้คลาสประวัติซึ่งคุณสามารถอ้างอิงGWT -บทคลาสประวัติศาสตร์
GWT ใช้คำ tokenซึ่งเป็นเพียงสตริงที่แอปพลิเคชันสามารถแยกวิเคราะห์เพื่อกลับไปยังสถานะเฉพาะ แอปพลิเคชันจะบันทึกโทเค็นนี้ในประวัติของเบราว์เซอร์เป็นส่วนย่อยของ URL
ในGWT -บทคลาสประวัติศาสตร์เราจัดการการสร้างโทเค็นและการตั้งค่าในประวัติโดยการเขียนโค้ด
ในบทความนี้เราจะพูดถึงวิดเจ็ตพิเศษไฮเปอร์ลิงก์ซึ่งสร้างโทเค็นและจัดการประวัติให้เราโดยอัตโนมัติและให้ความสามารถในการบุ๊กมาร์กของแอปพลิเคชัน
ตัวอย่างการบุ๊กมาร์ก
ตัวอย่างนี้จะนำคุณผ่านขั้นตอนง่ายๆในการสาธิตการบุ๊กมาร์กของแอปพลิเคชัน GWT
ขั้นตอนต่อไปนี้เพื่ออัปเดตแอปพลิเคชัน GWT ที่เราสร้างในGWT - สร้างบทแอปพลิเคชัน -
| ขั้นตอน | คำอธิบาย |
|---|---|
| 1 | สร้างโครงการที่มีชื่อHelloWorldภายใต้แพคเกจcom.tutorialspointตามที่อธิบายไว้ในGWT - สร้างแอพลิเคชันบท |
| 2 | แก้ไขHelloWorld.gwt.xml , HelloWorld.css , HelloWorld.htmlและHelloWorld.javaตามที่อธิบายด้านล่าง เก็บไฟล์ที่เหลือไว้ไม่เปลี่ยนแปลง |
| 3 | คอมไพล์และเรียกใช้แอปพลิเคชันเพื่อตรวจสอบผลลัพธ์ของตรรกะที่ใช้งาน |
ต่อไปนี้เป็นเนื้อหาของตัวอธิบายโมดูลที่แก้ไข src/com.tutorialspoint/HelloWorld.gwt.xml.
<?xml version = "1.0" encoding = "UTF-8"?>
<module rename-to = 'helloworld'>
   <!-- Inherit the core Web Toolkit stuff.                        -->
   <inherits name = 'com.google.gwt.user.User'/>

   <!-- Inherit the default GWT style sheet.                       -->
   <inherits name = 'com.google.gwt.user.theme.clean.Clean'/>

   <!-- Specify the app entry point class.                         -->
   <entry-point class = 'com.tutorialspoint.client.HelloWorld'/>
   <!-- Specify the paths for translatable code                    -->
   <source path = 'client'/>
   <source path = 'shared'/>

</module>
ต่อไปนี้เป็นเนื้อหาของไฟล์ Style Sheet ที่แก้ไข war/HelloWorld.css.
body {
   text-align: center;
   font-family: verdana, sans-serif;
}

h1 {
   font-size: 2em;
   font-weight: bold;
   color: #777777;
   margin: 40px 0px 70px;
   text-align: center;
}
ต่อไปนี้เป็นเนื้อหาของไฟล์โฮสต์ HTML ที่แก้ไข war/HelloWorld.html
<html>
   <head>
      <title>Hello World</title>
      <link rel = "stylesheet" href = "HelloWorld.css"/>
      <script language = "javascript" src = "helloworld/helloworld.nocache.js">
      </script>
   </head>

   <body>
      <iframe src = "javascript:''"id = "__gwt_historyFrame"
         style = "width:0;height:0;border:0"></iframe>
      <h1> Bookmarking Demonstration</h1>
      <div id = "gwtContainer"></div>
   </body>
</html>
ให้เรามีเนื้อหาต่อไปนี้ของไฟล์ Java src/com.tutorialspoint/HelloWorld.java ซึ่งเราจะสาธิตการทำบุ๊กมาร์กในรหัส GWT
package com.tutorialspoint.client;

import com.google.gwt.core.client.EntryPoint;

import com.google.gwt.event.logical.shared.ValueChangeEvent;
import com.google.gwt.event.logical.shared.ValueChangeHandler;

import com.google.gwt.user.client.History;
import com.google.gwt.user.client.ui.HTML;
import com.google.gwt.user.client.ui.HorizontalPanel;
import com.google.gwt.user.client.ui.Hyperlink;
import com.google.gwt.user.client.ui.RootPanel;
import com.google.gwt.user.client.ui.TabPanel;
import com.google.gwt.user.client.ui.VerticalPanel;

public class HelloWorld implements EntryPoint {

   private TabPanel tabPanel;

   private void selectTab(String historyToken){
      /*  parse the history token */
      try {
         if (historyToken.substring(0, 9).equals("pageIndex")) {
            String tabIndexToken = historyToken.substring(9, 10);
            int tabIndex = Integer.parseInt(tabIndexToken);
            /* Select the specified tab panel */
            tabPanel.selectTab(tabIndex);
         } else {
            tabPanel.selectTab(0);
         }
      } catch (IndexOutOfBoundsException e) {
         tabPanel.selectTab(0);
      }
   }

   /**
    * This is the entry point method.
    */
   public void onModuleLoad() {
      /* create a tab panel to carry multiple pages */
      tabPanel = new TabPanel();

      /* create pages */
      HTML firstPage = new HTML("<h1>We are on first Page.</h1>");
      HTML secondPage = new HTML("<h1>We are on second Page.</h1>");
      HTML thirdPage = new HTML("<h1>We are on third Page.</h1>");

      String firstPageTitle = "First Page";
      String secondPageTitle = "Second Page";
      String thirdPageTitle = "Third Page";

      Hyperlink firstPageLink = new Hyperlink("1", "pageIndex0");
      Hyperlink secondPageLink = new Hyperlink("2", "pageIndex1");
      Hyperlink thirdPageLink = new Hyperlink("3", "pageIndex2");

      HorizontalPanel linksHPanel = new HorizontalPanel();
      linksHPanel.setSpacing(10);
      linksHPanel.add(firstPageLink);
      linksHPanel.add(secondPageLink);
      linksHPanel.add(thirdPageLink);

      /* If the application starts with no history token,
         redirect to a pageIndex0 */
      String initToken = History.getToken();

      if (initToken.length() == 0) {
         History.newItem("pageIndex0");
         initToken = "pageIndex0";
      }

      tabPanel.setWidth("400");
      /* add pages to tabPanel*/
      tabPanel.add(firstPage, firstPageTitle);
      tabPanel.add(secondPage,secondPageTitle);
      tabPanel.add(thirdPage, thirdPageTitle);

      /* add value change handler to History
       * this method will be called, when browser's Back button
       * or Forward button are clicked.
       * and URL of application changes.
       * */
      History.addValueChangeHandler(new ValueChangeHandler<String>() {
         @Override
         public void onValueChange(ValueChangeEvent<String> event) {
            selectTab(event.getValue());
         }
      });

      selectTab(initToken);

      VerticalPanel vPanel = new VerticalPanel();

      vPanel.setSpacing(10);
      vPanel.add(tabPanel);
      vPanel.add(linksHPanel);

      /* add controls to RootPanel */
      RootPanel.get().add(vPanel);
   }
}
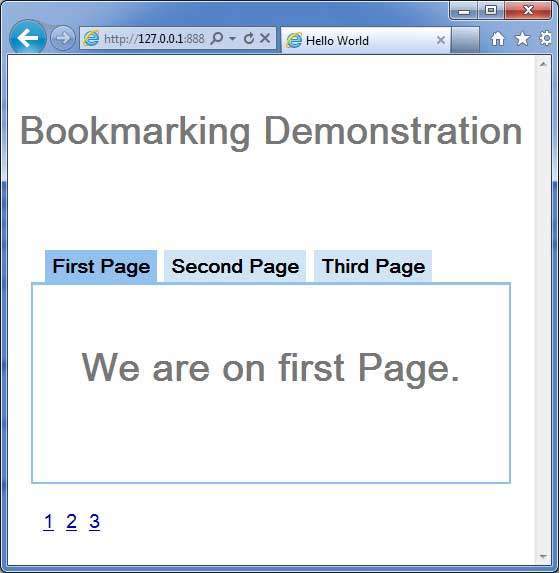
เมื่อคุณพร้อมกับการเปลี่ยนแปลงทั้งหมดแล้วให้เรารวบรวมและเรียกใช้แอปพลิเคชันในโหมดการพัฒนาเหมือนที่เราทำในGWT - สร้างบทแอปพลิเคชัน หากทุกอย่างเรียบร้อยกับแอปพลิเคชันของคุณสิ่งนี้จะให้ผลลัพธ์ดังต่อไปนี้ -

ตอนนี้คลิกที่ 1, 2 หรือ 3 คุณจะสังเกตได้ว่าแท็บเปลี่ยนไปตามดัชนี
คุณควรสังเกตเมื่อคุณคลิกที่ 1,2 หรือ 3 url ของแอปพลิเคชันจะเปลี่ยนไปและ #pageIndex จะถูกเพิ่มลงใน url
นอกจากนี้คุณยังสามารถเห็นว่าปุ่มย้อนกลับและไปข้างหน้าของเบราว์เซอร์เปิดใช้งานอยู่
ใช้ปุ่มย้อนกลับและไปข้างหน้าของเบราว์เซอร์และคุณจะเห็นแท็บต่างๆที่ได้รับเลือกตามนั้น
คลิกขวาที่ 1, 2 หรือ 3 คุณจะเห็นตัวเลือกต่างๆเช่นเปิดเปิดในหน้าต่างใหม่เปิดในแท็บใหม่เพิ่มรายการโปรดเป็นต้น
คลิกขวาที่ 3 เลือกเพิ่มในรายการโปรด บันทึกบุ๊กมาร์กเป็นหน้า 3
เปิดรายการโปรดและเลือกหน้า 3 คุณจะเห็นแท็บที่สามที่เลือก