GWT - กรอบการบันทึก
เฟรมเวิร์กการบันทึกเลียนแบบ java.util.logging ดังนั้นจึงใช้ไวยากรณ์เดียวกันและมีลักษณะการทำงานเหมือนกับรหัสการบันทึกฝั่งเซิร์ฟเวอร์
การบันทึก GWT กำหนดค่าโดยใช้ไฟล์. gwt.xml
เราสามารถกำหนดค่าการบันทึกให้เปิด / ปิดได้ เราสามารถเปิด / ปิดการใช้งานเครื่องจัดการเฉพาะและเปลี่ยนระดับการบันทึกเริ่มต้น
ประเภทของ Logger
คนตัดไม้จัดอยู่ในโครงสร้างแบบต้นไม้โดยมี Root Logger อยู่ที่รากของต้นไม้
ชื่อของคนตัดไม้กำหนดความสัมพันธ์แม่ / ลูกโดยใช้ . เพื่อแยกส่วนของชื่อ
ตัวอย่างเช่นถ้าเรามีคนตัดไม้สองคน Hospital.room1 และ Hospital.room2 พวกเขาเป็นพี่น้องกันโดยมีพ่อแม่เป็นคนตัดไม้ชื่อ Hospital คนตัดไม้ในโรงพยาบาล (และคนตัดไม้ที่มีชื่อซึ่งไม่มีจุด ".") มี Root Logger เป็นพาเรนต์
private static Logger room1Logger = Logger.getLogger("Hospital.room1");
private static Logger room2Logger = Logger.getLogger("Hospital.room2");
private static Logger hospitalLogger = Logger.getLogger("Hospital");
private static Logger rootLogger = Logger.getLogger("");
เครื่องจัดการบันทึก
GWT มีเครื่องจัดการเริ่มต้นซึ่งจะแสดงรายการบันทึกที่สร้างขึ้นโดยใช้เครื่องบันทึก
| ตัวจัดการ | เข้าสู่ระบบ | คำอธิบาย |
|---|---|---|
| SystemLogHandler | stdout | ข้อความเหล่านี้สามารถเห็นได้เฉพาะในโหมดการพัฒนาในหน้าต่าง DevMode |
| DevelopmentModeLogHandler | หน้าต่าง DevMode | บันทึกโดยเรียกเมธอด GWT.log ข้อความเหล่านี้สามารถเห็นได้เฉพาะในโหมดการพัฒนาในหน้าต่าง DevMode |
| ConsoleLogHandler | คอนโซล javascript | บันทึกไปยังคอนโซล javascript ซึ่งใช้โดย Firebug Lite (สำหรับ IE), Safari และ Chrome |
| FirebugLogHandler | Firebug | บันทึกไปที่คอนโซล firebug |
| PopupLogHandler | ป๊อปอัพ | บันทึกไปยังป๊อปอัปซึ่งอยู่ที่มุมซ้ายบนของแอปพลิเคชันเมื่อเปิดใช้งานตัวจัดการนี้ |
| SimpleRemoteLogHandler | เซิร์ฟเวอร์ | ตัวจัดการนี้จะส่งข้อความบันทึกไปยังเซิร์ฟเวอร์ซึ่งจะถูกบันทึกโดยใช้กลไกการบันทึกฝั่งเซิร์ฟเวอร์ |
กำหนดค่าการบันทึกในแอปพลิเคชัน GWT
ไฟล์ HelloWorld.gwt.xml จะถูกกำหนดค่าให้เปิดใช้งานการบันทึก GWT ดังนี้ -
# add logging module
   <inherits name = "com.google.gwt.logging.Logging"/>
# To change the default logLevel
   <set-property name = "gwt.logging.logLevel" value = "SEVERE"/>
# To enable logging
   <set-property name = "gwt.logging.enabled" value = "TRUE"/>
# To disable a popup Handler
   <set-property name = "gwt.logging.popupHandler" value = "DISABLED" />
ใช้คนตัดไม้เพื่อบันทึกการกระทำของผู้ใช้
/* Create Root Logger */
private static Logger rootLogger = Logger.getLogger("");
...
rootLogger.log(Level.SEVERE, "pageIndex selected: " + event.getValue());
...
ตัวอย่าง Logging Framework
ตัวอย่างนี้จะนำคุณผ่านขั้นตอนง่ายๆในการสาธิตความสามารถในการบันทึกของแอปพลิเคชัน GWT ทำตามขั้นตอนต่อไปนี้เพื่ออัปเดตแอปพลิเคชัน GWT ที่เราสร้างในGWT - สร้างบทแอปพลิเคชัน -
| ขั้นตอน | คำอธิบาย |
|---|---|
| 1 | สร้างโครงการที่มีชื่อHelloWorldภายใต้แพคเกจcom.tutorialspointตามที่อธิบายไว้ในGWT - สร้างแอพลิเคชันบท |
| 2 | แก้ไขHelloWorld.gwt.xml , HelloWorld.css , HelloWorld.htmlและHelloWorld.javaตามที่อธิบายด้านล่าง เก็บไฟล์ที่เหลือไว้ไม่เปลี่ยนแปลง |
| 3 | คอมไพล์และเรียกใช้แอปพลิเคชันเพื่อตรวจสอบผลลัพธ์ของตรรกะที่ใช้งาน |
ต่อไปนี้เป็นเนื้อหาของตัวอธิบายโมดูลที่แก้ไข src/com.tutorialspoint/HelloWorld.gwt.xml.
<?xml version = "1.0" encoding = "UTF-8"?>
<module rename-to = 'helloworld'>
   <!-- Inherit the core Web Toolkit stuff.                        -->
   <inherits name = 'com.google.gwt.user.User'/>

   <!-- Inherit the default GWT style sheet.                       -->
   <inherits name = 'com.google.gwt.user.theme.clean.Clean'/>
   <inherits name = "com.google.gwt.logging.Logging"/>
   <!-- Specify the app entry point class.                         -->
   <entry-point class = 'com.tutorialspoint.client.HelloWorld'/>
   <!-- Specify the paths for translatable code                    -->
   <source path = 'client'/>
   <source path = 'shared'/>
   <set-property name = "gwt.logging.logLevel" value="SEVERE"/>
   <set-property name = "gwt.logging.enabled" value = "TRUE"/>
   <set-property name = "gwt.logging.popupHandler" value=  "DISABLED" />
</module>
ต่อไปนี้เป็นเนื้อหาของไฟล์ Style Sheet ที่แก้ไข war/HelloWorld.css.
body {
   text-align: center;
   font-family: verdana, sans-serif;
}

h1 {
   font-size: 2em;
   font-weight: bold;
   color: #777777;
   margin: 40px 0px 70px;
   text-align: center;
}
ต่อไปนี้เป็นเนื้อหาของไฟล์โฮสต์ HTML ที่แก้ไข war/HelloWorld.html
<html>
   <head>
      <title>Hello World</title>
      <link rel = "stylesheet" href = "HelloWorld.css"/>
      <script language = "javascript" src = "helloworld/helloworld.nocache.js">
      </script>
   </head>

   <body>
      <iframe src = "javascript:''"id = "__gwt_historyFrame"
         style = "width:0;height:0;border:0"></iframe>
      <h1> Logging Demonstration</h1>
      <div id = "gwtContainer"></div>
   </body>
</html>
ให้เรามีเนื้อหาต่อไปนี้ของไฟล์ Java src/com.tutorialspoint/HelloWorld.java ซึ่งเราจะสาธิตการทำบุ๊กมาร์กในรหัส GWT
package com.tutorialspoint.client;

import java.util.logging.Level;
import java.util.logging.Logger;

import com.google.gwt.core.client.EntryPoint;

import com.google.gwt.event.logical.shared.ValueChangeEvent;
import com.google.gwt.event.logical.shared.ValueChangeHandler;

import com.google.gwt.logging.client.HasWidgetsLogHandler;

import com.google.gwt.user.client.History;
import com.google.gwt.user.client.ui.HTML;
import com.google.gwt.user.client.ui.HorizontalPanel;
import com.google.gwt.user.client.ui.Hyperlink;
import com.google.gwt.user.client.ui.RootPanel;
import com.google.gwt.user.client.ui.TabPanel;
import com.google.gwt.user.client.ui.VerticalPanel;

public class HelloWorld implements EntryPoint {

   private TabPanel tabPanel;
   /* Create Root Logger */
   private static Logger rootLogger = Logger.getLogger("");
   private VerticalPanel customLogArea;

   private void selectTab(String historyToken){
      /*  parse the history token */
      try {
         if (historyToken.substring(0, 9).equals("pageIndex")) {
            String tabIndexToken = historyToken.substring(9, 10);
            int tabIndex = Integer.parseInt(tabIndexToken);
            /* Select the specified tab panel */
            tabPanel.selectTab(tabIndex);
         } else {
            tabPanel.selectTab(0);
         }
      } catch (IndexOutOfBoundsException e) {
         tabPanel.selectTab(0);
      }
   }

   /**
    * This is the entry point method.
    */
   public void onModuleLoad() {
      /* create a tab panel to carry multiple pages */
      tabPanel = new TabPanel();

      /* create pages */
      HTML firstPage = new HTML("<h1>We are on first Page.</h1>");
      HTML secondPage = new HTML("<h1>We are on second Page.</h1>");
      HTML thirdPage = new HTML("<h1>We are on third Page.</h1>");

      String firstPageTitle = "First Page";
      String secondPageTitle = "Second Page";
      String thirdPageTitle = "Third Page";

      Hyperlink firstPageLink = new Hyperlink("1", "pageIndex0");
      Hyperlink secondPageLink = new Hyperlink("2", "pageIndex1");
      Hyperlink thirdPageLink = new Hyperlink("3", "pageIndex2");

      HorizontalPanel linksHPanel = new HorizontalPanel();
      linksHPanel.setSpacing(10);
      linksHPanel.add(firstPageLink);
      linksHPanel.add(secondPageLink);
      linksHPanel.add(thirdPageLink);

      /* If the application starts with no history token,
         redirect to a pageIndex0 */
      String initToken = History.getToken();

      if (initToken.length() == 0) {
         History.newItem("pageIndex0");
         initToken = "pageIndex0";
      }

      tabPanel.setWidth("400");
      /* add pages to tabPanel*/
      tabPanel.add(firstPage, firstPageTitle);
      tabPanel.add(secondPage,secondPageTitle);
      tabPanel.add(thirdPage, thirdPageTitle);

      /* add value change handler to History
       * this method will be called, when browser's Back button
       * or Forward button are clicked.
       * and URL of application changes.
       * */
      History.addValueChangeHandler(new ValueChangeHandler<String>() {
         @Override
         public void onValueChange(ValueChangeEvent<String> event) {
            selectTab(event.getValue());
            rootLogger.log(Level.SEVERE, "pageIndex selected: "
            + event.getValue());
         }
      });

      selectTab(initToken);

      VerticalPanel vPanel = new VerticalPanel();

      vPanel.setSpacing(10);
      vPanel.add(tabPanel);
      vPanel.add(linksHPanel);

      customLogArea = new VerticalPanel();
      vPanel.add(customLogArea);

      /* an example of using own custom logging area. */
      rootLogger.addHandler(new HasWidgetsLogHandler(customLogArea));

      /* add controls to RootPanel */
      RootPanel.get().add(vPanel);
   }
}
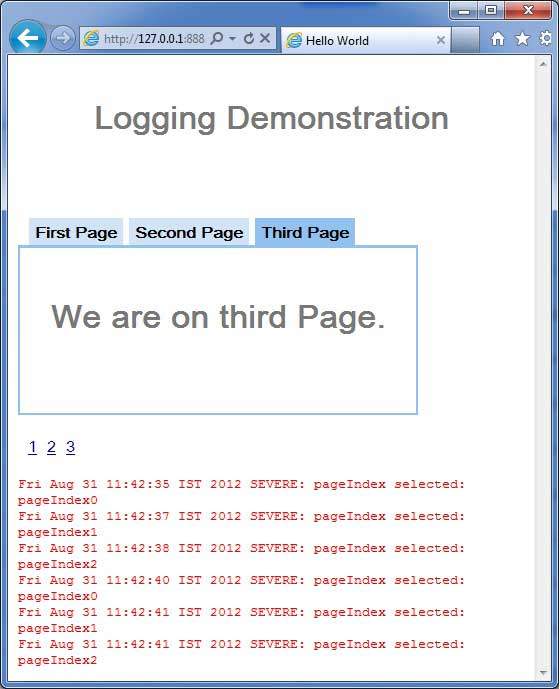
เมื่อคุณพร้อมกับการเปลี่ยนแปลงทั้งหมดแล้วให้เรารวบรวมและเรียกใช้แอปพลิเคชันในโหมดการพัฒนาเหมือนที่เราทำในGWT - สร้างบทแอปพลิเคชัน หากทุกอย่างเรียบร้อยกับแอปพลิเคชันของคุณสิ่งนี้จะให้ผลลัพธ์ดังต่อไปนี้ -

ตอนนี้คลิกที่ 1, 2 หรือ 3 คุณสามารถสังเกตได้เมื่อคุณคลิกที่ 1,2 หรือ 3 คุณจะเห็นบันทึกกำลังพิมพ์แสดง pageIndex ตรวจสอบเอาต์พุตคอนโซลใน Eclipse คุณสามารถเห็นบันทึกกำลังพิมพ์ในคอนโซล Eclipse เช่นกัน
Fri Aug 31 11:42:35 IST 2012
SEVERE: pageIndex selected: pageIndex0
Fri Aug 31 11:42:37 IST 2012
SEVERE: pageIndex selected: pageIndex1
Fri Aug 31 11:42:38 IST 2012
SEVERE: pageIndex selected: pageIndex2
Fri Aug 31 11:42:40 IST 2012
SEVERE: pageIndex selected: pageIndex0
Fri Aug 31 11:42:41 IST 2012
SEVERE: pageIndex selected: pageIndex1
Fri Aug 31 11:42:41 IST 2012
SEVERE: pageIndex selected: pageIndex2
ตอนนี้อัปเดตตัวอธิบายโมดูล src/com.tutorialspoint/HelloWorld.gwt.xml เพื่อเปิดใช้งาน popupHandler
<?xml version = "1.0" encoding = "UTF-8"?>
<module rename-to = 'helloworld'>
  <!-- Inherit the core Web Toolkit stuff.                        -->
   <inherits name = 'com.google.gwt.user.User'/>

   <!-- Inherit the default GWT style sheet.                       -->
   <inherits name = 'com.google.gwt.user.theme.clean.Clean'/>
   <inherits name = "com.google.gwt.logging.Logging"/>
   <!-- Specify the app entry point class.                         -->
   <entry-point class = 'com.tutorialspoint.client.HelloWorld'/>
   <!-- Specify the paths for translatable code                    -->
   <source path = 'client'/>
   <source path = 'shared'/>
   <set-property name = "gwt.logging.logLevel" value = "SEVERE"/>
   <set-property name = "gwt.logging.enabled" value = "TRUE"/>
   <set-property name="gwt.logging.popupHandler" value = "ENABLED" />
</module>
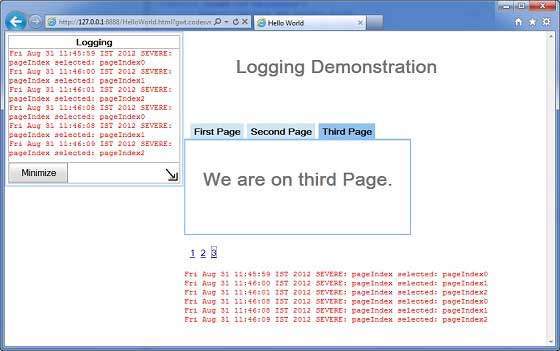
เมื่อคุณพร้อมสำหรับการเปลี่ยนแปลงทั้งหมดแล้วให้โหลดแอปพลิเคชันใหม่โดยรีเฟรชหน้าต่างเบราว์เซอร์ (กด F5 / ปุ่มโหลดซ้ำของเบราว์เซอร์) สังเกตเห็นหน้าต่างป๊อปอัปปรากฏขึ้นที่มุมซ้ายบนของแอปพลิเคชัน
ตอนนี้คลิกที่ 1, 2 หรือ 3 คุณจะสังเกตได้ว่าเมื่อคุณคลิกที่ 1,2 หรือ 3 คุณจะเห็นบันทึกกำลังพิมพ์โดยแสดง pageIndex ในหน้าต่างป๊อปอัป
