WPF - 2D Grafikler
WPF, uygulama gereksinimlerinize göre geliştirilebilen çok çeşitli 2D grafikler sağlar. WPF, grafik içerik çizmek için kullanılan hem Çizim hem de Şekil nesnelerini destekler.
Şekiller ve Çizim
Shape sınıfı, FrameworkElement sınıfından türetilir; Shape nesneleri, panellerin ve çoğu denetimin içinde kullanılabilir.
WPF, Elips, Çizgi, Yol, Çokgen, Çoklu Çizgi ve Dikdörtgen gibi Shape sınıfından türetilen bazı temel şekil nesneleri sağlar.
Öte yandan çizim nesneleri, FrameworkElement sınıfından türetilmez ve daha hafif bir uygulama sağlar.
Çizim nesneleri, Şekil nesnelerine kıyasla daha basittir. Aynı zamanda daha iyi performans özelliklerine sahiptirler.
Misal
Farklı şekillerdeki nesnelerin nasıl kullanılacağını anlamak için basit bir örnek verelim.
Adıyla yeni bir WPF projesi oluşturun WPF2DGraphics.
Aşağıdaki kod, farklı şekil türleri oluşturur.
<Window x:Class = "WPF2DGraphics.MainWindow"
   xmlns = "http://schemas.microsoft.com/winfx/2006/xaml/presentation"
   xmlns:x = "http://schemas.microsoft.com/winfx/2006/xaml"
   xmlns:d = "http://schemas.microsoft.com/expression/blend/2008"
   xmlns:mc = "http://schemas.openxmlformats.org/markup-compatibility/2006"
   xmlns:local = "clr-namespace:WPF2DGraphics"
   xmlns:PresentationOptions = "http://schemas.microsoft.com/winfx/2006/xaml/present ation/options"
   mc:Ignorable = "PresentationOptions" Title = "MainWindow" Height = "400" Width = "604">

   <StackPanel>
      <Ellipse Width = "100" Height = "60" Name = "sample" Margin = "10">
         <Ellipse.Fill>
            <RadialGradientBrush>
               <GradientStop Offset = "0" Color = "AliceBlue"/>
               <GradientStop Offset = "1" Color = "Gray"/>
               <GradientStop Offset = "2" Color = "Red"/>
            </RadialGradientBrush>
         </Ellipse.Fill>
      </Ellipse>

      <Path Stroke = "Red" StrokeThickness = "5" Data = "M 10,70 L 200,70"
         Height = "42.085" Stretch = "Fill" Margin = "140.598,0,146.581,0" />
      <Path Stroke = "BlueViolet" StrokeThickness = "5" Data = "M 20,100 A 100,56 42 1 0 200,10"
         Height = "81.316" Stretch = "Fill" Margin = "236.325,0,211.396,0" />

      <Path Fill = "LightCoral" Margin = "201.424,0,236.325,0"
         Stretch = "Fill" Height = "124.929">
         <Path.Data>
            <PathGeometry>
               <PathFigure StartPoint = "50,0" IsClosed = "True">
                  <LineSegment Point = "100,50"/>
                  <LineSegment Point = "50,100"/>
                  <LineSegment Point = "0,50"/>
               </PathFigure>
            </PathGeometry>
         </Path.Data>
      </Path>

   </StackPanel>

</Window>
Yukarıdaki kodu derleyip yürüttüğünüzde, bir elips, düz bir çizgi, bir yay ve bir çokgen üretecektir.

Misal
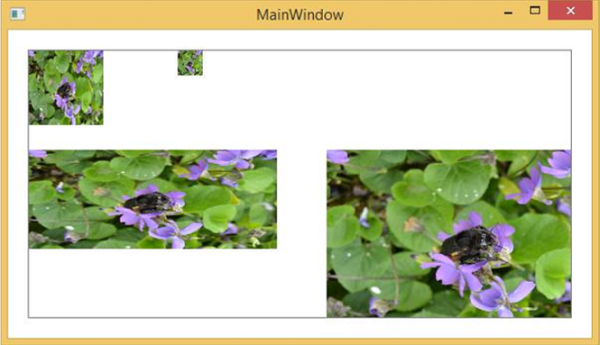
Bir alanın çizim ile nasıl boyanacağını gösteren başka bir örneğe bakalım.
Adıyla yeni bir WPF projesi oluşturun WPF2DGraphics1.
Aşağıdaki XAML kodu, resim çizimiyle nasıl farklı boyanacağını gösterir.
<Window x:Class = "WPF2DGraphics1.MainWindow"
   xmlns = "http://schemas.microsoft.com/winfx/2006/xaml/presentation"
   xmlns:x = "http://schemas.microsoft.com/winfx/2006/xaml"
   xmlns:d = "http://schemas.microsoft.com/expression/blend/2008"
   xmlns:PresentationOptions = "http://schemas.microsoft.com/winfx/2006/xaml/present ation/options"
   xmlns:mc = "http://schemas.openxmlformats.org/markup-compatibility/2006"
   mc:Ignorable = "PresentationOptions"
   xmlns:local = "clr-namespace:WPF2DGraphics1" Title = "MainWindow" Height = "350" Width = "604">

   <Grid>
      <Border BorderBrush = "Gray" BorderThickness = "1"
         HorizontalAlignment = "Left" VerticalAlignment = "Top"
         Margin = "20">

         <Image Stretch = "None">
            <Image.Source>
               <DrawingImage PresentationOptions:Freeze = "True">

                  <DrawingImage.Drawing>
                     <DrawingGroup>
                        <ImageDrawing Rect = "300,100,300,180" ImageSource = "Images\DSC_0104.JPG"/>
                        <ImageDrawing Rect = "0,100,250,100" ImageSource = "Images\DSC_0104.JPG"/>
                        <ImageDrawing Rect = "150,0,25,25" ImageSource = "Images\DSC_0104.JPG"/>
                        <ImageDrawing Rect = "0,0,75,75" ImageSource = "Images\DSC_0104.JPG"/>
                     </DrawingGroup>
                  </DrawingImage.Drawing>

               </DrawingImage>
            </Image.Source>
         </Image>

      </Border>
   </Grid>

</Window>
Uygulamanızı çalıştırdığınızda, aşağıdaki çıktıyı üretir -

Yukarıdaki kodu uygulamanızı ve daha fazla 2B şekil ve çizim denemenizi öneririz.