Winkelmaterial 7 - Eingabe
Das <mat-input>, eine Winkelrichtlinie, wird für <input> - und <textarea> -Elemente verwendet, unter denen gearbeitet werden soll <mat-form-field>.
Folgende Eingabetypen können innerhalb verwendet werden <mat-input>.
- color
- date
- datetime-local
- month
- number
- password
- search
- tel
- text
- time
- url
- week
In diesem Kapitel wird die Konfiguration vorgestellt, die für die Verwendung eines Steuerelements für die Matteneingabe in Angular Material erforderlich ist.
Erstellen Sie eine Winkelanwendung
Führen Sie die folgenden Schritte aus, um die Angular-Anwendung zu aktualisieren, die wir in Angular 6 - Projekt-Setup- Kapitel erstellt haben.
| Schritt | Beschreibung |
|---|---|
| 1 | Erstellen Sie ein Projekt mit dem Namen materialApp, wie im Kapitel Angular 6 - Projekteinrichtung erläutert . |
| 2 | Ändern app.module.ts , app.component.ts , app.component.css und app.component.html wie unten erläutert. Lassen Sie den Rest der Dateien unverändert. |
| 3 | Kompilieren Sie die Anwendung und führen Sie sie aus, um das Ergebnis der implementierten Logik zu überprüfen. |
Es folgt der Inhalt des modifizierten Moduldeskriptors app.module.ts.
import { BrowserModule } from '@angular/platform-browser';
import { NgModule } from '@angular/core';
import { AppComponent } from './app.component';
import {BrowserAnimationsModule} from '@angular/platform-browser/animations';
import {MatInputModule} from '@angular/material'
import {FormsModule, ReactiveFormsModule} from '@angular/forms';
@NgModule({
   declarations: [
      AppComponent
   ],
   imports: [
      BrowserModule,
      BrowserAnimationsModule,
      MatInputModule,
      FormsModule,
      ReactiveFormsModule
   ],
   providers: [],
   bootstrap: [AppComponent]
})
export class AppModule { }
Es folgt der Inhalt der geänderten CSS-Datei app.component.css.
.tp-form {
   min-width: 150px;
   max-width: 500px;
   width: 100%;
}
.tp-full-width {
   width: 100%;
}
Es folgt der Inhalt der geänderten ts-Datei app.component.ts.
import { Component } from '@angular/core';
import { FormControl } from "@angular/forms";
import {Validators} from '@angular/forms';
@Component({
   selector: 'app-root',
   templateUrl: './app.component.html',
   styleUrls: ['./app.component.css']
})
export class AppComponent {
   title = 'materialApp';
   emailFormControl = new FormControl('', [
      Validators.required,
      Validators.email,
  ]);
}
Es folgt der Inhalt der geänderten HTML-Hostdatei app.component.html.
<form class = "tp-form">
   <mat-form-field class = "tp-full-width">
      <input matInput placeholder = "Favorite Food" value = "Pasta">
   </mat-form-field>
   <mat-form-field class = "tp-full-width">
      <textarea matInput placeholder = "Enter your comment"></textarea>
   </mat-form-field>
   <mat-form-field class = "tp-full-width">
      <input matInput placeholder = "Email" [formControl] = "emailFormControl">
      <mat-error *ngIf = "emailFormControl.hasError('email')
         && !emailFormControl.hasError('required')">
         Please enter a valid email address
      </mat-error>
      <mat-error *ngIf = "emailFormControl.hasError('required')">
         Email is <strong>required</strong>
      </mat-error>
   </mat-form-field>
</form>
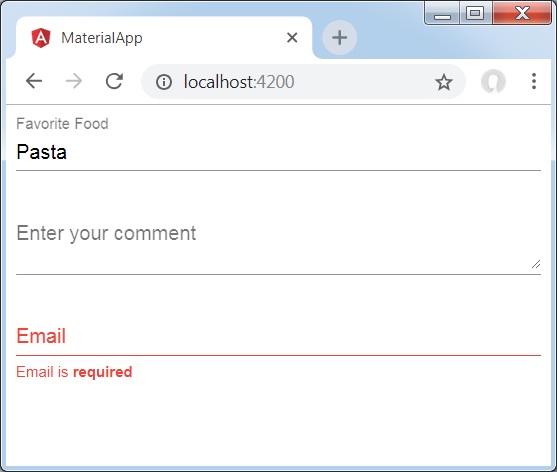
Ergebnis
Überprüfen Sie das Ergebnis.

Einzelheiten
Als erstes haben wir ein Formularfeld mit dem Mat-Form-Field-Wrapper erstellt.
Anschließend wird dem Formularfeld mithilfe des Eingabe- und des matInput-Attributs ein Formularsteuerelement hinzugefügt.