Flex-データバインディング
データバインディングとは何ですか?
データバインディングは、あるオブジェクトのデータが別のオブジェクトに関連付けられるプロセスです。これには、ソースプロパティ、宛先プロパティ、およびソースから宛先にデータをコピーするタイミングを示すトリガーイベントが必要です。
Flexは、以下のようにデータバインディングを行う3つの方法を提供します
- MXMLスクリプトの中括弧構文({})
- MXMLの<fx:binding>タグ
- ActionScriptのBindingUtils
データバインディング–MXMLで中括弧を使用する
次の例は、中括弧を使用してソースから宛先へのデータバインディングを指定する方法を示しています。
<s:TextInput id = "txtInput1" />
<s:TextInput id = "txtInput2" text = "{txtInput1.text}" />
データバインディング– MXMLで<fx:Binding>タグを使用
次の例は、使用方法を示しています
<fx:Binding source = "txtInput1.text" destination = "txtInput2.text" />
<s:TextInput id = "txtInput1" />
<s:TextInput id = "txtInput2" />
データバインディング–ActionScriptでBindingUtilsを使用する
次の例は、BindingUtilsを使用してソースから宛先へのデータバインディングを指定する方法を示しています。
<fx:Script>
   <![CDATA[
      import mx.binding.utils.BindingUtils;
      import mx.events.FlexEvent;

      protected function txtInput2_preinitializeHandler(event:FlexEvent):void {
         BindingUtils.bindProperty(txtInput2,"text",txtInput1, "text");
      }
   ]]>
</fx:Script>

<s:TextInput id = "txtInput1" />
<s:TextInput id = "txtInput2"
   preinitialize = "txtInput2_preinitializeHandler(event)" />
Flexデータバインディングの例
以下の手順に従って、テストアプリケーションを作成してFlexアプリケーションでスキニングが実際に動作することを確認しましょう。
| ステップ | 説明 |
|---|---|
| 1 | Flex-アプリケーションの作成の章で説明されているように、パッケージcom.tutorialspoint.clientの下にHelloWorldという名前のプロジェクトを作成します。 |
| 2 | 以下で説明するように、HelloWorld.mxmlを変更します。残りのファイルは変更しないでください。 |
| 3 | アプリケーションをコンパイルして実行し、ビジネスロジックが要件に従って機能していることを確認します。 |
以下は、変更されたHelloWorld.mxmlファイルの内容です。src/com/tutorialspoint/client/HelloWorld.mxml。
<?xml version = "1.0" encoding = "utf-8"?>
<s:Application xmlns:fx = "http://ns.adobe.com/mxml/2009"
xmlns:s = "library://ns.adobe.com/flex/spark"
xmlns:mx = "library://ns.adobe.com/flex/mx
width = "100%" height = "100%" minWidth = "500" minHeight = "500">
<fx:Style source = "/com/tutorialspoint/client/Style.css" />
<fx:Script>
<![CDATA[
import mx.binding.utils.BindingUtils;
import mx.events.FlexEvent;
protected function txtInput6_preinitializeHandler(event:FlexEvent):void {
BindingUtils.bindProperty(txtInput6,"text",txtInput5, "text");
}
]]>
</fx:Script>
<fx:Binding source = "txtInput3.text" destination = "txtInput4.text" />
<s:BorderContainer width = "500" height = "550" id = "mainContainer"
styleName = "container">
<s:VGroup width = "100%" height = "100%" gap = "50" horizontalAlign = "center"
verticalAlign = "middle">
<s:Label id = "lblHeader" text = "Data Binding Demonstration"
fontSize = "40" color = "0x777777" styleName = "heading" />
<s:Panel title = "Example #1 (Using Curly Braces,\{\})" width = "400"
height = "100" >
<s:layout>
<s:VerticalLayout paddingTop = "10" paddingLeft = "10" />
</s:layout>
<s:HGroup >
<s:Label text = "Type here: " width = "100" paddingTop = "6" />
<s:TextInput id = "txtInput1" />
</s:HGroup>
<s:HGroup >
<s:Label text = "Copied text: " width = "100" paddingTop = "6" />
<s:TextInput id = "txtInput2" text = "{txtInput1.text}" />
</s:HGroup>
</s:Panel>
<s:Panel title = "Example #2 (Using <fx:Binding>)" width = "400"
height = "100" >
<s:layout>
<s:VerticalLayout paddingTop = "10" paddingLeft = "10" />
</s:layout>
<s:HGroup >
<s:Label text = "Type here: " width = "100" paddingTop = "6" />
<s:TextInput id = "txtInput3" />
</s:HGroup>
<s:HGroup >
<s:Label text = "Copied text: " width = "100" paddingTop = "6" />
<s:Label id = "txtInput4" />
</s:HGroup>
</s:Panel>
<s:Panel title = "Example #3 (Using BindingUtils)" width = "400"
height = "100" >
<s:layout>
<s:VerticalLayout paddingTop = "10" paddingLeft = "10" />
</s:layout>
<s:HGroup >
<s:Label text = "Type here: " width = "100" paddingTop = "6" />
<s:TextInput id = "txtInput5" />
</s:HGroup>
<s:HGroup >
<s:Label text = "Copied text: " width = "100" paddingTop = "6" />
<s:TextInput enabled = "false" id = "txtInput6"
preinitialize = "txtInput6_preinitializeHandler(event)" />
</s:HGroup>
</s:Panel>
</s:VGroup>
</s:BorderContainer>
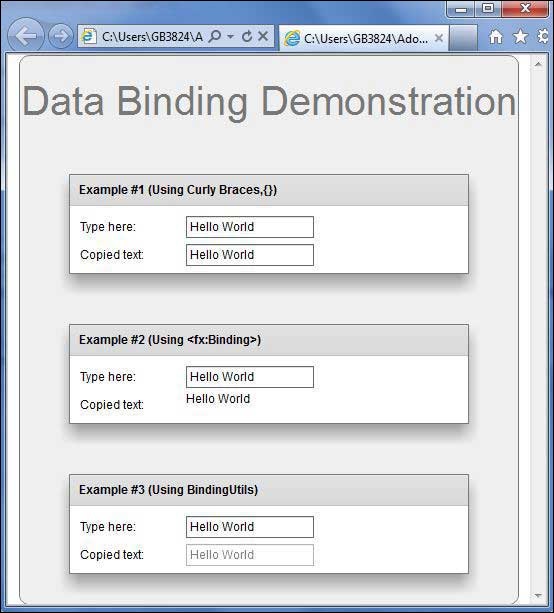
</s:Application>すべての変更を行う準備ができたら、Flex-アプリケーションの作成の章で行ったように、アプリケーションをコンパイルして通常モードで実行します。アプリケーションに問題がない場合は、次の結果が得られます。[オンラインで試す]
