GWT-デバッグアプリケーション
GWTは、サーバー側のコードだけでなくクライアント側のコードもデバッグする優れた機能を提供します。
開発モード中、GWTアプリケーションはJavaコードベースであり、JavaScriptに変換されません。
アプリケーションが開発モードで実行されている場合、Java仮想マシン(JVM)は、GWT機能を使用してブラウザーウィンドウに接続し、コンパイルされたJavaバイトコードとしてアプリケーションコードを実際に実行します。
GWTはブラウザベースのプラグインを使用してJVMに接続します。
そのため、開発者はJavaベースのIDEを自由に使用して、クライアント側のGWTコードとサーバー側のコードの両方をデバッグできます。
この記事では、Eclipseを使用してGWTクライアントコードをデバッグする方法を示します。次のタスクを実行します-
- コードでブレークポイントを設定し、ブレークポイントエクスプローラーで確認します。
- デバッグ中にコードを1行ずつステップスルーします。
- 変数の値を表示します。
- すべての変数の値を調べます。
- 式の値を調べます。
- 中断されたスレッドのスタックフレームを表示します。
デバッグ例
この例では、GWTアプリケーションのデバッグを示す簡単な手順を説明します。次の手順に従って、GWTで作成したGWTアプリケーションを更新します-アプリケーションの作成の章-
| ステップ | 説明 |
|---|---|
| 1 | GWT-アプリケーションの作成の章で説明されているように、パッケージcom.tutorialspointの下にHelloWorldという名前のプロジェクトを作成します。 |
| 2 | 変更HelloWorld.gwt.xml、HelloWorld.css、HelloWorld.htmlとHelloWorld.javaは、以下のように説明しました。残りのファイルは変更しないでください。 |
| 3 | アプリケーションをコンパイルして実行し、実装されたロジックの結果を確認します。 |
変更されたモジュール記述子の内容は次のとおりです src/com.tutorialspoint/HelloWorld.gwt.xml。
<?xml version = "1.0" encoding = "UTF-8"?>
<module rename-to = 'helloworld'>
   <!-- Inherit the core Web Toolkit stuff.                        -->
   <inherits name = 'com.google.gwt.user.User'/>

   <!-- Inherit the default GWT style sheet.                       -->
   <inherits name = 'com.google.gwt.user.theme.clean.Clean'/>

   <!-- Specify the app entry point class.                         -->
   <entry-point class = 'com.tutorialspoint.client.HelloWorld'/>

   <!-- Specify the paths for translatable code                    -->
   <source path = 'client'/>
   <source path = 'shared'/>

</module>
以下は、変更されたスタイルシートファイルの内容です。 war/HelloWorld.css。
body {
   text-align: center;
   font-family: verdana, sans-serif;
}

h1 {
   font-size: 2em;
   font-weight: bold;
   color: #777777;
   margin: 40px 0px 70px;
   text-align: center;
}

.gwt-Label{
   font-size: 150%;
   font-weight: bold;
   color:red;
   padding:5px;
   margin:5px;
}
以下は、変更されたHTMLホストファイルの内容です。 war/HelloWorld.html 2つのボタンに対応します。
<html>
   <head>
      <title>Hello World</title>
      <link rel = "stylesheet" href = "HelloWorld.css"/>
      <script language = "javascript" src = "helloworld/helloworld.nocache.js">
      </script>
   </head>

   <body>
      <h1>Debugging Application Demonstration</h1>
      <div id = "gwtContainer"></div>
   </body>
</html>
以下のJavaファイルの内容を見てみましょう src/com.tutorialspoint/HelloWorld.java これを使用して、GWTコードのデバッグ機能を示します。
package com.tutorialspoint.client;

import com.google.gwt.core.client.EntryPoint;
import com.google.gwt.event.dom.client.ClickEvent;
import com.google.gwt.event.dom.client.ClickHandler;
import com.google.gwt.event.dom.client.KeyCodes;
import com.google.gwt.event.dom.client.KeyUpEvent;
import com.google.gwt.event.dom.client.KeyUpHandler;
import com.google.gwt.user.client.Window;
import com.google.gwt.user.client.ui.Button;
import com.google.gwt.user.client.ui.DecoratorPanel;
import com.google.gwt.user.client.ui.HasHorizontalAlignment;
import com.google.gwt.user.client.ui.HorizontalPanel;
import com.google.gwt.user.client.ui.Label;
import com.google.gwt.user.client.ui.RootPanel;
import com.google.gwt.user.client.ui.TextBox;
import com.google.gwt.user.client.ui.VerticalPanel;

public class HelloWorld implements EntryPoint {

   public void onModuleLoad() {
      /*create UI */
      final TextBox txtName = new TextBox();
      txtName.setWidth("200");
      txtName.addKeyUpHandler(new KeyUpHandler() {
         @Override
         public void onKeyUp(KeyUpEvent event) {
            if(event.getNativeKeyCode() == KeyCodes.KEY_ENTER){
               Window.alert(getGreeting(txtName.getValue()));
            }
         }
      });
      Label lblName = new Label("Enter your name: ");

      Button buttonMessage = new Button("Click Me!");

      buttonMessage.addClickHandler(new ClickHandler() {
      @Override
      public void onClick(ClickEvent event) {
         Window.alert(getGreeting(txtName.getValue()));
      }});

      HorizontalPanel hPanel = new HorizontalPanel();
      hPanel.add(lblName);
      hPanel.add(txtName);
      hPanel.setCellWidth(lblName, "130");

      VerticalPanel vPanel = new VerticalPanel();
      vPanel.setSpacing(10);
      vPanel.add(hPanel);
      vPanel.add(buttonMessage);
      vPanel.setCellHorizontalAlignment(buttonMessage,
      HasHorizontalAlignment.ALIGN_RIGHT);

      DecoratorPanel panel = new DecoratorPanel();
      panel.add(vPanel);

      // Add widgets to the root panel.
      RootPanel.get("gwtContainer").add(panel);
   }

   public String getGreeting(String name){
      return "Hello "+name+"!";
   }
}
ステップ1-ブレークポイントを配置する
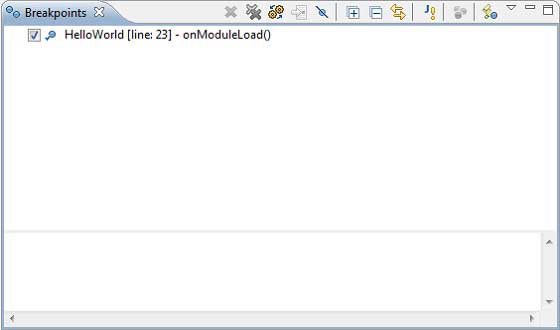
の最初の行にブレークポイントを配置します onModuleLoad() HelloWorld.javaの

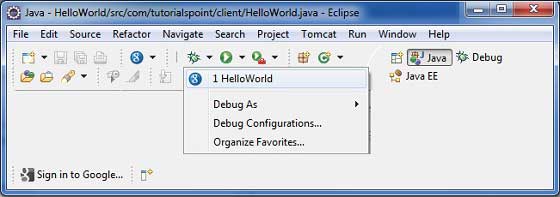
ステップ2-アプリケーションをデバッグする
次に、[
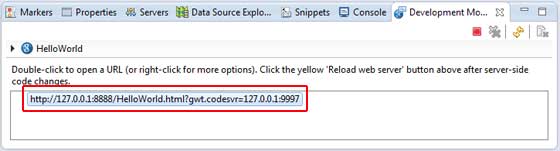
すべてが正常な場合は、以下に示すようなURLを含むEclipseでGWT開発モードがアクティブになっていることを確認する必要があります。URLをダブルクリックして、GWTアプリケーションを開きます。
アプリケーションが起動するとすぐに、エントリポイントメソッドの最初の行にブレークポイントを配置したため、Eclipseブレークポイントにフォーカスが表示されます。
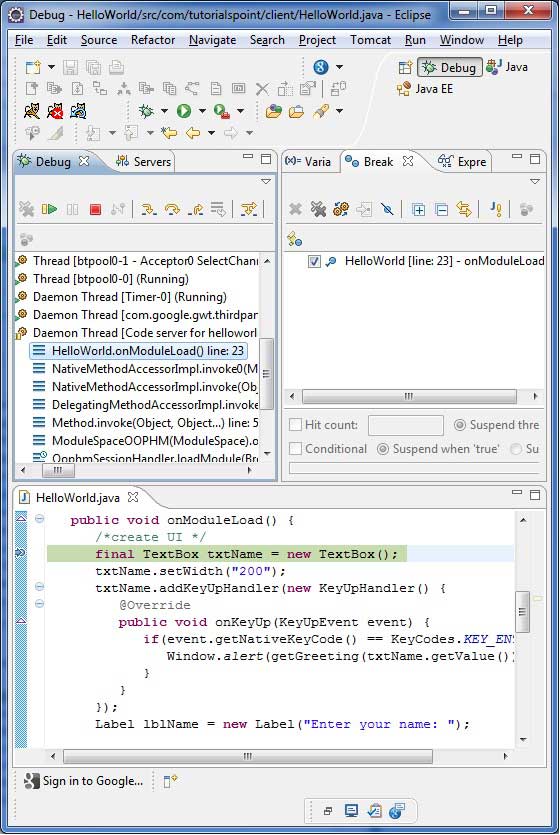
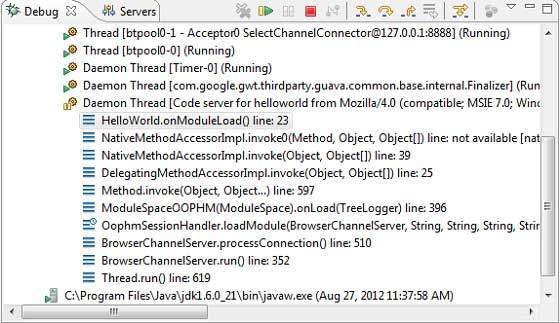
中断されたスレッドのスタックトレースを確認できます。
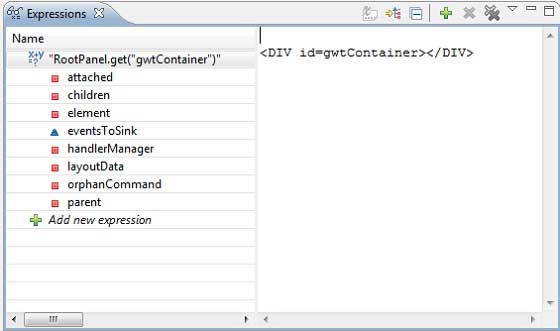
式の値を確認できます。
配置されたブレークポイントのリストを確認できます。
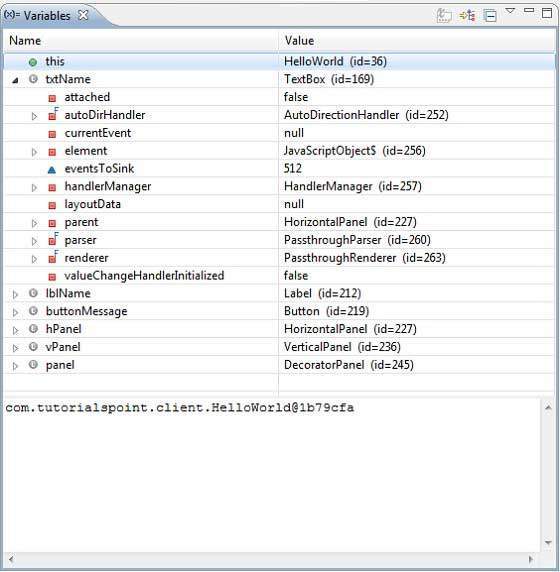
次に、onModuleLoad()メソッドの最後の行に到達するまでF6を押し続けます。ファンクションキーのリファレンスとして、F6はコードを1行ずつ検査し、F5はさらに内側に進み、F8はアプリケーションを再開します。これで、onModuleLoad()メソッドのすべての変数の値のリストが表示されます。
GWTクライアントコードは、Javaアプリケーションをデバッグするのと同じ方法でデバッグできます。任意の行にブレークポイントを設定し、GWTのデバッグ機能を試してみてください。