GWT-クイックガイド
GWTとは何ですか?
Google Web Toolkit(GWT)は、作成するための開発ツールキットです。 RICH Internet Applications (RIA)。ここにその注目すべき機能のいくつかがあります-
GWTは、JAVAでクライアント側アプリケーションを作成するためのオプションを開発者に提供します。
GWTは、JAVAで記述されたコードをJavaScriptコードにコンパイルします。
GWTで記述されたアプリケーションは、クロスブラウザーに準拠しています。GWTは、各ブラウザに適したJavaScriptコードを自動的に生成します。
GWTはオープンソースであり、完全に無料であり、世界中の何千もの開発者によって使用されています。ApacheLicenseバージョン2.0でライセンスされています。
全体として、GWTは framework メンテナンスが容易なまま、大規模で高性能なWebアプリケーションを構築します。
なぜGWTを使用するのですか?
Javaベースであるため、EclipseなどのJAVAIDEを使用してGWTアプリケーションを開発できます。
開発者は、コードのオートコンプリート/リファクタリング/ナビゲーション/プロジェクト管理と、完全なデバッグ機能を提供するIDE.GWTのすべての機能を使用できます。開発者は、Javaアプリケーションと同じようにクライアント側アプリケーションをデバッグできます。
GWTは、JunitおよびMavenとの簡単な統合を提供します。
再びJavaベースであるため、GWTはJava開発者にとって学習曲線が低くなっています。
GWTは、最適化されたJavaScriptコードを生成し、ブラウザー固有のJavaScriptコードを自分で生成します。
GWTはウィジェットライブラリを提供し、アプリケーションに必要なほとんどのタスクを提供します。
GWTは拡張可能であり、アプリケーションのニーズに対応するためにカスタムウィジェットを作成できます。
何よりも、GWTアプリケーションは、AndroidおよびiOSベースの電話/タブレットを含むすべての主要なブラウザーおよびスマートフォンで実行できます。
GWTのデメリット
GWTには多くの利点がありますが、次の欠点があります。
Not Indexable − GWTによって生成されたWebページは、これらのアプリケーションが動的に生成されるため、検索エンジンによって索引付けされません。
Not Degradable −アプリケーションユーザーがJavascriptを無効にすると、ユーザーには基本ページだけが表示され、それ以上は表示されません。
Not Designer's Friendly − GWTは、後で動的コンテンツを挿入するためにプレースホルダー付きのプレーンHTMLを使用することを好むWebデザイナーには適していません。
GWTコンポーネント
GWTフレームワークは、次の3つの主要部分に分けることができます。
GWT Java to JavaScript compiler−これはGWTの最も重要な部分であり、RIAを構築するための強力なツールになります。GWTコンパイラは、Javaで記述されたすべてのアプリケーションコードをJavaScriptに変換するために使用されます。
JRE Emulation library− Google Web Toolkitには、Javaランタイムライブラリのサブセットをエミュレートするライブラリが含まれています。このリストには、java.lang、java.lang.annotation、java.math、java.io、java.sql、java.util、およびjava.util.loggingが含まれています。
GWT UI building library − GWTのこの部分は、実際のUIコンポーネント、RPCサポート、履歴管理などを含む多くのサブパートで構成されています。
GWTは、GWTアプリケーションをホストモードで実行および実行できるGWTホストWebブラウザーも提供します。このブラウザーでは、コードはJavaScriptにコンパイルせずにJava仮想マシンでJavaとして実行されます。
このチュートリアルでは、GWTフレームワークで作業を開始するための開発環境を準備する方法について説明します。このチュートリアルでは、GWT Frameworkをセットアップする前に、マシンにJDK、Tomcat、Eclipseをセットアップする方法についても説明します。
システム要件
GWTにはJDK1.6以降が必要であるため、最初の要件はJDKをマシンにインストールすることです。
| JDK | 1.6以上。 |
|---|---|
| 記憶 | 最小要件はありません。 |
| ディスクスペース | 最小要件はありません。 |
| オペレーティング・システム | 最小要件はありません。 |
与えられた手順に従って、GWTアプリケーション開発を開始するための環境をセットアップします。
ステップ1-マシンへのJavaのインストールを確認する
次に、コンソールを開き、次のJavaコマンドを実行します。
| OS | 仕事 | コマンド |
|---|---|---|
| Windows | コマンドコンソールを開く | c:\> java -version |
| Linux | コマンドターミナルを開く | $ java -version |
| Mac | オープンターミナル | マシン:〜joseph $ java -version |
すべてのオペレーティングシステムの出力を確認しましょう
| シニア番号 | OSと生成された出力 |
|---|---|
| 1 | Windows Javaバージョン "1.6.0_21" Java(TM)SEランタイム環境(ビルド1.6.0_21-b07) Java HotSpot(TM)クライアントVM(ビルド17.0-b17、混合モード、共有) |
| 2 | Linux Javaバージョン "1.6.0_21" Java(TM)SEランタイム環境(ビルド1.6.0_21-b07) ava HotSpot(TM)クライアントVM(ビルド17.0-b17、混合モード、共有) |
| 3 | Mac Javaバージョン "1.6.0_21" Java(TM)SEランタイム環境(ビルド1.6.0_21-b07) Java HotSpot(TM)64ビットサーバーVM(ビルド17.0-b17、混合モード、共有) |
ステップ2-JavaDevelopment Kit(JDK)をセットアップする
Javaがインストールされていない場合は、OracleのJavaサイトであるJava SE DownloadsからJavaソフトウェア開発キット(SDK)をインストールできます。ダウンロードしたファイルにJDKをインストールする手順が記載されています。所定の手順に従って、セットアップをインストールおよび構成してください。最後に、PATHおよびJAVA_HOME環境変数を設定して、javaおよびjavacを含むディレクトリ(通常はそれぞれjava_install_dir / binおよびjava_install_dir)を参照します。
をセットする JAVA_HOMEJavaがマシンにインストールされているベースディレクトリの場所を指す環境変数。例えば
| シニア番号 | OSと出力 |
|---|---|
| 1 | Windows 環境変数JAVA_HOMEをC:\ Program Files \ Java \ jdk1.6.0_21に設定します |
| 2 | Linux export JAVA_HOME = / usr / local / java-current |
| 3 | Mac export JAVA_HOME = / Library / Java / Home |
Javaコンパイラの場所をシステムパスに追加します。
| シニア番号 | OSと出力 |
|---|---|
| 1 | Windows 文字列;%JAVA_HOME%\ binをシステム変数Pathの最後に追加します。 |
| 2 | Linux export PATH =$PATH:$JAVA_HOME / bin / |
| 3 | Mac 必要ありません |
または、Borland JBuilder、Eclipse、IntelliJ IDEA、Sun ONE Studioなどの統合開発環境(IDE)を使用している場合は、簡単なプログラムをコンパイルして実行し、IDEがJavaのインストール場所を認識していることを確認します。それ以外の場合は、所定のドキュメントに従って適切なセットアップを行います。 IDEの。
ステップ3-EclipseIDEをセットアップする
このチュートリアルのすべての例は、EclipseIDEを使用して作成されています。したがって、オペレーティングシステムに基づいて最新バージョンのEclipseをマシンにインストールすることをお勧めします。
Eclipse IDEをインストールするには、から最新のEclipseバイナリをダウンロードします。 https://www.eclipse.org。インストールをダウンロードしたら、バイナリディストリビューションを便利な場所に解凍します。たとえば、WindowsのC:\ eclipse、またはLinux / Unixの/ usr / local / eclipseで、最後にPATH変数を適切に設定します。
Eclipseは、Windowsマシンで次のコマンドを実行することで起動できます。または、eclipse.exeをダブルクリックするだけです。
%C:\eclipse\eclipse.exeEclipseは、Unix(Solaris、Linuxなど)マシンで次のコマンドを実行することで起動できます。
$/usr/local/eclipse/eclipse起動が成功した後、すべてが正常であれば、次の結果が表示されます-

ステップ4-Eclipse用のGWTSDKとプラグインをインストールする
リンクPluginfor Eclipse(SDKを含む)に記載されている手順に従って、GWTSDKとPluginforEclipseバージョンをマシンにインストールします。
GWTプラグインのセットアップが成功した後、すべてが正常であれば、次の画面が表示されます。 Google icon 以下に示すように赤い長方形でマークされています-
ステップ5:ApacheTomcatをセットアップする
Tomcatの最新バージョンはからダウンロードできます。 https://tomcat.apache.org/。インストールをダウンロードしたら、バイナリディストリビューションを便利な場所に解凍します。たとえば、Windowsの場合はC:\ apache-tomcat-6.0.33、Linux / Unixの場合は/usr/local/apache-tomcat-6.0.33で、インストール場所を指すCATALINA_HOME環境変数を設定します。
Tomcatは、Windowsマシンで次のコマンドを実行することで起動できます。または、startup.batをダブルクリックするだけです。
%CATALINA_HOME%\bin\startup.bat
or
/usr/local/apache-tomcat-6.0.33/bin/startup.sh
正常に起動すると、Tomcatに含まれているデフォルトのWebアプリケーションが次のサイトにアクセスして利用できるようになります http://localhost:8080/。すべてが正常であれば、次の結果が表示されます-

Tomcatの構成と実行の詳細については、ここに含まれているドキュメントと、TomcatのWebサイトを参照してください。 https://tomcat.apache.org/
Windowsマシンで以下のコマンドを実行することでTomcatを停止できます-
%CATALINA_HOME%\bin\shutdown
or
C:\apache-tomcat-5.5.29\bin\shutdown
Unix(Solaris、Linuxなど)マシンで次のコマンドを実行すると、Tomcatを停止できます。
$CATALINA_HOME/bin/shutdown.sh
or
/usr/local/apache-tomcat-5.5.29/bin/shutdown.sh
GWTを使用して実際の「HelloWorld」アプリケーションの作成を開始する前に、GWTアプリケーションの実際の部分が何であるかを見てみましょう。
GWTアプリケーションは、次の4つの重要な部分で構成されており、最後の部分はオプションですが、最初の3つの部分は必須です。
- モジュール記述子
- パブリックリソース
- クライアント側のコード
- サーバー側コード
典型的なgwtアプリケーションのさまざまな部分のサンプルの場所 HelloWord 以下のようになります−
| 名前 | ロケーション |
|---|---|
| プロジェクトルート | こんにちは世界/ |
| モジュール記述子 | src / com / tutorialspoint / HelloWorld.gwt.xml |
| パブリックリソース | src / com / tutorialspoint / war / |
| クライアント側のコード | src / com / tutorialspoint / client / |
| サーバー側コード | src / com / tutorialspoint / server / |
モジュール記述子
モジュール記述子は、GWTアプリケーションを構成するために使用されるXML形式の構成ファイルです。
モジュール記述子ファイル拡張子は* .gwt.xmlです。ここで、*はアプリケーションの名前であり、このファイルはプロジェクトのルートに存在する必要があります。
以下は、HelloWorldアプリケーションのデフォルトのモジュール記述子HelloWorld.gwt.xmlです-
<?xml version = "1.0" encoding = "utf-8"?>
<module rename-to = 'helloworld'>
   <!-- inherit the core web toolkit stuff.                        -->
   <inherits name = 'com.google.gwt.user.user'/>

   <!-- inherit the default gwt style sheet.                       -->
   <inherits name = 'com.google.gwt.user.theme.clean.Clean'/>

   <!-- specify the app entry point class.                         -->
   <entry-point class = 'com.tutorialspoint.client.HelloWorld'/>

   <!-- specify the paths for translatable code                    -->
   <source path = '...'/>
   <source path = '...'/>

   <!-- specify the paths for static files like html, css etc.     -->
   <public path = '...'/>
   <public path = '...'/>

   <!-- specify the paths for external javascript files            -->
   <script src = "js-url" />
   <script src = "js-url" />

   <!-- specify the paths for external style sheet files            -->
   <stylesheet  src = "css-url" />
   <stylesheet  src = "css-url" />
</module>
以下は、モジュール記述子で使用されるさまざまなパーツに関する簡単な詳細です。
| シニア番号 | ノードと説明 |
|---|---|
| 1 | <module rename-to = "helloworld"> これは、アプリケーションの名前を提供します。 |
| 2 | <inherits name = "logical-module-name" /> これにより、Javaアプリケーションでインポートが行うのと同じように、アプリケーションに他のgwtモジュールが追加されます。この方法で、任意の数のモジュールを継承できます。 |
| 3 | <entry-point class = "classname" /> これは、GWTアプリケーションのロードを開始するクラスの名前を指定します。任意の数のエントリポイントクラスを追加でき、モジュールファイルに表示される順序で順番に呼び出されます。したがって、最初のエントリポイントのonModuleLoad()が終了すると、次のエントリポイントがすぐに呼び出されます。 |
| 4 | <source path = "path" /> これは、GWTコンパイラーがソースコンパイルを検索するソースフォルダーの名前を指定します。 |
| 5 | <public path = "path" /> パブリックパスは、CSSや画像など、GWTモジュールによって参照される静的リソースが保存されるプロジェクト内の場所です。デフォルトのパブリックパスは、モジュールXMLファイルが保存されている下のパブリックサブディレクトリです。 |
| 6 | <script src="js-url" /> srcで指定された場所にある外部JavaScriptファイルを自動的に挿入します。 |
| 7 | <stylesheet src="css-url" /> srcで指定された場所にある外部CSSファイルを自動的に挿入します。 |
パブリックリソース
これらはすべて、ホストHTMLページ、CSS、画像など、GWTモジュールによって参照されるファイルです。
これらのリソースの場所は、モジュール構成ファイルの<public path = "path" />要素を使用して構成できます。デフォルトでは、モジュールXMLファイルが保存されている下のパブリックサブディレクトリです。
アプリケーションをJavaScriptにコンパイルすると、パブリックパスにあるすべてのファイルがモジュールの出力ディレクトリにコピーされます。
最も重要なパブリックリソースは、実際のGWTアプリケーションを呼び出すために使用されるホストページです。アプリケーションの一般的なHTMLホストページには、表示されるHTML本文のコンテンツがまったく含まれていない場合がありますが、次のように<script ... />タグを介してGWTアプリケーションが含まれていることが常に期待されます。
<html>
<head>
<title>Hello World</title>
<link rel = "stylesheet" href = "HelloWorld.css"/>
<script language = "javascript" src = "helloworld/helloworld.nocache.js">
</script>
</head>
<body>
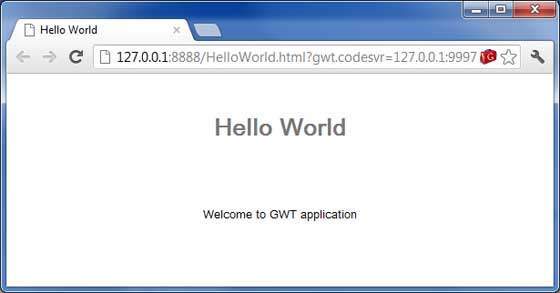
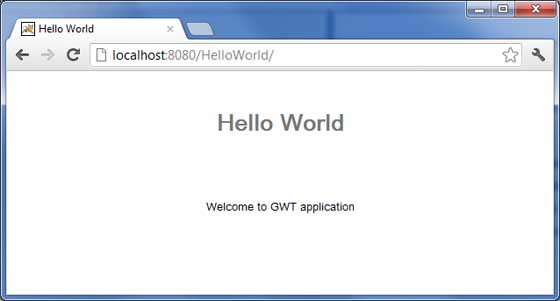
<h1>Hello World</h1>
<p>Welcome to first GWT application</p>
</body>
</html>以下は、ホストページに含まれているサンプルスタイルシートです。
body {
   text-align: center;
   font-family: verdana, sans-serif;
}

h1 {
   font-size: 2em;
   font-weight: bold;
   color: #777777;
   margin: 40px 0px 70px;
   text-align: center;
}
クライアント側のコード
これは、アプリケーションのビジネスロジックを実装して記述された実際のJavaコードであり、GWTコンパイラーがJavaScriptに変換し、最終的にブラウザー内で実行されます。これらのリソースの場所は、モジュール構成ファイルの<source path = "path" />要素を使用して構成できます。
例えば Entry Point コードはクライアント側のコードとして使用され、その場所は<source path = "path" />を使用して指定されます。
モジュール entry-point に割り当て可能な任意のクラスです EntryPointそしてそれはパラメータなしで構築することができます。モジュールがロードされると、すべてのエントリポイントクラスがインスタンス化され、EntryPoint.onModuleLoad()メソッドが呼び出されます。HelloWorldエントリポイントクラスのサンプルは次のようになります-
public class HelloWorld implements EntryPoint {
   public void onModuleLoad() {
      Window.alert("Hello, World!");
   }
}
サーバー側コード
これはアプリケーションのサーバー側の部分であり、非常にオプションです。アプリケーション内でバックエンド処理を行っていない場合、この部分は必要ありませんが、バックエンドで必要な処理があり、クライアント側アプリケーションがサーバーと対話する場合は、これらのコンポーネントを開発する必要があります。
次の章では、上記のすべての概念を利用して、EclipseIDEを使用してHelloWorldアプリケーションを作成します。
GWTの力は Write in Java, Run in JavaScript、Java IDEEclipseを使用して例を示します。
簡単なHelloWorldアプリケーションから始めましょう-
ステップ1-プロジェクトを作成する
最初のステップは、EclipseIDEを使用して単純なWebアプリケーションプロジェクトを作成することです。オプションを使用してプロジェクトウィザードを起動しますGoogle Icon
![]()

選択解除 Use Google App Engine このプロジェクトでは使用しておらず、他のデフォルト値のままにしているためです( Generate Sample project code オプションをオンにします)そのようにして、[完了]ボタンをクリックします。
プロジェクトが正常に作成されると、プロジェクトエクスプローラーに次のコンテンツが表示されます-
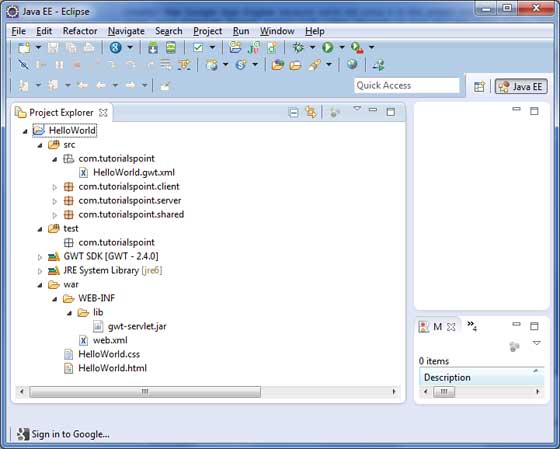
ここにすべての重要なフォルダの簡単な説明があります
| シニア番号 | フォルダと場所 |
|---|---|
| 1 | src ソースコード(Javaクラス)ファイル。 クライアントUIの表示を担当するクライアント側固有のJavaクラスを含むクライアントフォルダー。 サーバー側の処理を担当するサーバー側のJavaクラスを含むサーバーフォルダー。 サーバーからクライアントへ、またはその逆にデータを転送するためのJavaモデルクラスを含む共有フォルダー。 HelloWorld.gwt.xmlは、GWTコンパイラがHelloWorldプロジェクトをコンパイルするために必要なモジュール記述子ファイルです。 |
| 2 | test テストコード(Javaクラス)のソースファイル。 gwtクライアント側コードのテストを担当するJavaクラスを含むクライアントフォルダー。 |
| 3 | war これは最も重要な部分であり、実際にデプロイ可能なWebアプリケーションを表します。 コンパイルされたクラス、gwtライブラリ、サーブレットライブラリを含むWEB-INF。 HelloWorld.css、プロジェクトスタイルシート。 HelloWorld.html、GWTUIアプリケーションを呼び出すHTMLをホットします。 |
ステップ2-モジュール記述子を変更する:HelloWorld.gwt.xml
GWTプラグインは、以下に示すデフォルトのモジュール記述子ファイルsrc / com.tutorialspoint /HelloWorld.gwt.xmlを作成します。この例では変更していませんが、要件に基づいて変更できます。
<?xml version = "1.0" encoding = "UTF-8"?>
<module rename-to = 'helloworld'>
   <!-- Inherit the core Web Toolkit stuff.                        -->
   <inherits name = 'com.google.gwt.user.User'/>

   <!-- Inherit the default GWT style sheet.  You can change       -->
   <!-- the theme of your GWT application by uncommenting          -->
   <!-- any one of the following lines.                            -->
   <inherits name = 'com.google.gwt.user.theme.clean.Clean'/>
   <!-- <inherits name = 'com.google.gwt.user.theme.chrome.Chrome'/> -->
   <!-- <inherits name = 'com.google.gwt.user.theme.dark.Dark'/>     -->

   <!-- Other module inherits                                      -->

   <!-- Specify the app entry point class.                         -->
   <entry-point class = 'com.tutorialspoint.client.HelloWorld'/>

   <!-- Specify the paths for translatable code                    -->
   <source path = 'client'/>
   <source path = 'shared'/>

</module>
ステップ3-スタイルシートを変更する:HelloWorld.css
GWTプラグインは、デフォルトのスタイルシートファイルwar /HelloWorld.cssを作成します。このファイルを変更して、例を最も単純なレベルの理解に保つようにしましょう。
body {
   text-align: center;
   font-family: verdana, sans-serif;
}

h1 {
   font-size: 2em;
   font-weight: bold;
   color: #777777;
   margin: 40px 0px 70px;
   text-align: center;
}
ステップ4-ホストファイルを変更する:HelloWorld.html
GWTプラグインは、デフォルトのHTMLホストファイルwar /HelloWorld.htmlを作成します。このファイルを変更して、例を最も単純なレベルの理解に保つようにしましょう。
<html>
   <head>
      <title>Hello World</title>
      <link rel = "stylesheet" href = "HelloWorld.css"/>
      <script language = "javascript" src = "helloworld/helloworld.nocache.js">
      </script>
   </head>

   <body>
      <h1>Hello World</h1>
      <p>Welcome to first GWT application</p>
   </body>
</html>
同じソースディレクトリにHTML、CSS、画像などの静的ファイルを作成することも、さらにサブディレクトリを作成してそれらのサブディレクトリにファイルを移動し、アプリケーションのモジュール記述子でそれらのサブディレクトリを構成することもできます。
ステップ5-エントリポイントを変更する:HelloWorld.java
GWTプラグインは、デフォルトのJavaファイルsrc / com.tutorialspoint / HelloWorld.javaを作成します。これは、アプリケーションのエントリポイントを保持します。
このファイルを変更して、「Hello、World!」を表示してみましょう。
package com.tutorialspoint.client;

import com.google.gwt.core.client.EntryPoint;
import com.google.gwt.user.client.Window;

public class HelloWorld implements EntryPoint {
   public void onModuleLoad() {
      Window.alert("Hello, World!");
   }
}
同じソースディレクトリにさらにJavaファイルを作成して、エントリポイントを定義したり、ヘルパールーチンを定義したりできます。
ステップ6-アプリケーションをコンパイルする
すべての変更を行う準備ができたら、プロジェクトをコンパイルします。オプションを使用するGoogle Icon
![]()
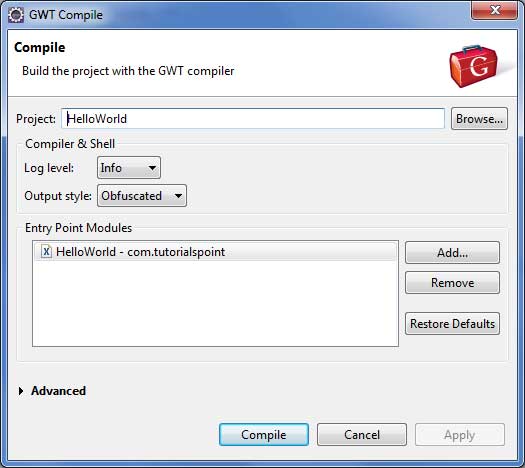
デフォルト値をそのままにして、[コンパイル]ボタンをクリックします。すべてがうまくいけば、Eclipseコンソールに次の出力が表示されます
Compiling module com.tutorialspoint.HelloWorld
   Compiling 6 permutations
      Compiling permutation 0...
      Compiling permutation 1...
      Compiling permutation 2...
      Compiling permutation 3...
      Compiling permutation 4...
      Compiling permutation 5...
   Compile of permutations succeeded
Linking into C:\workspace\HelloWorld\war\helloworld
   Link succeeded
   Compilation succeeded -- 33.029s
ステップ7-アプリケーションを実行する
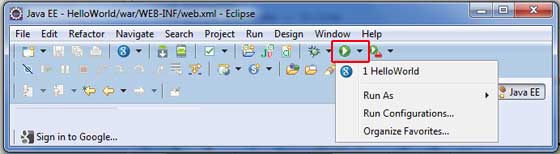
次に、[
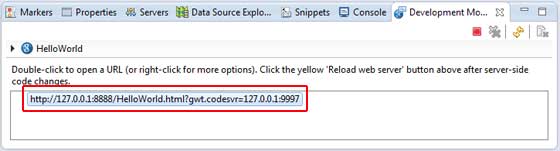
すべてが正常な場合は、以下に示すようなURLを含むEclipseでGWT開発モードがアクティブになっていることを確認する必要があります。URLをダブルクリックして、GWTアプリケーションを開きます。
アプリケーションを開発モードで実行しているため、ブラウザーにGWTプラグインをインストールする必要があります。画面の指示に従ってプラグインをインストールするだけです。
ブラウザにGWTプラグインがすでに設定されている場合は、次の出力が表示されるはずです。
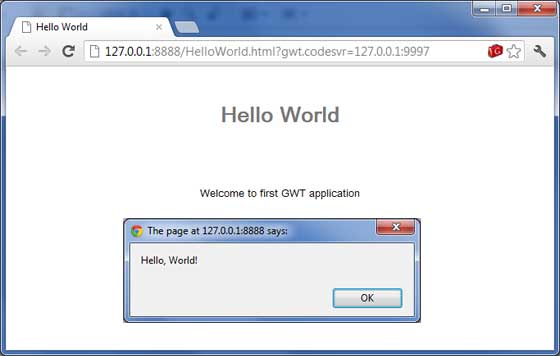
おめでとう!Google Web Toolkit(GWT)を使用して最初のアプリケーションを実装しました。
このチュートリアルでは、アプリケーションの作成方法について説明します "war" ファイルとそれをApacheTomcatWebseverルートにデプロイする方法。
この簡単な例を理解していれば、同じ手順に従って複雑なGWTアプリケーションをデプロイすることもできます。
Eclipse IDEとGWTプラグインを配置し、次の手順に従ってGWTアプリケーションを作成しましょう-
| ステップ | 説明 |
|---|---|
| 1 | GWT-アプリケーションの作成の章で説明されているように、パッケージcom.tutorialspointの下にHelloWorldという名前のプロジェクトを作成します。 |
| 2 | 変更HelloWorld.gwt.xml、HelloWorld.css、HelloWorld.htmlとHelloWorld.javaは、以下のように説明しました。残りのファイルは変更しないでください。 |
| 3 | アプリケーションをコンパイルして実行し、ビジネスロジックが要件に従って機能していることを確認します。 |
| 4 | 最後に、アプリケーションのwarフォルダーのコンテンツをwarファイルの形式で圧縮し、Apache TomcatWebサーバーにデプロイします。 |
| 5 | 最後のステップで以下に説明するように、適切なURLを使用してWebアプリケーションを起動します。 |
変更されたモジュール記述子の内容は次のとおりです src/com.tutorialspoint/HelloWorld.gwt.xml。
<?xml version = "1.0" encoding = "UTF-8"?>
<module rename-to = 'helloworld'>
   <!-- Inherit the core Web Toolkit stuff.                        -->
   <inherits name = 'com.google.gwt.user.User'/>

   <!-- Inherit the default GWT style sheet.                       -->
   <inherits name = 'com.google.gwt.user.theme.clean.Clean'/>

   <!-- Specify the app entry point class.                         -->
   <entry-point class = 'com.tutorialspoint.client.HelloWorld'/>

   <!-- Specify the paths for translatable code                    -->
   <source path = 'client'/>
   <source path = 'shared'/>

</module>
変更されたスタイルシートファイルの内容は次のとおりです war/HelloWorld.css。
body {
   text-align: center;
   font-family: verdana, sans-serif;
}

h1 {
   font-size: 2em;
   font-weight: bold;
   color: #777777;
   margin: 40px 0px 70px;
   text-align: center;
}
以下は、変更されたHTMLホストファイルの内容です。 war/HelloWorld.html。
<html>
   <head>
      <title>Hello World</title>
      <link rel = "stylesheet" href = "HelloWorld.css"/>
      <script language = "javascript" src = "helloworld/helloworld.nocache.js">
      </script>
   </head>

   <body>
      <h1>Hello World</h1>
      <div id = "gwtContainer"></div>
   </body>
</html>
前の例からHTMLを少し変更しました。ここでは、エントリポイントのJavaクラスを使用してコンテンツを挿入するプレースホルダー<div> ... </ div>を作成しました。では、Javaファイルの次のコンテンツを用意しましょうsrc/com.tutorialspoint/HelloWorld.java。
package com.tutorialspoint.client;

import com.google.gwt.core.client.EntryPoint;
import com.google.gwt.user.client.ui.HTML;
import com.google.gwt.user.client.ui.RootPanel;

public class HelloWorld implements EntryPoint {
   public void onModuleLoad() {
      HTML html = new HTML("<p>Welcome to GWT application</p>");

      RootPanel.get("gwtContainer").add(html);
   }
}
ここでは、基本的なウィジェットHTMLで作成し、id = "gwtContainer"を持つdivタグ内に追加しました。次の章では、さまざまなGWTウィジェットについて学習します。
すべての変更を行う準備ができたら、GWT-アプリケーションの作成の章で行ったように、アプリケーションをコンパイルして開発モードで実行します。アプリケーションに問題がない場合、次の結果が得られます-
WARファイルを作成する
これで、アプリケーションは正常に機能し、warファイルとしてエクスポートする準備が整いました。
次の手順に従います-
あなたのプロジェクトに入る war ディレクトリ C:\workspace\HelloWorld\war
warディレクトリ内で利用可能なすべてのファイルとフォルダを選択します。
選択したすべてのファイルとフォルダーをHelloWorld.zipというファイルに圧縮します。
HelloWorld.zipの名前をHelloWorld.warに変更します。
WARファイルをデプロイする
Tomcatサーバーを停止します。
HelloWorld.warファイルをにコピーしますtomcat installation directory > webapps folder.
Tomcatサーバーを起動します。
webappsディレクトリ内を見てください。フォルダがあるはずです。 helloworld 作成されました。
これで、HelloWorld.warがTomcatWebサーバールートに正常にデプロイされました。
アプリケーションを実行する
WebブラウザにURLを入力します。 http://localhost:8080/HelloWorld アプリケーションを起動します
サーバー名(localhost)とポート(8080)は、Tomcatの構成によって異なる場合があります。
GWTウィジェットは、視覚的なスタイル設定をカスケードスタイルシート(CSS)に依存しています。デフォルトでは、各コンポーネントのクラス名はgwt-<classname>。
たとえば、Buttonウィジェットのデフォルトスタイルはgwt -Buttonであり、同様の方法でTextBoxwidgestのデフォルトスタイルはgwt -TextBoxです。
すべてのボタンとテキストボックスに大きなフォントを与えるために、アプリケーションのCSSファイルに次のルールを配置できます。
.gwt-Button  { font-size: 150%; }

.gwt-TextBox { font-size: 150%; }
デフォルトでは、ブラウザもGWTもデフォルトを作成しません idウィジェットの属性。CSSで使用できる要素の一意のIDを明示的に作成する必要があります。IDを持つ特定のボタンを与えるためにmy-button-id フォントが大きい場合は、アプリケーションのCSSファイルに次のルールを含めることができます-
#my-button-id { font-size: 150%; }GWTウィジェットのIDを設定するには、そのDOM要素を取得してから、次のようにid属性を設定します。
Button b = new Button();
DOM.setElementAttribute(b.getElement(), "id", "my-button-id")
CSSスタイリングAPI
GWTウィジェットのCSS設定をハングアップするために利用できる多くのAPIがあります。以下は、GWTを使用した日常のWebプログラミングに役立ついくつかの重要なAPIです。
| シニア番号 | APIと説明 |
|---|---|
| 1 | public void setStyleName(java.lang.String style) この方法は、既存のスタイルをクリアして使用して提供される新しいCSSクラスにウィジェットスタイルを設定しますスタイルを。 |
| 2 | public void addStyleName(java.lang.String style) このメソッドは、ウィジェットにセカンダリまたは依存スタイル名を追加します。セカンダリスタイル名は追加のスタイル名です。つまり、以前に適用されたスタイル名があった場合、それらは保持されます。 |
| 3 | public void removeStyleName(java.lang.String style) このメソッドは、ウィジェットから特定のスタイルを削除し、ウィジェットに関連付けられている他のスタイルを残します。 |
| 4 | public java.lang.String getStyleName() このメソッドは、オブジェクトのすべてのスタイル名をスペースで区切られたリストとして取得します。 |
| 5 | public void setStylePrimaryName(java.lang.String style) このメソッドは、オブジェクトのプライマリスタイル名を設定し、すべての依存スタイル名を更新します。 |
たとえば、テキストに適用する2つの新しいスタイルを定義しましょう-
.gwt-Big-Text {
   font-size:150%;
}

.gwt-Small-Text {
   font-size:75%;
}

.gwt-Red-Text {
   color:red;
}これで、setStyleName(Style)を使用して、デフォルト設定を新しい設定に変更できます。以下のルールを適用すると、テキストのフォントが大きくなります
txtWidget.setStyleName("gwt-Big-Text");同じウィジェットにセカンダリCSSルールを適用して、次のように色を変更できます-
txtWidget.addStyleName("gwt-Red-Text");上記の方法を使用すると、ウィジェットに適用するスタイルをいくつでも追加できます。ボタンウィジェットから最初のスタイルを削除しても、2番目のスタイルはテキストに残ります。
txtWidget.removeStyleName("gwt-Big-Text");一次および二次スタイル
デフォルトでは、ウィジェットのプライマリスタイル名は、ウィジェットクラスのデフォルトのスタイル名になります(例:gwt-Button for Buttonウィジェット)。AddStyleName()メソッドを使用してスタイル名を追加および削除する場合、それらのスタイルはセカンダリスタイルと呼ばれます。
ウィジェットの最終的な外観は、ウィジェットに追加されたすべてのセカンダリスタイルとそのプライマリスタイルの合計によって決まります。ウィジェットのプライマリスタイルは、setStylePrimaryName(String)メソッドを使用して設定します。説明のために、ラベルウィジェットがあるとしましょう。CSSファイルには、次のルールが定義されています-
.MyText {
   color: blue;
}

.BigText {
   font-size: large;
}

.LoudText {
   font-weight:  bold;
}
特定のラベルウィジェットに常に青いテキストを表示させ、場合によっては、強調を追加するために、より大きく太字のフォントを使用するとします。
私たちはこのようなことをすることができます-
// set up our primary style
Label someText = new Label();
someText.setStylePrimaryName("MyText");
...

// later on, to really grab the user's attention
someText.addStyleName("BigText");
someText.addStyleName("LoudText");
...

// after the crisis is over
someText.removeStyleName("BigText");
someText.removeStyleName("LoudText");
CSSファイルの関連付け
CSSファイルをモジュールに関連付けるには複数のアプローチがあります。最新のGWTアプリケーションは通常、CssResourceとUiBinderの組み合わせを使用します。この例では、最初のアプローチのみを使用しています。
ホストHTMLページで<link>タグを使用する。
モジュールXMLファイルの<stylesheet>要素を使用します。
を使って CssResource 内に含まれる ClientBundle。
でインライン<ui:style>要素を使用する UiBinder テンプレート。
GWTCSSの例
この例では、GWTウィジェットにさまざまなCSSルールを適用するための簡単な手順を説明します。Eclipse IDEとGWTプラグインを配置し、次の手順に従ってGWTアプリケーションを作成しましょう-
| ステップ | 説明 |
|---|---|
| 1 | GWT-アプリケーションの作成の章で説明されているように、パッケージcom.tutorialspointの下にHelloWorldという名前のプロジェクトを作成します。 |
| 2 | 変更HelloWorld.gwt.xml、HelloWorld.css、HelloWorld.htmlとHelloWorld.javaは、以下のように説明しました。残りのファイルは変更しないでください。 |
| 3 | アプリケーションをコンパイルして実行し、実装されたロジックの結果を確認します。 |
変更されたモジュール記述子の内容は次のとおりです src/com.tutorialspoint/HelloWorld.gwt.xml。
<?xml version = "1.0" encoding = "UTF-8"?>
<module rename-to = 'helloworld'>
   <!-- Inherit the core Web Toolkit stuff.                        -->
   <inherits name = 'com.google.gwt.user.User'/>

   <!-- Inherit the default GWT style sheet.                       -->
   <inherits name = 'com.google.gwt.user.theme.clean.Clean'/>

   <!-- Specify the app entry point class.                         -->
   <entry-point class = 'com.tutorialspoint.client.HelloWorld'/>

   <!-- Specify the paths for translatable code                    -->
   <source path = 'client'/>
   <source path = 'shared'/>

</module>
変更されたスタイルシートファイルの内容は次のとおりです war/HelloWorld.css。
body {
   text-align: center;
   font-family: verdana, sans-serif;
}

h1 {
   font-size: 2em;
   font-weight: bold;
   color: #777777;
   margin: 40px 0px 70px;
   text-align: center;
}

.gwt-Button {
   font-size: 150%;
   font-weight: bold;
   width:100px;
   height:100px;
}

.gwt-Big-Text {
   font-size:150%;
}

.gwt-Small-Text {
   font-size:75%;
}
以下は、変更されたHTMLホストファイルの内容です。 war/HelloWorld.html 2つのボタンに対応します。
<html>
   <head>
      <title>Hello World</title>
      <link rel = "stylesheet" href = "HelloWorld.css"/>
      <script language = "javascript" src = "helloworld/helloworld.nocache.js">
      </script>
   </head>

   <body>
      <div id = "mytext"><h1>Hello, World!</h1></div>
      <div id = "gwtGreenButton"></div>
      <div id = "gwtRedButton"></div>
   </body>
</html>
以下のJavaファイルの内容を見てみましょう src/com.tutorialspoint/HelloWorld.java HTMLに2つのボタンを追加し、カスタムCSSスタイルを適用します。
package com.tutorialspoint.client;

import com.google.gwt.core.client.EntryPoint;
import com.google.gwt.event.dom.client.ClickEvent;
import com.google.gwt.event.dom.client.ClickHandler;
import com.google.gwt.user.client.ui.Button;
import com.google.gwt.user.client.ui.HTML;
import com.google.gwt.user.client.ui.RootPanel;

public class HelloWorld implements EntryPoint {
   public void onModuleLoad() {

   // add button to change font to big when clicked.
   Button Btn1 = new Button("Big Text");
   Btn1.addClickHandler(new ClickHandler() {
      public void onClick(ClickEvent event) {
         RootPanel.get("mytext").setStyleName("gwt-Big-Text");
      }
   });

   // add button to change font to small when clicked.
   Button Btn2 = new Button("Small Text");
   Btn2.addClickHandler(new ClickHandler() {
      public void onClick(ClickEvent event) {
         RootPanel.get("mytext").setStyleName("gwt-Small-Text");
      }
   });

   RootPanel.get("gwtGreenButton").add(Btn1);
   RootPanel.get("gwtRedButton").add(Btn2);
   }
}
すべての変更を行う準備ができたら、GWT-アプリケーションの作成の章で行ったように、アプリケーションをコンパイルして開発モードで実行します。アプリケーションに問題がない場合、次の結果が得られます-
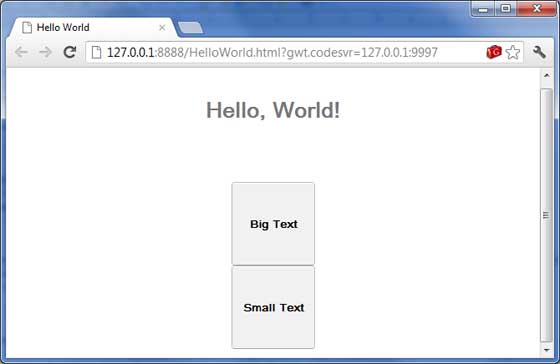
表示された2つのボタンをクリックして、「Hello、World!」を確認してください。2つのボタンをクリックするとフォントが変化し続けるテキスト。
すべてのユーザーインターフェイスは、次の3つの主要な側面を考慮します-
UI elements−これらは、ユーザーが最終的に見て対話するコア視覚要素です。GWTは、このチュートリアルで取り上げる、基本的なものから複雑なものまで、広く使用されている一般的な要素の膨大なリストを提供します。
Layouts− UI要素を画面上でどのように編成するかを定義し、GUI(グラフィカルユーザーインターフェイス)に最終的なルックアンドフィールを提供します。この部分については、レイアウトの章で説明します。
Behavior−これらは、ユーザーがUI要素を操作したときに発生するイベントです。この部分については、イベント処理の章で説明します。
GWTUI要素
GWTライブラリは、複雑なWebベースのユーザーインターフェイスを作成するために、明確に定義されたクラス階層でクラスを提供します。このコンポーネント階層内のすべてのクラスは、UIObject 以下に示す基本クラス-
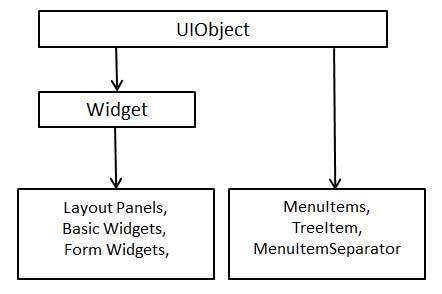
すべての基本的なUIウィジェットは、ウィジェットクラスからプロパティを継承し、ウィジェットクラスはUIObjectからプロパティを継承します。ツリーとメニューについては、複雑なウィジェットのチュートリアルで説明します。
| シニア番号 | ウィジェットと説明 |
|---|---|
| 1 | GWTUIObjectクラス このウィジェットにはテキストが含まれており、<div>要素を使用してHTMLとして解釈されないため、ブロックレイアウトで表示されます。 |
| 2 | GWTウィジェットクラス このウィジェットにはHTMLテキストを含めることができ、<div>要素を使用してhtmlコンテンツを表示し、ブロックレイアウトで表示します。 |
基本的なウィジェット
以下はいくつかの重要な基本ウィジェットです-
| シニア番号 | ウィジェットと説明 |
|---|---|
| 1 | ラベル このウィジェットにはテキストが含まれており、<div>要素を使用してHTMLとして解釈されないため、ブロックレイアウトで表示されます。 |
| 2 | HTML このウィジェットにはHTMLテキストを含めることができ、<div>要素を使用してhtmlコンテンツを表示し、ブロックレイアウトで表示します。 |
| 3 | 画像 このウィジェットは、指定されたURLに画像を表示します。 |
| 4 | アンカー このウィジェットは、単純な<a>要素を表します。 |
フォームウィジェットを使用すると、ユーザーはデータを入力でき、アプリケーションとの対話機能を提供します。すべてのフォームウィジェットはウィジェットクラスからプロパティを継承し、ウィジェットクラスはUIObjectクラスとWigdetクラスからプロパティを継承します。
| シニア番号 | ウィジェットと説明 |
|---|---|
| 1 | GWTUIObjectクラス このウィジェットにはテキストが含まれており、<div>要素を使用してHTMLとして解釈されないため、ブロックレイアウトで表示されます。 |
| 2 | GWTウィジェットクラス このウィジェットにはHTMLテキストを含めることができ、<div>要素を使用してhtmlコンテンツを表示し、ブロックレイアウトで表示します。 |
フォームウィジェット
以下はいくつかの重要なフォームウィジェットです-
| シニア番号 | ウィジェットと説明 |
|---|---|
| 1 | ボタン このウィジェットは、標準のプッシュボタンを表します。 |
| 2 | ボタンを押す このウィジェットは、カスタムスタイルの通常のプッシュボタンを表します。 |
| 3 | ToggleButton このウィジェットは、ユーザーがアップ状態とダウン状態を切り替えることができるスタイリッシュなステートフルボタンを表します。 |
| 4 | チェックボックス このウィジェットは、標準のチェックボックスウィジェットを表します。このクラスは、RadioButtonの基本クラスとしても機能します。 |
| 5 | ラジオボタン このウィジェットは、相互に排他的な選択ラジオボタンウィジェットを表します。 |
| 6 | リストボックス このウィジェットは、リストボックスまたはドロップダウンリストとして、ユーザーに選択肢のリストを表します。 |
| 7 | SuggestBox このウィジェットは、ユーザーの入力に一致する事前構成された選択のセットを表示するテキストボックスまたはテキスト領域を表します。各SuggestBoxは、単一のSuggestOracleに関連付けられています。SuggestOracleは、特定のクエリ文字列を指定して一連の選択を提供するために使用されます。 |
| 8 | テキストボックス このウィジェットは、1行のテキストボックスを表します。 |
| 9 | PasswordTextBox このウィジェットは、盗聴を防ぐために入力を視覚的にマスクするテキストボックスを表します。 |
| 10 | TextArea このウィジェットは、複数行のテキストを入力できるテキストボックスを表します。 |
| 11 | RichTextArea このウィジェットは、複雑なスタイルとフォーマットを可能にするリッチテキストエディターを表します。 |
| 12 | FileUpload このウィジェットは、HTMLの<input type = 'file'>要素をラップします。 |
| 13 | 隠し このウィジェットは、HTMLフォームの非表示フィールドを再プリセットします。 |
「複雑なウィジェット」により、ユーザーはアプリケーションとの高度な対話機能を利用できます。すべてのComplexウィジェットは、ウィジェットクラスからプロパティを継承し、ウィジェットクラスはUIObjectからプロパティを継承します。
| シニア番号 | ウィジェットと説明 |
|---|---|
| 1 | GWTUIObjectクラス このウィジェットにはテキストが含まれており、<div>要素を使用してHTMLとして解釈されないため、ブロックレイアウトで表示されます。 |
| 2 | GWTウィジェットクラス このウィジェットにはHTMLテキストを含めることができ、<div>要素を使用してhtmlコンテンツを表示し、ブロックレイアウトで表示します。 |
複雑なウィジェット
以下はいくつかの重要な複雑なウィジェットです-
| シニア番号 | ウィジェットと説明 |
|---|---|
| 1 | 木 このウィジェットは、標準の階層ツリーウィジェットを表します。ツリーには、ユーザーが開いたり、閉じたり、選択したりできるTreeItemの階層が含まれています。 |
| 2 | メニューバー このウィジェットは、標準のメニューバーウィジェットを表します。メニューバーには任意の数のメニュー項目を含めることができ、各項目はコマンドを起動するか、カスケードされたメニューバーを開くことができます。 |
| 3 | DatePicker このウィジェットは、標準のGWT日付ピッカーを表します。 |
| 4 | CellTree このウィジェットは、ツリーのビューを表します。このウィジェットは標準モードでのみ機能します。このモードでは、ウィジェットが実行されるHTMLページに明示的な<!DOCTYPE>宣言が必要です。 |
| 5 | CellList このウィジェットは、セルの単一列リストを表します。 |
| 6 | CellTable このウィジェットは、ページングと列をサポートする表形式のビューを表します。 |
| 7 | CellBrowser このウィジェットは browsableレベルごとに1つのノードのみを一度に開くことができるツリーのビュー。このウィジェットは標準モードでのみ機能します。このモードでは、ウィジェットが実行されるHTMLページに明示的な<!DOCTYPE>宣言が必要です。 |
レイアウトパネルには、他のウィジェットを含めることができます。これらのパネルは、ウィジェットがユーザーインターフェイスに表示される方法を制御します。すべてのPanelウィジェットはPanelクラスからプロパティを継承し、PanelクラスはWidgetクラスからプロパティを継承し、次にUIObjectクラスからプロパティを継承します。
| シニア番号 | ウィジェットと説明 |
|---|---|
| 1 | GWTUIObjectクラス このウィジェットにはテキストが含まれており、<div>要素を使用してHTMLとして解釈されないため、ブロックレイアウトで表示されます。 |
| 2 | GWTウィジェットクラス このウィジェットにはHTMLテキストを含めることができ、<div>要素を使用してhtmlコンテンツを表示し、ブロックレイアウトで表示します。 |
| 3 | GWTパネルクラス これは、他のウィジェットを含めることができるウィジェットであるすべてのパネルの抽象基本クラスです。 |
レイアウトパネル
以下はいくつかの重要なレイアウトパネルです-
| シニア番号 | ウィジェットと説明 |
|---|---|
| 1 | FlowPanel このウィジェットは、デフォルトのHTMLレイアウト動作を使用して子ウィジェットをフォーマットするパネルを表します。 |
| 2 | HorizontalPanel このウィジェットは、すべてのウィジェットを1つの水平列に配置するパネルを表します。 |
| 3 | VerticalPanel このウィジェットは、すべてのウィジェットを単一の垂直列に配置するパネルを表します。 |
| 4 | HorizontalSplitPanel このウィジェットは、2つのウィジェットを1つの水平方向の行に配置し、ユーザーが2つのウィジェットのそれぞれに専用の幅の比率をインタラクティブに変更できるようにするパネルを表します。HorizontalSplitPanel内に含まれるウィジェットは、必要に応じてスクロールバーで自動的に装飾されます。 |
| 5 | VerticalSplitPanel このウィジェットは、2つのウィジェットを1つの垂直列に配置し、ユーザーが2つのウィジェットのそれぞれに専用の高さの比率をインタラクティブに変更できるようにするAパネルを表します。VertialSplitPanelに含まれるウィジェットは、必要に応じてスクロールバーで自動的に装飾されます。 |
| 6 | FlexTable このウィジェットは、オンデマンドでセルを作成する柔軟なテーブルを表します。ギザギザにすることができ(つまり、各行に異なる数のセルを含めることができます)、個々のセルを複数の行または列にまたがるように設定できます。 |
| 7 | グリッド このウィジェットは、セル内にテキスト、html、または子ウィジェットを含めることができる長方形のグリッドを表します。必要な行数と列数に明示的にサイズ変更する必要があります。 |
| 8 | DeckPanel すべての子ウィジェットを「デッキ」に表示するパネル。一度に表示できるのは1つだけです。TabPanelによって使用されます。 |
| 9 | DockPanel このウィジェットは、子ウィジェットをその外側の端に「ドッキング」して配置し、最後のウィジェットが中央の残りのスペースを占有できるようにするパネルを表します。 |
| 10 | HTMLPanel このウィジェットは、HTMLを含み、そのHTML内の識別された要素に子ウィジェットをアタッチできるパネルを表します。 |
| 11 | TabPanel このウィジェットは、タブ付きのページセットを表すパネルを表し、各ページには別のウィジェットが含まれています。ユーザーがそれらに関連付けられたさまざまなタブを選択すると、その子ウィジェットが表示されます。タブには任意のHTMLを含めることができます。 |
| 12 | 複合 このウィジェットは、別のウィジェットをラップして、ラップされたウィジェットのメソッドを非表示にできるウィジェットのタイプを表します。パネルに追加すると、コンポジットは、ラップするウィジェットが追加されたかのように正確に動作します。 |
| 13 | SimplePanel このウィジェットは、ウィジェットを1つだけ含むパネルの基本クラスを表します。 |
| 14 | ScrollPanel このウィジェットは、コンテンツをスクロール可能な領域にラップする単純なパネルを表します |
| 15 | FocusPanel このウィジェットは、コンテンツをフォーカス可能にし、マウスとキーボードのイベントをキャッチする機能を追加するシンプルなパネルを表します。 |
| 16 | FormPanel このウィジェットは、そのコンテンツをHTMLの<FORM>要素でラップするパネルを表します。 |
| 17 | PopupPanel このウィジェットは、次のことができるパネルを表します。 pop up他のウィジェットの上に。ブラウザのクライアント領域(および以前に作成されたポップアップ)をオーバーレイします。 |
| 18 | ダイアログボックス このウィジェットは、上部にキャプション領域があり、ユーザーがドラッグできるポップアップの形式を表します。PopupPanelとは異なり、PopupPanel.setWidth(String)およびPopupPanel.setHeight(String)を呼び出すと、ウィジェットがまだ追加されていない場合でも、ダイアログボックス自体の幅と高さが設定されます。 |
GWTは、JavaAWTまたはSWINGユーザーインターフェイスフレームワークと同様のイベントハンドラモデルを提供します。
リスナーインターフェイスは、ウィジェットがイベントをアナウンスするために呼び出す1つ以上のメソッドを定義します。GWTは、考えられるさまざまなイベントに対応するインターフェースのリストを提供します。
特定のタイプのイベントを受信したいクラスは、関連するハンドラーインターフェイスを実装し、それ自体への参照をウィジェットに渡して、一連のイベントをサブスクライブします。
たとえば、 Button クラスは公開します click eventsしたがって、ClickHandlerを実装して処理するクラスを作成する必要がありますclick イベント。
イベントハンドラーインターフェイス
すべてのGWTイベントハンドラーはEventHandlerインターフェースから拡張されており、各ハンドラーには単一の引数を持つ単一のメソッドしかありません。この引数は、常に関連するイベントタイプのオブジェクトです。各eventオブジェクトには、渡されたイベントオブジェクトを操作するためのいくつかのメソッドがあります。たとえば、クリックイベントの場合、ハンドラーを次のように記述する必要があります-
/**
 * create a custom click handler which will call
 * onClick method when button is clicked.
 */
public class MyClickHandler implements ClickHandler {
   @Override
   public void onClick(ClickEvent event) {
      Window.alert("Hello World!");
   }
}
これで、クリックイベントの受信を希望するクラスはすべて電話をかけます addClickHandler() 次のようにイベントハンドラーを登録するには-
/**
 * create button and attach click handler
 */
Button button = new Button("Click Me!");
button.addClickHandler(new MyClickHandler());イベントタイプをサポートする各ウィジェットには、HandlerRegistrationaddという形式のメソッドがあります。Fooハンドラ(Fooイベント)ここで Foo Click、Error、KeyPressなどの実際のイベントです。
以下は、重要なGWTイベントハンドラーと関連イベントおよびハンドラー登録方法のリストです-
| シニア番号 | イベントインターフェイス | イベントの方法と説明 |
|---|---|---|
| 1 | 選択ハンドラーの前<I> | void on Before Selection (Before Selection Event<I> event); BeforeSelectionEventが発生したときに呼び出されます。 |
| 2 | BlurHandler | void on Blur(Blur Event event); ブラーイベントが発生したときに呼び出されます。 |
| 3 | ChangeHandler | void on Change(ChangeEvent event); 変更イベントが発生したときに呼び出されます。 |
| 4 | ClickHandler | void on Click(ClickEvent event); ネイティブクリックイベントが発生したときに呼び出されます。 |
| 5 | CloseHandler <T> | void on Close(CloseEvent<T> event); CloseEventが発生したときに呼び出されます。 |
| 6 | コンテキストメニューハンドラ | void on Context Menu(Context Menu Event event); ネイティブコンテキストメニューイベントが発生したときに呼び出されます。 |
| 7 | ダブルクリックハンドラー | void on Double Click(Double Click Event event); ダブルクリックイベントが発生したときに呼び出されます。 |
| 8 | エラーハンドラ | void on Error(Error Event event); エラーイベントが発生したときに呼び出されます。 |
| 9 | フォーカスハンドラー | void on Focus(Focus Event event); フォーカスイベントが発生したときに呼び出されます。 |
| 10 | フォームパネル。完全なハンドラーを送信 | void on Submit Complete(Form Panel.Submit Complete Event event); フォームが正常に送信されたときに発生します。 |
| 11 | FormPanel.SubmitHandler | void on Submit(Form Panel.Submit Event event); フォームが送信されたときに発生します。 |
| 12 | キーダウンハンドラー | void on Key Down(Key Down Event event); KeyDownEventが発生したときに呼び出されます。 |
| 13 | KeyPressHandler | void on KeyPress(KeyPressEvent event); KeyPressEventが発生したときに呼び出されます。 |
| 14 | KeyUpHandler | void on KeyUp(KeyUpEvent event); KeyUpEventが発生したときに呼び出されます。 |
| 15 | LoadHandler | void on Load(LoadEvent event); LoadEventが発生したときに呼び出されます。 |
| 16 | MouseDownHandler | void on MouseDown(MouseDownEvent event); MouseDownが起動されたときに呼び出されます。 |
| 17 | MouseMoveHandler | void on MouseMove(MouseMoveEvent event); MouseMoveEventが発生したときに呼び出されます。 |
| 18 | MouseOutHandler | void on MouseOut(MouseOutEvent event); MouseOutEventが発生したときに呼び出されます。 |
| 19 | MouseOverHandler | void on MouseOver(MouseOverEvent event); MouseOverEventが発生したときに呼び出されます。 |
| 20 | MouseUpHandler | void on MouseUp(MouseUpEvent event); MouseUpEventが発生したときに呼び出されます。 |
| 21 | MouseWheelHandler | void on MouseWheel(MouseWheelEvent event); MouseWheelEventが発生したときに呼び出されます。 |
| 22 | ResizeHandler | void on Resize(ResizeEvent event); ウィジェットのサイズが変更されたときに発生します。 |
| 23 | ScrollHandler | void on Scroll(ScrollEvent event); ScrollEventが発生したときに呼び出されます。 |
| 24 | SelectionHandler <I> | void on Selection(SelectionEvent<I> event); SelectionEventが発生したときに呼び出されます。 |
| 25 | ValueChangeHandler <I> | void on ValueChange(ValueChangeEvent<I> event); ValueChangeEventが発生したときに呼び出されます。 |
| 26 | Window.ClosingHandler | void on WindowClosing(Window.ClosingEvent event); ブラウザウィンドウが閉じるか、別のサイトに移動する直前に発生します。 |
| 27 | Window.ScrollHandler | void on WindowScroll(Window.ScrollEvent event); ブラウザウィンドウがスクロールされたときに発生します。 |
イベントメソッド
前述のように、各ハンドラーには、イベントオブジェクトを保持する単一の引数を持つ単一のメソッドがあります(例:void onClick(ClickEvent event)またはvoid onKeyDown(KeyDownEvent event))。ClickEventやKeyDownEventなどのイベントオブジェクトには、以下に示す一般的なメソッドがいくつかあります。
| シニア番号 | 方法と説明 |
|---|---|
| 1 | protected void dispatch(ClickHandler handler) このメソッドは、HandlerManagerによってのみ呼び出される必要があります |
| 2 | DomEvent.Type <FooHandler> getAssociatedType() このメソッドは、登録に使用されたタイプを返します Foo イベント。 |
| 3 | static DomEvent.Type<FooHandler> getType() このメソッドは、に関連付けられたイベントタイプを取得します Foo イベント。 |
| 4 | public java.lang.Object getSource() このメソッドは、このイベントを最後に発生させたソースを返します。 |
| 5 | protected final boolean isLive() このメソッドは、イベントがライブであるかどうかを返します。 |
| 6 | protected void kill() このメソッドはイベントを強制終了します |
例
この例では、の使用法を示す簡単な手順を説明します。 Click イベントと KeyDownGWTでのイベント処理。次の手順に従って、GWTで作成したGWTアプリケーションを更新します-アプリケーションの作成の章-
| ステップ | 説明 |
|---|---|
| 1 | GWT-アプリケーションの作成の章で説明されているように、パッケージcom.tutorialspointの下にHelloWorldという名前のプロジェクトを作成します。 |
| 2 | 変更HelloWorld.gwt.xml、HelloWorld.css、HelloWorld.htmlとHelloWorld.javaは、以下のように説明しました。残りのファイルは変更しないでください。 |
| 3 | アプリケーションをコンパイルして実行し、実装されたロジックの結果を確認します。 |
変更されたモジュール記述子の内容は次のとおりです src/com.tutorialspoint/HelloWorld.gwt.xml。
<?xml version = "1.0" encoding = "UTF-8"?>
<module rename-to = 'helloworld'>
   <!-- Inherit the core Web Toolkit stuff.                        -->
   <inherits name = 'com.google.gwt.user.User'/>

   <!-- Inherit the default GWT style sheet.                       -->
   <inherits name = 'com.google.gwt.user.theme.clean.Clean'/>

   <!-- Specify the app entry point class.                         -->
   <entry-point class = 'com.tutorialspoint.client.HelloWorld'/>

   <!-- Specify the paths for translatable code                    -->
   <source path = 'client'/>
   <source path = 'shared'/>

</module>
変更されたスタイルシートファイルの内容は次のとおりです war/HelloWorld.css。
body {
   text-align: center;
   font-family: verdana, sans-serif;
}

h1 {
   font-size: 2em;
   font-weight: bold;
   color: #777777;
   margin: 40px 0px 70px;
   text-align: center;
}
以下は、変更されたHTMLホストファイルの内容です。 war/HelloWorld.html。
<html>
<head>
<title>Hello World</title>
<link rel = "stylesheet" href = "HelloWorld.css"/>
<script language = "javascript" src = "helloworld/helloworld.nocache.js">
</script>
</head>
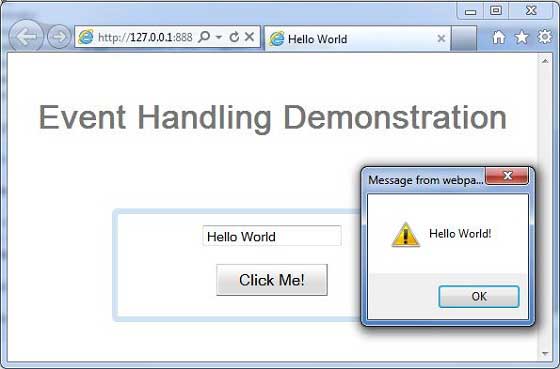
<body>
<h1>Event Handling Demonstration</h1>
<div id = "gwtContainer"></div>
</body>
</html>以下のJavaファイルの内容を見てみましょう src/com.tutorialspoint/HelloWorld.java これは、GWTでのイベント処理の使用法を示します。
package com.tutorialspoint.client;

import com.google.gwt.core.client.EntryPoint;
import com.google.gwt.event.dom.client.ClickEvent;
import com.google.gwt.event.dom.client.ClickHandler;
import com.google.gwt.event.dom.client.KeyCodes;
import com.google.gwt.event.dom.client.KeyDownEvent;
import com.google.gwt.event.dom.client.KeyDownHandler;
import com.google.gwt.user.client.Window;
import com.google.gwt.user.client.ui.Button;
import com.google.gwt.user.client.ui.DecoratorPanel;
import com.google.gwt.user.client.ui.HasHorizontalAlignment;
import com.google.gwt.user.client.ui.RootPanel;
import com.google.gwt.user.client.ui.TextBox;
import com.google.gwt.user.client.ui.VerticalPanel;

public class HelloWorld implements EntryPoint {
   public void onModuleLoad() {
      /**
       * create textbox and attach key down handler
       */
      TextBox textBox = new TextBox();
      textBox.addKeyDownHandler(new MyKeyDownHandler());

      /*
       * create button and attach click handler
       */
      Button button = new Button("Click Me!");
      button.addClickHandler(new MyClickHandler());

      VerticalPanel panel = new VerticalPanel();
      panel.setSpacing(10);
      panel.setHorizontalAlignment(HasHorizontalAlignment.ALIGN_CENTER);
      panel.setSize("300", "100");
      panel.add(textBox);
      panel.add(button);

      DecoratorPanel decoratorPanel = new DecoratorPanel();
      decoratorPanel.add(panel);
      RootPanel.get("gwtContainer").add(decoratorPanel);
   }

   /**
    * create a custom click handler which will call
    * onClick method when button is clicked.
    */
   private class MyClickHandler implements ClickHandler {
      @Override
      public void onClick(ClickEvent event) {
         Window.alert("Hello World!");
      }
   }

   /**
    * create a custom key down handler which will call
    * onKeyDown method when a key is down in textbox.
    */
   private class MyKeyDownHandler implements KeyDownHandler {
      @Override
      public void onKeyDown(KeyDownEvent event) {
         if(event.getNativeKeyCode() == KeyCodes.KEY_ENTER){
            Window.alert(((TextBox)event.getSource()).getValue());
         }
      }
   }
}
すべての変更を行う準備ができたら、GWT-アプリケーションの作成の章で行ったように、アプリケーションをコンパイルして開発モードで実行します。アプリケーションに問題がない場合、次の結果が得られます-
GWTは、カスタムユーザーインターフェイス要素を作成する3つの方法を提供します。従うべき3つの一般的な戦略があります-
Create a widget by extending Composite Class−これは、カスタムウィジェットを作成するための最も一般的で最も簡単な方法です。ここでは、既存のウィジェットを使用して、カスタムプロパティを持つ複合ビューを作成できます。
Create a widget using GWT DOM API in JAVA−GWT基本ウィジェットはこの方法で作成されます。それでも、カスタムウィジェットを作成するには非常に複雑な方法であるため、慎重に使用する必要があります。
Use JavaScript and wrap it in a widget using JSNI−これは通常、最後の手段としてのみ実行する必要があります。ネイティブメソッドのブラウザ間の影響を考慮すると、非常に複雑になり、デバッグも難しくなります。
複合クラスを使用してカスタムウィジェットを作成する
この例では、GWTでのカスタムウィジェットの作成を示す簡単な手順を説明します。次の手順に従って、GWTで作成したGWTアプリケーションを更新します-基本ウィジェットの章-
ここでは、Compositeクラスを拡張してカスタムウィジェットを作成します。これは、カスタムウィジェットを作成する最も簡単な方法です。
| ステップ | 説明 |
|---|---|
| 1 | GWT-アプリケーションの作成の章で説明されているように、パッケージcom.tutorialspointの下にHelloWorldという名前のプロジェクトを作成します。 |
| 2 | 変更HelloWorld.gwt.xml、HelloWorld.css、HelloWorld.htmlとHelloWorld.javaは、以下のように説明しました。残りのファイルは変更しないでください。 |
| 3 | アプリケーションをコンパイルして実行し、実装されたロジックの結果を確認します。 |
変更されたモジュール記述子の内容は次のとおりです src/com.tutorialspoint/HelloWorld.gwt.xml。
<?xml version = "1.0" encoding = "UTF-8"?>
<module rename-to = 'helloworld'>
   <!-- Inherit the core Web Toolkit stuff.                        -->
   <inherits name = 'com.google.gwt.user.User'/>

   <!-- Inherit the default GWT style sheet.                       -->
   <inherits name = 'com.google.gwt.user.theme.clean.Clean'/>

   <!-- Specify the app entry point class.                         -->
   <entry-point class = 'com.tutorialspoint.client.HelloWorld'/>

   <!-- Specify the paths for translatable code                    -->
   <source path = 'client'/>
   <source path = 'shared'/>

</module>
変更されたスタイルシートファイルの内容は次のとおりです war/HelloWorld.css。
body {
   text-align: center;
   font-family: verdana, sans-serif;
}

h1 {
   font-size: 2em;
   font-weight: bold;
   color: #777777;
   margin: 40px 0px 70px;
   text-align: center;
}
以下は、変更されたHTMLホストファイルの内容です。 war/HelloWorld.html。
<html>
   <head>
      <title>Hello World</title>
      <link rel = "stylesheet" href = "HelloWorld.css"/>
      <script language = "javascript" src = "helloworld/helloworld.nocache.js">
      </script>
   </head>

   <body>
      <h1>Custom Widget Demonstration</h1>
      <div id = "gwtContainer"></div>
   </body>
</html>
以下のJavaファイルの内容を見てみましょう src/com.tutorialspoint/HelloWorld.java これは、カスタムウィジェットの作成を示します。
package com.tutorialspoint.client;

import com.google.gwt.core.client.EntryPoint;
import com.google.gwt.event.dom.client.ClickEvent;
import com.google.gwt.event.dom.client.ClickHandler;
import com.google.gwt.user.client.ui.CheckBox;
import com.google.gwt.user.client.ui.Composite;
import com.google.gwt.user.client.ui.HorizontalPanel;
import com.google.gwt.user.client.ui.RootPanel;
import com.google.gwt.user.client.ui.TextBox;

public class HelloWorld implements EntryPoint {

   /**
    * A composite of a TextBox and a CheckBox that optionally enables it.
    */
   private static class OptionalTextBox extends Composite implements
   ClickHandler {

      private TextBox textBox = new TextBox();
      private CheckBox checkBox = new CheckBox();
      private boolean enabled = true;

      public boolean isEnabled() {
         return enabled;
      }

      public void setEnabled(boolean enabled) {
         this.enabled = enabled;
      }

      /**
       * Style this widget using .optionalTextWidget CSS class.<br/>
       * Style textbox using .optionalTextBox CSS class.<br/>
       * Style checkbox using .optionalCheckBox CSS class.<br/>
       * Constructs an OptionalTextBox with the given caption
       * on the check.
       * @param caption the caption to be displayed with the check box
       */
      public OptionalTextBox(String caption) {
         // place the check above the text box using a vertical panel.
         HorizontalPanel panel = new HorizontalPanel();
         // panel.setBorderWidth(1);
         panel.setSpacing(10);
         panel.add(checkBox);
         panel.add(textBox);

         // all composites must call initWidget() in their constructors.
         initWidget(panel);

         //set style name for entire widget
         setStyleName("optionalTextWidget");

         //set style name for text box
         textBox.setStyleName("optionalTextBox");

         //set style name for check box
         checkBox.setStyleName("optionalCheckBox");
         textBox.setWidth("200");

         // Set the check box's caption, and check it by default.
         checkBox.setText(caption);
         checkBox.setValue(enabled);
         checkBox.addClickHandler(this);
         enableTextBox(enabled,checkBox.getValue());
      }

      public void onClick(ClickEvent event) {
         if (event.getSource() == checkBox) {
            // When the check box is clicked,
            //update the text box's enabled state.
            enableTextBox(enabled,checkBox.getValue());
         }
      }

      private void enableTextBox(boolean enable,boolean isChecked){
         enable = (enable && isChecked) || (!enable && !isChecked);
         textBox.setStyleDependentName("disabled", !enable);
         textBox.setEnabled(enable);
      }
   }

   public void onModuleLoad() {
      // Create an optional text box and add it to the root panel.
      OptionalTextBox otb = new OptionalTextBox(
         "Want to explain the solution?");
      otb.setEnabled(true);
      RootPanel.get().add(otb);
   }
}
すべての変更を行う準備ができたら、GWT-アプリケーションの作成の章で行ったように、アプリケーションをコンパイルして開発モードで実行します。アプリケーションに問題がない場合、次の結果が得られます-
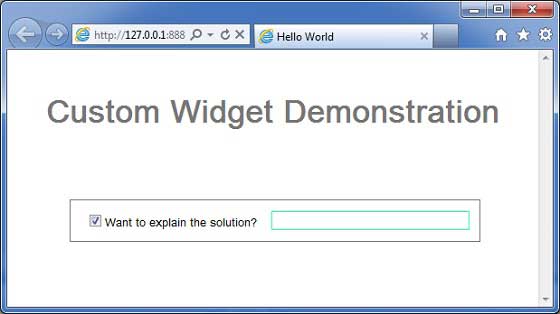
You can notice following points
コンポジットウィジェットを拡張してカスタムウィジェットを作成するのはとても簡単です。
GWTに組み込まれたウィジェット、TextBoxおよびCheckBoxを使用してウィジェットを作成し、再利用性の概念を使用しました。
テキストボックスは、チェックボックスの状態に応じて無効/有効になります。コントロールを有効/無効にするAPIを提供しました。
文書化されたCSSスタイルを介して内部ウィジェットスタイルを公開しました。
前書き
UiBinderは、ユーザーインターフェイスの機能とビューを分離するように設計されたフレームワークです。
UiBinderフレームワークを使用すると、開発者はgwtアプリケーションをHTMLページとして構築し、GWTウィジェットを全体に構成できます。
UiBinderフレームワークにより、JavaソースコードよりもXML、HTML、およびCSSに慣れているUIデザイナーとのコラボレーションが容易になります。
UIBinderは、ユーザーインターフェイスを定義する宣言的な方法を提供します。
UIBinderは、プログラムロジックをUIから分離します。
UIBinderは、JSPがサーブレットに対して行うものと似ています。
UiBinderワークフロー
ステップ1-UI宣言XMLファイルを作成する
XML / HTMLベースのユーザーインターフェイス宣言ファイルを作成します。作成しましたLogin.ui.xml この例ではファイル。
<ui:UiBinder xmlns:ui = 'urn:ui:com.google.gwt.uibinder'
   xmlns:gwt = 'urn:import:com.google.gwt.user.client.ui'
   xmlns:res = 'urn:with:com.tutorialspoint.client.LoginResources'>
   <ui:with type = "com.tutorialspoint.client.LoginResources" field = "res">
   </ui:with>
   <gwt:HTMLPanel>
   ...
   </gwt:HTMLPanel>
</ui:UiBinder>
ステップ2-後でバインドするためにui:fieldを使用する
XML / HTML要素のui:field属性を使用して、XMLのUIフィールドをJAVAファイルのUIフィールドに関連付け、後でバインドします。
<gwt:Label ui:field = "completionLabel1" />
<gwt:Label ui:field = "completionLabel2" />
ステップ3-UIXMLに対応するJavaを作成する
Compositeウィジェットを拡張して、XMLベースのレイアウトに対応するJavaベースを作成します。作成しましたLogin.java この例ではファイル。
package com.tutorialspoint.client;
   ...
public class Login extends Composite {
   ...
}
ステップ4-JavaUIフィールドをUiFieldアノテーションでバインドする
で@UiFieldアノテーションを使用する Login.java のXMLベースのフィールドにバインドする対応するクラスメンバーを指定する Login.ui.xml
public class Login extends Composite {
   ...
   @UiField
   Label completionLabel1;

   @UiField
   Label completionLabel2;
   ...
}
ステップ5-UiTemplateアノテーションを使用してJavaUIをUIXMLにバインドする
JavaベースのコンポーネントをバインドするようにGWTに指示します Login.java およびXMLベースのレイアウト Login.ui.xml @UiTemplateアノテーションを使用
public class Login extends Composite {

   private static LoginUiBinder uiBinder = GWT.create(LoginUiBinder.class);

   /*
    * @UiTemplate is not mandatory but allows multiple XML templates
    * to be used for the same widget.
    * Default file loaded will be <class-name>.ui.xml
    */

   @UiTemplate("Login.ui.xml")
   interface LoginUiBinder extends UiBinder<Widget, Login> {
   }
   ...
}
ステップ6-CSSファイルを作成する
外部CSSファイルを作成するLogin.css およびJavaベースのリソース LoginResources.java cssスタイルと同等のファイル
.blackText {
   font-family: Arial, Sans-serif;
   color: #000000;
   font-size: 11px;
   text-align: left;
}
...
ステップ7-CSSファイル用のJavaベースのリソースファイルを作成する
package com.tutorialspoint.client;
...
public interface LoginResources extends ClientBundle {
   public interface MyCss extends CssResource {
      String blackText();

      ...
   }

   @Source("Login.css")
   MyCss style();
}
ステップ8-JavaUIコードファイルにCSSリソースを添付します。
外部CSSファイルを添付しますLogin.css JavaベースのウィジェットクラスのContructorを使用する Login.java
public Login() {
   this.res = GWT.create(LoginResources.class);
   res.style().ensureInjected();
   initWidget(uiBinder.createAndBindUi(this));
}
UIBinderの完全な例
この例では、GWTでのUIBinderの使用法を示す簡単な手順を説明します。次の手順に従って、GWTで作成したGWTアプリケーションを更新します-アプリケーションの作成の章-
| ステップ | 説明 |
|---|---|
| 1 | GWT-アプリケーションの作成の章で説明されているように、パッケージcom.tutorialspointの下にHelloWorldという名前のプロジェクトを作成します。 |
| 2 | 変更HelloWorld.gwt.xml、HelloWorld.css、HelloWorld.htmlとHelloWorld.javaは、以下のように説明しました。残りのファイルは変更しないでください。 |
| 3 | アプリケーションをコンパイルして実行し、実装されたロジックの結果を確認します。 |
変更されたモジュール記述子の内容は次のとおりです src/com.tutorialspoint/HelloWorld.gwt.xml。
<?xml version = "1.0" encoding = "UTF-8"?>
<module rename-to = 'helloworld'>
   <!-- Inherit the core Web Toolkit stuff.                        -->
   <inherits name = 'com.google.gwt.user.User'/>

   <!-- Inherit the default GWT style sheet.                       -->
   <inherits name = 'com.google.gwt.user.theme.clean.Clean'/>
   <!-- Inherit the UiBinder module.                               -->
   <inherits name = "com.google.gwt.uibinder.UiBinder"/>
   <!-- Specify the app entry point class.                         -->
   <entry-point class = 'com.tutorialspoint.client.HelloWorld'/>

   <!-- Specify the paths for translatable code                    -->
   <source path ='client'/>
   <source path = 'shared'/>

</module>
変更されたスタイルシートファイルの内容は次のとおりです war/HelloWorld.css。
body {
   text-align: center;
   font-family: verdana, sans-serif;
}

h1 {
   font-size: 2em;
   font-weight: bold;
   color: #777777;
   margin: 40px 0px 70px;
   text-align: center;
}
以下は、変更されたHTMLホストファイルの内容です。 war/HelloWorld.html。
<html>
<head>
<title>Hello World</title>
<link rel = "stylesheet" href = "HelloWorld.css"/>
<script language = "javascript" src = "helloworld/helloworld.nocache.js">
</script>
</head>
<body>
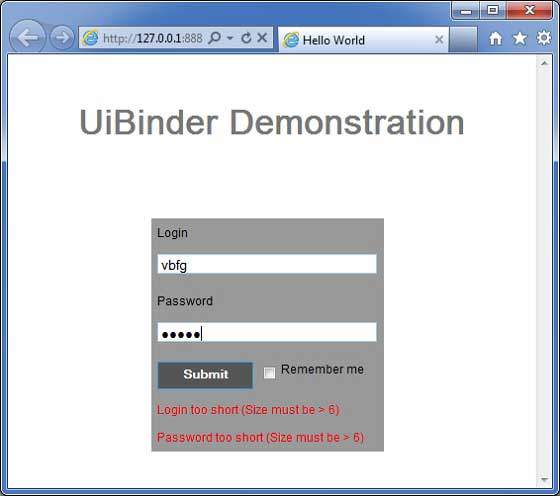
<h1>UiBinder Demonstration</h1>
<div id = "gwtContainer"></div>
</body>
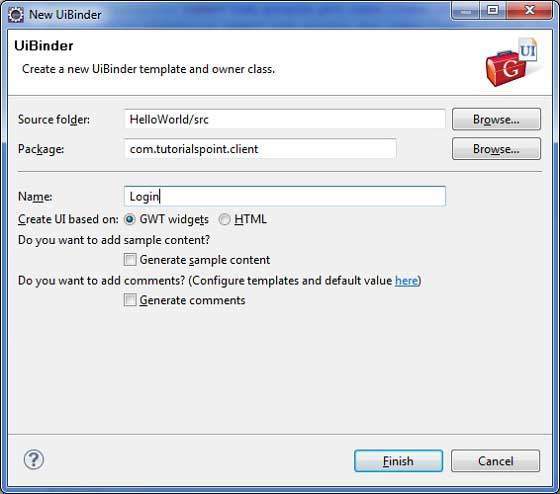
</html>次に、新しいUiBinderテンプレートと所有者クラスを作成します([ファイル]→[新規]→[UiBinder])。
プロジェクトのクライアントパッケージを選択し、Loginという名前を付けます。他のすべてのデフォルトのままにします。[完了]ボタンをクリックすると、プラグインは新しいUiBinderテンプレートと所有者クラスを作成します。
次に、Login.cssファイルを src/com.tutorialspoint/client 次の内容をパッケージ化して配置します
.blackText {
   font-family: Arial, Sans-serif;
   color: #000000;
   font-size: 11px;
   text-align: left;
}

.redText {
   font-family: Arial, Sans-serif;
   color: #ff0000;
   font-size: 11px;
   text-align: left;
}

.loginButton {
   border: 1px solid #3399DD;
   color: #FFFFFF;
   background: #555555;
   font-size: 11px;
   font-weight: bold;
   margin: 0 5px 0 0;
   padding: 4px 10px 5px;
   text-shadow: 0 -1px 0 #3399DD;
}

.box {
   border: 1px solid #AACCEE;
   display: block;
   font-size: 12px;
   margin: 0 0 5px;
   padding: 3px;
   width: 203px;
}

.background {
   background-color: #999999;
   border: 1px none transparent;
   color: #000000;
   font-size: 11px;
   margin-left: -8px;
   margin-top: 5px;
   padding: 6px;
}
次に、LoginResources.javaファイルを src/com.tutorialspoint/client 次の内容をパッケージ化して配置します
package com.tutorialspoint.client;

import com.google.gwt.resources.client.ClientBundle;
import com.google.gwt.resources.client.CssResource;

public interface LoginResources extends ClientBundle {
   /**
    * Sample CssResource.
    */
   public interface MyCss extends CssResource {
      String blackText();

      String redText();

      String loginButton();

      String box();

      String background();
   }

   @Source("Login.css")
   MyCss style();
}
Login.ui.xmlの内容を src/com.tutorialspoint/client 次のパッケージ
<ui:UiBinder xmlns:ui = 'urn:ui:com.google.gwt.uibinder'
   xmlns:gwt = 'urn:import:com.google.gwt.user.client.ui'
   xmlns:res = 'urn:with:com.tutorialspoint.client.LoginResources'>

   <ui:with type = "com.tutorialspoint.client.LoginResources" field = "res">
   </ui:with>

   <gwt:HTMLPanel>
      <div align = "center">

         <gwt:VerticalPanel res:styleName = "style.background">
            <gwt:Label text = "Login" res:styleName = "style.blackText" />
            <gwt:TextBox ui:field="loginBox" res:styleName = "style.box" />
            <gwt:Label text = "Password" res:styleName = "style.blackText" />
            <gwt:PasswordTextBox ui:field = "passwordBox" res:styleName = "style.box" />

            <gwt:HorizontalPanel verticalAlignment = "middle">
               <gwt:Button ui:field = "buttonSubmit" text="Submit"
                  res:styleName = "style.loginButton" />
               <gwt:CheckBox ui:field = "myCheckBox" />
               <gwt:Label ui:field = "myLabel" text = "Remember me"
                  res:styleName = "style.blackText" />
            </gwt:HorizontalPanel>

            <gwt:Label ui:field = "completionLabel1" res:styleName = "style.blackText" />
            <gwt:Label ui:field = "completionLabel2" res:styleName = "style.blackText" />
         </gwt:VerticalPanel>

      </div>
   </gwt:HTMLPanel>

</ui:UiBinder>
Login.javaの内容を src/com.tutorialspoint/client 次のパッケージ
package com.tutorialspoint.client;

import com.google.gwt.core.client.GWT;
import com.google.gwt.event.dom.client.ClickEvent;
import com.google.gwt.event.logical.shared.ValueChangeEvent;
import com.google.gwt.uibinder.client.UiBinder;
import com.google.gwt.uibinder.client.UiField;
import com.google.gwt.uibinder.client.UiHandler;
import com.google.gwt.uibinder.client.UiTemplate;
import com.google.gwt.user.client.Window;
import com.google.gwt.user.client.ui.Composite;
import com.google.gwt.user.client.ui.Label;
import com.google.gwt.user.client.ui.TextBox;
import com.google.gwt.user.client.ui.Widget;

public class Login extends Composite {

   private static LoginUiBinder uiBinder = GWT.create(LoginUiBinder.class);

   /*
    * @UiTemplate is not mandatory but allows multiple XML templates
    * to be used for the same widget.
    * Default file loaded will be <class-name>.ui.xml
    */
   @UiTemplate("Login.ui.xml")
   interface LoginUiBinder extends UiBinder<Widget, Login> {
   }

   @UiField(provided = true)
   final LoginResources res;

   public Login() {
      this.res = GWT.create(LoginResources.class);
      res.style().ensureInjected();
      initWidget(uiBinder.createAndBindUi(this));
   }

   @UiField
   TextBox loginBox;

   @UiField
   TextBox passwordBox;

   @UiField
   Label completionLabel1;

   @UiField
   Label completionLabel2;

   private Boolean tooShort = false;

   /*
    * Method name is not relevant, the binding is done according to the class
    * of the parameter.
    */
   @UiHandler("buttonSubmit")
   void doClickSubmit(ClickEvent event) {
      if (!tooShort) {
         Window.alert("Login Successful!");
      } else {
         Window.alert("Login or Password is too short!");
      }
   }

   @UiHandler("loginBox")
   void handleLoginChange(ValueChangeEvent<String> event) {
      if (event.getValue().length() < 6) {
         completionLabel1.setText("Login too short (Size must be > 6)");
         tooShort = true;
      } else {
         tooShort = false;
         completionLabel1.setText("");
      }
   }

   @UiHandler("passwordBox")
   void handlePasswordChange(ValueChangeEvent<String> event) {
      if (event.getValue().length() < 6) {
         tooShort = true;
         completionLabel2.setText("Password too short (Size must be > 6)");
      } else {
         tooShort = false;
         completionLabel2.setText("");
      }
   }
}
以下のJavaファイルの内容を見てみましょう src/com.tutorialspoint/HelloWorld.java UiBinderの使用法を示します。
package com.tutorialspoint.client;

import com.google.gwt.core.client.EntryPoint;
import com.google.gwt.user.client.ui.RootPanel;

public class HelloWorld implements EntryPoint {
   public void onModuleLoad() {
      RootPanel.get().add(new Login());
   }
}
すべての変更を行う準備ができたら、GWT-アプリケーションの作成の章で行ったように、アプリケーションをコンパイルして開発モードで実行します。アプリケーションに問題がない場合、次の結果が得られます-
GWTベースのアプリケーションは、通常、クライアント側モジュールとサーバー側モジュールで構成されます。クライアント側のコードはブラウザで実行され、サーバー側のコードはWebサーバーで実行されます。クライアント側のコードは、サーバー側のデータにアクセスするために、ネットワークを介してHTTP要求を行う必要があります。
RPC、リモートプロシージャコールは、クライアントコードがサーバー側のメソッドを直接実行できるGWTで使用されるメカニズムです。
GWTRPCはサーブレットベースです。
GWT RPCは非同期であり、通信中にクライアントがブロックされることはありません。
GWT RPCを使用すると、Javaオブジェクトをクライアントとサーバー間で直接送信できます(GWTフレームワークによって自動的にシリアル化されます)。
サーバー側サーブレットは、 service。
クライアント側のコードからサーバー側サーブレットのメソッドを呼び出すリモートプロシージャコールは、 invoking a service。
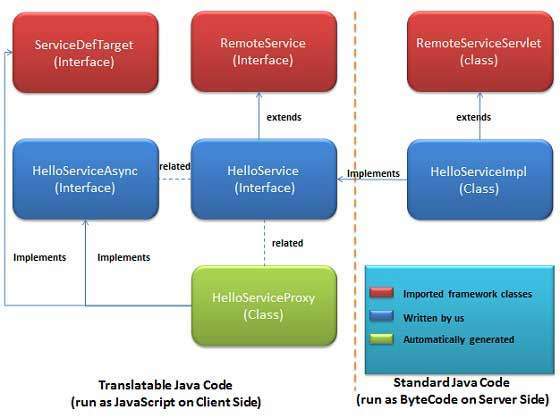
GWTRPCコンポーネント
以下は、GWTRPC通信メカニズムで使用される3つのコンポーネントです。
- サーバー上で実行されるリモートサービス(サーバー側サーブレット)。
- そのサービスを呼び出すためのクライアントコード。
- クライアントとサーバー間で渡されるJavaデータオブジェクト。
GWTクライアントとサーバーは両方ともデータを自動的にシリアル化および逆シリアル化するため、開発者はオブジェクトをシリアル化/逆シリアル化する必要がなく、データオブジェクトはHTTPを介して移動できます。
次の図は、RPCアーキテクチャを示しています。
RPCの使用を開始するには、GWTの規則に従う必要があります。
RPC通信ワークフロー
ステップ1-シリアル化可能なモデルクラスを作成する
シリアル化可能である必要があるクライアント側でJavaモデルオブジェクトを定義します。
public class Message implements Serializable {
   ...
   private String message;
   public Message(){};

   public void setMessage(String message) {
      this.message = message;
   }
   ...
}
ステップ2-サービスインターフェイスを作成する
すべてのサービスメソッドを一覧表示するRemoteServiceを拡張するクライアント側のサービスのインターフェイスを定義します。
アノテーション@RemoteServiceRelativePathを使用して、モジュールのベースURLを基準にしたリモートサーブレットのデフォルトパスでサービスをマップします。
@RemoteServiceRelativePath("message")
public interface MessageService extends RemoteService {
   Message getMessage(String input);
}
ステップ3-非同期サービスインターフェースを作成する
GWTクライアントコードで使用されるクライアント側(上記のサービスと同じ場所)のサービスへの非同期インターフェイスを定義します。
public interface MessageServiceAsync {
   void getMessage(String input, AsyncCallback<Message> callback);
}
ステップ4-サービス実装サーブレットクラスを作成する
サーバー側でインターフェースを実装すると、そのクラスはRemoteServiceServletクラスを拡張する必要があります。
public class MessageServiceImpl extends RemoteServiceServlet
   implements MessageService{
   ...
   public Message getMessage(String input) {
      String messageString = "Hello " + input + "!";
      Message message = new Message();
      message.setMessage(messageString);
      return message;
   }
}
ステップ5-サーブレット宣言を含むようにWeb.xmlを更新します
Webアプリケーションのデプロイメント記述子(web.xml)を編集して、MessageServiceImplサーブレット宣言を含めます。
<web-app>
   ...
   <servlet>
      <servlet-name>messageServiceImpl</servlet-name>
      <servlet-class>com.tutorialspoint.server.MessageServiceImpl
      </servlet-class>
   </servlet>

   <servlet-mapping>
      <servlet-name>messageServiceImpl</servlet-name>
      <url-pattern>/helloworld/message</url-pattern>
   </servlet-mapping>
</web-app>
ステップ6-アプリケーションコードでリモートプロシージャコールを行う
サービスプロキシクラスを作成します。
MessageServiceAsync messageService = GWT.create(MessageService.class);サーバーがクライアントにメッセージを返すRPCコールバックを処理するAsyncCallbackハンドラーを作成します
class MessageCallBack implements AsyncCallback<Message> {

   @Override
   public void onFailure(Throwable caught) {
      Window.alert("Unable to obtain server response: "
      + caught.getMessage());
   }

   @Override
   public void onSuccess(Message result) {
      Window.alert(result.getMessage());
   }
}
ユーザーがUIを操作するときにリモートサービスを呼び出す
public class HelloWorld implements EntryPoint {
   ...
   public void onModuleLoad() {
   ...
      buttonMessage.addClickHandler(new ClickHandler() {
         @Override
         public void onClick(ClickEvent event) {
            messageService.getMessage(txtName.getValue(),
            new MessageCallBack());
         }
      });
   ...
   }
}
RPC通信の完全な例
この例では、GWTでのRPC通信の例を示す簡単な手順を説明します。次の手順に従って、GWTで作成したGWTアプリケーションを更新します-アプリケーションの作成の章-
| ステップ | 説明 |
|---|---|
| 1 | GWT-アプリケーションの作成の章で説明されているように、パッケージcom.tutorialspointの下にHelloWorldという名前のプロジェクトを作成します。 |
| 2 | 変更HelloWorld.gwt.xml、HelloWorld.css、HelloWorld.htmlとHelloWorld.javaは、以下のように説明しました。残りのファイルは変更しないでください。 |
| 3 | アプリケーションをコンパイルして実行し、実装されたロジックの結果を確認します。 |
変更されたモジュール記述子の内容は次のとおりです src/com.tutorialspoint/HelloWorld.gwt.xml。
<?xml version = "1.0" encoding = "UTF-8"?>
<module rename-to = 'helloworld'>
   <!-- Inherit the core Web Toolkit stuff.                        -->
   <inherits name = 'com.google.gwt.user.User'/>

   <!-- Inherit the default GWT style sheet.                       -->
   <inherits name = 'com.google.gwt.user.theme.clean.Clean'/>
   <!-- Inherit the UiBinder module.                               -->
   <inherits name = "com.google.gwt.uibinder.UiBinder"/>
   <!-- Specify the app entry point class.                         -->
   <entry-point class = 'com.tutorialspoint.client.HelloWorld'/>

   <!-- Specify the paths for translatable code                    -->
   <source path = 'client'/>
   <source path = 'shared'/>

</module>
変更されたスタイルシートファイルの内容は次のとおりです war/HelloWorld.css。
body {
   text-align: center;
   font-family: verdana, sans-serif;
}

h1 {
   font-size: 2em;
   font-weight: bold;
   color: #777777;
   margin: 40px 0px 70px;
   text-align: center;
}
以下は、変更されたHTMLホストファイルの内容です。 war/HelloWorld.html。
<html>
   <head>
      <title>Hello World</title>
      <link rel = "stylesheet" href = "HelloWorld.css"/>
      <script language = "javascript" src = "helloworld/helloworld.nocache.js">
      </script>
   </head>

   <body>
      <h1>RPC Communication Demonstration</h1>
      <div id = "gwtContainer"></div>
   </body>
</html>
次に、Message.javaファイルを作成します。 src/com.tutorialspoint/client 次の内容をパッケージ化して配置します
package com.tutorialspoint.client;

import java.io.Serializable;

public class Message implements Serializable {

   private static final long serialVersionUID = 1L;
   private String message;
   public Message(){};

   public void setMessage(String message) {
      this.message = message;
   }

   public String getMessage() {
      return message;
   }
}
次に、MessageService.javaファイルを src/com.tutorialspoint/client 次の内容をパッケージ化して配置します
package com.tutorialspoint.client;

import com.google.gwt.user.client.rpc.RemoteService;
import com.google.gwt.user.client.rpc.RemoteServiceRelativePath;

@RemoteServiceRelativePath("message")
public interface MessageService extends RemoteService {
   Message getMessage(String input);
}
次に、MessageServiceAsync.javaファイルを src/com.tutorialspoint/client 次の内容をパッケージ化して配置します
package com.tutorialspoint.client;

import com.google.gwt.user.client.rpc.AsyncCallback;

public interface MessageServiceAsync {
   void getMessage(String input, AsyncCallback<Message> callback);
}
次に、MessageServiceImpl.javaファイルを作成します。 src/com.tutorialspoint/server 次の内容をパッケージ化して配置します
package com.tutorialspoint.server;

import com.google.gwt.user.server.rpc.RemoteServiceServlet;
import com.tutorialspoint.client.Message;
import com.tutorialspoint.client.MessageService;

public class MessageServiceImpl extends RemoteServiceServlet
   implements MessageService{

   private static final long serialVersionUID = 1L;

   public Message getMessage(String input) {
      String messageString = "Hello " + input + "!";
      Message message = new Message();
      message.setMessage(messageString);
      return message;
   }
}
変更されたWebアプリケーションデプロイメント記述子のコンテンツを更新します war/WEB-INF/web.xml MessageServiceImplサーブレット宣言を含めるため。
<?xml version = "1.0" encoding = "UTF-8"?>
<!DOCTYPE web-app
   PUBLIC "-//Sun Microsystems, Inc.//DTD Web Application 2.3//EN"
   "http://java.sun.com/dtd/web-app_2_3.dtd">

<web-app>
   <!-- Default page to serve -->
   <welcome-file-list>
      <welcome-file>HelloWorld.html</welcome-file>
   </welcome-file-list>

   <servlet>
      <servlet-name>messageServiceImpl</servlet-name>
      <servlet-class>com.tutorialspoint.server.MessageServiceImpl
      </servlet-class>
   </servlet>

   <servlet-mapping>
      <servlet-name>messageServiceImpl</servlet-name>
      <url-pattern>/helloworld/message</url-pattern>
   </servlet-mapping>
</web-app>
のHelloWorld.javaの内容を置き換えます src/com.tutorialspoint/client 次のパッケージ
package com.tutorialspoint.client;
import com.google.gwt.core.client.EntryPoint;
import com.google.gwt.core.client.GWT;
import com.google.gwt.event.dom.client.ClickEvent;
import com.google.gwt.event.dom.client.ClickHandler;
import com.google.gwt.event.dom.client.KeyCodes;
import com.google.gwt.event.dom.client.KeyUpEvent;
import com.google.gwt.event.dom.client.KeyUpHandler;
import com.google.gwt.user.client.Window;
import com.google.gwt.user.client.rpc.AsyncCallback;
import com.google.gwt.user.client.ui.Button;
import com.google.gwt.user.client.ui.DecoratorPanel;
import com.google.gwt.user.client.ui.HasHorizontalAlignment;
import com.google.gwt.user.client.ui.HorizontalPanel;
import com.google.gwt.user.client.ui.Label;
import com.google.gwt.user.client.ui.RootPanel;
import com.google.gwt.user.client.ui.TextBox;
import com.google.gwt.user.client.ui.VerticalPanel;
public class HelloWorld implements EntryPoint {
private MessageServiceAsync messageService =
GWT.create(MessageService.class);
private class MessageCallBack implements AsyncCallback<Message> {
@Override
public void onFailure(Throwable caught) {
/* server side error occured */
Window.alert("Unable to obtain server response: " + caught.getMessage());
}
@Override
public void onSuccess(Message result) {
/* server returned result, show user the message */
Window.alert(result.getMessage());
}
}
public void onModuleLoad() {
/*create UI */
final TextBox txtName = new TextBox();
txtName.setWidth("200");
txtName.addKeyUpHandler(new KeyUpHandler() {
@Override
public void onKeyUp(KeyUpEvent event) {
if(event.getNativeKeyCode() == KeyCodes.KEY_ENTER){
/* make remote call to server to get the message */
messageService.getMessage(txtName.getValue(),
new MessageCallBack());
}
}
});
Label lblName = new Label("Enter your name: ");
Button buttonMessage = new Button("Click Me!");
buttonMessage.addClickHandler(new ClickHandler() {
@Override
public void onClick(ClickEvent event) {
/* make remote call to server to get the message */
messageService.getMessage(txtName.getValue(),
new MessageCallBack());
}
});
HorizontalPanel hPanel = new HorizontalPanel();
hPanel.add(lblName);
hPanel.add(txtName);
hPanel.setCellWidth(lblName, "130");
VerticalPanel vPanel = new VerticalPanel();
vPanel.setSpacing(10);
vPanel.add(hPanel);
vPanel.add(buttonMessage);
vPanel.setCellHorizontalAlignment(buttonMessage,
HasHorizontalAlignment.ALIGN_RIGHT);
DecoratorPanel panel = new DecoratorPanel();
panel.add(vPanel);
// Add widgets to the root panel.
RootPanel.get("gwtContainer").add(panel);
}
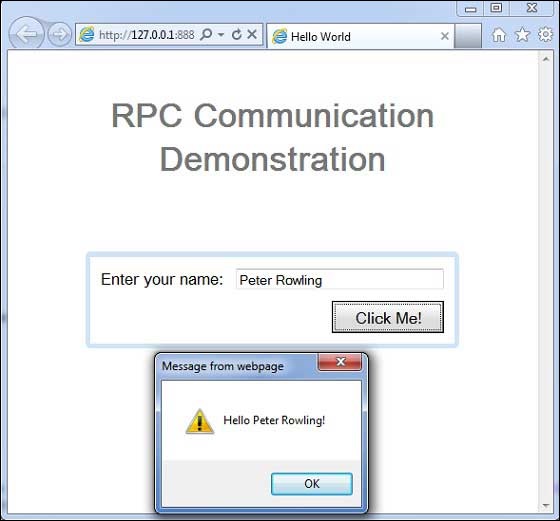
}すべての変更を行う準備ができたら、GWT-アプリケーションの作成の章で行ったように、アプリケーションをコンパイルして開発モードで実行します。アプリケーションに問題がない場合、次の結果が得られます-
GWTは、JUnitテストフレームワークを使用したクライアント側コードの自動テストに優れたサポートを提供します。この記事では、GWTとJUNITの統合について説明します。
JUnitアーカイブをダウンロードする
JUnit公式サイト- https://www.junit.org
ダウンロード Junit-4.10.jar
| OS | アーカイブ名 |
|---|---|
| ウィンドウズ | junit4.10.jar |
| Linux | junit4.10.jar |
| マック | junit4.10.jar |
ダウンロードしたjarファイルをコンピューターのどこかに保存します。に保管しましたC:/ > JUNIT
GWTインストールフォルダーを見つけます
| OS | GWTインストールフォルダー |
|---|---|
| ウィンドウズ | C:\ GWT \ gwt-2.1.0 |
| Linux | /usr/local/GWT/gwt-2.1.0 |
| マック | /Library/GWT/gwt-2.1.0 |
GWTTestCaseクラス
GWTは提供します GWTTestCaseJUnit統合を提供する基本クラス。JUnitでGWTTestCaseを拡張するコンパイル済みクラスを実行すると、HtmlUnitブラウザーが起動し、テスト実行中のアプリケーションの動作をエミュレートします。
GWTTestCaseは、JUnitのTestCaseから派生したクラスであり、JUnitTestRunnerを使用して実行できます。
webAppCreatorの使用
GWTは特別なコマンドラインツールを提供します webAppCreator これにより、スターターテストケースに加えて、開発モードと本番モードの両方でテストするためのantターゲットとEclipse起動構成を生成できます。
コマンドプロンプトを開き、に移動します C:\ > GWT_WORKSPACE > テストサポート付きの新しいプロジェクトを作成する場所次のコマンドを実行します
C:\GWT_WORKSPACE>C:\GWT\gwt-2.1.0\webAppCreator
   -out HelloWorld
   -junit C:\JUNIT\junit-4.10.jar
   com.tutorialspoint.HelloWorld
注目すべき点
- webAppCreatorコマンドラインユーティリティを実行しています。
- HelloWorldは、作成されるプロジェクトの名前です。
- -junitオプションは、プロジェクトにjunitサポートを追加するようにwebAppCreatorに指示します
- com.tutorialspoint.HelloWorldはモジュールの名前です
出力を確認します。
Created directory HelloWorld\src
Created directory HelloWorld\war
Created directory HelloWorld\war\WEB-INF
Created directory HelloWorld\war\WEB-INF\lib
Created directory HelloWorld\src\com\tutorialspoint
Created directory HelloWorld\src\com\tutorialspoint\client
Created directory HelloWorld\src\com\tutorialspoint\server
Created directory HelloWorld\src\com\tutorialspoint\shared
Created directory HelloWorld\test\com\tutorialspoint
Created directory HelloWorld\test\com\tutorialspoint\client
Created file HelloWorld\src\com\tutorialspoint\HelloWorld.gwt.xml
Created file HelloWorld\war\HelloWorld.html
Created file HelloWorld\war\HelloWorld.css
Created file HelloWorld\war\WEB-INF\web.xml
Created file HelloWorld\src\com\tutorialspoint\client\HelloWorld.java
Created file
HelloWorld\src\com\tutorialspoint\client\GreetingService.java
Created file
HelloWorld\src\com\tutorialspoint\client\GreetingServiceAsync.java
Created file
HelloWorld\src\com\tutorialspoint\server\GreetingServiceImpl.java
Created file HelloWorld\src\com\tutorialspoint\shared\FieldVerifier.java
Created file HelloWorld\build.xml
Created file HelloWorld\README.txt
Created file HelloWorld\test\com\tutorialspoint\HelloWorldJUnit.gwt.xml
Created file HelloWorld\test\com\tutorialspoint\client\HelloWorldTest.java
Created file HelloWorld\.project
Created file HelloWorld\.classpath
Created file HelloWorld\HelloWorld.launch
Created file HelloWorld\HelloWorldTest-dev.launch
Created file HelloWorld\HelloWorldTest-prod.launch
テストクラスを理解する:HelloWorldTest.java
package com.tutorialspoint.client;

import com.tutorialspoint.shared.FieldVerifier;
import com.google.gwt.core.client.GWT;
import com.google.gwt.junit.client.GWTTestCase;
import com.google.gwt.user.client.rpc.AsyncCallback;
import com.google.gwt.user.client.rpc.ServiceDefTarget;

/**
 * GWT JUnit tests must extend GWTTestCase.
 */
public class HelloWorldTest extends GWTTestCase {

   /**
    * must refer to a valid module that sources this class.
    */
   public String getModuleName() {
      return "com.tutorialspoint.HelloWorldJUnit";
   }

   /**
    * tests the FieldVerifier.
    */
   public void testFieldVerifier() {
      assertFalse(FieldVerifier.isValidName(null));
      assertFalse(FieldVerifier.isValidName(""));
      assertFalse(FieldVerifier.isValidName("a"));
      assertFalse(FieldVerifier.isValidName("ab"));
      assertFalse(FieldVerifier.isValidName("abc"));
      assertTrue(FieldVerifier.isValidName("abcd"));
   }

   /**
    * this test will send a request to the server using the greetServer
    *  method in GreetingService and verify the response.
    */
   public void testGreetingService() {
      /* create the service that we will test. */
      GreetingServiceAsync greetingService =
      GWT.create(GreetingService.class);
      ServiceDefTarget target = (ServiceDefTarget) greetingService;
      target.setServiceEntryPoint(GWT.getModuleBaseURL()
      + "helloworld/greet");

      /* since RPC calls are asynchronous, we will need to wait
       for a response after this test method returns. This line
       tells the test runner to wait up to 10 seconds
       before timing out. */
      delayTestFinish(10000);

      /* send a request to the server. */
      greetingService.greetServer("GWT User",
         new AsyncCallback<String>() {
         public void onFailure(Throwable caught) {
            /* The request resulted in an unexpected error. */
            fail("Request failure: " + caught.getMessage());
         }

         public void onSuccess(String result) {
            /* verify that the response is correct. */
            assertTrue(result.startsWith("Hello, GWT User!"));

            /* now that we have received a response, we need to
             tell the test runner that the test is complete.
             You must call finishTest() after an asynchronous test
             finishes successfully, or the test will time out.*/
            finishTest();
         }
      });
   }
}
注目すべき点
| シニア番号 | 注意 |
|---|---|
| 1 | HelloWorldTestクラスは、HelloWorld / testディレクトリの下のcom.tutorialspoint.clientパッケージで生成されました。 |
| 2 | HelloWorldTestクラスには、HelloWorldの単体テストケースが含まれます。 |
| 3 | HelloWorldTestクラスは、com.google.gwt.junit.clientパッケージのGWTTestCaseクラスを拡張します。 |
| 4 | HelloWorldTestクラスには、GWTモジュールの名前を返す必要がある抽象メソッド(getModuleName)があります。HelloWorldの場合、これはcom.tutorialspoint.HelloWorldJUnitです。 |
| 5 | HelloWorldTestクラスは、2つのサンプルテストケースtestFieldVerifier、testSimpleを使用して生成されます。testGreetingServiceを追加しました。 |
| 6 | これらのメソッドは、GWTTestCaseの祖先であるJUnitAssertクラスから継承する多くのassert *関数の1つを使用します。 |
| 7 | assertTrue(boolean)関数は、渡されたブール引数がtrueと評価されることをアサートします。そうでない場合、JUnitで実行するとテストは失敗します。 |
GWT-JUnit統合の完全な例
この例では、GWTでのJUnit統合の例を示す簡単な手順を説明します。
上記で作成したGWTアプリケーションを更新するには、次の手順に従います-
| ステップ | 説明 |
|---|---|
| 1 | 既存のプロジェクトのインポートウィザード([ファイル]→[インポート]→[一般]→[既存のプロジェクト]をワークスペースに)を使用して、HelloWorldという名前のプロジェクトをEclipseにインポートします。 |
| 2 | 変更HelloWorld.gwt.xml、HelloWorld.css、HelloWorld.htmlとHelloWorld.javaは、以下のように説明しました。残りのファイルは変更しないでください。 |
| 3 | アプリケーションをコンパイルして実行し、実装されたロジックの結果を確認します。 |
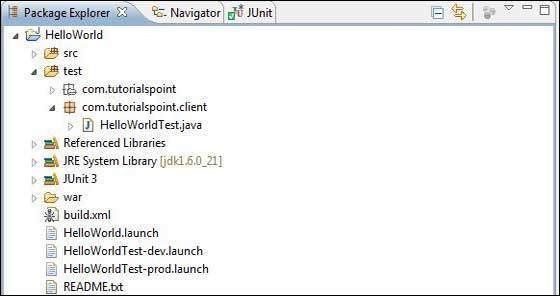
以下は、Eclipseのプロジェクト構造です。
変更されたモジュール記述子の内容は次のとおりです src/com.tutorialspoint/HelloWorld.gwt.xml。
<?xml version = "1.0" encoding = "UTF-8"?>
<module rename-to = 'helloworld'>
   <!-- Inherit the core Web Toolkit stuff.                        -->
   <inherits name = 'com.google.gwt.user.User'/>

   <!-- Inherit the default GWT style sheet.                       -->
   <inherits name = 'com.google.gwt.user.theme.clean.Clean'/>
   <!-- Inherit the UiBinder module.                               -->
   <inherits name = "com.google.gwt.uibinder.UiBinder"/>
   <!-- Specify the app entry point class.                         -->
   <entry-point class = 'com.tutorialspoint.client.HelloWorld'/>

   <!-- Specify the paths for translatable code                    -->
   <source path = 'client'/>
   <source path = 'shared'/>

</module>
変更されたスタイルシートファイルの内容は次のとおりです war/HelloWorld.css。
body {
   text-align: center;
   font-family: verdana, sans-serif;
}

h1 {
   font-size: 2em;
   font-weight: bold;
   color: #777777;
   margin: 40px 0px 70px;
   text-align: center;
}
以下は、変更されたHTMLホストファイルの内容です。 war/HelloWorld.html。
<html>
   <head>
      <title>Hello World</title>
      <link rel = "stylesheet" href = "HelloWorld.css"/>
      <script language = "javascript" src = "helloworld/helloworld.nocache.js">
      </script>
   </head>

   <body>
      <h1>JUnit Integration Demonstration</h1>
      <div id = "gwtContainer"></div>
   </body>
</html>
のHelloWorld.javaの内容を置き換えます src/com.tutorialspoint/client 次のパッケージ
package com.tutorialspoint.client;

import com.google.gwt.core.client.EntryPoint;

import com.google.gwt.core.client.GWT;
import com.google.gwt.event.dom.client.ClickEvent;
import com.google.gwt.event.dom.client.ClickHandler;
import com.google.gwt.event.dom.client.KeyCodes;
import com.google.gwt.event.dom.client.KeyUpEvent;
import com.google.gwt.event.dom.client.KeyUpHandler;

import com.google.gwt.user.client.Window;
import com.google.gwt.user.client.rpc.AsyncCallback;
import com.google.gwt.user.client.ui.Button;
import com.google.gwt.user.client.ui.DecoratorPanel;
import com.google.gwt.user.client.ui.HasHorizontalAlignment;
import com.google.gwt.user.client.ui.HorizontalPanel;
import com.google.gwt.user.client.ui.Label;
import com.google.gwt.user.client.ui.RootPanel;
import com.google.gwt.user.client.ui.TextBox;
import com.google.gwt.user.client.ui.VerticalPanel;

public class HelloWorld implements EntryPoint {

   public void onModuleLoad() {
      /*create UI */
      final TextBox txtName = new TextBox();
      txtName.setWidth("200");
      txtName.addKeyUpHandler(new KeyUpHandler() {
         @Override
         public void onKeyUp(KeyUpEvent event) {
            if(event.getNativeKeyCode() == KeyCodes.KEY_ENTER){
               Window.alert(getGreeting(txtName.getValue()));
            }
         }
      });
      Label lblName = new Label("Enter your name: ");

      Button buttonMessage = new Button("Click Me!");

      buttonMessage.addClickHandler(new ClickHandler() {
         @Override
         public void onClick(ClickEvent event) {
            Window.alert(getGreeting(txtName.getValue()));
         }
      });

      HorizontalPanel hPanel = new HorizontalPanel();
      hPanel.add(lblName);
      hPanel.add(txtName);
      hPanel.setCellWidth(lblName, "130");

      VerticalPanel vPanel = new VerticalPanel();
      vPanel.setSpacing(10);
      vPanel.add(hPanel);
      vPanel.add(buttonMessage);
      vPanel.setCellHorizontalAlignment(buttonMessage,
      HasHorizontalAlignment.ALIGN_RIGHT);

      DecoratorPanel panel = new DecoratorPanel();
      panel.add(vPanel);

      // Add widgets to the root panel.
      RootPanel.get("gwtContainer").add(panel);
   }

   public String getGreeting(String name){
      return "Hello "+name+"!";
   }
}
のHelloWorldTest.javaの内容を置き換えます test/com.tutorialspoint/client 次のパッケージ
package com.tutorialspoint.client;

import com.tutorialspoint.shared.FieldVerifier;
import com.google.gwt.core.client.GWT;
import com.google.gwt.junit.client.GWTTestCase;
import com.google.gwt.user.client.rpc.AsyncCallback;
import com.google.gwt.user.client.rpc.ServiceDefTarget;

/**
 * GWT JUnit tests must extend GWTTestCase.
 */
public class HelloWorldTest extends GWTTestCase {

   /**
    * must refer to a valid module that sources this class.
    */
   public String getModuleName() {
      return "com.tutorialspoint.HelloWorldJUnit";
   }

   /**
    * tests the FieldVerifier.
    */
   public void testFieldVerifier() {
      assertFalse(FieldVerifier.isValidName(null));
      assertFalse(FieldVerifier.isValidName(""));
      assertFalse(FieldVerifier.isValidName("a"));
      assertFalse(FieldVerifier.isValidName("ab"));
      assertFalse(FieldVerifier.isValidName("abc"));
      assertTrue(FieldVerifier.isValidName("abcd"));
   }

   /**
      * this test will send a request to the server using the greetServer
      *  method in GreetingService and verify the response.
   */
   public void testGreetingService() {
      /* create the service that we will test. */
      GreetingServiceAsync greetingService =
      GWT.create(GreetingService.class);
      ServiceDefTarget target = (ServiceDefTarget) greetingService;
      target.setServiceEntryPoint(GWT.getModuleBaseURL()
      + "helloworld/greet");

      /* since RPC calls are asynchronous, we will need to wait
       for a response after this test method returns. This line
       tells the test runner to wait up to 10 seconds
       before timing out. */
      delayTestFinish(10000);

      /* send a request to the server. */
      greetingService.greetServer("GWT User",
         new AsyncCallback<String>() {
         public void onFailure(Throwable caught) {
            /* The request resulted in an unexpected error. */
            fail("Request failure: " + caught.getMessage());
         }

         public void onSuccess(String result) {
            /* verify that the response is correct. */
            assertTrue(result.startsWith("Hello, GWT User!"));

            /* now that we have received a response, we need to
             tell the test runner that the test is complete.
             You must call finishTest() after an asynchronous test
             finishes successfully, or the test will time out.*/
            finishTest();
         }
      });

      /**
         * tests the getGreeting method.
      */
      public void testGetGreeting() {
         HelloWorld helloWorld = new HelloWorld();
         String name = "Robert";
         String expectedGreeting = "Hello "+name+"!";
         assertEquals(expectedGreeting,helloWorld.getGreeting(name));
      }
   }
}
生成された起動構成を使用してEclipseでテストケースを実行します
開発モードと本番モードの両方でwebAppCreatorによって生成された起動構成を使用して、Eclipseで単体テストを実行します。
開発モードでJUnitテストを実行します
- Eclipseメニューバーから、「実行」→「構成の実行...」を選択します。
- JUnitセクションで、HelloWorldTest-devを選択します
- 引数への変更を保存するには、[適用]を押します
- テストを実行するには、[実行]を押します
アプリケーションに問題がない場合、次の結果が得られます-
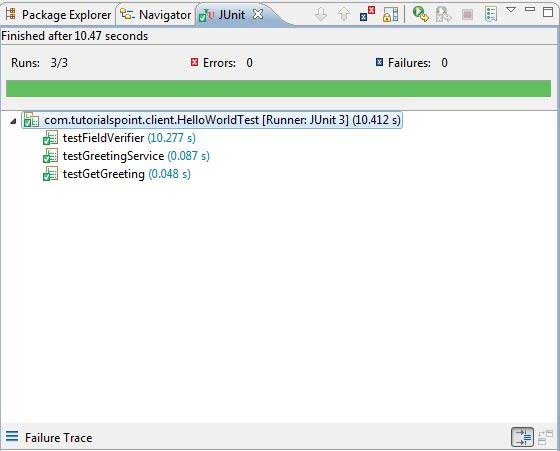
JUnitテストを本番モードで実行します
- Eclipseメニューバーから、「実行」→「構成の実行...」を選択します。
- JUnitセクションで、HelloWorldTest-prodを選択します
- 引数への変更を保存するには、[適用]を押します
- テストを実行するには、[実行]を押します
アプリケーションに問題がない場合、次の結果が得られます-
GWTは、サーバー側のコードだけでなくクライアント側のコードもデバッグする優れた機能を提供します。
開発モード中、GWTアプリケーションはJavaコードベースであり、JavaScriptに変換されません。
アプリケーションが開発モードで実行されている場合、Java仮想マシン(JVM)は、GWT機能を使用してブラウザーウィンドウに接続し、コンパイルされたJavaバイトコードとしてアプリケーションコードを実際に実行します。
GWTはブラウザベースのプラグインを使用してJVMに接続します。
そのため、開発者はJavaベースのIDEを自由に使用して、クライアント側のGWTコードとサーバー側のコードの両方をデバッグできます。
この記事では、Eclipseを使用してGWTクライアントコードをデバッグする方法を示します。次のタスクを実行します-
- コードでブレークポイントを設定し、ブレークポイントエクスプローラーで確認します。
- デバッグ中にコードを1行ずつステップスルーします。
- 変数の値を表示します。
- すべての変数の値を調べます。
- 式の値を調べます。
- 中断されたスレッドのスタックフレームを表示します。
デバッグ例
この例では、GWTアプリケーションのデバッグを示す簡単な手順を説明します。次の手順に従って、GWTで作成したGWTアプリケーションを更新します-アプリケーションの作成の章-
| ステップ | 説明 |
|---|---|
| 1 | GWT-アプリケーションの作成の章で説明されているように、パッケージcom.tutorialspointの下にHelloWorldという名前のプロジェクトを作成します。 |
| 2 | 変更HelloWorld.gwt.xml、HelloWorld.css、HelloWorld.htmlとHelloWorld.javaは、以下のように説明しました。残りのファイルは変更しないでください。 |
| 3 | アプリケーションをコンパイルして実行し、実装されたロジックの結果を確認します。 |
変更されたモジュール記述子の内容は次のとおりです src/com.tutorialspoint/HelloWorld.gwt.xml。
<?xml version = "1.0" encoding = "UTF-8"?>
<module rename-to = 'helloworld'>
   <!-- Inherit the core Web Toolkit stuff.                        -->
   <inherits name = 'com.google.gwt.user.User'/>

   <!-- Inherit the default GWT style sheet.                       -->
   <inherits name = 'com.google.gwt.user.theme.clean.Clean'/>

   <!-- Specify the app entry point class.                         -->
   <entry-point class = 'com.tutorialspoint.client.HelloWorld'/>

   <!-- Specify the paths for translatable code                    -->
   <source path = 'client'/>
   <source path = 'shared'/>

</module>
変更されたスタイルシートファイルの内容は次のとおりです war/HelloWorld.css。
body {
   text-align: center;
   font-family: verdana, sans-serif;
}

h1 {
   font-size: 2em;
   font-weight: bold;
   color: #777777;
   margin: 40px 0px 70px;
   text-align: center;
}

.gwt-Label{
   font-size: 150%;
   font-weight: bold;
   color:red;
   padding:5px;
   margin:5px;
}
以下は、変更されたHTMLホストファイルの内容です。 war/HelloWorld.html 2つのボタンに対応します。
<html>
   <head>
      <title>Hello World</title>
      <link rel = "stylesheet" href = "HelloWorld.css"/>
      <script language = "javascript" src = "helloworld/helloworld.nocache.js">
      </script>
   </head>

   <body>
      <h1>Debugging Application Demonstration</h1>
      <div id = "gwtContainer"></div>
   </body>
</html>
以下のJavaファイルの内容を見てみましょう src/com.tutorialspoint/HelloWorld.java これを使用して、GWTコードのデバッグ機能を示します。
package com.tutorialspoint.client;

import com.google.gwt.core.client.EntryPoint;
import com.google.gwt.event.dom.client.ClickEvent;
import com.google.gwt.event.dom.client.ClickHandler;
import com.google.gwt.event.dom.client.KeyCodes;
import com.google.gwt.event.dom.client.KeyUpEvent;
import com.google.gwt.event.dom.client.KeyUpHandler;
import com.google.gwt.user.client.Window;
import com.google.gwt.user.client.ui.Button;
import com.google.gwt.user.client.ui.DecoratorPanel;
import com.google.gwt.user.client.ui.HasHorizontalAlignment;
import com.google.gwt.user.client.ui.HorizontalPanel;
import com.google.gwt.user.client.ui.Label;
import com.google.gwt.user.client.ui.RootPanel;
import com.google.gwt.user.client.ui.TextBox;
import com.google.gwt.user.client.ui.VerticalPanel;

public class HelloWorld implements EntryPoint {

   public void onModuleLoad() {
      /*create UI */
      final TextBox txtName = new TextBox();
      txtName.setWidth("200");
      txtName.addKeyUpHandler(new KeyUpHandler() {
         @Override
         public void onKeyUp(KeyUpEvent event) {
            if(event.getNativeKeyCode() == KeyCodes.KEY_ENTER){
               Window.alert(getGreeting(txtName.getValue()));
            }
         }
      });
      Label lblName = new Label("Enter your name: ");

      Button buttonMessage = new Button("Click Me!");

      buttonMessage.addClickHandler(new ClickHandler() {
      @Override
      public void onClick(ClickEvent event) {
         Window.alert(getGreeting(txtName.getValue()));
      }});

      HorizontalPanel hPanel = new HorizontalPanel();
      hPanel.add(lblName);
      hPanel.add(txtName);
      hPanel.setCellWidth(lblName, "130");

      VerticalPanel vPanel = new VerticalPanel();
      vPanel.setSpacing(10);
      vPanel.add(hPanel);
      vPanel.add(buttonMessage);
      vPanel.setCellHorizontalAlignment(buttonMessage,
      HasHorizontalAlignment.ALIGN_RIGHT);

      DecoratorPanel panel = new DecoratorPanel();
      panel.add(vPanel);

      // Add widgets to the root panel.
      RootPanel.get("gwtContainer").add(panel);
   }

   public String getGreeting(String name){
      return "Hello "+name+"!";
   }
}
ステップ1-ブレークポイントを配置する
の最初の行にブレークポイントを配置します onModuleLoad() HelloWorld.javaの

ステップ2-アプリケーションをデバッグする
次に、[
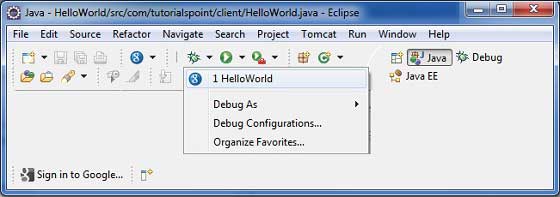
すべてが正常な場合は、以下に示すようなURLを含むEclipseでGWT開発モードがアクティブになっていることを確認する必要があります。URLをダブルクリックして、GWTアプリケーションを開きます。
アプリケーションが起動するとすぐに、エントリポイントメソッドの最初の行にブレークポイントを配置したため、Eclipseブレークポイントにフォーカスが表示されます。
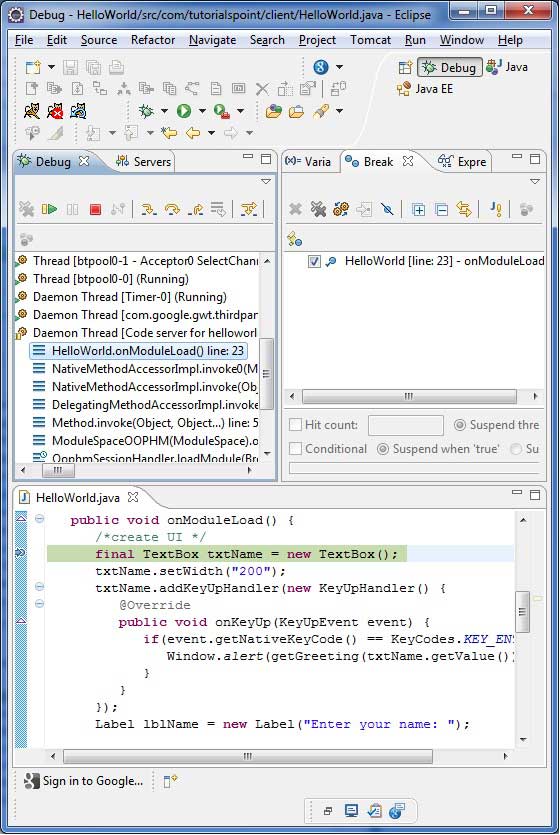
中断されたスレッドのスタックトレースを確認できます。
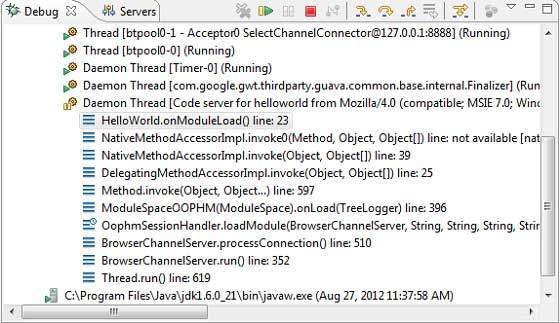
式の値を確認できます。
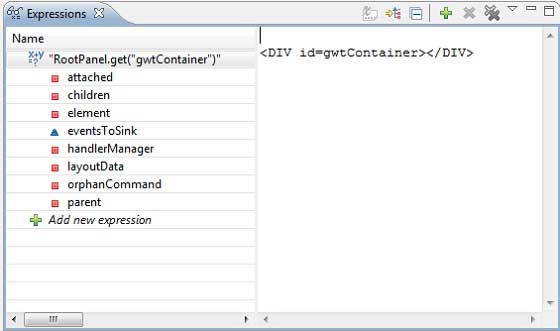
配置されたブレークポイントのリストを確認できます。
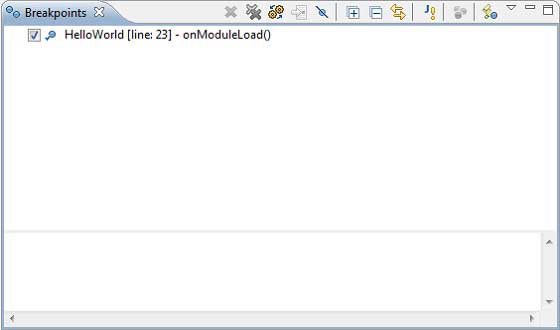
次に、onModuleLoad()メソッドの最後の行に到達するまでF6を押し続けます。ファンクションキーのリファレンスとして、F6はコードを1行ずつ検査し、F5はさらに内側に進み、F8はアプリケーションを再開します。これで、onModuleLoad()メソッドのすべての変数の値のリストが表示されます。
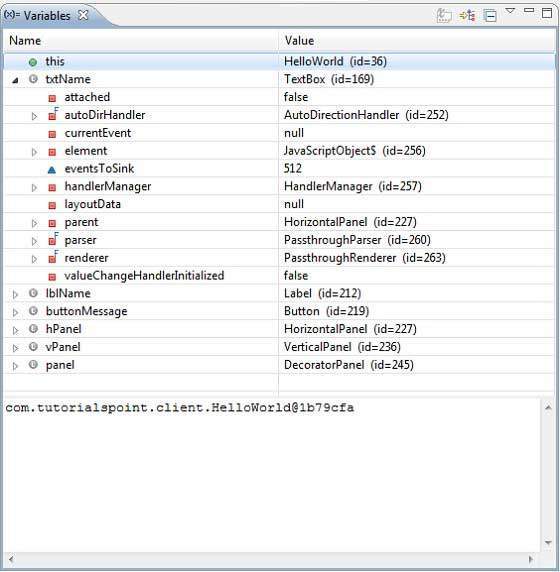
GWTクライアントコードは、Javaアプリケーションをデバッグするのと同じ方法でデバッグできます。任意の行にブレークポイントを設定し、GWTのデバッグ機能を試してみてください。
GWTは、GWTアプリケーションを国際化する3つの方法を提供します。プロジェクト間で最も一般的に使用されている静的文字列国際化の使用法を示します。
| シニア番号 | テクニックと説明 |
|---|---|
| 1 | Static String Internationalization この手法は最も普及しており、実行時に必要なオーバーヘッドはごくわずかです。定数文字列とパラメータ化された文字列の両方を変換するための非常に効率的な手法であり、実装が最も簡単です。 静的文字列の国際化では、標準のJavaプロパティファイルを使用して、翻訳された文字列とパラメータ化されたメッセージを格納し、強い型のJavaインターフェイスを作成してそれらの値を取得します。 |
| 2 | Dynamic String Internationalization この手法は非常に柔軟性がありますが、静的な文字列の国際化よりも低速です。ホストページにはローカライズされた文字列が含まれているため、新しいロケールを追加するときにアプリケーションを再コンパイルする必要はありません。GWTアプリケーションを既存のサーバー側ローカリゼーションシステムと統合する場合は、この手法を使用します。 |
| 3 | Localizable Interface この手法は、3つの手法の中で最も強力です。Localizableを実装すると、カスタムタイプのローカライズバージョンを作成できます。これは高度な国際化手法です。 |
GWTアプリケーションを国際化するワークフロー
ステップ1-プロパティファイルを作成する
アプリケーションで使用するメッセージを含むプロパティファイルを作成します。作成しましたHelloWorldMessages.properties この例ではファイル。
enterName = Enter your name
clickMe = Click Me
applicationTitle = Application Internationalization Demonstration
greeting = Hello {0}ロケールに固有の変換された値を含むプロパティファイルを作成します。作成しましたHelloWorldMessages_de.propertiesこの例ではファイル。このファイルには、ドイツ語の翻訳が含まれています。_deはドイツ語のロケールを指定し、アプリケーションでドイツ語をサポートします。
Eclipseを使用してプロパティファイルを作成している場合は、ファイルのエンコーディングをUTF-8に変更します。ファイルを選択し、右クリックしてプロパティウィンドウを開きます。テキストファイルのエンコーディングを次のように選択します。 Other UTF-8。変更を適用して保存します。
enterName = Geben Sie Ihren Namen
clickMe = Klick mich
applicationTitle = Anwendung Internationalisierung Demonstration
greeting = Hallo {0}
ステップ2-i18nモジュールをモジュール記述子XMLファイルに追加します
モジュールファイルを更新する HelloWorld.gwt.xml ドイツ語ロケールのサポートを含める
<?xml version = "1.0" encoding = "UTF-8"?>
<module rename-to = 'helloworld'>
   ...
   <extend-property name = "locale" values="de" />
   ...
</module>
ステップ3-プロパティファイルと同等のインターフェイスを作成する
GWTのMessagesインターフェースを拡張して内部化のサポートを含めることにより、HelloWorldMessages.javaインターフェースを作成します。プロパティファイルのキーと同じメソッド名が含まれている必要があります。プレースホルダーはString引数に置き換えられます。
public interface HelloWorldMessages extends Messages {

   @DefaultMessage("Enter your name")
   String enterName();

   @DefaultMessage("Click Me")
   String clickMe();

   @DefaultMessage("Application Internalization Demonstration")
   String applicationTitle();

   @DefaultMessage("Hello {0}")
   String greeting(String name);
}
ステップ4-UIコンポーネントでメッセージインターフェイスを使用します。
のオブジェクトを使用する HelloWorldMessages に HelloWorld メッセージを取得します。
public class HelloWorld implements EntryPoint {

   /* create an object of HelloWorldMessages interface
      using GWT.create() method */
   private HelloWorldMessages messages =
   GWT.create(HelloWorldMessages.class);

   public void onModuleLoad() {
   ...
      Label titleLabel = new Label(messages.applicationTitle());
      //Add title to the application
      RootPanel.get("gwtAppTitle").add(titleLabel);
   ...
   }
}
国際化-完全な例
この例では、GWTアプリケーションの国際化機能を示す簡単な手順を説明します。
次の手順に従って、GWTで作成したGWTアプリケーションを更新します-アプリケーションの作成の章-
| ステップ | 説明 |
|---|---|
| 1 | GWT-アプリケーションの作成の章で説明されているように、パッケージcom.tutorialspointの下にHelloWorldという名前のプロジェクトを作成します。 |
| 2 | 変更HelloWorld.gwt.xml、HelloWorld.css、HelloWorld.htmlとHelloWorld.javaは、以下のように説明しました。残りのファイルは変更しないでください。 |
| 3 | アプリケーションをコンパイルして実行し、実装されたロジックの結果を確認します。 |
変更されたモジュール記述子の内容は次のとおりです src/com.tutorialspoint/HelloWorld.gwt.xml。
<?xml version = "1.0" encoding = "UTF-8"?>
<module rename-to = 'helloworld'>
  <!-- Inherit the core Web Toolkit stuff.                        -->
  <inherits name = 'com.google.gwt.user.User'/>

  <!-- Inherit the default GWT style sheet.                       -->
  <inherits name = 'com.google.gwt.user.theme.clean.Clean'/>

  <!-- Specify the app entry point class.                         -->
  <entry-point class = 'com.tutorialspoint.client.HelloWorld'/>
  <extend-property name = "locale" values="de" />
  <!-- Specify the paths for translatable code                    -->
  <source path = 'client'/>
  <source path = 'shared'/>

</module>
変更されたスタイルシートファイルの内容は次のとおりです war/HelloWorld.css。
body {
   text-align: center;
   font-family: verdana, sans-serif;
}

h1 {
   font-size: 2em;
   font-weight: bold;
   color: #777777;
   margin: 40px 0px 70px;
   text-align: center;
}
以下は、変更されたHTMLホストファイルの内容です。 war/HelloWorld.html。
<html>
   <head>
      <title>Hello World</title>
      <link rel = "stylesheet" href = "HelloWorld.css"/>
      <script language = "javascript" src = "helloworld/helloworld.nocache.js">
      </script>
   </head>
   <body>

      <h1 id = "gwtAppTitle"></h1>
      <div id = "gwtContainer"></div>

   </body>
</html>
次に、HelloWorldMessages.propertiesファイルを src/com.tutorialspoint/client 次の内容をパッケージ化して配置します
enterName = Enter your name
clickMe = Click Me
applicationTitle = Application Internationalization Demonstration
greeting = Hello {0}
次に、HelloWorldMessages_de.propertiesファイルを src/com.tutorialspoint/client 次の内容をパッケージ化して配置します
enterName = Geben Sie Ihren Namen
clickMe = Klick mich
applicationTitle = Anwendung Internationalisierung Demonstration
greeting = Hallo {0}
次に、HelloWorldMessages.javaクラスを作成します。 src/com.tutorialspoint/client 次の内容をパッケージ化して配置します
package com.tutorialspoint.client;
import com.google.gwt.i18n.client.Messages;

public interface HelloWorldMessages extends Messages {
   @DefaultMessage("Enter your name")
   String enterName();

   @DefaultMessage("Click Me")
   String clickMe();

   @DefaultMessage("Application Internationalization Demonstration")
   String applicationTitle();

   @DefaultMessage("Hello {0}")
   String greeting(String name);
}
以下のJavaファイルの内容を見てみましょう src/com.tutorialspoint/HelloWorld.java これを使用して、GWTコードの国際化機能を示します。
package com.tutorialspoint.client;

import com.google.gwt.core.client.EntryPoint;
import com.google.gwt.core.client.GWT;

import com.google.gwt.event.dom.client.ClickEvent;
import com.google.gwt.event.dom.client.ClickHandler;
import com.google.gwt.event.dom.client.KeyCodes;
import com.google.gwt.event.dom.client.KeyUpEvent;
import com.google.gwt.event.dom.client.KeyUpHandler;

import com.google.gwt.user.client.Window;
import com.google.gwt.user.client.ui.Button;
import com.google.gwt.user.client.ui.DecoratorPanel;
import com.google.gwt.user.client.ui.HasHorizontalAlignment;
import com.google.gwt.user.client.ui.HorizontalPanel;
import com.google.gwt.user.client.ui.Label;
import com.google.gwt.user.client.ui.RootPanel;
import com.google.gwt.user.client.ui.TextBox;
import com.google.gwt.user.client.ui.VerticalPanel;

public class HelloWorld implements EntryPoint {

   /* create an object of HelloWorldMessages interface
      using GWT.create() method */
   private HelloWorldMessages messages =
   GWT.create(HelloWorldMessages.class);

   public void onModuleLoad() {
      /*create UI */
      final TextBox txtName = new TextBox();
      txtName.setWidth("200");
      txtName.addKeyUpHandler(new KeyUpHandler() {
         @Override
         public void onKeyUp(KeyUpEvent event) {
            if(event.getNativeKeyCode() == KeyCodes.KEY_ENTER){
               Window.alert(getGreeting(txtName.getValue()));
            }
         }
      });
      Label lblName = new Label(messages.enterName() + ": ");

      Button buttonMessage = new Button(messages.clickMe() + "!");

      buttonMessage.addClickHandler(new ClickHandler() {
         @Override
         public void onClick(ClickEvent event) {
            Window.alert(getGreeting(txtName.getValue()));
         }
      });

      HorizontalPanel hPanel = new HorizontalPanel();
      hPanel.add(lblName);
      hPanel.add(txtName);

      VerticalPanel vPanel = new VerticalPanel();
      vPanel.setSpacing(10);
      vPanel.add(hPanel);
      vPanel.add(buttonMessage);
      vPanel.setCellHorizontalAlignment(buttonMessage,
      HasHorizontalAlignment.ALIGN_RIGHT);

      DecoratorPanel panel = new DecoratorPanel();
      panel.add(vPanel);
      Label titleLabel = new Label(messages.applicationTitle());
      //Add title to the application
      RootPanel.get("gwtAppTitle").add(titleLabel);
      // Add widgets to the root panel.
      RootPanel.get("gwtContainer").add(panel);
   }

   public String getGreeting(String name){
      return messages.greeting(name + "!");
   }
}
すべての変更を行う準備ができたら、GWT-アプリケーションの作成の章で行ったように、アプリケーションをコンパイルして開発モードで実行します。アプリケーションに問題がない場合、次の結果が得られます-
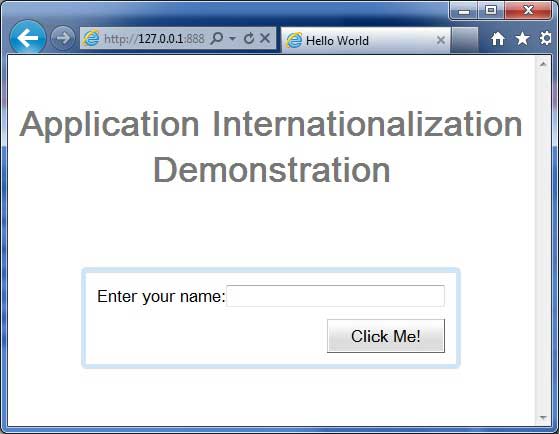
今ロケール= de.Set URLを格納するためのURLを更新- http://127.0.0.1:8888/HelloWorld.html?gwt.codesvr=127.0.0.1:9997&locale=de。アプリケーションに問題がない場合、次の結果が得られます-
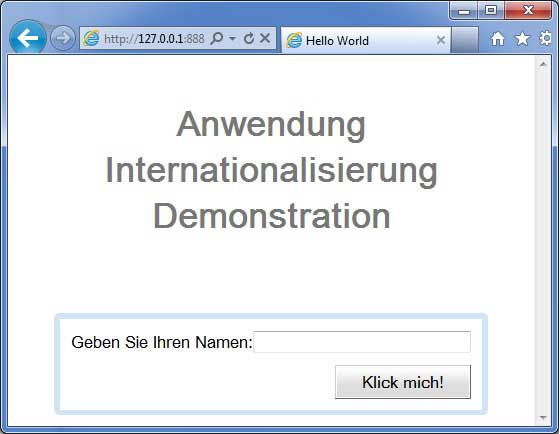
GWTアプリケーションは通常、JavaScriptを実行する単一ページのアプリケーションであり、多くのページが含まれていないため、ブラウザーはユーザーによるアプリケーションとの対話を追跡しません。ブラウザの履歴機能を使用するには、アプリケーションはナビゲート可能なページごとに一意のURLフラグメントを生成する必要があります。
GWTは提供します History Mechanism この状況を処理します。
GWTは用語を使用します tokenこれは、アプリケーションが特定の状態に戻るために解析できる単なる文字列です。アプリケーションは、このトークンをブラウザの履歴にURLフラグメントとして保存します。
たとえば、「pageIndex1」という名前の履歴トークンは、次のようにURLに追加されます。
http://www.tutorialspoint.com/HelloWorld.html#pageIndex0履歴管理ワークフロー
ステップ1-履歴サポートを有効にする
GWT履歴サポートを使用するには、最初に次のiframeをホストHTMLページに埋め込む必要があります。
<iframe src = "javascript:''"
   id = "__gwt_historyFrame"
   style = "width:0;height:0;border:0"></iframe>
ステップ2-履歴にトークンを追加する
次の統計例は、ブラウザの履歴にトークンを追加する方法です
int index = 0;
History.newItem("pageIndex" + index);
ステップ3-履歴からトークンを取得する
ユーザーがブラウザの戻る/進むボタンを使用すると、トークンが取得され、それに応じてアプリケーションの状態が更新されます。
History.addValueChangeHandler(new ValueChangeHandler<String>() {
   @Override
   public void onValueChange(ValueChangeEvent<String> event) {
      String historyToken = event.getValue();
      /* parse the history token */
      try {
         if (historyToken.substring(0, 9).equals("pageIndex")) {
            String tabIndexToken = historyToken.substring(9, 10);
            int tabIndex = Integer.parseInt(tabIndexToken);
            /* select the specified tab panel */
            tabPanel.selectTab(tabIndex);
         } else {
            tabPanel.selectTab(0);
         }
      } catch (IndexOutOfBoundsException e) {
         tabPanel.selectTab(0);
      }
   }
});
それでは、HistoryClassの動作を見てみましょう。
歴史クラス-完全な例
この例では、GWTアプリケーションの履歴管理を示す簡単な手順を説明します。次の手順に従って、GWTで作成したGWTアプリケーションを更新します-アプリケーションの作成の章-
| ステップ | 説明 |
|---|---|
| 1 | GWT-アプリケーションの作成の章で説明されているように、パッケージcom.tutorialspointの下にHelloWorldという名前のプロジェクトを作成します。 |
| 2 | 変更HelloWorld.gwt.xml、HelloWorld.css、HelloWorld.htmlとHelloWorld.javaは、以下のように説明しました。残りのファイルは変更しないでください。 |
| 3 | アプリケーションをコンパイルして実行し、実装されたロジックの結果を確認します。 |
変更されたモジュール記述子の内容は次のとおりです src/com.tutorialspoint/HelloWorld.gwt.xml。
<?xml version = "1.0" encoding = "UTF-8"?>
<module rename-to = 'helloworld'>
   <!-- Inherit the core Web Toolkit stuff.                        -->
   <inherits name = 'com.google.gwt.user.User'/>

   <!-- Inherit the default GWT style sheet.                       -->
   <inherits name = 'com.google.gwt.user.theme.clean.Clean'/>

   <!-- Specify the app entry point class.                         -->
   <entry-point class = 'com.tutorialspoint.client.HelloWorld'/>
   <!-- Specify the paths for translatable code                    -->
   <source path = 'client'/>
   <source path = 'shared'/>

</module>
変更されたスタイルシートファイルの内容は次のとおりです war/HelloWorld.css。
body {
   text-align: center;
   font-family: verdana, sans-serif;
}

h1 {
   font-size: 2em;
   font-weight: bold;
   color: #777777;
   margin: 40px 0px 70px;
   text-align: center;
}
以下は、変更されたHTMLホストファイルの内容です。 war/HelloWorld.html
<html>
   <head>
      <title>Hello World</title>
      <link rel = "stylesheet" href = "HelloWorld.css"/>
      <script language = "javascript" src = "helloworld/helloworld.nocache.js">
      </script>
   </head>

   <body>
      <iframe src = "javascript:''"id = "__gwt_historyFrame"
         style = "width:0;height:0;border:0"></iframe>
      <h1> History Class Demonstration</h1>
      <div id = "gwtContainer"></div>
   </body>
</html>
以下のJavaファイルの内容を見てみましょう src/com.tutorialspoint/HelloWorld.java これを使用して、GWTコードでの履歴管理を示します。
package com.tutorialspoint.client;

import com.google.gwt.core.client.EntryPoint;

import com.google.gwt.event.logical.shared.SelectionEvent;
import com.google.gwt.event.logical.shared.SelectionHandler;
import com.google.gwt.event.logical.shared.ValueChangeEvent;
import com.google.gwt.event.logical.shared.ValueChangeHandler;

import com.google.gwt.user.client.History;
import com.google.gwt.user.client.ui.HTML;
import com.google.gwt.user.client.ui.RootPanel;
import com.google.gwt.user.client.ui.TabPanel;

public class HelloWorld implements EntryPoint {

   /**
    * This is the entry point method.
    */
   public void onModuleLoad() {
      /* create a tab panel to carry multiple pages */
      final TabPanel tabPanel = new TabPanel();

      /* create pages */
      HTML firstPage = new HTML("<h1>We are on first Page.</h1>");
      HTML secondPage = new HTML("<h1>We are on second Page.</h1>");
      HTML thirdPage = new HTML("<h1>We are on third Page.</h1>");

      String firstPageTitle = "First Page";
      String secondPageTitle = "Second Page";
      String thirdPageTitle = "Third Page";
      tabPanel.setWidth("400");

	  /* add pages to tabPanel*/
      tabPanel.add(firstPage, firstPageTitle);
      tabPanel.add(secondPage,secondPageTitle);
      tabPanel.add(thirdPage, thirdPageTitle);

      /* add tab selection handler */
      tabPanel.addSelectionHandler(new SelectionHandler<Integer>() {
         @Override
         public void onSelection(SelectionEvent<Integer> event) {
            /* add a token to history containing pageIndex
             History class will change the URL of application
             by appending the token to it.
            */
            History.newItem("pageIndex" + event.getSelectedItem());
         }
      });

      /* add value change handler to History
       this method will be called, when browser's
       Back button or Forward button are clicked
       and URL of application changes.
       */
      History.addValueChangeHandler(new ValueChangeHandler<String>() {
         @Override
         public void onValueChange(ValueChangeEvent<String> event) {
            String historyToken = event.getValue();
            /* parse the history token */
            try {
               if (historyToken.substring(0, 9).equals("pageIndex")) {
                  String tabIndexToken = historyToken.substring(9, 10);
                  int tabIndex = Integer.parseInt(tabIndexToken);
                  /* select the specified tab panel */
                  tabPanel.selectTab(tabIndex);
               } else {
                  tabPanel.selectTab(0);
               }
            } catch (IndexOutOfBoundsException e) {
               tabPanel.selectTab(0);
            }
         }
      });

      /* select the first tab by default */
      tabPanel.selectTab(0);

      /* add controls to RootPanel */
      RootPanel.get().add(tabPanel);
   }
}
すべての変更を行う準備ができたら、GWT-アプリケーションの作成の章で行ったように、アプリケーションをコンパイルして開発モードで実行します。アプリケーションに問題がない場合、次の結果が得られます-
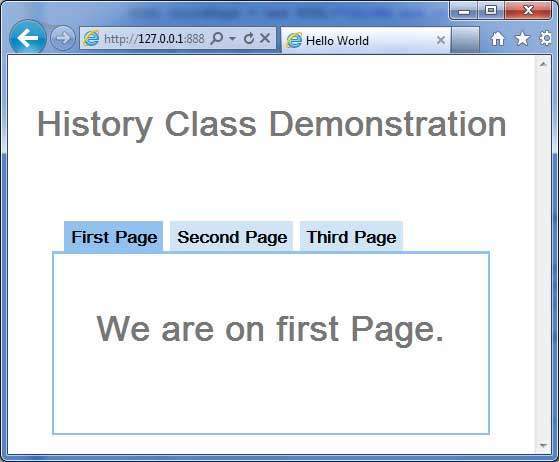
次に、各タブをクリックして、さまざまなページを選択します。
各タブを選択すると、アプリケーションのURLが変更され、#pageIndexがURLに追加されることに注意してください。
また、ブラウザの戻るボタンと進むボタンが有効になっていることもわかります。
ブラウザの戻るボタンと進むボタンを使用すると、それに応じてさまざまなタブが選択されます。
GWTは、GWT-HistoryClassの章を参照できるHistoryクラスを使用したブラウザー履歴管理をサポートしています。
GWTは用語を使用します tokenこれは、アプリケーションが特定の状態に戻るために解析できる単なる文字列です。アプリケーションは、このトークンをブラウザの履歴にURLフラグメントとして保存します。
ではGWT -歴史クラス章、我々はコードを書くことで歴史の中でトークン作成と設定を処理します。
この記事では、トークンの作成と履歴の管理を自動的に行い、ブックマークのアプリケーション機能を提供する特別なウィジェットハイパーリンクについて説明します。
ブックマークの例
この例では、GWTアプリケーションのブックマークを示す簡単な手順を説明します。
GWTで作成したGWTアプリケーションを更新するための次の手順-アプリケーションの作成の章-
| ステップ | 説明 |
|---|---|
| 1 | GWT-アプリケーションの作成の章で説明されているように、パッケージcom.tutorialspointの下にHelloWorldという名前のプロジェクトを作成します。 |
| 2 | 変更HelloWorld.gwt.xml、HelloWorld.css、HelloWorld.htmlとHelloWorld.javaは、以下のように説明しました。残りのファイルは変更しないでください。 |
| 3 | アプリケーションをコンパイルして実行し、実装されたロジックの結果を確認します。 |
変更されたモジュール記述子の内容は次のとおりです src/com.tutorialspoint/HelloWorld.gwt.xml。
<?xml version = "1.0" encoding = "UTF-8"?>
<module rename-to = 'helloworld'>
   <!-- Inherit the core Web Toolkit stuff.                        -->
   <inherits name = 'com.google.gwt.user.User'/>

   <!-- Inherit the default GWT style sheet.                       -->
   <inherits name = 'com.google.gwt.user.theme.clean.Clean'/>

   <!-- Specify the app entry point class.                         -->
   <entry-point class = 'com.tutorialspoint.client.HelloWorld'/>
   <!-- Specify the paths for translatable code                    -->
   <source path = 'client'/>
   <source path = 'shared'/>

</module>
変更されたスタイルシートファイルの内容は次のとおりです war/HelloWorld.css。
body {
   text-align: center;
   font-family: verdana, sans-serif;
}

h1 {
   font-size: 2em;
   font-weight: bold;
   color: #777777;
   margin: 40px 0px 70px;
   text-align: center;
}
以下は、変更されたHTMLホストファイルの内容です。 war/HelloWorld.html
<html>
   <head>
      <title>Hello World</title>
      <link rel = "stylesheet" href = "HelloWorld.css"/>
      <script language = "javascript" src = "helloworld/helloworld.nocache.js">
      </script>
   </head>

   <body>
      <iframe src = "javascript:''"id = "__gwt_historyFrame"
         style = "width:0;height:0;border:0"></iframe>
      <h1> Bookmarking Demonstration</h1>
      <div id = "gwtContainer"></div>
   </body>
</html>
以下のJavaファイルの内容を見てみましょう src/com.tutorialspoint/HelloWorld.java これを使用して、GWTコードでブックマークをデモンストレーションします。
package com.tutorialspoint.client;

import com.google.gwt.core.client.EntryPoint;

import com.google.gwt.event.logical.shared.ValueChangeEvent;
import com.google.gwt.event.logical.shared.ValueChangeHandler;

import com.google.gwt.user.client.History;
import com.google.gwt.user.client.ui.HTML;
import com.google.gwt.user.client.ui.HorizontalPanel;
import com.google.gwt.user.client.ui.Hyperlink;
import com.google.gwt.user.client.ui.RootPanel;
import com.google.gwt.user.client.ui.TabPanel;
import com.google.gwt.user.client.ui.VerticalPanel;

public class HelloWorld implements EntryPoint {

   private TabPanel tabPanel;

   private void selectTab(String historyToken){
      /*  parse the history token */
      try {
         if (historyToken.substring(0, 9).equals("pageIndex")) {
            String tabIndexToken = historyToken.substring(9, 10);
            int tabIndex = Integer.parseInt(tabIndexToken);
            /* Select the specified tab panel */
            tabPanel.selectTab(tabIndex);
         } else {
            tabPanel.selectTab(0);
         }
      } catch (IndexOutOfBoundsException e) {
         tabPanel.selectTab(0);
      }
   }

   /**
    * This is the entry point method.
    */
   public void onModuleLoad() {
      /* create a tab panel to carry multiple pages */
      tabPanel = new TabPanel();

      /* create pages */
      HTML firstPage = new HTML("<h1>We are on first Page.</h1>");
      HTML secondPage = new HTML("<h1>We are on second Page.</h1>");
      HTML thirdPage = new HTML("<h1>We are on third Page.</h1>");

      String firstPageTitle = "First Page";
      String secondPageTitle = "Second Page";
      String thirdPageTitle = "Third Page";

      Hyperlink firstPageLink = new Hyperlink("1", "pageIndex0");
      Hyperlink secondPageLink = new Hyperlink("2", "pageIndex1");
      Hyperlink thirdPageLink = new Hyperlink("3", "pageIndex2");

      HorizontalPanel linksHPanel = new HorizontalPanel();
      linksHPanel.setSpacing(10);
      linksHPanel.add(firstPageLink);
      linksHPanel.add(secondPageLink);
      linksHPanel.add(thirdPageLink);

      /* If the application starts with no history token,
         redirect to a pageIndex0 */
      String initToken = History.getToken();

      if (initToken.length() == 0) {
         History.newItem("pageIndex0");
         initToken = "pageIndex0";
      }

      tabPanel.setWidth("400");
      /* add pages to tabPanel*/
      tabPanel.add(firstPage, firstPageTitle);
      tabPanel.add(secondPage,secondPageTitle);
      tabPanel.add(thirdPage, thirdPageTitle);

      /* add value change handler to History
       * this method will be called, when browser's Back button
       * or Forward button are clicked.
       * and URL of application changes.
       * */
      History.addValueChangeHandler(new ValueChangeHandler<String>() {
         @Override
         public void onValueChange(ValueChangeEvent<String> event) {
            selectTab(event.getValue());
         }
      });

      selectTab(initToken);

      VerticalPanel vPanel = new VerticalPanel();

      vPanel.setSpacing(10);
      vPanel.add(tabPanel);
      vPanel.add(linksHPanel);

      /* add controls to RootPanel */
      RootPanel.get().add(vPanel);
   }
}
すべての変更を行う準備ができたら、GWT-アプリケーションの作成の章で行ったように、アプリケーションをコンパイルして開発モードで実行します。アプリケーションに問題がない場合、次の結果が得られます-
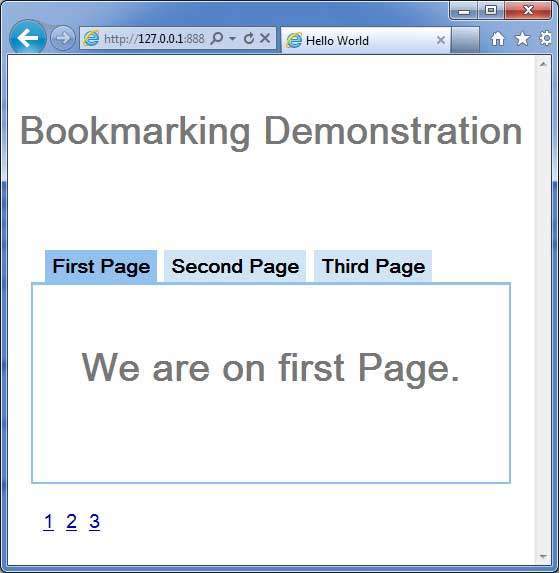
次に、1、2、または3をクリックします。タブがインデックスによって変化することがわかります。
1、2、または3をクリックすると、アプリケーションのURLが変更され、#pageIndexがURLに追加されることに注意してください。
また、ブラウザの戻るボタンと進むボタンが有効になっていることもわかります。
ブラウザの戻るボタンと進むボタンを使用すると、それに応じてさまざまなタブが選択されます。
1、2、または3を右クリックします。開く、新しいウィンドウで開く、新しいタブで開く、お気に入りに追加などのオプションが表示されます。
3.を右クリックします。[お気に入りに追加]を選択します。ブックマークを3ページとして保存します。
お気に入りを開き、3ページを選択します。3番目のタブが選択されているのがわかります。
ロギングフレームワークはjava.util.loggingをエミュレートするため、サーバー側のロギングコードと同じ構文を使用し、同じ動作をします。
GWTロギングは、.gwt.xmlファイルを使用して構成されます。
ロギングを有効/無効に設定できます。特定のハンドラーを有効/無効にしたり、デフォルトのログレベルを変更したりできます。
ロガーの種類
ロガーはツリー構造で編成され、ルートロガーがツリーのルートにあります。
ロガーの名前は、を使用して親子関係を決定します . 名前のセクションを区切る。
例として、2つのロガーHospital.room1とHospital.room2がある場合、それらは兄弟であり、その親はHospitalという名前のロガーです。Hospitalロガー(およびドット「。」を含まない名前のロガー)には、親としてルートロガーがあります。
private static Logger room1Logger = Logger.getLogger("Hospital.room1");
private static Logger room2Logger = Logger.getLogger("Hospital.room2");
private static Logger hospitalLogger = Logger.getLogger("Hospital");
private static Logger rootLogger = Logger.getLogger("");
ログハンドラー
GWTは、ロガーを使用して作成されたログエントリを表示するデフォルトのハンドラーを提供します。
| ハンドラ | にログを記録 | 説明 |
|---|---|---|
| SystemLogHandler | stdout | これらのメッセージは、DevModeウィンドウの開発モードでのみ表示されます。 |
| DevelopmentModeLogHandler | DevModeウィンドウ | メソッドGWT.logを呼び出してログを記録します。これらのメッセージは、DevModeウィンドウの開発モードでのみ表示されます。 |
| ConsoleLogHandler | javascriptコンソール | Firebug Lite(IE用)、Safari、およびChromeで使用されるjavascriptコンソールにログを記録します。 |
| FirebugLogHandler | Firebug | Firebugコンソールにログを記録します。 |
| PopupLogHandler | 現れる | このハンドラーが有効になっている場合、アプリケーションの左上隅にあるポップアップにログを記録します。 |
| SimpleRemoteLogHandler | サーバ | このハンドラーはログメッセージをサーバーに送信し、サーバー側のログメカニズムを使用してログに記録されます。 |
GWTアプリケーションでのロギングの構成
HelloWorld.gwt.xmlファイルは、GWTロギングを有効にするように次のように構成する必要があります-
# add logging module
   <inherits name = "com.google.gwt.logging.Logging"/>
# To change the default logLevel
   <set-property name = "gwt.logging.logLevel" value = "SEVERE"/>
# To enable logging
   <set-property name = "gwt.logging.enabled" value = "TRUE"/>
# To disable a popup Handler
   <set-property name = "gwt.logging.popupHandler" value = "DISABLED" />
ロガーを使用してユーザーアクションをログに記録する
/* Create Root Logger */
private static Logger rootLogger = Logger.getLogger("");
...
rootLogger.log(Level.SEVERE, "pageIndex selected: " + event.getValue());
...
ロギングフレームワークの例
この例では、GWTアプリケーションのロギング機能を示す簡単な手順を説明します。次の手順に従って、GWTで作成したGWTアプリケーションを更新します-アプリケーションの作成の章-
| ステップ | 説明 |
|---|---|
| 1 | GWT-アプリケーションの作成の章で説明されているように、パッケージcom.tutorialspointの下にHelloWorldという名前のプロジェクトを作成します。 |
| 2 | 変更HelloWorld.gwt.xml、HelloWorld.css、HelloWorld.htmlとHelloWorld.javaは、以下のように説明しました。残りのファイルは変更しないでください。 |
| 3 | アプリケーションをコンパイルして実行し、実装されたロジックの結果を確認します。 |
変更されたモジュール記述子の内容は次のとおりです src/com.tutorialspoint/HelloWorld.gwt.xml。
<?xml version = "1.0" encoding = "UTF-8"?>
<module rename-to = 'helloworld'>
   <!-- Inherit the core Web Toolkit stuff.                        -->
   <inherits name = 'com.google.gwt.user.User'/>

   <!-- Inherit the default GWT style sheet.                       -->
   <inherits name = 'com.google.gwt.user.theme.clean.Clean'/>
   <inherits name = "com.google.gwt.logging.Logging"/>
   <!-- Specify the app entry point class.                         -->
   <entry-point class = 'com.tutorialspoint.client.HelloWorld'/>
   <!-- Specify the paths for translatable code                    -->
   <source path = 'client'/>
   <source path = 'shared'/>
   <set-property name = "gwt.logging.logLevel" value="SEVERE"/>
   <set-property name = "gwt.logging.enabled" value = "TRUE"/>
   <set-property name = "gwt.logging.popupHandler" value=  "DISABLED" />
</module>
変更されたスタイルシートファイルの内容は次のとおりです war/HelloWorld.css。
body {
   text-align: center;
   font-family: verdana, sans-serif;
}

h1 {
   font-size: 2em;
   font-weight: bold;
   color: #777777;
   margin: 40px 0px 70px;
   text-align: center;
}
以下は、変更されたHTMLホストファイルの内容です。 war/HelloWorld.html
<html>
   <head>
      <title>Hello World</title>
      <link rel = "stylesheet" href = "HelloWorld.css"/>
      <script language = "javascript" src = "helloworld/helloworld.nocache.js">
      </script>
   </head>

   <body>
      <iframe src = "javascript:''"id = "__gwt_historyFrame"
         style = "width:0;height:0;border:0"></iframe>
      <h1> Logging Demonstration</h1>
      <div id = "gwtContainer"></div>
   </body>
</html>
以下のJavaファイルの内容を見てみましょう src/com.tutorialspoint/HelloWorld.java これを使用して、GWTコードでブックマークをデモンストレーションします。
package com.tutorialspoint.client;

import java.util.logging.Level;
import java.util.logging.Logger;

import com.google.gwt.core.client.EntryPoint;

import com.google.gwt.event.logical.shared.ValueChangeEvent;
import com.google.gwt.event.logical.shared.ValueChangeHandler;

import com.google.gwt.logging.client.HasWidgetsLogHandler;

import com.google.gwt.user.client.History;
import com.google.gwt.user.client.ui.HTML;
import com.google.gwt.user.client.ui.HorizontalPanel;
import com.google.gwt.user.client.ui.Hyperlink;
import com.google.gwt.user.client.ui.RootPanel;
import com.google.gwt.user.client.ui.TabPanel;
import com.google.gwt.user.client.ui.VerticalPanel;

public class HelloWorld implements EntryPoint {

   private TabPanel tabPanel;
   /* Create Root Logger */
   private static Logger rootLogger = Logger.getLogger("");
   private VerticalPanel customLogArea;

   private void selectTab(String historyToken){
      /*  parse the history token */
      try {
         if (historyToken.substring(0, 9).equals("pageIndex")) {
            String tabIndexToken = historyToken.substring(9, 10);
            int tabIndex = Integer.parseInt(tabIndexToken);
            /* Select the specified tab panel */
            tabPanel.selectTab(tabIndex);
         } else {
            tabPanel.selectTab(0);
         }
      } catch (IndexOutOfBoundsException e) {
         tabPanel.selectTab(0);
      }
   }

   /**
    * This is the entry point method.
    */
   public void onModuleLoad() {
      /* create a tab panel to carry multiple pages */
      tabPanel = new TabPanel();

      /* create pages */
      HTML firstPage = new HTML("<h1>We are on first Page.</h1>");
      HTML secondPage = new HTML("<h1>We are on second Page.</h1>");
      HTML thirdPage = new HTML("<h1>We are on third Page.</h1>");

      String firstPageTitle = "First Page";
      String secondPageTitle = "Second Page";
      String thirdPageTitle = "Third Page";

      Hyperlink firstPageLink = new Hyperlink("1", "pageIndex0");
      Hyperlink secondPageLink = new Hyperlink("2", "pageIndex1");
      Hyperlink thirdPageLink = new Hyperlink("3", "pageIndex2");

      HorizontalPanel linksHPanel = new HorizontalPanel();
      linksHPanel.setSpacing(10);
      linksHPanel.add(firstPageLink);
      linksHPanel.add(secondPageLink);
      linksHPanel.add(thirdPageLink);

      /* If the application starts with no history token,
         redirect to a pageIndex0 */
      String initToken = History.getToken();

      if (initToken.length() == 0) {
         History.newItem("pageIndex0");
         initToken = "pageIndex0";
      }

      tabPanel.setWidth("400");
      /* add pages to tabPanel*/
      tabPanel.add(firstPage, firstPageTitle);
      tabPanel.add(secondPage,secondPageTitle);
      tabPanel.add(thirdPage, thirdPageTitle);

      /* add value change handler to History
       * this method will be called, when browser's Back button
       * or Forward button are clicked.
       * and URL of application changes.
       * */
      History.addValueChangeHandler(new ValueChangeHandler<String>() {
         @Override
         public void onValueChange(ValueChangeEvent<String> event) {
            selectTab(event.getValue());
            rootLogger.log(Level.SEVERE, "pageIndex selected: "
            + event.getValue());
         }
      });

      selectTab(initToken);

      VerticalPanel vPanel = new VerticalPanel();

      vPanel.setSpacing(10);
      vPanel.add(tabPanel);
      vPanel.add(linksHPanel);

      customLogArea = new VerticalPanel();
      vPanel.add(customLogArea);

      /* an example of using own custom logging area. */
      rootLogger.addHandler(new HasWidgetsLogHandler(customLogArea));

      /* add controls to RootPanel */
      RootPanel.get().add(vPanel);
   }
}
すべての変更を行う準備ができたら、GWT-アプリケーションの作成の章で行ったように、アプリケーションをコンパイルして開発モードで実行します。アプリケーションに問題がない場合、次の結果が得られます-
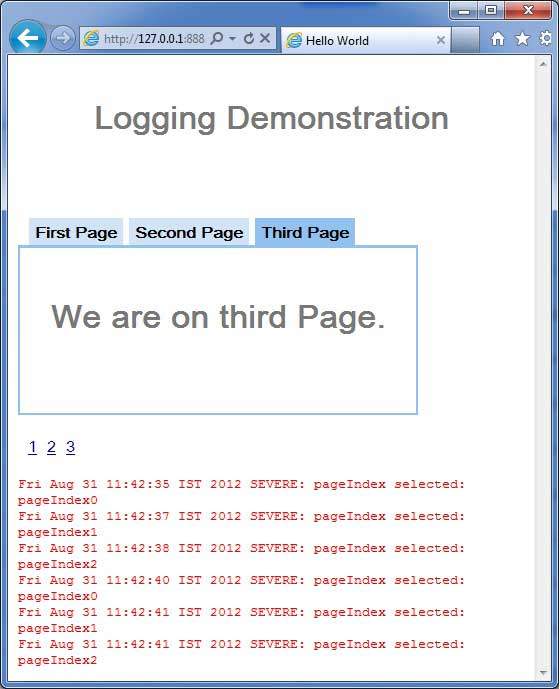
ここで、1、2、または3をクリックします。1、2、または3をクリックすると、pageIndexを表示してログが印刷されていることがわかります。Eclipseでコンソール出力を確認します。ログがEclipseコンソールでも印刷されていることがわかります。
Fri Aug 31 11:42:35 IST 2012
SEVERE: pageIndex selected: pageIndex0
Fri Aug 31 11:42:37 IST 2012
SEVERE: pageIndex selected: pageIndex1
Fri Aug 31 11:42:38 IST 2012
SEVERE: pageIndex selected: pageIndex2
Fri Aug 31 11:42:40 IST 2012
SEVERE: pageIndex selected: pageIndex0
Fri Aug 31 11:42:41 IST 2012
SEVERE: pageIndex selected: pageIndex1
Fri Aug 31 11:42:41 IST 2012
SEVERE: pageIndex selected: pageIndex2
モジュール記述子を更新します src/com.tutorialspoint/HelloWorld.gwt.xml popupHandlerを有効にします。
<?xml version = "1.0" encoding = "UTF-8"?>
<module rename-to = 'helloworld'>
  <!-- Inherit the core Web Toolkit stuff.                        -->
   <inherits name = 'com.google.gwt.user.User'/>

   <!-- Inherit the default GWT style sheet.                       -->
   <inherits name = 'com.google.gwt.user.theme.clean.Clean'/>
   <inherits name = "com.google.gwt.logging.Logging"/>
   <!-- Specify the app entry point class.                         -->
   <entry-point class = 'com.tutorialspoint.client.HelloWorld'/>
   <!-- Specify the paths for translatable code                    -->
   <source path = 'client'/>
   <source path = 'shared'/>
   <set-property name = "gwt.logging.logLevel" value = "SEVERE"/>
   <set-property name = "gwt.logging.enabled" value = "TRUE"/>
   <set-property name="gwt.logging.popupHandler" value = "ENABLED" />
</module>
すべての変更を行う準備ができたら、ブラウザウィンドウを更新してアプリケーションをリロードします(ブラウザのF5 /リロードボタンを押します)。アプリケーションの左上隅にポップアップウィンドウが表示されていることに注目してください。
ここで、1、2、または3をクリックします。1、2、または3をクリックすると、ログが印刷され、ポップアップウィンドウにpageIndexが表示されていることがわかります。