JavaScript-ループ制御
JavaScriptは、ループとswitchステートメントを処理するための完全な制御を提供します。ループの底に到達せずにループから抜け出す必要がある場合があります。コードブロックの一部をスキップして、ループの次の反復を開始したい場合もあります。
このようなすべての状況を処理するために、JavaScriptは break そして continueステートメント。これらのステートメントは、ループからすぐに抜け出すため、またはループの次の反復を開始するためにそれぞれ使用されます。
ブレークステートメント
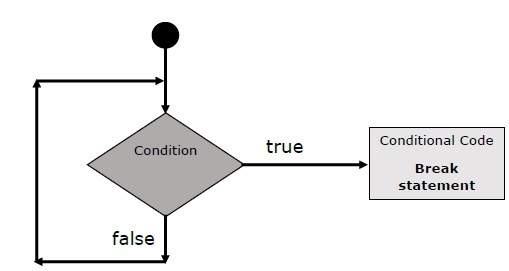
ザ・ breakswitchステートメントで簡単に導入されたステートメントは、ループを早期に終了するために使用され、囲んでいる中括弧から抜け出します。
フローチャート
breakステートメントのフローチャートは次のようになります-

例
次の例は、 breakwhileループのあるステートメント。ループが一度早く発生することに注意してくださいx 5に達し、に達する document.write (..) 右中括弧のすぐ下のステートメント-
<html>
   <body>
      <script type = "text/javascript">
         <!--
         var x = 1;
         document.write("Entering the loop<br /> ");

         while (x < 20) {
            if (x == 5) {
               break;   // breaks out of loop completely
            }
            x = x + 1;
            document.write( x + "<br />");
         }
         document.write("Exiting the loop!<br /> ");
         //-->
      </script>

      <p>Set the variable to different value and then try...</p>
   </body>
</html>
出力
Entering the loop
2
3
4
5
Exiting the loop!
Set the variable to different value and then try...
私たちはすでにの使用法を見てきました break 内部のステートメント a switch ステートメント。
継続ステートメント
ザ・ continueステートメントは、ループの次の反復をすぐに開始し、残りのコードブロックをスキップするようにインタープリターに指示します。いつcontinue ステートメントが検出されると、プログラムフローはすぐにループチェック式に移動し、条件がtrueのままの場合は次の反復を開始し、そうでない場合は制御がループから外れます。
例
この例は、 continuewhileループのあるステートメント。どのようにcontinue ステートメントは、インデックスが変数に保持されている場合に印刷をスキップするために使用されます x 5に達する-
<html>
   <body>
      <script type = "text/javascript">
         <!--
            var x = 1;
            document.write("Entering the loop<br /> ");

            while (x < 10) {
               x = x + 1;

               if (x == 5) {
                  continue;   // skip rest of the loop body
               }
               document.write( x + "<br />");
            }
            document.write("Exiting the loop!<br /> ");
         //-->
      </script>
      <p>Set the variable to different value and then try...</p>
   </body>
</html>
出力
Entering the loop
2
3
4
6
7
8
9
10
Exiting the loop!
Set the variable to different value and then try...
ラベルを使用したフローの制御
JavaScript 1.2以降、ラベルはで使用できます break そして continue流れをより正確に制御します。Alabelは、ステートメントまたはコードのブロックに適用されるコロン(:)が後に続く単なる識別子です。ブレークとコンティニューでラベルを使用する方法を理解するために、2つの異なる例を示します。
Note −間の改行は許可されていません ‘continue’ または ‘break’ステートメントとそのラベル名。また、ラベル名と関連するループの間に他のステートメントがあってはなりません。
ラベルをよりよく理解するために、次の2つの例を試してください。
例1
次の例は、breakステートメントを使用してLabelを実装する方法を示しています。
<html>
   <body>
      <script type = "text/javascript">
         <!--
            document.write("Entering the loop!<br /> ");
            outerloop:        // This is the label name
            for (var i = 0; i < 5; i++) {
               document.write("Outerloop: " + i + "<br />");
               innerloop:
               for (var j = 0; j < 5; j++) {
                  if (j > 3 ) break ;           // Quit the innermost loop
                  if (i == 2) break innerloop;  // Do the same thing
                  if (i == 4) break outerloop;  // Quit the outer loop
                  document.write("Innerloop: " + j + " <br />");
               }
            }
            document.write("Exiting the loop!<br /> ");
         //-->
      </script>
   </body>
</html>
出力
Entering the loop!
Outerloop: 0
Innerloop: 0
Innerloop: 1
Innerloop: 2
Innerloop: 3
Outerloop: 1
Innerloop: 0
Innerloop: 1
Innerloop: 2
Innerloop: 3
Outerloop: 2
Outerloop: 3
Innerloop: 0
Innerloop: 1
Innerloop: 2
Innerloop: 3
Outerloop: 4
Exiting the loop!
例2
<html>
   <body>

      <script type = "text/javascript">
         <!--
         document.write("Entering the loop!<br /> ");
         outerloop:     // This is the label name

         for (var i = 0; i < 3; i++) {
            document.write("Outerloop: " + i + "<br />");
            for (var j = 0; j < 5; j++) {
               if (j == 3) {
                  continue outerloop;
               }
               document.write("Innerloop: " + j + "<br />");
            }
         }

         document.write("Exiting the loop!<br /> ");
         //-->
      </script>

   </body>
</html>
出力
Entering the loop!
Outerloop: 0
Innerloop: 0
Innerloop: 1
Innerloop: 2
Outerloop: 1
Innerloop: 0
Innerloop: 1
Innerloop: 2
Outerloop: 2
Innerloop: 0
Innerloop: 1
Innerloop: 2
Exiting the loop!