SharePoint-Feature \ Event Receiver
この章では、追加する方法を学びます code handle。コードハンドルは、機能がアクティブ化または非アクティブ化されたときに発生するイベントです。言い換えれば、私たちは検討しますFeature Receivers。
前の章で作成したVisualStudioプロジェクトには1つの機能があり、アクティブ化されると、連絡先リスト、SitePage、およびSitePageへのリンクがプロビジョニングされました。
ただし、機能が非アクティブ化されている場合、SharePointはリンクのみを削除し、SitePageと連絡先リストは残ります。
必要に応じて、機能が非アクティブ化されたときにコードを記述して、リストとページを削除できます。この章では、機能が非アクティブ化されたときにコンテンツと要素を削除する方法を学習します。
機能のイベントを処理するには、 Feature Receiver。
Step 1 −フィーチャーレシーバーを取得するには、ソリューションエクスプローラーでフィーチャーを右クリックし、[ Add Event Receiver。
using System;
using System.Runtime.InteropServices;
using System.Security.Permissions;
using Microsoft.SharePoint;

namespace FeaturesAndElements.Features.Sample {
   /// <summary>
      /// This class handles events raised during feature activation, deactivation,
         installation, uninstallation, and upgrade.
   /// </summary>
   /// <remarks>
      /// The GUID attached to this class may be used during packaging and should not be modified.
   /// </remarks>
   [Guid("e873932c-d514-46f9-9d17-320bd3fbcb86")]

   public class SampleEventReceiver : SPFeatureReceiver {
      // Uncomment the method below to handle the event raised after a feature has been activated.
      //public override void FeatureActivated(SPFeatureReceiverProperties properties)//{
         //
      }
      // Uncomment the method below to handle the event raised before a feature is deactivated.
      //public override void FeatureDeactivating(SPFeatureReceiverProperties properties)// {
         //
      }
      // Uncomment the method below to handle the event raised after a feature has been installed.
      //public override void FeatureInstalled(SPFeatureReceiverProperties properties)// {
         //
      }
      // Uncomment the method below to handle the event raised before a feature is uninstalled.
      //public override void FeatureUninstalling(SPFeatureReceiverProperties properties)// {
         //
      }
      // Uncomment the method below to handle the event raised when a feature is upgrading.
      //public override void FeatureUpgrading(SPFeatureReceiverProperties
         properties, string upgradeActionName,
         System.Collections.Generic.IDictionary<string, string> parameters) // {
         //
      }
   }
}
あなたは私たちが得るものがから継承するクラスであることがわかります SPFeatureReceiver。
SharePointには、処理できるイベントの種類ごとに異なるクラスがあります。たとえば、リストのイベント、リストアイテムのイベント、サイトのイベントなどです。特定のイベントレシーバーから派生したクラスを作成してから、そのクラス内のメソッドをオーバーライドしてイベントを処理できます。
機能のイベントは、次の場合に使用されます-
- Activated
- Deactivated
- Installed
- Uninstalled
- Upgrading
次に、そのクラスを特定のアイテムのイベントハンドラーとしてアタッチする必要があります。たとえば、リストイベントを処理するイベントハンドラーがある場合、そのクラスをリストにアタッチする必要があります。
したがって、2つの機能を処理します-
機能がアクティブ化されたとき
非アクティブ化されているとき。
Step 2 −実装します FeatureActivated 以下に示すように、FeatureDeactivateメソッド-
using System;
using System.Runtime.InteropServices;
using System.Security.Permissions;
using Microsoft.SharePoint;

namespace FeaturesAndElements.Features.Sample {
   /// <summary>
      /// This class handles events raised during feature activation, deactivation,
         installation, uninstallation, and upgrade.
   /// </summary>
   /// <remarks>
      /// The GUID attached to this class may be used during packaging and should
         not be modified.
   /// </remarks>

   [Guid("e873932c-d514-46f9-9d17-320bd3fbcb86")]
   public class SampleEventReceiver : SPFeatureReceiver {
      private const string listName = "Announcements";

      public override void FeatureActivated(SPFeatureReceiverProperties properties) {
         var web = properties.Feature.Parent as SPWeb;

         if (web == null) return;
         var list = web.Lists.TryGetList(listName);

         if (list != null) return;
         var listId = web.Lists.Add(listName, string.Empty,
         SPListTemplateType.Announcements);
         list = web.Lists[listId];
         list.OnQuickLaunch = true;
         list.Update();
      }
      public override void FeatureDeactivating(SPFeatureReceiverProperties properties) {
         var web = properties.Feature.Parent as SPWeb;

         if (web == null) return;
         var list = web.Lists.TryGetList(listName);

         if (list == null) return;
         if (list.ItemCount == 0) {
            list.Delete();
         }
      }
   }
}
Note −
この機能が有効になると、お知らせリストが作成されます。
この機能が無効になっている場合は、お知らせリストが空かどうかを確認し、空の場合は削除します。
Step 3−プロジェクトを右クリックして、デプロイを選択します。次の展開の競合の警告が表示されます。
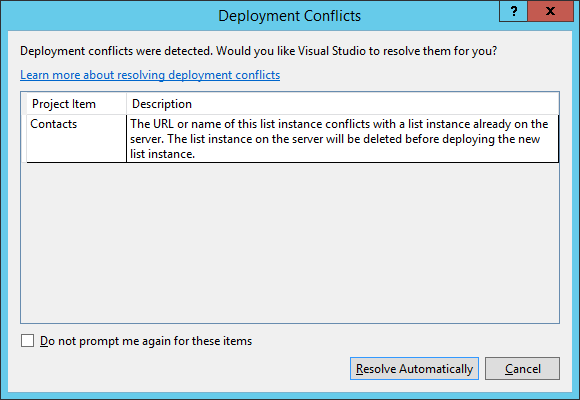
Visual Studioは、連絡先というリストを作成しようとしていると言っていますが、連絡先というサイトにはすでにリストがあります。既存のリストを上書きするかどうかを尋ねられます。この場合は、Resolve。
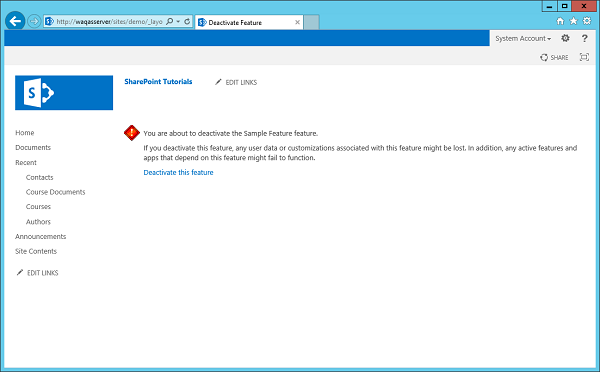
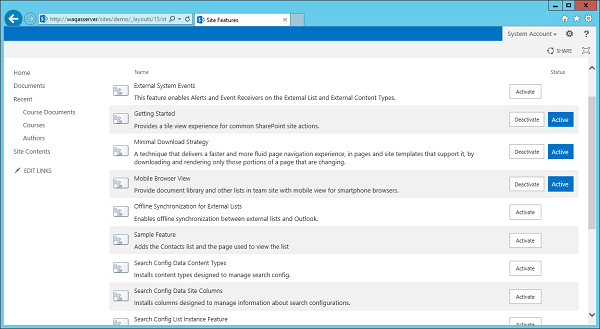
Step 4 − SharePointに戻り、サイトを更新して、 Site Actions → Site settings → Manage site features → Sample feature。
左側のペインにアナウンスリストがないことがわかります。
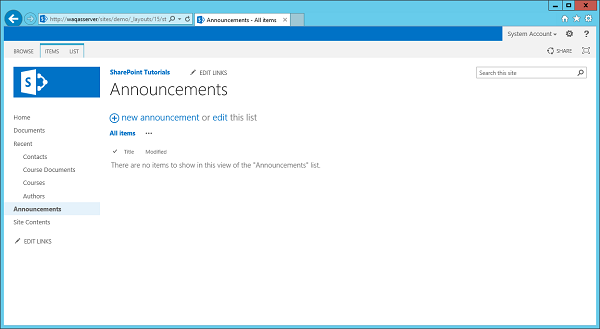
Step 5 −サンプル機能をアクティブにすると、アナウンスリストが表示されますが、現在は空です。
Note −サンプル機能を無効にすると、アナウンスリストが消えることに気付くでしょう。
Step 6−機能を再度アクティブにします。[お知らせ]に移動して、新しいお知らせを追加します。このテストを呼び出して、[保存]をクリックします。
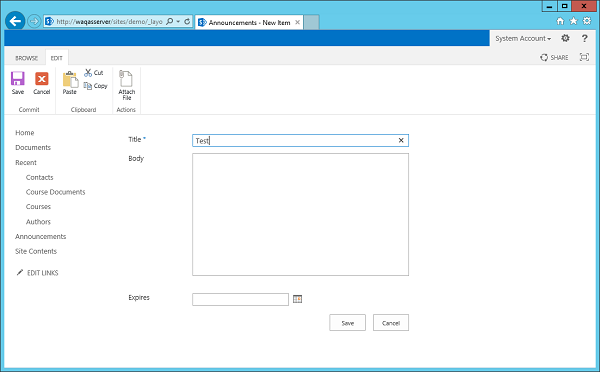
お知らせの下にテストファイルが表示されます。
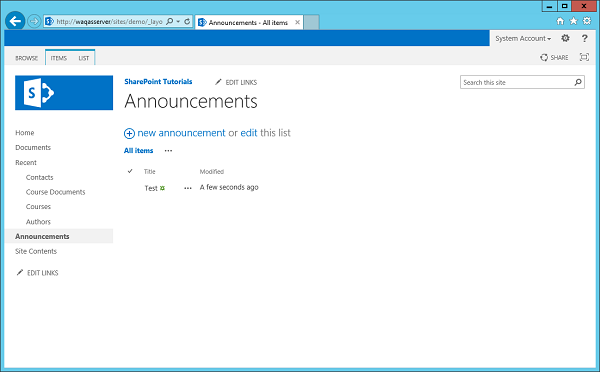
これで、アナウンスを非アクティブ化すると、アナウンスリストが空ではなかったために残っていることがわかります。