SpringBoot-JWTを使用したOAuth2
この章では、Spring BootSecurityメカニズムとJWTを使用したOAuth2について詳しく学習します。
承認サーバー
Authorization Serverは、WebAPIセキュリティの最高のアーキテクチャコンポーネントです。承認サーバーは、アプリとHTTPエンドポイントがアプリケーションの機能を識別できるようにする一元化承認ポイントとして機能します。
リソースサーバー
Resource Serverは、Resource ServerHTTPエンドポイントにアクセスするためのアクセストークンをクライアントに提供するアプリケーションです。これは、HTTPエンドポイント、静的リソース、および動的Webページを含むライブラリのコレクションです。
OAuth2
OAuth2は、アプリケーションWebセキュリティがクライアントからリソースにアクセスできるようにする承認フレームワークです。OAuth2アプリケーションを構築するには、付与タイプ(認証コード)、クライアントID、およびクライアントシークレットに焦点を当てる必要があります。
JWTトークン
JWTトークンはJSONWebトークンであり、2者間で保護されたクレームを表すために使用されます。JWTトークンの詳細については、www.jwt.io /をご覧ください。
次に、JWTトークンを使用してAuthorization Server、ResourceServerの使用を可能にするOAuth2アプリケーションを構築します。
次の手順を使用して、データベースにアクセスすることにより、JWTトークンを使用したSpring BootSecurityを実装できます。
まず、ビルド構成ファイルに次の依存関係を追加する必要があります。
Mavenユーザーは、pom.xmlファイルに次の依存関係を追加できます。
<dependency>
   <groupId>org.springframework.boot</groupId>
   <artifactId>spring-boot-starter-jdbc</artifactId>
</dependency>

<dependency>
   <groupId>org.springframework.boot</groupId>
   <artifactId>spring-boot-starter-security</artifactId>
</dependency>

<dependency>
   <groupId>org.springframework.boot</groupId>
   <artifactId>spring-boot-starter-web</artifactId>
</dependency>

<dependency>
   <groupId>org.springframework.security.oauth</groupId>
   <artifactId>spring-security-oauth2</artifactId>
</dependency>

<dependency>
   <groupId>org.springframework.security</groupId>
   <artifactId>spring-security-jwt</artifactId>
</dependency>

<dependency>
   <groupId>com.h2database</groupId>
   <artifactId>h2</artifactId>
</dependency>

<dependency>
   <groupId>org.springframework.boot</groupId>
   <artifactId>spring-boot-starter-test</artifactId>
   <scope>test</scope>
</dependency>

<dependency>
   <groupId>org.springframework.security</groupId>
   <artifactId>spring-security-test</artifactId>
   <scope>test</scope>
</dependency>
Gradleユーザーは、build.gradleファイルに次の依存関係を追加できます。
compile('org.springframework.boot:spring-boot-starter-security')
compile('org.springframework.boot:spring-boot-starter-web')
testCompile('org.springframework.boot:spring-boot-starter-test')
testCompile('org.springframework.security:spring-security-test')

compile("org.springframework.security.oauth:spring-security-oauth2")
compile('org.springframework.security:spring-security-jwt')
compile("org.springframework.boot:spring-boot-starter-jdbc")
compile("com.h2database:h2:1.4.191")
どこ、
Spring Boot Starter Security − SpringSecurityを実装します
Spring Security OAuth2 − OAUTH2構造を実装して、承認サーバーとリソースサーバーを有効にします。
Spring Security JWT −Webセキュリティ用のJWTトークンを生成します
Spring Boot Starter JDBC −データベースにアクセスして、ユーザーが対応可能かどうかを確認します。
Spring Boot Starter Web −HTTPエンドポイントを書き込みます。
H2 Database −認証と承認のためにユーザー情報を保存します。
完全なビルド構成ファイルを以下に示します。
<?xml version = "1.0" encoding = "UTF-8"?>
<project xmlns = "http://maven.apache.org/POM/4.0.0"
   xmlns:xsi = "http://www.w3.org/2001/XMLSchema-instance"
   xsi:schemaLocation = "http://maven.apache.org/POM/4.0.0
   http://maven.apache.org/xsd/maven-4.0.0.xsd">

   <modelVersion>4.0.0</modelVersion>
   <groupId>com.tutorialspoint</groupId>
   <artifactId>websecurityapp</artifactId>
   <version>0.0.1-SNAPSHOT</version>
   <packaging>jar</packaging>
   <name>websecurityapp</name>
   <description>Demo project for Spring Boot</description>

   <parent>
      <groupId>org.springframework.boot</groupId>
      <artifactId>spring-boot-starter-parent</artifactId>
      <version>1.5.9.RELEASE</version>
      <relativePath /> <!-- lookup parent from repository -->
   </parent>

   <properties>
      <project.build.sourceEncoding>UTF-8</project.build.sourceEncoding>
      <project.reporting.outputEncoding>UTF-8</project.reporting.outputEncoding>
      <java.version>1.8</java.version>
   </properties>

   <dependencies>
      <dependency>
         <groupId>org.springframework.boot</groupId>
         <artifactId>spring-boot-starter-jdbc</artifactId>
      </dependency>

      <dependency>
         <groupId>org.springframework.boot</groupId>
         <artifactId>spring-boot-starter-security</artifactId>
      </dependency>

      <dependency>
         <groupId>org.springframework.boot</groupId>
         <artifactId>spring-boot-starter-web</artifactId>
      </dependency>

      <dependency>
         <groupId>org.springframework.security.oauth</groupId>
         <artifactId>spring-security-oauth2</artifactId>
      </dependency>

      <dependency>
         <groupId>org.springframework.security</groupId>
         <artifactId>spring-security-jwt</artifactId>
      </dependency>

      <dependency>
         <groupId>com.h2database</groupId>
         <artifactId>h2</artifactId>
      </dependency>

      <dependency>
         <groupId>org.springframework.boot</groupId>
         <artifactId>spring-boot-starter-test</artifactId>
         <scope>test</scope>
      </dependency>

      <dependency>
         <groupId>org.springframework.security</groupId>
         <artifactId>spring-security-test</artifactId>
         <scope>test</scope>
      </dependency>
   </dependencies>

   <build>
      <plugins>
         <plugin>
            <groupId>org.springframework.boot</groupId>
            <artifactId>spring-boot-maven-plugin</artifactId>
         </plugin>
      </plugins>
   </build>

</project>
Gradle – build.gradle
buildscript {
   ext {
      springBootVersion = '1.5.9.RELEASE'
   }
   repositories {
      mavenCentral()
   }
   dependencies {
      classpath("org.springframework.boot:spring-boot-gradle-plugin:${springBootVersion}")
   }
}
apply plugin: 'java'
apply plugin: 'eclipse'
apply plugin: 'org.springframework.boot'

group = 'com.tutorialspoint'
version = '0.0.1-SNAPSHOT'
sourceCompatibility = 1.8

repositories {
   mavenCentral()
}

dependencies {
   compile('org.springframework.boot:spring-boot-starter-security')
   compile('org.springframework.boot:spring-boot-starter-web')
   testCompile('org.springframework.boot:spring-boot-starter-test')
   testCompile('org.springframework.security:spring-security-test')
   compile("org.springframework.security.oauth:spring-security-oauth2")
   compile('org.springframework.security:spring-security-jwt')
   compile("org.springframework.boot:spring-boot-starter-jdbc")
   compile("com.h2database:h2:1.4.191")
}
ここで、メインのSpring Bootアプリケーションで、@ EnableAuthorizationServerアノテーションと@EnableResourceServerアノテーションを追加して、同じアプリケーションで認証サーバーとリソースサーバーとして機能します。
また、次のコードを使用して、JWTトークンを使用してSpringSecurityでAPIにアクセスするための単純なHTTPエンドポイントを記述できます。
package com.tutorialspoint.websecurityapp;

import org.springframework.boot.SpringApplication;
import org.springframework.boot.autoconfigure.SpringBootApplication;
import org.springframework.security.oauth2.config.annotation.web.configuration.EnableAuthorizationServer;
import org.springframework.security.oauth2.config.annotation.web.configuration.EnableResourceServer;
import org.springframework.web.bind.annotation.RequestMapping;
import org.springframework.web.bind.annotation.RestController;

@SpringBootApplication
@EnableAuthorizationServer
@EnableResourceServer
@RestController
public class WebsecurityappApplication {
   public static void main(String[] args) {
      SpringApplication.run(WebsecurityappApplication.class, args);
   }
   @RequestMapping(value = "/products")
   public String getProductName() {
      return "Honey";
   }
}
次のコードを使用して、認証用のユーザー情報を格納するPOJOクラスを定義します。
package com.tutorialspoint.websecurityapp;

import java.util.ArrayList;
import java.util.Collection;
import org.springframework.security.core.GrantedAuthority;

public class UserEntity {
   private String username;
   private String password;
   private Collection<GrantedAuthority> grantedAuthoritiesList = new ArrayList<>();

   public String getPassword() {
      return password;
   }
   public void setPassword(String password) {
      this.password = password;
   }
   public Collection<GrantedAuthority> getGrantedAuthoritiesList() {
      return grantedAuthoritiesList;
   }
   public void setGrantedAuthoritiesList(Collection<GrantedAuthority> grantedAuthoritiesList) {
      this.grantedAuthoritiesList = grantedAuthoritiesList;
   }
   public String getUsername() {
      return username;
   }
   public void setUsername(String username) {
      this.username = username;
   }
}
ここで、次のコードを使用して、SpringBoot認証用にorg.springframework.security.core.userdetails.Userクラスを拡張するCustomUserクラスを定義します。
package com.tutorialspoint.websecurityapp;

import org.springframework.security.core.userdetails.User;

public class CustomUser extends User {
   private static final long serialVersionUID = 1L;
   public CustomUser(UserEntity user) {
      super(user.getUsername(), user.getPassword(), user.getGrantedAuthoritiesList());
   }
}
@Repositoryクラスを作成して、データベースからユーザー情報を読み取り、それをカスタムユーザーサービスに送信し、付与された権限「ROLE_SYSTEMADMIN」を追加することもできます。
package com.tutorialspoint.websecurityapp;

import java.sql.ResultSet;
import java.util.ArrayList;
import java.util.Collection;
import java.util.List;

import org.springframework.beans.factory.annotation.Autowired;
import org.springframework.jdbc.core.JdbcTemplate;
import org.springframework.security.core.GrantedAuthority;
import org.springframework.security.core.authority.SimpleGrantedAuthority;
import org.springframework.stereotype.Repository;

@Repository
public class OAuthDao {
   @Autowired
   private JdbcTemplate jdbcTemplate;

   public UserEntity getUserDetails(String username) {
      Collection<GrantedAuthority> grantedAuthoritiesList = new ArrayList<>();
      String userSQLQuery = "SELECT * FROM USERS WHERE USERNAME=?";
      List<UserEntity> list = jdbcTemplate.query(userSQLQuery, new String[] { username },
         (ResultSet rs, int rowNum) -> {

         UserEntity user = new UserEntity();
         user.setUsername(username);
         user.setPassword(rs.getString("PASSWORD"));
         return user;
      });
      if (list.size() > 0) {
         GrantedAuthority grantedAuthority = new SimpleGrantedAuthority("ROLE_SYSTEMADMIN");
         grantedAuthoritiesList.add(grantedAuthority);
         list.get(0).setGrantedAuthoritiesList(grantedAuthoritiesList);
         return list.get(0);
      }
      return null;
   }
}図のように、org.springframework.security.core.userdetails.UserDetailsServiceを拡張してDAOリポジトリクラスを呼び出すカスタムユーザー詳細サービスクラスを作成できます。
package com.tutorialspoint.websecurityapp;

import org.springframework.beans.factory.annotation.Autowired;
import org.springframework.security.core.userdetails.UserDetailsService;
import org.springframework.security.core.userdetails.UsernameNotFoundException;
import org.springframework.stereotype.Service;

@Service
public class CustomDetailsService implements UserDetailsService {
   @Autowired
   OAuthDao oauthDao;

   @Override
   public CustomUser loadUserByUsername(final String username) throws UsernameNotFoundException {
      UserEntity userEntity = null;
      try {
         userEntity = oauthDao.getUserDetails(username);
         CustomUser customUser = new CustomUser(userEntity);
         return customUser;
      } catch (Exception e) {
         e.printStackTrace();
         throw new UsernameNotFoundException("User " + username + " was not found in the database");
      }
   }
}
次に、@ configurationクラスを作成して、Webセキュリティを有効にし、パスワードエンコーダー(BCryptPasswordEncoder)を定義し、AuthenticationManagerBeanを定義します。Security構成クラスは、WebSecurityConfigurerAdapterクラスを拡張する必要があります。
package com.tutorialspoint.websecurityapp;

import org.springframework.beans.factory.annotation.Autowired;
import org.springframework.context.annotation.Bean;
import org.springframework.context.annotation.Configuration;

import org.springframework.security.authentication.AuthenticationManager;
import org.springframework.security.config.annotation.authentication.builders.AuthenticationManagerBuilder;
import org.springframework.security.config.annotation.method.configuration.EnableGlobalMethodSecurity;
import org.springframework.security.config.annotation.web.builders.HttpSecurity;
import org.springframework.security.config.annotation.web.builders.WebSecurity;
import org.springframework.security.config.annotation.web.configuration.EnableWebSecurity;
import org.springframework.security.config.annotation.web.configuration.WebSecurityConfigurerAdapter;
import org.springframework.security.config.http.SessionCreationPolicy;
import org.springframework.security.crypto.bcrypt.BCryptPasswordEncoder;
import org.springframework.security.crypto.password.PasswordEncoder;

@Configuration
@EnableWebSecurity
@EnableGlobalMethodSecurity(prePostEnabled = true)
public class SecurityConfiguration extends WebSecurityConfigurerAdapter {
   @Autowired
   private CustomDetailsService customDetailsService;

   @Bean
   public PasswordEncoder encoder() {
      return new BCryptPasswordEncoder();
   }
   @Override
   @Autowired
   protected void configure(AuthenticationManagerBuilder auth) throws Exception {
      auth.userDetailsService(customDetailsService).passwordEncoder(encoder());
   }
   @Override
   protected void configure(HttpSecurity http) throws Exception {
      http.authorizeRequests().anyRequest().authenticated().and().sessionManagement()
         .sessionCreationPolicy(SessionCreationPolicy.NEVER);
   }
   @Override
   public void configure(WebSecurity web) throws Exception {
      web.ignoring();
   }
   @Override
   @Bean
   public AuthenticationManager authenticationManagerBean() throws Exception {
      return super.authenticationManagerBean();
   }
}次に、OAuth2構成クラスを定義して、クライアントID、クライアントシークレットを追加し、トークン署名者キーと検証者キーのJwtAccessTokenConverter、秘密キー、公開キーを定義し、スコープを使用してトークンの有効性についてClientDetailsServiceConfigurerを構成します。
package com.tutorialspoint.websecurityapp;

import org.springframework.beans.factory.annotation.Autowired;
import org.springframework.beans.factory.annotation.Qualifier;
import org.springframework.context.annotation.Bean;
import org.springframework.context.annotation.Configuration;

import org.springframework.security.authentication.AuthenticationManager;
import org.springframework.security.oauth2.config.annotation.configurers.ClientDetailsServiceConfigurer;
import org.springframework.security.oauth2.config.annotation.web.configuration.AuthorizationServerConfigurerAdapter;
import org.springframework.security.oauth2.config.annotation.web.configurers.AuthorizationServerEndpointsConfigurer;
import org.springframework.security.oauth2.config.annotation.web.configurers.AuthorizationServerSecurityConfigurer;
import org.springframework.security.oauth2.provider.token.store.JwtAccessTokenConverter;
import org.springframework.security.oauth2.provider.token.store.JwtTokenStore;

@Configuration
public class OAuth2Config extends AuthorizationServerConfigurerAdapter {
   private String clientid = "tutorialspoint";
   private String clientSecret = "my-secret-key";
   private String privateKey = "private key";
   private String publicKey = "public key";

   @Autowired
   @Qualifier("authenticationManagerBean")
   private AuthenticationManager authenticationManager;

   @Bean
   public JwtAccessTokenConverter tokenEnhancer() {
      JwtAccessTokenConverter converter = new JwtAccessTokenConverter();
      converter.setSigningKey(privateKey);
      converter.setVerifierKey(publicKey);
      return converter;
   }
   @Bean
   public JwtTokenStore tokenStore() {
      return new JwtTokenStore(tokenEnhancer());
   }
   @Override
   public void configure(AuthorizationServerEndpointsConfigurer endpoints) throws Exception {
      endpoints.authenticationManager(authenticationManager).tokenStore(tokenStore())
      .accessTokenConverter(tokenEnhancer());
   }
   @Override
   public void configure(AuthorizationServerSecurityConfigurer security) throws Exception {
      security.tokenKeyAccess("permitAll()").checkTokenAccess("isAuthenticated()");
   }
   @Override
   public void configure(ClientDetailsServiceConfigurer clients) throws Exception {
      clients.inMemory().withClient(clientid).secret(clientSecret).scopes("read", "write")
         .authorizedGrantTypes("password", "refresh_token").accessTokenValiditySeconds(20000)
         .refreshTokenValiditySeconds(20000);

   }
}
次に、opensslを使用して秘密鍵と公開鍵を作成します。
秘密鍵を生成するには、次のコマンドを使用できます。
openssl genrsa -out jwt.pem 2048
openssl rsa -in jwt.pem
公開鍵の生成には、以下のコマンドを使用できます。
openssl rsa -in jwt.pem -pubout1.5リリースより後のバージョンのSpringBootの場合、以下のプロパティをapplication.propertiesファイルに追加して、OAuth2リソースフィルターの順序を定義します。
security.oauth2.resource.filter-order=3YAMLファイルのユーザーは、YAMLファイルに以下のプロパティを追加できます。
security:
   oauth2:
      resource:
         filter-order: 3
次に、クラスパスリソースの下にschema.sqlファイルとdata.sqlファイルを作成します src/main/resources/directory アプリケーションをH2データベースに接続します。
schema.sqlファイルは次のとおりです-
CREATE TABLE USERS (ID INT PRIMARY KEY, USERNAME VARCHAR(45), PASSWORD VARCHAR(60));data.sqlファイルは次のとおりです-
INSERT INTO USERS (ID, USERNAME,PASSWORD) VALUES (
   1, '[email protected]','$2a$08$fL7u5xcvsZl78su29x1ti.dxI.9rYO8t0q5wk2ROJ.1cdR53bmaVG');

INSERT INTO USERS (ID, USERNAME,PASSWORD) VALUES (
   2, '[email protected]','$2a$08$fL7u5xcvsZl78su29x1ti.dxI.9rYO8t0q5wk2ROJ.1cdR53bmaVG');
Note −パスワードは、データベーステーブルにBcryptエンコーダの形式で保存する必要があります。
次のMavenまたはGradleコマンドを使用して、実行可能なJARファイルを作成し、SpringBootアプリケーションを実行できます。
Mavenの場合、以下のコマンドを使用できます-
mvn clean install「BUILDSUCCESS」の後、JARファイルはターゲットディレクトリの下にあります。
Gradleの場合、次のようにコマンドを使用できます-
gradle clean build「BUILDSUCCESSFUL」の後、build / libsディレクトリの下にJARファイルがあります。
ここで、ここに示すコマンドを使用してJARファイルを実行します-
java –jar <JARFILE>アプリケーションはTomcatポート8080で起動されます。

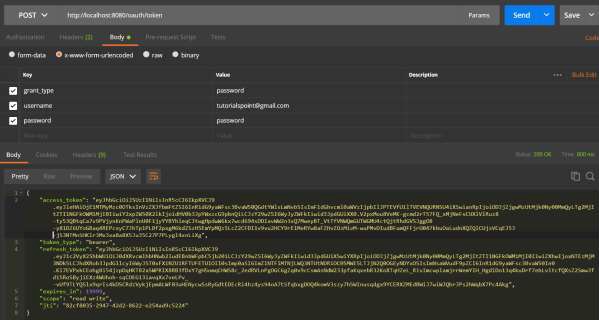
次に、POSTMANを介してPOSTメソッドのURLをヒットし、OAUTH2トークンを取得します。
http://localhost:8080/oauth/token
ここで、次のようにリクエストヘッダーを追加します-
Authorization −クライアントIDとクライアントシークレットを使用した基本認証。
Content Type − application / x-www-form-urlencoded

ここで、次のようにリクエストパラメータを追加します-
- grant_type =パスワード
- ユーザー名=あなたのユーザー名
- パスワード=あなたのパスワード

ここで、APIをヒットし、図のようにaccess_tokenを取得します-

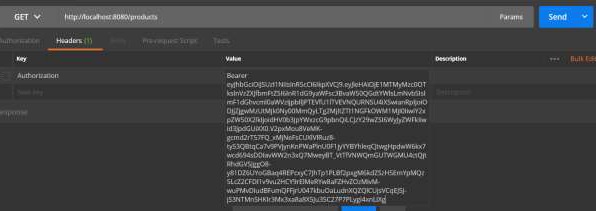
次に、図のように、リクエストヘッダーのベアラーアクセストークンでResource ServerAPIをヒットします。

次に、以下に示すような出力を確認できます。
