Flex-애플리케이션 생성
Flash Builder 4.5를 사용하여 Flex 애플리케이션을 만들 것입니다. 간단한 것부터 시작합시다HelloWorld 신청.
1 단계 – 프로젝트 생성
첫 번째 단계는 Flash Builder IDE를 사용하여 간단한 Flex 프로젝트를 만드는 것입니다. 옵션을 사용하여 프로젝트 마법사 시작File > New > Flex Project. 이제 다음과 같이 마법사 창을 사용 하여 프로젝트 이름을 HelloWorld 로 지정합니다.
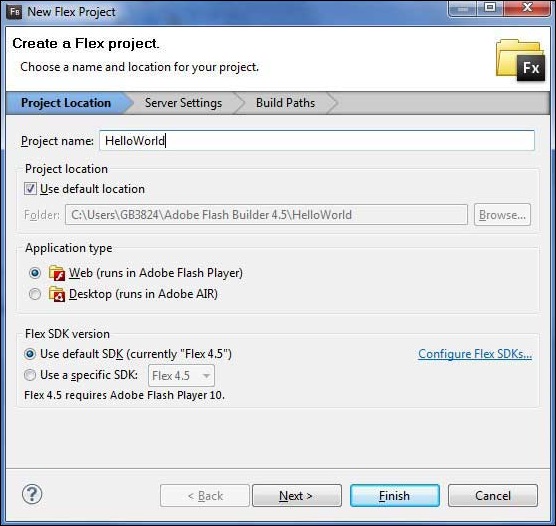
애플리케이션 유형 선택 Web (runs in Adobe Flash Player). 그러나 이것이 선택되지 않은 경우 다른 기본값을 그대로두고 Finish 버튼을 클릭합니다. 프로젝트가 성공적으로 생성되면 프로젝트 탐색기에 다음 내용이 표시됩니다.

다음은 모든 중요한 폴더에 대한 간략한 설명입니다.
| 폴더 | 위치 |
|---|---|
| 테이블 테이블 테두리 | 소스 코드 (mxml / as classes) 파일. 클라이언트 UI 표시를 담당하는 클라이언트 측 특정 Java 클래스를 포함하는 com / tutorialspoint / client 폴더 구조를 만들었습니다. |
| 빈 디버그 | 이것은 출력 부분이며 실제 배포 가능한 웹 응용 프로그램을 나타냅니다. History 폴더에는 Flex 애플리케이션의 이력 관리를위한 지원 파일이 포함되어 있습니다. framework_xxx.swf, flex 프레임 워크 파일은 flex 응용 프로그램에서 사용해야합니다. HelloWorld.html, 플렉스 애플리케이션 용 래퍼 / 호스트 HTML 파일. Flex 기반 애플리케이션 인 HelloWorld.swf. playerProductInstall.swf, 플래시 플레이어 익스프레스 설치 프로그램. spark_xxx.swf, 스파크 구성 요소 지원을위한 라이브러리. swfobject.js, HelloWorld.html에서 HelloWorld.swf를로드하는 JavaScript입니다. Flash Player 버전을 확인하고 초기화 매개 변수를 HelloWorld.swf 파일에 전달합니다. textLayout_xxx.swf, 텍스트 구성 요소 지원을위한 라이브러리. |
| HTML 템플릿 | 이것은 구성 가능한 웹 애플리케이션을 나타냅니다. Flash Builder는 html 템플릿에서 bin-debug 폴더로 파일을 컴파일합니다. History 폴더에는 Flex 애플리케이션의 이력 관리를위한 지원 파일이 포함되어 있습니다. index.template.html, Flash Builder 특정 구성을위한 자리 표시자가있는 플렉스 애플리케이션 용 래퍼 / 호스트 HTML 파일입니다. 빌드 중에 bin-debug 폴더의 HelloWorld.html로 컴파일됩니다. playerProductInstall.swf, Flash Player Express 설치 프로그램은 빌드 중에 bin-debug 폴더에 복사됩니다. swfobject.js, HelloWorld.html에서 HelloWorld.swf를로드하는 JavaScript입니다. Flash Player 버전을 확인하고 초기화 매개 변수를 HelloWorld.swf 파일에 전달하면 빌드 중에 bindebug 폴더에 복사됩니다. |
2 단계 – 외부 CSS 파일 만들기
CSS 파일 만들기 styles.css 래퍼 HTML 페이지 용 html-template 폴더.
html, body {
   height:100%;
}

body {
   margin:0;
   padding:0;
   overflow:auto;
   text-align:center;
}

object:focus {
   outline:none;
}

#flashContent {
   display:none;
}

.pluginHeader {
   font-family:Arial, Helvetica, sans-serif;
   font-size:14px;
   color:#9b1204;
   text-decoration:none;
   font-weight:bold;
}

.pluginInstallText {
   font-family:Arial, Helvetica, sans-serif;
   font-size:12px;
   color:#000000;
   line-height:18px;
   font-style:normal;
}

.pluginText {
   font-family:Arial, Helvetica, sans-serif;
   font-size:12px;
   color:#000000;
   line-height:18px;
   font-style:normal;
}
3 단계 – 래퍼 HTML 페이지 템플릿 수정
래퍼 HTML 페이지 템플릿 수정 index.template.html 에 htmltemplate폴더. Flash Builder는 HelloWorld.html로 컴파일 될 기본 래퍼 HTML 페이지 템플릿 html-template / index.template.html을 만듭니다 .
이 파일에는 컴파일 프로세스 중에 Flash Builder가 대체하는 자리 표시자가 포함되어 있습니다. 예 : 플래시 플레이어 버전, 애플리케이션 이름 등
플래시 플러그인이 설치되지 않은 경우 사용자 지정 메시지를 표시하도록이 파일을 수정하겠습니다.
<!DOCTYPE html PUBLIC "-//W3C//DTD XHTML 1.0 Transitional//EN"
"http://www.w3.org/TR/xhtml1/DTD/xhtml1-transitional.dtd">
<html xmlns = "http://www.w3.org/1999/xhtml" lang = "en" xml:lang = "en">

   <head>
      <title>${title}</title>
      <meta name = "google" value = "notranslate" />
      <meta http-equiv = "Content-Type" content = "text/html; charset = utf-8" />
      <link rel = "stylesheet" href = "styles.css" type = "text/css"></link>
      <link rel = "stylesheet" type = "text/css" href = "history/history.css" />
      <script type = "text/javascript" table table-bordered = "history/history.js">
      </script>
      <script type = "text/javascript" table table-bordered = "swfobject.js"></script>

      <script type = "text/javascript">
         // For version detection, set to min. required Flash Player version,
         //or 0 (or 0.0.0), for no version detection.
         var swfVersionStr = "${version_major}.${version_minor}.${version_revision}";

         // To use express install, set to playerProductInstall.swf,
         //otherwise the empty string.
         var xiSwfUrlStr = "${expressInstallSwf}";
         var flashvars = {};
         var params = {};
         params.quality = "high";
         params.bgcolor = "${bgcolor}";
         params.allowscriptaccess = "sameDomain";
         params.allowfullscreen = "true";

         var attributes = {};
         attributes.id = "${application}";
         attributes.name = "${application}";
         attributes.align = "middle";
         swfobject.embedSWF (
            "${swf}.swf", "flashContent",
            "${width}", "${height}",
            swfVersionStr, xiSwfUrlStr,
            flashvars, params, attributes);

         // JavaScript enabled so display the flashContent div in case
         //it is not replaced with a swf object.
         swfobject.createCSS("#flashContent", "display:block;text-align:left;");
      </script>
   </head>

   <body>
      <div id = "flashContent">
         <p style = "margin:100px;">

            <table width = "700" cellpadding = "10" cellspacing = "2" border = "0">
               <tr>
                  <td class = "pluginHeader">Flash Player Required</td>
               </tr>

               <tr>
                  <td class = "pluginText">The Adobe Flash Player version
                     10.2.0 or greater is required.</td>
               </tr>

               <tr>
                  <td class = "pluginInstallText" align = "left">

                  <table border = "0" width = "100%">
                     <tr class = "pluginInstallText" >
                        <td>Click here to download and install Adobe Flash Player:</td>
                        <td> </td>
                        <td align = "right">
                           <script type = "text/javascript">
                              var pageHost
                                 = ((document.location.protocol == "https:") ? "https://" : "http://");
                              document.write("<a target = '_blank'"
                                 +" href = 'http://get.adobe.com/flashplayer/'><"
                                 +"img style = 'border-style: none' table table-bordered = '"
                                 +pageHost
                                 +"www.adobe.com/images/shared/download_buttons/get_flash_player.gif'"
                                 +" alt = 'Get Adobe Flash player' /></a>" );
                           </script>
                        </td>
                     </tr>
                  </table>
               </tr>
            </table>
         </p>
      </div>

      <noscript>
         <object classid = "clsid:D27CDB6E-AE6D-11cf-96B8-444553540000"
            width = "${width}" height = "${height}" id = "${application}">
            <param name = "movie" value = "${swf}.swf" />
            <param name = "quality" value = "high" />
            <param name = "bgcolor" value = "${bgcolor}" />
            <param name = "allowScriptAccess" value = "sameDomain" />
            <param name = "allowFullScreen" value = "true" />

            <!--[if !IE]>-->
            <object type = "application/x-shockwave-flash" data = "${swf}.swf"
               width = "${width}" height = "${height}">
               <param name = "quality" value = "high" />
               <param name = "bgcolor" value = "${bgcolor}" />
               <param name = "allowScriptAccess" value = "sameDomain" />
               <param name = "allowFullScreen" value = "true" />
            <!--<![endif]-->

            <!--[if gte IE 6]>-->
               <p>
                  <p style = "margin:100px;">
                     <table width = "700" cellpadding = "10" cellspacing = "2"
                        border = "0">
                        <tr>
                           <td class = "pluginHeader">Flash Player Required</td>
                        </tr>

                        <tr>
                           <td class = "pluginText">The Adobe Flash Player version
                           10.2.0 or greater is required.</td>
                        </tr>

                        <tr>
                           <td class = "pluginInstallText" align = "left">

                           <table border = "0" width = "100%">
                              <tr class = "pluginInstallText" >
                                 <td>Click here to download and install Adobe Flash
                                    Player:</td>
                                 <td> </td>
                                 <td align = "right">
                                    <script type = "text/javascript">
                                       var pageHost
                                          = ((document.location.protocol == "https:") ? "https://" : "http://");
                                       document.write("<a target = '_blank'"
                                          +" href = 'http://get.adobe.com/flashplayer/'><"
                                          +"img style = 'border-style: none' table table-bordered = '"
                                          +pageHost
                                          +"www.adobe.com/images/shared/download_buttons/get_flash_player.gif'"
                                          +" alt = 'Get Adobe Flash player' /></a>" );
                                    </script>
                                 </td>
                              </tr>
                           </table>
                        </tr>
                     </table>
                  </p>
               </p>
            <!--<![endif]-->

            <p style = "margin:100px;">
               <table width = "700" cellpadding = "10" cellspacing = "2" border = "0">
                  <tr><td class = "pluginHeader">Flash Player Required</td></tr>
                  <tr><td class = "pluginText">The Adobe Flash Player version
                     10.2.0 or greater is required.</td></tr>
                  <tr>
                     <td class = "pluginInstallText" align = "left">
                        <table border = "0" width = "100%">
                           <tr class = "pluginInstallText" >
                              <td>Click here to download and install Adobe Flash
                                 Player:</td>
                              <td> </td>
                              <td align = "right">
                                 <script type = "text/javascript">
                                    var pageHost
                                       = ((document.location.protocol == "https:") ? "https://" : "http://");
                                    document.write("<a target = '_blank'"
                                       +" href = 'http://get.adobe.com/flashplayer/'><"
                                       +"img style = 'border-style: none' table table-bordered = '"
                                       +pageHost
                                       +"www.adobe.com/images/shared/download_buttons/get_flash_player.gif'"
                                       +" alt = 'Get Adobe Flash player' /></a>" );
                                 </script>
                              </td>
                           </tr>
                        </table>
                     </td>
                  </tr>
               </table>
            </p>
         <!--[if !IE]>-->
         </object>
         <!--<![endif]-->
         </object>
      </noscript>
   </body>
</html>
4 단계 – 내부 CSS 파일 만들기
CSS 파일 만들기 Style.css ...에 대한 HelloWorld.mxml 에 table tablebordered/com/tutorialspoint폴더. Flex는 HTML UI 컨트롤에 대한 CSS 스타일이 있기 때문에 UI 컨트롤에 유사한 CSS 스타일을 제공합니다.
/* CSS file */
@namespace s "library://ns.adobe.com/flex/spark";
@namespace mx "library://ns.adobe.com/flex/mx";

.heading {
   fontFamily: Arial, Helvetica, sans-serif;
   fontSize: 17px;
   color: #9b1204;
   textDecoration:none;
   fontWeight:normal;
}

.button {
   fontWeight: bold;
}

.container {
   cornerRadius :10;
   horizontalCenter :0;
   borderColor: #777777;
   verticalCenter:0;
   backgroundColor: #efefef;
}
5 단계 – 엔트리 레벨 클래스 수정
Flash Builder는 응용 프로그램에 대한 루트 태그 <application> 컨테이너가 있는 기본 mxml 파일 테이블 tableborder / com.tutorialspoint / HelloWorld.mxml을 만듭니다 . "Hello, World!"를 표시하도록이 파일을 수정하겠습니다. −
<?xml version = "1.0" encoding = "utf-8"?>
<s:Application xmlns:fx = "http://ns.adobe.com/mxml/2009"
   xmlns:s = "library://ns.adobe.com/flex/spark"
   xmlns:mx = "library://ns.adobe.com/flex/mx
   width = "100%" height = "100%"
      minWidth = "500" minHeight = "500"
      initialize = "application_initializeHandler(event)">

   <fx:Style source = "/com/tutorialspoint/client/Style.css" />
   <fx:Script>
      <![CDATA[
         import mx.controls.Alert;
         import mx.events.FlexEvent;
         protected function btnClickMe_clickHandler(event:MouseEvent):void {
            Alert.show("Hello World!");
         }

         protected function application_initializeHandler(event:FlexEvent):void {
            lblHeader.text = "My Hello World Application";
         }
      ]]>
   </fx:Script>

   <s:BorderContainer width = "500" height = "500" id = "mainContainer"
      styleName = "container">
      <s:VGroup width = "100%" height = "100%" gap = "50" horizontalAlign = "center"
         verticalAlign = "middle">
         <s:Label id = "lblHeader" fontSize = "40" color = "0x777777"
            styleName = "heading" />
         <s:Button label = "Click Me!" id = "btnClickMe"
            click = "btnClickMe_clickHandler(event)" styleName = "button" />
      </s:VGroup>
   </s:BorderContainer>
</s:Application>
동일한 소스 디렉토리에 더 많은 mxml 또는 actionscript 파일을 작성하여 새 애플리케이션을 정의하거나 헬퍼 루틴을 정의 할 수 있습니다.
6 단계 – 애플리케이션 빌드
Flash Builder에는 Build Automatically기본적으로 선택되어 있습니다. 확인하십시오Problems오류가 있는지 확인합니다. 변경을 완료하면 오류가 표시되지 않습니다.
7 단계 – 애플리케이션 실행
이제

모든 것이 정상이면 브라우저 팝업, 애플리케이션 실행 및 실행이 표시되어야합니다. 응용 프로그램에 문제가 없으면 다음과 같은 결과가 나타납니다. [ 온라인 시도 ]
Flash Player에서 응용 프로그램을 실행하고 있기 때문에 브라우저 용 Flash Player 플러그인을 설치해야합니다. 화면의 지시에 따라 플러그인을 설치하십시오. 브라우저에 이미 Flash Player 플러그인이 설정되어있는 경우 다음 출력을 볼 수 있습니다.
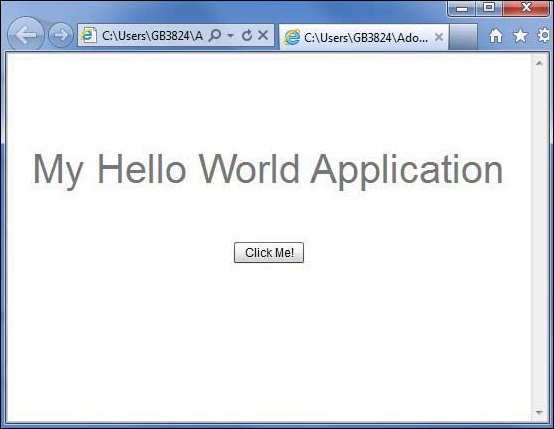
축하합니다! 다음을 사용하여 첫 번째 애플리케이션을 구현했습니다.Flex.