MVC 프레임 워크-고급 예제
첫 번째 장에서는 컨트롤러와 뷰가 MVC에서 상호 작용하는 방식을 배웠습니다. 이 자습서에서는 한 단계 더 나아가 모델을 사용하고 고급 응용 프로그램을 만들어 생성, 편집, 삭제하는 방법을 배웁니다. 애플리케이션에서 사용자 목록을 볼 수 있습니다.
고급 MVC 응용 프로그램 만들기
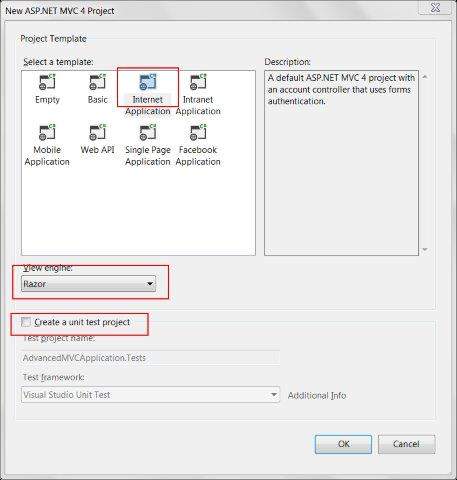
Step 1− 파일 → 새로 만들기 → 프로젝트 → ASP.NET MVC 웹 응용 프로그램을 선택합니다. AdvancedMVCApplication으로 이름을 지정하십시오. 확인을 클릭하십시오. 다음 창에서 Template as Internet Application 및 View Engine as Razor를 선택합니다. 이번에는 빈 응용 프로그램 대신 템플릿을 사용하고 있는지 확인하십시오.
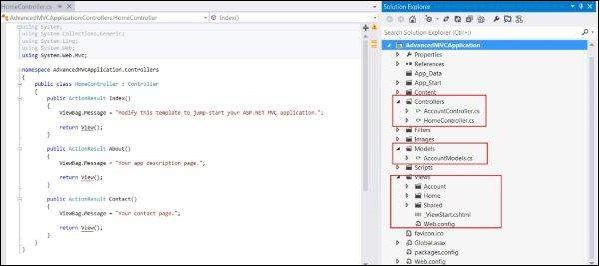
그러면 다음 스크린 샷과 같이 새 솔루션 프로젝트가 생성됩니다. 기본 ASP.NET 테마를 사용하고 있으므로 샘플보기, 컨트롤러, 모델 및 기타 파일과 함께 제공됩니다.
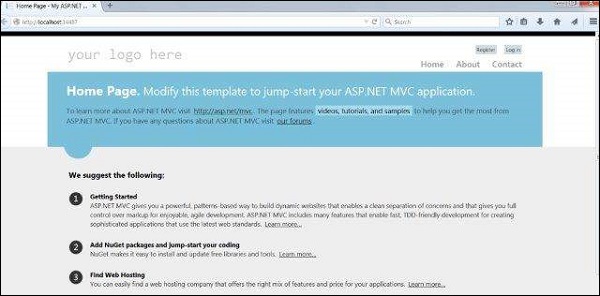
Step 2 − 다음 스크린 샷과 같이 솔루션을 빌드하고 응용 프로그램을 실행하여 기본 출력을 확인합니다.
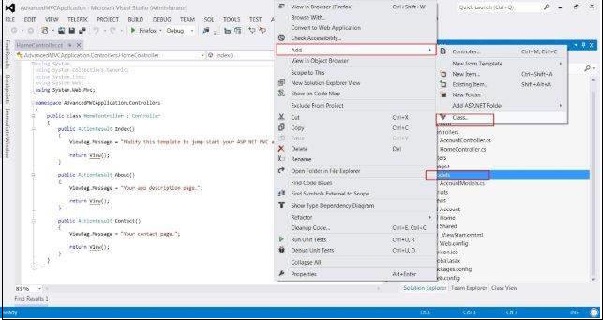
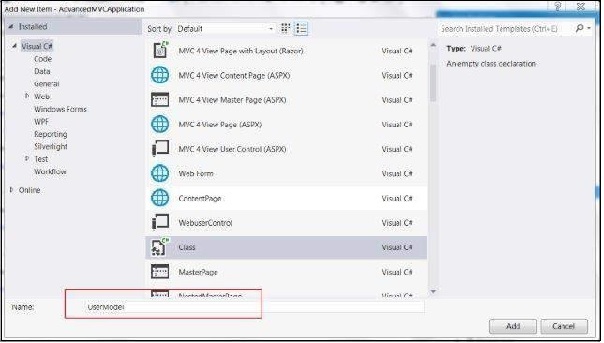
Step 3− 사용자 데이터의 구조를 정의 할 새 모델을 추가합니다. Models 폴더를 마우스 오른쪽 버튼으로 클릭하고 추가 → 클래스를 클릭합니다. 이 이름을 UserModel로 지정하고 추가를 클릭하십시오.
Step 4 − 새로 생성 된 UserModel.cs에 다음 코드를 복사합니다.
using System;
using System.ComponentModel;
using System.ComponentModel.DataAnnotations;
using System.Web.Mvc.Html;

namespace AdvancedMVCApplication.Models {
   public class UserModels {

      [Required]
      public int Id { get; set; }
      [DisplayName("First Name")]
      [Required(ErrorMessage = "First name is required")]
      public string FirstName { get; set; }
      [Required]
      public string LastName { get; set; }

      public string Address { get; set; }

      [Required]
      [StringLength(50)]
      public string Email { get; set; }

      [DataType(DataType.Date)]
      public DateTime DOB { get; set; }

      [Range(100,1000000)]
      public decimal Salary { get; set; }
   }
}
위의 코드에서 우리는 사용자 모델에있는 모든 매개 변수, 데이터 유형 및 필수 필드 및 길이와 같은 유효성 검사를 지정했습니다.
이제 데이터를 보관할 사용자 모델이 준비되었으므로 사용자보기, 사용자 추가, 편집 및 삭제를위한 메서드가 포함 된 클래스 파일 Users.cs를 만듭니다.
Step 5− 모델을 마우스 오른쪽 버튼으로 클릭하고 추가 → 클래스를 클릭합니다. 사용자로 이름을 지정하십시오. 그러면 모델 내부에 users.cs 클래스가 생성됩니다. users.cs 클래스에서 다음 코드를 복사합니다.
using System;
using System.Collections.Generic;
using System.EnterpriseServices;

namespace AdvancedMVCApplication.Models {

   public class Users {
      public List UserList = new List();

      //action to get user details
      public UserModels GetUser(int id) {
         UserModels usrMdl = null;

         foreach (UserModels um in UserList)

            if (um.Id == id)
               usrMdl = um;
               return usrMdl;
      }

      //action to create new user
      public void CreateUser(UserModels userModel) {
         UserList.Add(userModel);
      }

      //action to udpate existing user
      public void UpdateUser(UserModels userModel) {

         foreach (UserModels usrlst in UserList) {

            if (usrlst.Id == userModel.Id) {
               usrlst.Address = userModel.Address;
               usrlst.DOB = userModel.DOB;
               usrlst.Email = userModel.Email;
               usrlst.FirstName = userModel.FirstName;
               usrlst.LastName = userModel.LastName;
               usrlst.Salary = userModel.Salary;
               break;
            }
         }
      }

      //action to delete exising user
      public void DeleteUser(UserModels userModel) {

         foreach (UserModels usrlst in UserList) {

            if (usrlst.Id == userModel.Id) {
               UserList.Remove(usrlst);
               break;
            }
         }
      }
   }
}
UserModel.cs 및 Users.cs가 있으면 사용자보기, 사용자 추가, 편집 및 삭제를 위해 모델에보기를 추가합니다. 먼저 사용자를 생성하기위한보기를 생성하겠습니다.
Step 6 −보기 폴더를 마우스 오른쪽 버튼으로 클릭하고 추가 →보기를 클릭합니다.

Step 7 − 다음 창에서 View Name as UserAdd, View Engine as Razor를 선택하고 Create a strong-typed view 확인란을 선택합니다.
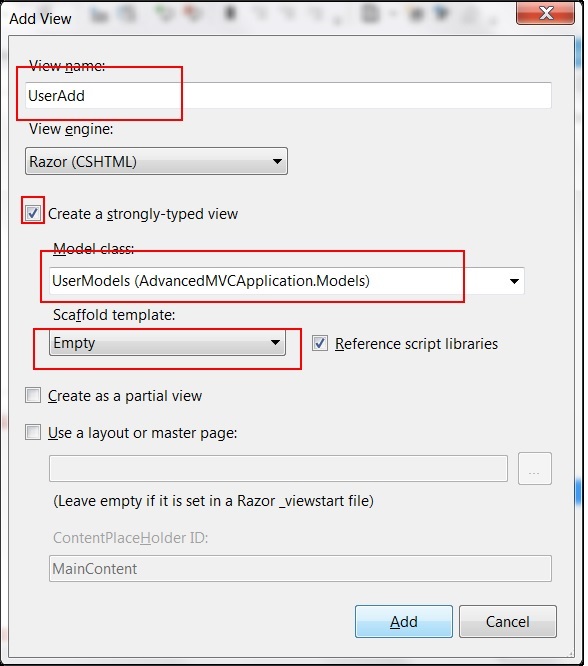
Step 8− 추가를 클릭합니다. 그러면 아래와 같이 기본적으로 다음 CSHML 코드가 생성됩니다.
@model AdvancedMVCApplication.Models.UserModels
@{
ViewBag.Title = "UserAdd";
}
<h2>UserAdd</h2>
@using (Html.BeginForm()) {
@Html.ValidationSummary(true)
<fieldset>
<legend>UserModels</legend>
<div class = "editor-label">
@Html.LabelFor(model => model.FirstName)
</div>
<div class = "editor-field">
@Html.EditorFor(model => model.FirstName)
@Html.ValidationMessageFor(model => model.FirstName)
</div>
<div class = "editor-label">
@Html.LabelFor(model => model.LastName)
</div>
<div class = "editor-field">
@Html.EditorFor(model => model.LastName)
@Html.ValidationMessageFor(model => model.LastName)
</div>
<div class = "editor-label">
@Html.LabelFor(model => model.Address)
</div>
<div class = "editor-field">
@Html.EditorFor(model => model.Address)
@Html.ValidationMessageFor(model => model.Address)
</div>
<div class = "editor-label">
@Html.LabelFor(model => model.Email)
</div>
<div class = "editor-field">
@Html.EditorFor(model => model.Email)
@Html.ValidationMessageFor(model => model.Email)
</div>
<div class = "editor-label">
@Html.LabelFor(model => model.DOB)
</div>
<div class = "editor-field">
@Html.EditorFor(model => model.DOB)
@Html.ValidationMessageFor(model => model.DOB)
</div>
<div class = "editor-label">
@Html.LabelFor(model => model.Salary)
</div>
<div class = "editor-field">
@Html.EditorFor(model => model.Salary)
@Html.ValidationMessageFor(model => model.Salary)
</div>
<p>
<input type = "submit" value = "Create" />
</p>
</fieldset>
}
<div>
@Html.ActionLink("Back to List", "Index")
</div>
@section Scripts {
@Scripts.Render("~/bundles/jqueryval")
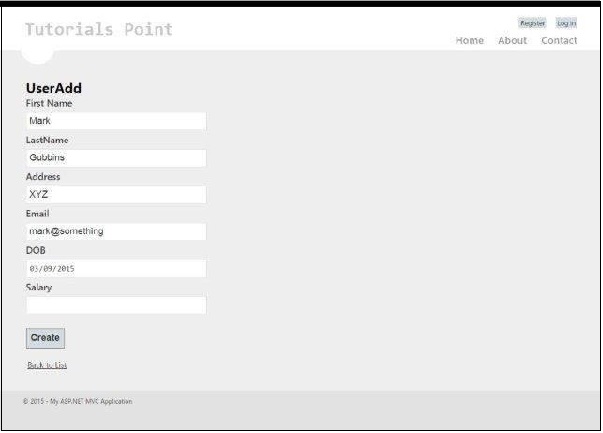
}보시다시피이보기에는 유효성 검사 메시지, 레이블 등을 포함하여 필드의 모든 속성에 대한 세부 정보가 포함되어 있습니다.이보기는 최종 애플리케이션에서 다음과 같이 표시됩니다.
UserAdd와 유사하게, 이제 주어진 코드로 아래에 주어진 4 개의 뷰를 더 추가합니다.
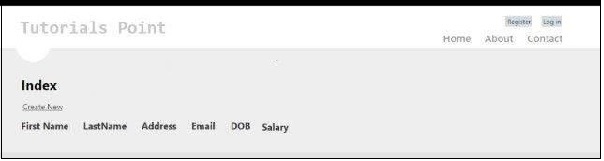
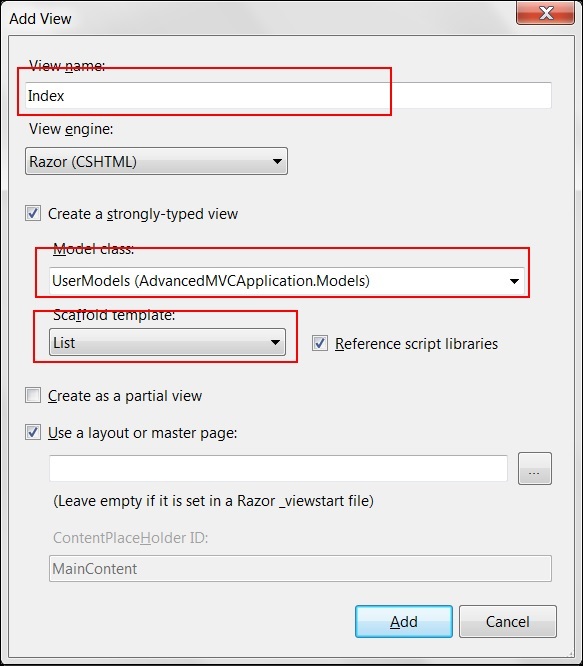
Index.cshtml
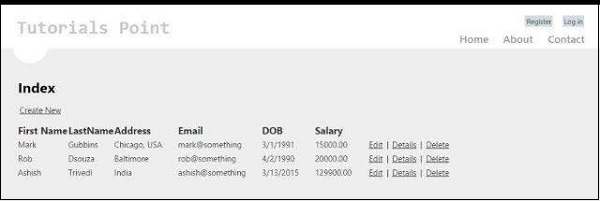
이보기는 색인 페이지에 시스템에있는 모든 사용자를 표시합니다.
@model IEnumerable<AdvancedMVCApplication.Models.UserModels>

@{
   ViewBag.Title = "Index";
}

<h2>Index</h2>

<p>
   @Html.ActionLink("Create New", "UserAdd")
</p>

<table>
   <tr>
      <th>
         @Html.DisplayNameFor(model => model.FirstName)
      </th>

      <th>
         @Html.DisplayNameFor(model => model.LastName)
      </th>

      <th>
         @Html.DisplayNameFor(model => model.Address)
      </th>

      <th>
         @Html.DisplayNameFor(model => model.Email)
      </th>

      <th>
         @Html.DisplayNameFor(model => model.DOB)
      </th>

      <th>
         @Html.DisplayNameFor(model => model.Salary)
      </th>

      <th></th>
   </tr>

   @foreach (var item in Model) {
      <tr>
         <td>
            @Html.DisplayFor(modelItem => item.FirstName)
         </td>

         <td>
            @Html.DisplayFor(modelItem => item.LastName)
         </td>

         <td>
            @Html.DisplayFor(modelItem => item.Address)
         </td>

         <td>
            @Html.DisplayFor(modelItem => item.Email)
         </td>

         <td>
            @Html.DisplayFor(modelItem => item.DOB)
         </td>

         <td>
            @Html.DisplayFor(modelItem => item.Salary)
         </td>

         <td>
            @Html.ActionLink("Edit", "Edit", new { id = item.Id }) |
            @Html.ActionLink("Details", "Details", new { id = item.Id }) |
            @Html.ActionLink("Delete", "Delete", new { id = item.Id })
         </td>
      </tr>
   }
</table>
이보기는 최종 애플리케이션에서 다음과 같이 표시됩니다.
Details.cshtml
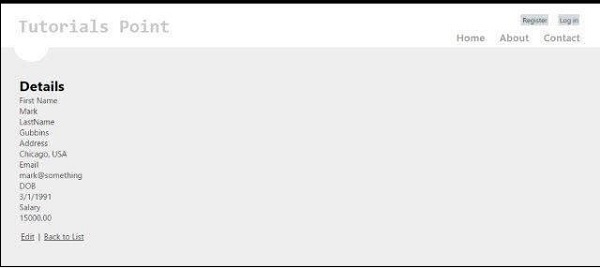
이보기는 사용자 레코드를 클릭 할 때 특정 사용자의 세부 정보를 표시합니다.
@model AdvancedMVCApplication.Models.UserModels

@{
   ViewBag.Title = "Details";
}

<h2>Details</h2>
<fieldset>
   <legend>UserModels</legend>
   <div class = "display-label">
      @Html.DisplayNameFor(model => model.FirstName)
   </div>

   <div class = "display-field">
      @Html.DisplayFor(model => model.FirstName)
   </div>

   <div class = "display-label">
      @Html.DisplayNameFor(model => model.LastName)
   </div>

   <div class = "display-field">
      @Html.DisplayFor(model => model.LastName)
   </div>

   <div class = "display-label">
      @Html.DisplayNameFor(model => model.Address)
   </div>

   <div class = "display-field">
      @Html.DisplayFor(model => model.Address)
   </div>

   <div class = "display-label">
      @Html.DisplayNameFor(model => model.Email)
   </div>

   <div class = "display-field">
      @Html.DisplayFor(model => model.Email)
   </div>

   <div class = "display-label">
      @Html.DisplayNameFor(model => model.DOB)
   </div>

   <div class = "display-field">
      @Html.DisplayFor(model => model.DOB)
   </div>

   <div class = "display-label">
      @Html.DisplayNameFor(model => model.Salary)
   </div>

   <div class = "display-field">
      @Html.DisplayFor(model => model.Salary)
   </div>

</fieldset>
<p>
   @Html.ActionLink("Edit", "Edit", new { id = Model.Id }) |
   @Html.ActionLink("Back to List", "Index")
</p>
이보기는 최종 애플리케이션에서 다음과 같이 표시됩니다.
Edit.cshtml
이보기는 기존 사용자의 세부 정보를 편집 할 수있는 편집 양식을 표시합니다.
@model AdvancedMVCApplication.Models.UserModels

@{
   ViewBag.Title = "Edit";
}

<h2>Edit</h2>
@using (Html.BeginForm()) {
   @Html.AntiForgeryToken()
   @Html.ValidationSummary(true)

   <fieldset>
      <legend>UserModels</legend>
      @Html.HiddenFor(model => model.Id)
      <div class = "editor-label">
         @Html.LabelFor(model => model.FirstName)
      </div>

      <div class = "editor-field">
         @Html.EditorFor(model => model.FirstName)
         @Html.ValidationMessageFor(model => model.FirstName)
      </div>

      <div class = "editor-label">
         @Html.LabelFor(model => model.LastName)
      </div>

      <div class = "editor-field">
         @Html.EditorFor(model => model.LastName)
         @Html.ValidationMessageFor(model => model.LastName)
      </div>

      <div class = "editor-label">
         @Html.LabelFor(model => model.Address)
      </div>

      <div class = "editor-field">
         @Html.EditorFor(model => model.Address)
         @Html.ValidationMessageFor(model => model.Address)
      </div>

      <div class = "editor-label">
         @Html.LabelFor(model => model.Email)
      </div>

      <div class = "editor-field">
         @Html.EditorFor(model => model.Email)
         @Html.ValidationMessageFor(model => model.Email)
      </div>

      <div class = "editor-label">
         @Html.LabelFor(model => model.DOB)
      </div>

      <div class = "editor-field">
         @Html.EditorFor(model => model.DOB)
         @Html.ValidationMessageFor(model => model.DOB)
      </div>

      <div class = "editor-label">
         @Html.LabelFor(model => model.Salary)
      </div>

      <div class = "editor-field">
         @Html.EditorFor(model => model.Salary)
         @Html.ValidationMessageFor(model => model.Salary)
      </div>

      <p>
         <input type = "submit" value = "Save" />
      </p>
   </fieldset>
}
<div>
   @Html.ActionLink("Back to List", "Index")
</div>

@section Scripts {
   @Scripts.Render("~/bundles/jqueryval")
}
이보기는 애플리케이션에서 다음과 같이 보입니다.

Delete.cshtml
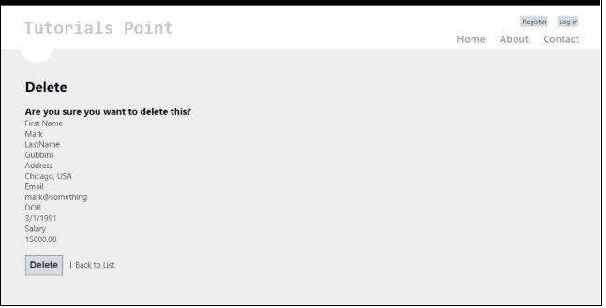
이보기는 기존 사용자를 삭제하는 양식을 표시합니다.
@model AdvancedMVCApplication.Models.UserModels

@{
   ViewBag.Title = "Delete";
}

<h2>Delete</h2>
<h3>Are you sure you want to delete this?</h3>
<fieldset>
   <legend>UserModels</legend>
   <div class = "display-label">
      @Html.DisplayNameFor(model => model.FirstName)
   </div>

   <div class = "display-field">
      @Html.DisplayFor(model => model.FirstName)
   </div>

   <div class = "display-label">
      @Html.DisplayNameFor(model => model.LastName)
   </div>

   <div class = "display-field">
      @Html.DisplayFor(model => model.LastName)
   </div>

   <div class = "display-label">
      @Html.DisplayNameFor(model => model.Address)
   </div>

   <div class = "display-field">
      @Html.DisplayFor(model => model.Address)
   </div>

   <div class = "display-label">
      @Html.DisplayNameFor(model => model.Email)
   </div>

   <div class = "display-field">
      @Html.DisplayFor(model => model.Email)
   </div>

   <div class = "display-label">
      @Html.DisplayNameFor(model => model.DOB)
   </div>

   <div class = "display-field">
      @Html.DisplayFor(model => model.DOB)
   </div>

   <div class = "display-label">
      @Html.DisplayNameFor(model => model.Salary)
   </div>

   <div class = "display-field">
      @Html.DisplayFor(model => model.Salary)
   </div>
</fieldset>

@using (Html.BeginForm()) {
   @Html.AntiForgeryToken()

   <p>
      <input type = "submit" value = "Delete" /> |
      @Html.ActionLink("Back to List", "Index")
   </p>
}
이보기는 최종 애플리케이션에서 다음과 같이 표시됩니다.
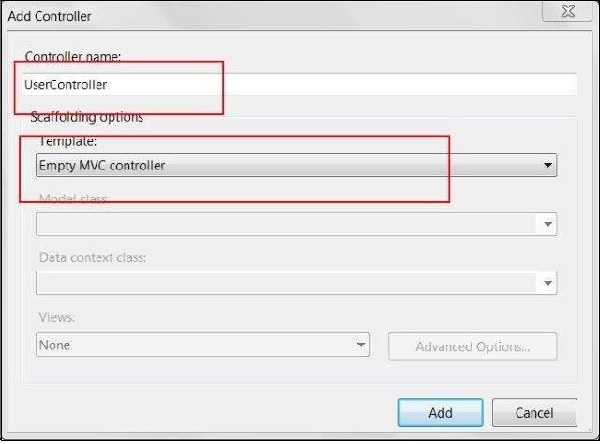
Step 9− 이미 애플리케이션에 모델과 뷰를 추가했습니다. 이제 마지막으로 뷰에 대한 컨트롤러를 추가합니다. Controllers 폴더를 마우스 오른쪽 버튼으로 클릭하고 추가 → 컨트롤러를 클릭합니다. 이름을 UserController로 지정하십시오.
기본적으로 Controller 클래스는 다음 코드로 생성됩니다.
using System;
using System.Collections.Generic;
using System.Linq;
using System.Web;
using System.Web.Mvc;
using AdvancedMVCApplication.Models;

namespace AdvancedMVCApplication.Controllers {

   public class UserController : Controller {
      private static Users _users = new Users();

      public ActionResult Index() {
         return View(_users.UserList);
      }
   }
}
위의 코드에서 Index 메서드는 Index 페이지에서 사용자 목록을 렌더링하는 동안 사용됩니다.
Step 10 − Index 방법을 마우스 오른쪽 버튼으로 클릭하고 Create View를 선택하여 Index 페이지에 대한 뷰를 생성합니다 (모든 사용자를 나열하고 새 사용자를 생성하는 옵션을 제공합니다).
Step 11− 이제 UserController.cs에 다음 코드를 추가합니다. 이 코드에서는 다양한 사용자 작업에 대한 작업 메서드를 만들고 이전에 만든 해당 뷰를 반환합니다.
각 작업에 대해 GET 및 POST라는 두 가지 메서드를 추가합니다. HttpGet은 데이터를 가져오고 렌더링하는 동안 사용됩니다. HttpPost는 데이터 생성 / 업데이트에 사용됩니다. 예를 들어, 새 사용자를 추가 할 때 사용자를 추가하는 양식이 필요합니다. 이는 GET 작업입니다. 양식을 작성하고 해당 값을 제출하면 POST 메서드가 필요합니다.
//Action for Index View
public ActionResult Index() {
   return View(_users.UserList);
}

//Action for UserAdd View
[HttpGet]
public ActionResult UserAdd() {
   return View();
}

[HttpPost]
public ActionResult UserAdd(UserModels userModel) {
   _users.CreateUser(userModel);
   return View("Index", _users.UserList);
}

//Action for Details View
[HttpGet]
public ActionResult Details(int id) {
   return View(_users.UserList.FirstOrDefault(x => x.Id == id));
}

[HttpPost]
public ActionResult Details() {
   return View("Index", _users.UserList);
}

//Action for Edit View
[HttpGet]
public ActionResult Edit(int id) {
   return View(_users.UserList.FirstOrDefault(x=>x.Id==id));
}

[HttpPost]
public ActionResult Edit(UserModels userModel) {
   _users.UpdateUser(userModel);
   return View("Index", _users.UserList);
}

//Action for Delete View
[HttpGet]
public ActionResult Delete(int id) {
   return View(_users.UserList.FirstOrDefault(x => x.Id == id));
}

[HttpPost]
public ActionResult Delete(UserModels userModel) {
   _users.DeleteUser(userModel);
   return View("Index", _users.UserList);
} sers.UserList);
Step 12 − 마지막으로 할 일은 App_Start 폴더의 RouteConfig.cs 파일로 이동하여 기본 컨트롤러를 User로 변경하는 것입니다.
defaults: new { controller = "User", action = "Index", id = UrlParameter.Optional }이것이 우리가 고급 애플리케이션을 시작하고 실행하는 데 필요한 전부입니다.
Step 13− 이제 응용 프로그램을 실행하십시오. 다음 스크린 샷과 같이 응용 프로그램을 볼 수 있습니다. 이전 스크린 샷에서 본 것처럼 사용자 추가,보기, 편집 및 삭제의 모든 기능을 수행 할 수 있습니다.