MVC 프레임 워크-Ajax 지원
아시다시피 Ajax는 비동기 JavaScript 및 XML의 약자입니다. MVC 프레임 워크에는 눈에 잘 띄지 않는 Ajax에 대한 지원이 내장되어 있습니다. 헬퍼 메소드를 사용하여 모든 뷰에 코드를 추가하지 않고도 Ajax 기능을 정의 할 수 있습니다. MVC의이 기능은 jQuery 기능을 기반으로합니다.
MVC 애플리케이션에서 눈에 잘 띄지 않는 AJAX 지원을 활성화하려면 Web.Config 파일을 열고 다음 코드를 사용하여 appSettings 섹션에서 UnobtrusiveJavaScriptEnabled 속성을 설정합니다. 키가 이미 애플리케이션에있는 경우이 단계를 무시할 수 있습니다.
<add key = "UnobtrusiveJavaScriptEnabled" value = "true" />
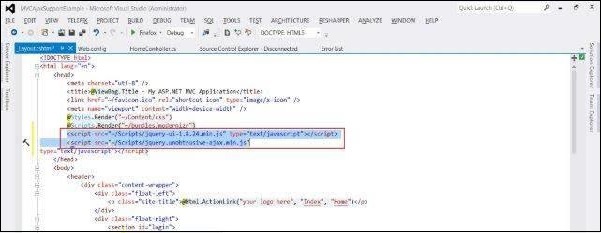
그런 다음 공통 레이아웃 파일을 엽니 다. _Layout.cshtmlViews / Shared 폴더에있는 파일. 다음 코드를 사용하여 여기에 jQuery 라이브러리에 대한 참조를 추가합니다.
<script src = "~/Scripts/jquery-ui-1.8.24.min.js" type = "text/javascript">
</script>

<script src = "~/Scripts/jquery.unobtrusive-ajax.min.js" type = "text/javascript">
</script>
눈에 잘 띄지 않는 Ajax 애플리케이션 만들기
다음 예에서는 시스템의 사용자 목록을 표시하는 양식을 작성합니다. Admin, Normal 및 Guest의 세 가지 옵션이있는 드롭 다운을 배치합니다. 이러한 값 중 하나를 선택하면 눈에 잘 띄지 않는 AJAX 설정을 사용하여이 범주에 속하는 사용자 목록이 표시됩니다.
Step 1 − Model.cs 모델 파일을 생성하고 다음 코드를 복사합니다.
using System;

namespace MVCAjaxSupportExample.Models {

   public class User {
      public int UserId { get; set; }
      public string FirstName { get; set; }
      public string LastName { get; set; }
      public DateTime BirthDate { get; set; }
      public Role Role { get; set; }
   }

   public enum Role {
      Admin,
      Normal,
      Guest
   }
}
Step 2 − UserController.cs라는 컨트롤러 파일을 생성하고 그 안에 다음 코드를 사용하여 두 개의 액션 메소드를 생성합니다.
using System;
using System.Collections.Generic;
using System.Linq;
using System.Web.Mvc;
using MVCAjaxSupportExample.Models;

namespace MVCAjaxSupportExample.Controllers {

   public class UserController : Controller {

      private readonly User[] userData =
      {
         new User {FirstName = "Edy", LastName = "Clooney", Role = Role.Admin},
         new User {FirstName = "David", LastName = "Sanderson", Role = Role.Admin},
         new User {FirstName = "Pandy", LastName = "Griffyth", Role = Role.Normal},
         new User {FirstName = "Joe", LastName = "Gubbins", Role = Role.Normal},
         new User {FirstName = "Mike", LastName = "Smith", Role = Role.Guest}
      };

      public ActionResult Index() {
         return View(userData);
      }

      public PartialViewResult GetUserData(string selectedRole = "All") {
         IEnumerable data = userData;

         if (selectedRole != "All") {
            var selected = (Role) Enum.Parse(typeof (Role), selectedRole);
            data = userData.Where(p => p.Role == selected);
         }

         return PartialView(data);
      }

      public ActionResult GetUser(string selectedRole = "All") {
         return View((object) selectedRole);
      }
   }
}
Step 3− 이제 다음 코드로 GetUserData라는 부분보기를 생성합니다. 이보기는 드롭 다운에서 선택한 역할을 기반으로 사용자 목록을 렌더링하는 데 사용됩니다.
@model IEnumerable<MVCAjaxSupportExample.Models.User>

<table>
   <tr>
      <th>
         @Html.DisplayNameFor(model => model.FirstName)
      </th>

      <th>
         @Html.DisplayNameFor(model => model.LastName)
      </th>

      <th>
         @Html.DisplayNameFor(model => model.BirthDate)
      </th>
      <th></th>
   </tr>

   @foreach (var item in Model) {
   <tr>
      <td>
         @Html.DisplayFor(modelItem => item.FirstName)
      </td>

      <td>
         @Html.DisplayFor(modelItem => item.LastName)
      </td>

      <td>
         @Html.DisplayFor(modelItem => item.BirthDate)
      </td>

      <td>

      </td>
   </tr>
}
</table>
Step 4− 이제 다음 코드로 View GetUser를 생성합니다. 이 뷰는 이전에 생성 된 컨트롤러의 GetUserData 작업에서 데이터를 비동기 적으로 가져옵니다.
@using MVCAjaxSupportExample.Models
@model string

@{
ViewBag.Title = "GetUser";

AjaxOptions ajaxOpts = new AjaxOptions {
UpdateTargetId = "tableBody"
};
}

<h2>Get User</h2>
<table>
   <thead>
      <tr>
         <th>First</th>
         <th>Last</th>
         <th>Role</th>
      </tr>
   </thead>

   <tbody id="tableBody">
      @Html.Action("GetUserData", new {selectedRole = Model })
   </tbody>
</table>

@using (Ajax.BeginForm("GetUser", ajaxOpts)) {
   <div>
      @Html.DropDownList("selectedRole", new SelectList(
      new [] {"All"}.Concat(Enum.GetNames(typeof(Role)))))
      <button type="submit">Submit</button>
   </div>
}
Step 5 − 마지막으로 Route.config 항목을 변경하여 사용자 컨트롤러를 시작합니다.
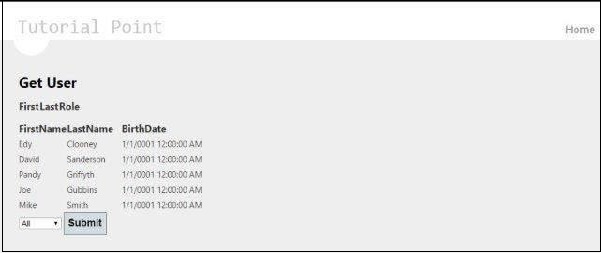
defaults: new { controller = "User", action = "GetUser", id = UrlParameter.Optional }Step 6 − 다음 스크린 샷과 같은 응용 프로그램을 실행합니다.

드롭 다운에서 관리자를 선택하면 관리자 유형의 모든 사용자를 가져옵니다. 이것은 AJAX를 통해 발생하며 전체 페이지를 다시로드하지 않습니다.
