Yii-검증
사용자로부터받은 데이터를 신뢰해서는 안됩니다. 사용자 입력으로 모델을 검증하려면 다음을 호출해야합니다.yii\base\Model::validate()방법. 유효성 검사가 성공하면 부울 값을 반환합니다. 오류가있는 경우yii\base\Model::$errors 특성.
규칙 사용
만들기 위해 validate() 기능이 작동하는 경우 yii\base\Model::rules() 방법.
Step 1 − rules() 메서드는 다음 형식으로 배열을 반환합니다.
[
   // required, specifies which attributes should be validated
   ['attr1', 'attr2', ...],
   // required, specifies the type a rule.
   'type_of_rule',
   // optional, defines in which scenario(s) this rule should be applied
   'on' => ['scenario1', 'scenario2', ...],
   // optional, defines additional configurations
   'property' => 'value', ...
]
각 규칙에 대해 최소한 규칙이 적용되는 속성과 적용되는 규칙 유형을 정의해야합니다.
핵심 유효성 검사 규칙은 다음과 같습니다. boolean, captcha, compare, date, default, double, each, email, exist, file, filter, image, ip, in, integer, match, number, required, safe, string, trim, unique, url.
Step 2 −에서 새 모델을 생성합니다. models 폴더.
<?php
   namespace app\models;
   use Yii;
   use yii\base\Model;
   class RegistrationForm extends Model {
      public $username;
      public $password; public $email;
      public $country; public $city;
      public $phone;
      public function rules() {
         return [
            // the username, password, email, country, city, and phone attributes are
            //required
            [['username' ,'password', 'email', 'country', 'city', 'phone'], 'required'],
            // the email attribute should be a valid email address
            ['email', 'email'],
         ];
      }
   }
?>
등록 양식의 모델을 선언했습니다. 모델에는 사용자 이름, 비밀번호, 이메일, 국가, 도시 및 전화의 5 가지 속성이 있습니다. 모두 필수이며 이메일 속성은 유효한 이메일 주소 여야합니다.
Step 3 − 추가 actionRegistration 방법 SiteController 우리가 새로 만드는 곳 RegistrationForm 모델을 만들고 뷰에 전달합니다.
public function actionRegistration() {
   $model = new RegistrationForm();
   return $this->render('registration', ['model' => $model]);
}
Step 4− 등록 양식에 대한보기를 추가합니다. views / site 폴더 안에 다음 코드를 사용하여 registration.php라는 파일을 만듭니다.
<?php
   use yii\bootstrap\ActiveForm;
   use yii\bootstrap\Html;
?>

<div class = "row">
   <div class = "col-lg-5">
      <?php $form = ActiveForm::begin(['id' => 'registration-form']); ?> <?= $form->field($model, 'username') ?> <?= $form->field($model, 'password')->passwordInput() ?> <?= $form->field($model, 'email')->input('email') ?> <?= $form->field($model, 'country') ?> <?= $form->field($model, 'city') ?> <?= $form->field($model, 'phone') ?>
         <div class = "form-group">
            <?= Html::submitButton('Submit', ['class' => 'btn btn-primary',
               'name' => 'registration-button']) ?>
         </div>
      <?php ActiveForm::end(); ?>
   </div>
</div>
우리는 ActiveForm 등록 양식을 표시하기위한 위젯.
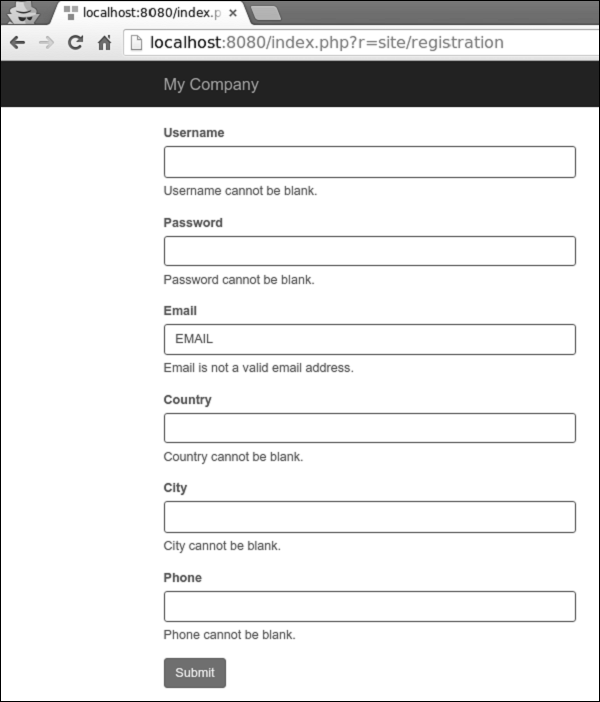
Step 5 − 로컬 호스트로 이동하는 경우 http://localhost:8080/index.php?r=site/registration 제출 버튼을 클릭하면 작동중인 유효성 검사 규칙이 표시됩니다.
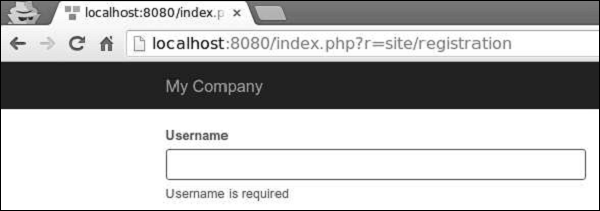
Step 6 − 오류 메시지를 사용자 지정하려면 username 속성, 수정 rules() 의 방법 RegistrationForm 다음과 같은 방식으로.
public function rules() {
   return [
      // the username, password, email, country, city, and phone attributes are required
      [['password', 'email', 'country', 'city', 'phone'], 'required'],
      ['username', 'required', 'message' => 'Username is required'],
      // the email attribute should be a valid email address
      ['email', 'email'],
   ];
}
Step 7 − 로컬 호스트로 이동 http://localhost:8080/index.php?r=site/registration제출 버튼을 클릭합니다. 사용자 이름 속성의 오류 메시지가 변경되었음을 알 수 있습니다.
Step 8 − 유효성 검사 프로세스를 사용자 지정하려면 이러한 방법을 재정의 할 수 있습니다.
yii \ base \ Model :: beforeValidate () :
yii \ base \ Model :: EVENT_BEFORE_VALIDATE 이벤트.
yii \ base \ Model :: afterValidate () :
yii \ base \ Model :: EVENT_AFTER_VALIDATE 이벤트.
Step 9 − 국가 속성 주변의 공간을 잘라 내고 도시 속성의 빈 입력을 null로 바꾸려면 trim 과 default 검증 인.
public function rules() {
   return [
      // the username, password, email, country, city, and phone attributes are required
      [['password', 'email', 'country', 'city', 'phone'], 'required'],
      ['username', 'required', 'message' => 'Username is required'],
      ['country', 'trim'], ['city', 'default'],
      // the email attribute should be a valid email address
      ['email', 'email'],
   ];
}
Step 10 − 입력이 비어있는 경우 기본값을 설정할 수 있습니다.
public function rules() {
   return [
      ['city', 'default', 'value' => 'Paris'],
   ];
}
도시 속성이 비어 있으면 기본 "파리"값이 사용됩니다.